Nissan March K13. Manual - part 614
SR-34
< REMOVAL AND INSTALLATION >
DEPLOYMENT AND DISPOSAL
The battery must show voltage of 9.6 V or more.
Remove the battery from the vehicle and place it on dry wood blocks
approximately 5.0 m (16.4 ft) away from the vehicle.
• Wait 3 minutes or more after the vehicle battery is disconnected
before proceeding.
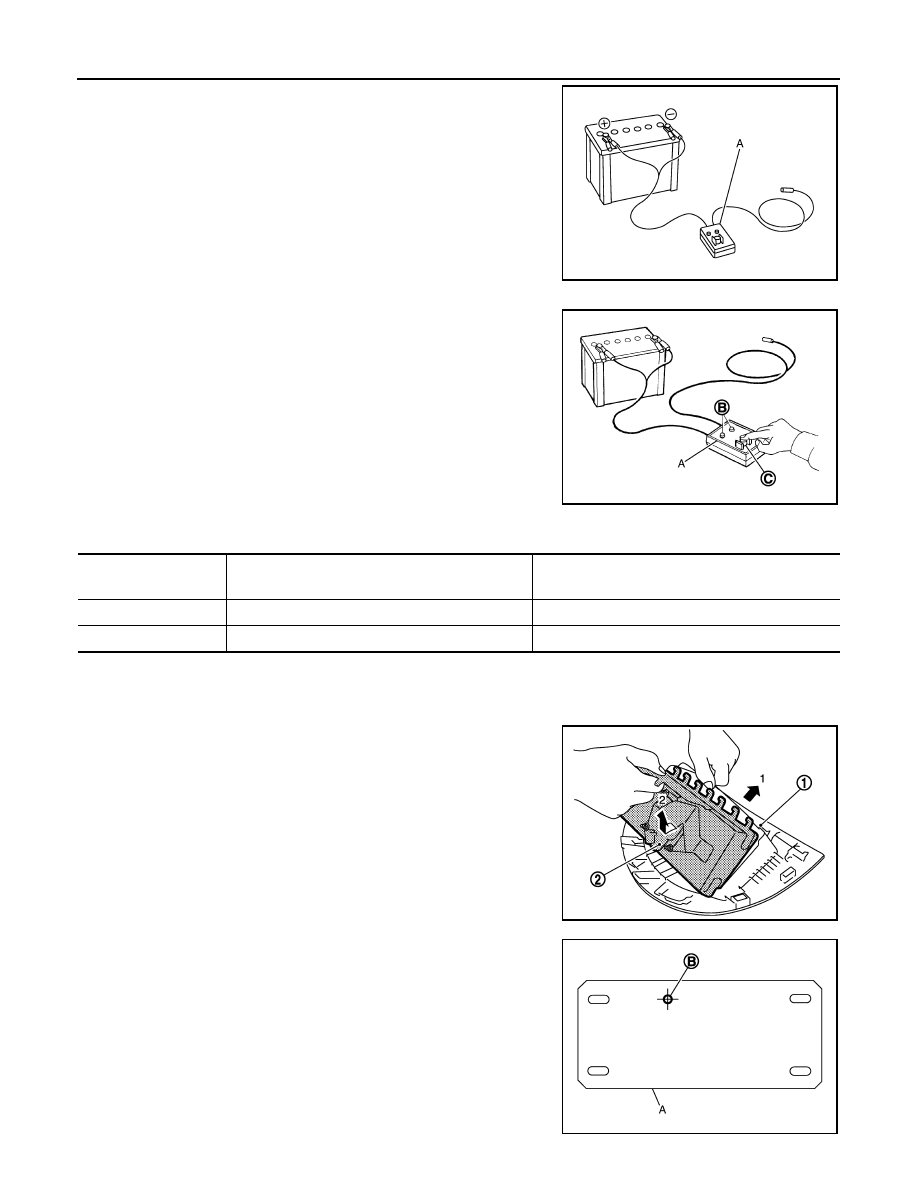
• Connect red clip of deployment tool (A) to battery positive terminal
and black clip to negative terminal.
Check that the polarity is correct. The right side lamp in the
tool, marked “deployment tool power”, should illuminate with a
green light. If the right side lamp illuminates red, reverse the
connections to the battery.
Deployment Tool Check
Press the deployment tool switch (C) to the ON position. The left
side lamp in the tool, marked “air bag connector voltage” should illu-
minate (B). If it does not illuminate, replace the deployment tool (A).
Air Bag Deployment Tool Lamp Illumination Chart (Battery Connected)
*: If this lamp illuminates red, the tool is connected to the battery incorrectly. Reverse the connections and check that the lamp illumi-
nates green.
DEPLOYMENT OF FRONT PASSENGER AIR BAG MODULE (OUTSIDE OF VEHICLE)
1.
Remove the front passenger air bag module (2) from lid (1).
2.
Make 8.5 mm (0.335 in) diameter hole (B) in air bag module
bracket (SST: KV99105300) (A) at the position shown in figure.
JMHIA0204ZZ
JMHIA0205ZZ
Switch operation
Left side lamp, green*
“AIR BAG CONNECTOR VOLTAGE”
Right side lamp, green*
“DEPLOYMENT TOOL POWER”
OFF
OFF
ON
ON
ON
ON
JMHIA1539ZZ
JMHIA0225ZZ