Nissan GT-R. Manual - part 201


  Главная      Nissan     Nissan GT-R (2007-2014 year) - Service Manual


поиск по сайту            


содержание   ..  199  200  201  202   ..


Nissan GT-R. Manual - part 201


MA-26

< PERIODIC MAINTENANCE >

ENGINE MAINTENANCE

2.

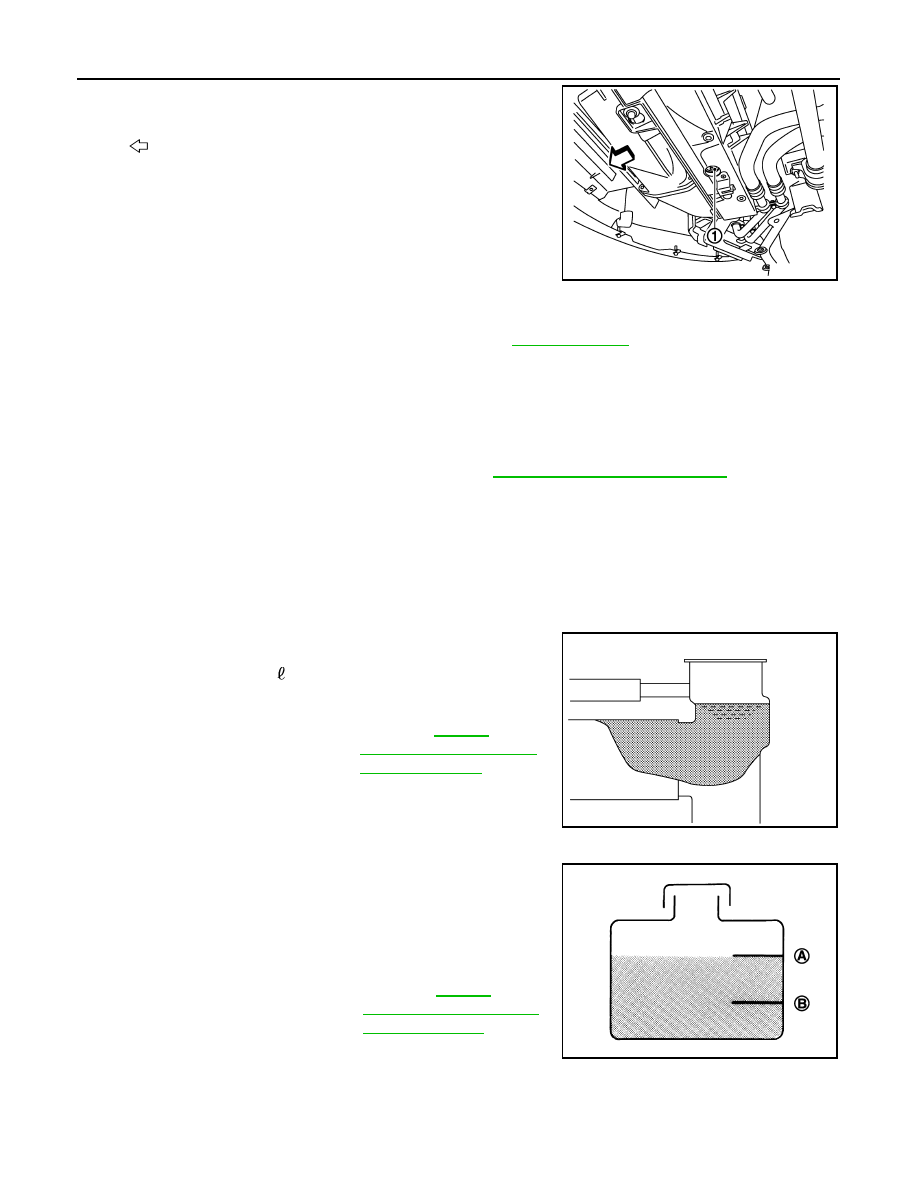
Open radiator drain plug (1) at the bottom of radiator, and then
remove reservoir tank cap. 

3.

Remove reservoir tank if necessary, drain engine coolant, and clean reservoir tank before installing. 

4.

Check drained engine coolant for contaminants such as rust, corrosion or discoloration.
If contaminated, flush the engine cooling system. Refer to 

CO-6, "Flushing"

.

ENGINE COOLANT : Refilling

INFOID:0000000009190118

CAUTION:

• Do not reuse O-rings.
• Do not put additive such as waterleak preventive, since it may cause cooling waterway clogging.
• When refilling use Genuine NISSAN Long Life Antifreeze/Coolant (blue) or equivalent in its quality

mixed with water (distilled or demineralized). Refer to 

MA-22, "Fluids and Lubricants"

.

1.

Install reservoir tank if removed.

2.

Install radiator drain plug.

CAUTION:

Be sure to clean drain plug and install with new O-ring.

3.

Check that each hose clamp has been firmly tightened.

4.

Fill radiator to specified level.
• Pour engine coolant through engine coolant filler neck

slowly of less than 2  (2-1/8 US qt, 1-3/4 lmp qt) a minute
to allow air in system to escape.

5.

Install radiator cap.

6.

Fill reservoir tank to “MAX” level line with engine coolant if nec-
essary.

7.

Install reservoir tank cap, and then start the engine.

8.

Warm up engine until thermostat opens. Standard for warming-up time is approximately 10 minutes at
3,000 rpm.
• Check thermostat opening condition by touching radiator hose (lower) to see a flow of warm water.

CAUTION:

: Vehicle front

NNBIA0164ZZ

Tightening torque

: 1.2 N·m (0.12 kg-m, 11 in-lb)

Engine coolant capacity

: Refer to 

CO-10, 

"Periodical Maintenanc
e Specification"

.

(With reservoir tank at 
“MAX” level)

JPBIA0412ZZ

A

:  MAX

B

:  MIN

Reservoir tank engine cool-
ant capacity

: Refer to 

CO-10, 

"Periodical Maintenanc
e Specification"

.

(At “MAX” level)

JPBIA0102ZZ

ENGINE MAINTENANCE

MA-27

< PERIODIC MAINTENANCE >

C

D

E

F

G

H

I

J

K

L

M

B

MA

N

O

A

Watch water temperature gauge so as not to overheat engine.

9.

Stop the engine and cool down to less than approximately 50

°

C (122

°

F).

• Cool down using fan to reduce the time.
• If necessary, refill radiator up to filler neck with engine coolant.

10. Repeat steps 6 through 9 two or more times with radiator cap and reservoir tank cap installed until engine

coolant level no longer drops. 

11. When the coolant level of the radiator stops lowering, refill reser-

voir tank to the midpoint between the “MIN” (B) and “MAX” (A) of
the reservoir tank.

12. Check cooling system for leakage with engine running.
13. Warm up the engine, and check for sound of engine coolant flow while running engine from idle up to

3,000 rpm with heater temperature controller set at several positions between “COOL” and “WARM”.
• Sound may be noticeable at heater unit.

14. Repeat step 13 three times.

15. If sound is heard, bleed air from cooling system by repeating steps from 3 to 13 until engine coolant level

no longer drops. 

16. Recheck reservoir tank engine coolant level with the engine completely cold. Refer to 

MA-24, "ENGINE

COOLANT : Inspection"

.

ENGINE COOLANT : Flushing

INFOID:0000000009190119

1.

Install reservoir tank if removed, and radiator drain plug.

CAUTION:

Be sure to clean drain plug and install with new O-ring.

2.

Fill radiator and reservoir tank with water.

3.

Run the engine and warm it up to normal operating temperature.

4.

Rev the engine two or three times under no-load.

5.

Stop the engine and wait until it cools down.

6.

Drain water from the system. Refer to 

CO-5, "Draining"

.

7.

Repeat steps 1 through 6 until clear water begins to drain from radiator.

AIR CLEANER FILTER

AIR CLEANER FILTER : Removal and Installation

INFOID:0000000009161766

REMOVAL

NNBIA0235ZZ

Tightening torque

: 1.2 N·m (0.12 kg-m, 11 in-lb)

MA-28

< PERIODIC MAINTENANCE >

ENGINE MAINTENANCE

1.

Unhook clips (A) and remove holder (1) from air cleaner case.

2.

Remove air cleaner filter (2) from holder (1).

INSTALLATION

Note the following, and install in the reverse order of removal.
• Install the air cleaner filter by aligning the seal with the notch of air cleaner case.

ENGINE OIL

ENGINE OIL : Draining

INFOID:0000000009161767

WARNING:

• Be careful not to get burned, as engine oil may be hot.
• Prolonged and repeated contact with used engine oil may cause skin cancer. Try to avoid direct skin

contact with used engine oil. If skin contact is made, wash thoroughly with soap or hand cleaner as
soon as possible. 

1.

Warm up the engine, and check for engine oil leakage from engine components. Refer to 

LU-4, "Inspec-

tion"

.

2.

Stop the engine and wait for 5 minutes.

3.

Loosen oil filler cap.

4.

Remove front undercover. Refer to 

EXT-37, "FRONT UNDER COVER : Exploded View"

.

5.

Remove drain plug (1) and then drain engine oil.

ENGINE OIL : Refilling

INFOID:0000000009190114

1.

Install drain plug with new washer.

CAUTION:

Be sure to clean drain plug and install with new washer.

NNBIA0177ZZ

NNBIA0178ZZ

: Vehicle front

NNBIA0115ZZ

ENGINE MAINTENANCE

MA-29

< PERIODIC MAINTENANCE >

C

D

E

F

G

H

I

J

K

L

M

B

MA

N

O

A

2.

Refill with new engine oil.
Engine oil specification and viscosity: Refer to 

MA-22, "Fluids and Lubricants"

.

CAUTION:

• When filling engine oil, never pull out oil level gauge.
• The refill capacity depends on the engine oil temperature and drain time. Use these specifica-

tions for reference only.

• Always use oil level gauge to determine the proper amount of engine oil in engine.

3.

Warm up the engine and check area around drain plug and oil filter for engine oil leakage.

4.

Stop the engine and wait for 5 minutes.

5.

Check the engine oil level. Refer to 

LU-4, "Inspection"

.

OIL FILTER

OIL FILTER : Removal and Installation

INFOID:0000000009161769

REMOVAL

CAUTION:

• Oil filter is provided with relief valve. Use genuine NISSAN oil filter or equivalent.
• Be careful not to get burned when engine and engine oil may be hot.
• When removing, prepare a shop cloth to absorb any engine oil leakage or spillage.
• Never allow engine oil to adhere to drive belt.
• Completely wipe off any engine oil that adheres to engine and vehicle.
1.

Remove front undercover. Refer to 

EXT-37, "FRONT UNDER COVER : Exploded View"

.

2.

Using oil filter wrench [SST: KV10115801 (J-38956)] (A), remove
oil filter.

INSTALLATION

1.

Remove foreign materials adhering to oil filter installation surface.

2.

Apply engine oil to the oil seal contact surface of new oil filter.

Tightening torque

: 34.3 N·m (3.5 kg-m, 25 ft-lb)

Engine oil capacity

Refer to 

LU-9, "Periodical Maintenance Specification"

.

: Vehicle front

NNBIA0116ZZ

SMA010


содержание   ..  199  200  201  202   ..