Nissan Pathfinder (2011 year). Manual - part 472


  Index      Manuals     Nissan Pathfinder (2011 year) - Service and Repair Manual


Search            copyright infringement  


Content      ..     470      471      472      473     ..


Nissan Pathfinder (2011 year). Manual - part 472


CLUSTER LID A

IP-13

< REMOVAL AND INSTALLATION >

C

D

E

F

G

H

I

K

L

M

A

B

IP

N

O

P

CLUSTER LID A

Removal and Installation

INFOID:0000000006826739

REMOVAL

1. Remove front pillar upper finisher LH. Refer to 

INT-19, "Removal and Installation"

.

2. Remove instrument lower panel LH. Refer to 

IP-14, "Removal and Installation"

.

3. Remove steering lock escutcheon.
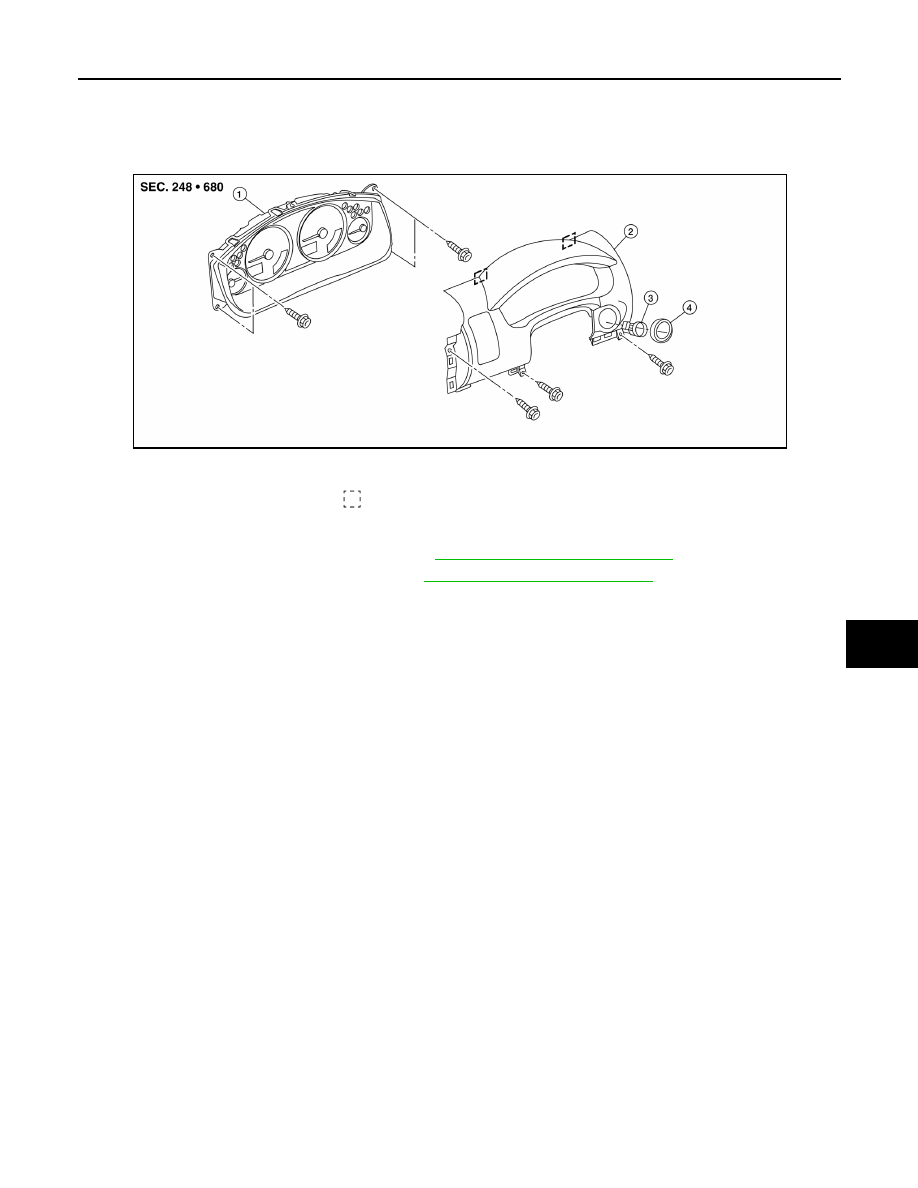
4. Remove the screws, release the clips, and remove cluster lid A.

INSTALLATION

Installation is in the reverse order of removal.

1.

Combination meter

2.

Cluster lid A

3.

Ignition key lamp assembly

4.

Steering lock escutcheon

Metal clip

AWJIA0787ZZ

2011 Pathfinder

IP-14

< REMOVAL AND INSTALLATION >

INSTRUMENT LOWER PANEL LH

INSTRUMENT LOWER PANEL LH

Removal and Installation

INFOID:0000000006826740

REMOVAL

1. Remove front pillar lower finisher LH. Refer to 

INT-19, "Removal and Installation"

.

2. Remove instrument lower panel LH, using power tool.
3. Pull rearward to release instrument lower panel LH.
4. Disconnect instrument lower panel LH harness connectors.

INSTALLATION

Installation is in the reverse order of removal.

LIIA1744E

2011 Pathfinder

CLUSTER LID C

IP-15

< REMOVAL AND INSTALLATION >

C

D

E

F

G

H

I

K

L

M

A

B

IP

N

O

P

CLUSTER LID C

Removal and Installation

INFOID:0000000006826741

WITHOUT DISPLAY UNIT

REMOVAL

1. Remove A/T finisher. Refer to 

IP-20, "Removal and Installation"

.

2. Remove storage tray, then remove cluster lid C screw.
3. Pull cluster lid C rearward to release clips.
4. Disconnect harness connectors, then remove cluster lid C.

INSTALLATION

Installation is in the reverse order of removal.

WITH DISPLAY UNIT

REMOVAL

1. Remove A/T finisher. Refer to 

IP-20, "Removal and Installation"

.

2. Remove the center console bin screws and center console bin.
3. Remove cluster lid C bolts, then release the clips and remove cluster lid C.

1.

Storage tray

2.

Cluster lid C

3.

Cluster lid C screw

AWJIA0463ZZ

1.

Instrument panel

2.

Cluster lid C

A.

Cluster lid C bolt

Clip C103

Metal clip

AWJIA0055ZZ

2011 Pathfinder

IP-16

< REMOVAL AND INSTALLATION >

CLUSTER LID C

4. Disconnect electrical connectors and remove cluster lid C.

INSTALLATION

Installation is in the reverse order of removal.

2011 Pathfinder

CLUSTER LID D

IP-17

< REMOVAL AND INSTALLATION >

C

D

E

F

G

H

I

K

L

M

A

B

IP

N

O

P

CLUSTER LID D

Removal and Installation

INFOID:0000000006826742

EXPLODED VIEW

REMOVAL

1. Remove A/T finisher. Refer to 

IP-20, "Removal and Installation"

.

2. Remove instrument lower panel LH. Refer to 

IP-14, "Removal and Installation"

.

3. Remove instrument lower panel RH and glove box. Refer to 

IP-19, "Removal and Installation"

.

4. Remove cluster lid C. Refer to 

IP-15, "Removal and Installation"

.

5. Disconnect the electrical connectors and remove cluster lid D.

INSTALLATION

Installation is in the reverse order of removal.

AWJIA0662ZZ

1.

Cluster lid D

A.

Cluster lid D screw

2011 Pathfinder

IP-18

< REMOVAL AND INSTALLATION >

UPPER GLOVE BOX

UPPER GLOVE BOX

Removal and Installation

INFOID:0000000006826743

REMOVAL

1. Remove instrument lower panel RH and glove box. Refer to 

IP-19, "Removal and Installation"

.

2. Remove cluster lid C. Refer to 

IP-15, "Removal and Installation"

.

3. Remove upper glove box.  
a. Remove upper glove box screws.
b. Pull upper glove box rearward and release from instrument panel to remove.

INSTALLATION

Installation is in the reverse order of removal.

2011 Pathfinder

INSTRUMENT LOWER PANEL RH AND GLOVE BOX

IP-19

< REMOVAL AND INSTALLATION >

C

D

E

F

G

H

I

K

L

M

A

B

IP

N

O

P

INSTRUMENT LOWER PANEL RH AND GLOVE BOX

Removal and Installation

INFOID:0000000006826744

REMOVAL

1. Remove front pillar lower finisher. Refer to 

INT-19, "Removal and Installation"

.

2. Remove instrument lower panel RH screws, using power tool.
3. Remove instrument lower panel RH and lower glove box.

INSTALLATION

Installation is in the reverse order of removal.

NOTE:

Install upper glove box before installing lower glove box. 

2011 Pathfinder

IP-20

< REMOVAL AND INSTALLATION >

A/T FINISHER

A/T FINISHER

Removal and Installation

INFOID:0000000006826745

EXPLODED VIEW

REMOVAL

1. Remove cup holder finisher. 
2. Release the shift selector handle clip, then remove shift selector handle. Refer to 

TM-170, "Exploded

view"

.

3. Pull up to release clips and disconnect the connectors, then remove the A/T finisher.

INSTALLATION

Installation is in the reverse order of removal.

1.

Cluster lid D

2.

Center console front base

3.

Cup holder finisher

4.

A/T finisher

Front

Metal clip

AWJIA0663ZZ

2011 Pathfinder


Content      ..     470      471      472      473     ..