Nissan Pathfinder (2010 year). Manual - part 640


  Index      Manuals     Nissan Pathfinder (2010 year) - Service and Repair Manual


Search            copyright infringement  


Content      ..     638      639      640      641     ..


Nissan Pathfinder (2010 year). Manual - part 640


TM-248

< DISASSEMBLY AND ASSEMBLY >

MID SUN GEAR, REAR SUN GEAR, HIGH AND LOW REVERSE CLUTCH HUB

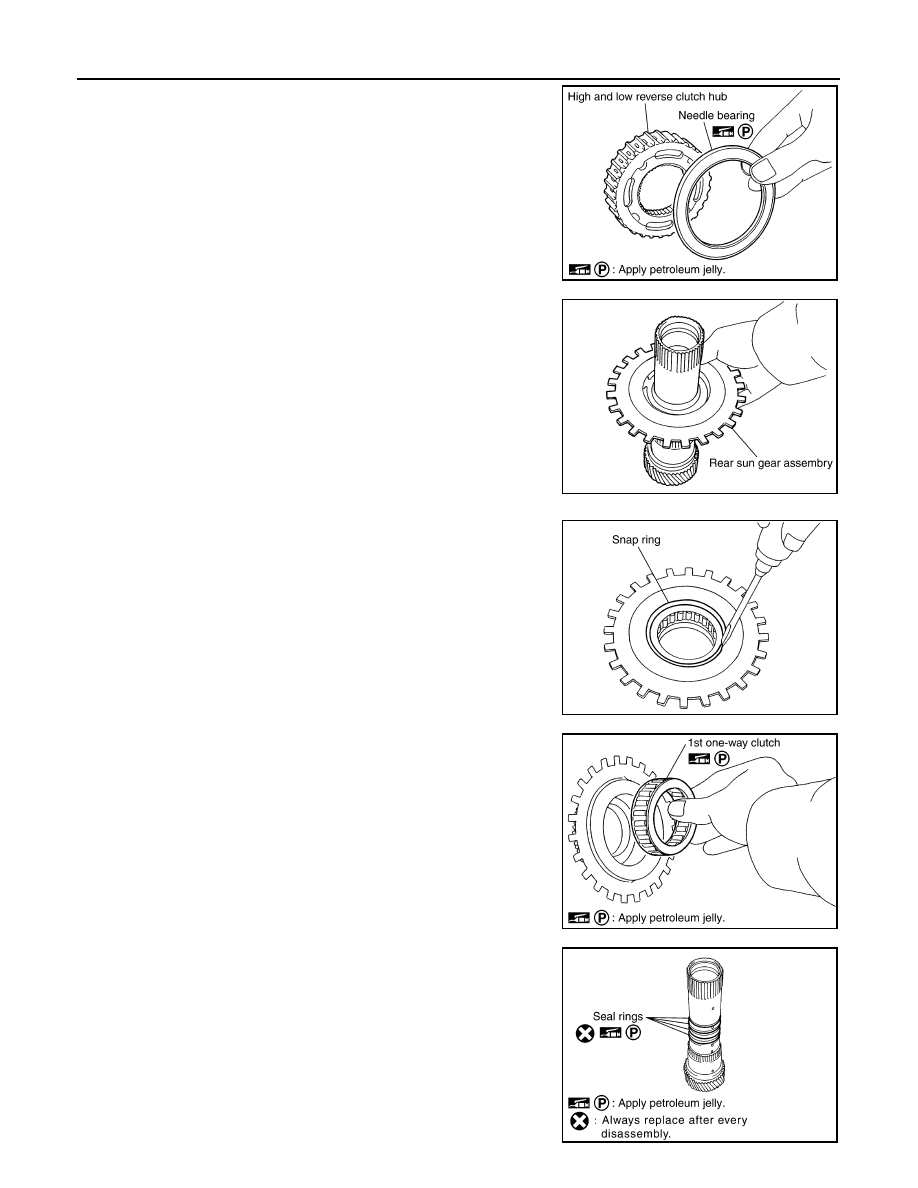
a. Remove needle bearing from high and low reverse clutch hub.

4. Remove rear sun gear assembly from mid sun gear assembly.

a. Remove snap ring from rear sun gear using suitable tool.

b. Remove 1st one-way clutch from rear sun gear.

5. Remove seal rings from mid sun gear.

SCIA2857E

SCIA2858E

SCIA2859E

SCIA4633E

SCIA2861E

2010 Pathfinder

MID SUN GEAR, REAR SUN GEAR, HIGH AND LOW REVERSE CLUTCH HUB

TM-249

< DISASSEMBLY AND ASSEMBLY >

C

E

F

G

H

I

J

K

L

M

A

B

TM

N

O

P

INSPECTION

High and Low Reverse Clutch Hub Snap Ring, Rear Sun Gear Snap Ring

• Check for deformation, fatigue or damage.

CAUTION:

If necessary, replace the snap ring.

1st One-way Clutch

• Check frictional surface for wear or damage.

CAUTION:

If necessary, replace the 1st one-way clutch.

Mid Sun Gear

• Check for deformation, fatigue or damage.

CAUTION:

If necessary, replace the mid sun gear.

Rear Sun Gear

• Check for deformation, fatigue or damage.

CAUTION:

If necessary, replace the rear sun gear.

High and Low Reverse Clutch Hub

• Check for deformation, fatigue or damage.

CAUTION:

If necessary, replace the high and low reverse clutch hub.

ASSEMBLY

1. Install seal rings to mid sun gear.

CAUTION:

• Do not reuse seal rings.

• Apply petroleum jelly to seal rings.

2. Install 1st one-way clutch to rear sun gear.

CAUTION:

Apply petroleum jelly to 1st one-way clutch.

SCIA2861E

SCIA4633E

2010 Pathfinder

TM-250

< DISASSEMBLY AND ASSEMBLY >

MID SUN GEAR, REAR SUN GEAR, HIGH AND LOW REVERSE CLUTCH HUB

3. Install snap ring to rear sun gear using suitable tool.

4. Install rear sun gear assembly to mid sun gear assembly.

5. Install needle bearing to high and low reverse clutch hub.

CAUTION:

Apply petroleum jelly to needle bearing.

6. Install high and low reverse clutch hub to mid sun gear assem-

bly.

7. Install snap ring to mid sun gear assembly using suitable tool.

CAUTION:

Do not excessively expand snap ring.

SCIA2859E

SCIA2858E

SCIA2857E

SCIA2856E

SCIA2855E

2010 Pathfinder

MID SUN GEAR, REAR SUN GEAR, HIGH AND LOW REVERSE CLUTCH HUB

TM-251

< DISASSEMBLY AND ASSEMBLY >

C

E

F

G

H

I

J

K

L

M

A

B

TM

N

O

P

8. Check operation of 1st one-way clutch.
a. Hold mid sun gear and turn rear sun gear.
b. Check 1st one-way clutch for correct locking and unlocking

directions.

CAUTION:

If not as shown, check installation direction of 1st one-way

clutch.

9. Install needle bearing and bearing race to high and low reverse clutch hub.

CAUTION:

Apply petroleum jelly to needle bearing and bearing race.

• VQ40DE models

• VK56DE models

SCIA3132E

SCIA2854E

SCIA5238E

2010 Pathfinder

TM-252

< DISASSEMBLY AND ASSEMBLY >

HIGH AND LOW REVERSE CLUTCH

HIGH AND LOW REVERSE CLUTCH

Exploded View

INFOID:0000000005258209

Disassembly and Assembly

INFOID:0000000005258210

DISASSEMBLY

1. Remove bearing race from high and low reverse clutch drum.

2. Remove snap ring from high and low reverse clutch drum using

suitable tool.

3. Remove drive plates, driven plates and retaining plate from high

and low reverse clutch drum.

INSPECTION

Check the following, and replace high and low reverse clutch assembly if necessary.

High and Low Reverse Clutch Snap Ring

• Check for deformation, fatigue or damage.

High and Low Reverse Clutch Drive Plates

1.

High and low reverse clutch drum 2.

Driven plate

3.

Retaining plate

4.

Snap ring

5.

Drive plate

6.

Bearing race

SCIA5224E

SCIA5215E

SCIA2868E

2010 Pathfinder

HIGH AND LOW REVERSE CLUTCH

TM-253

< DISASSEMBLY AND ASSEMBLY >

C

E

F

G

H

I

J

K

L

M

A

B

TM

N

O

P

• Check facing for burns, cracks or damage.

High and Low Reverse Clutch Retaining Plate and Driven Plates

• Check facing for burns, cracks or damage.

ASSEMBLY

1. Install drive plates, driven plates and retaining plate in high and low reverse clutch drum.

CAUTION:

Take care with order of plates.

2. Install snap ring in high and low reverse clutch drum using suit-

able tool.

3. Install bearing race to high and low reverse clutch drum.

CAUTION:

Apply petroleum jelly to bearing race.

SCIA2868E

SCIA5215E

2010 Pathfinder

TM-254

< DISASSEMBLY AND ASSEMBLY >

DIRECT CLUTCH

DIRECT CLUTCH

Exploded View

INFOID:0000000005258211

Disassembly and Assembly

INFOID:0000000005258212

DISASSEMBLY

1. Remove snap ring from direct clutch drum using suitable tool.
2. Remove retaining plates, drive plates, driven plates and dish

plate from direct clutch drum.

INSPECTION

Check the following, and replace direct clutch assembly if necessary.

Direct Clutch Snap Ring

• Check for deformation, fatigue or damage.

Direct Clutch Drive Plates

• Check facing for burns, cracks or damage.

Direct Clutch Retaining Plate and Driven Plates

• Check facing for burns, cracks or damage.

ASSEMBLY

1.

Direct clutch drum

2.

Dish plate

3.

Retaining plate

4.

Driven plate

5.

Retaining plate

6.

Snap ring

7.

Drive plate

SCIA7015E

SCIA2868E

2010 Pathfinder

DIRECT CLUTCH

TM-255

< DISASSEMBLY AND ASSEMBLY >

C

E

F

G

H

I

J

K

L

M

A

B

TM

N

O

P

1. Install dish plate, retaining plates, drive plates and driven plates

in direct clutch drum.

CAUTION:

Take care with order of plates.

• VQ40DE models

- Snap ring (1)

- Retaining plate (2)

- Drive plate (3)

- Driven plate (4)

- Dish plate (5)

- Driveplate/Driven plate: 5/4

CAUTION:

Take care with order of plates.

• VK56DE models

- Snap ring (1)

- Retaining plate (2)

- Drive plate (3)

- Driven plate (4)

- Dish plate (5)

- Driveplate/Driven plate: 6/6

2. Install snap ring in direct clutch drum using suitable tool.

SCIA6952E

SCIA6951E

SCIA2868E

2010 Pathfinder


Content      ..     638      639      640      641     ..