Nissan Pathfinder (2008 year). Manual - part 450


  Index      Manuals     Nissan Pathfinder (2008 year) - Service and Repair Manual


Search            copyright infringement  


Content      ..     448      449      450      451     ..


Nissan Pathfinder (2008 year). Manual - part 450


HAC-144

< COMPONENT DIAGNOSIS >

[MANUAL AIR CONDITIONER]

INTAKE DOOR MOTOR

2.

Turn mode dial to vent mode (

).

3.

Press REC (

) switch. 

4.

Press REC (

) switch again.

5.

Listen for intake door position change (you should hear blower sound change slightly).

Can a symptom be duplicated?

YES

>> GO TO 3.

NO

>> GO TO 2.

2.

PERFORM COMPLETE OPERATIONAL CHECK

Perform a complete operational check and check for any symptoms. Refer to 

HAC-123, "Operational Check"

.

Can a symptom be duplicated?

YES

>> Refer to 

HAC-171, "Symptom Matrix Chart"

.

NO

>> System OK.

3.

CHECK FOR SERVICE BULLETINS

Check for any service bulletins.

>> GO TO 4.

4.

CHECK INTAKE DOOR OPERATION

Check and verify intake door mechanism for smooth operation. 
Is inspection result normal?

YES

>> GO TO 5.

NO

>> Repair intake door mechanism.

5.

RECHECK FOR ANY SYMPTOMS 

Perform a complete operational check for any symptoms. Refer to 

HAC-123, "Operational Check"

.

Does another symptom exist?

YES

>> Refer to 

HAC-171, "Symptom Matrix Chart"

NO

>> Replace front air control. Refer to XX-XX, "*****".

Intake Door Motor Diagnosis Procedure

INFOID:0000000001366791

DIAGNOSTIC PROCEDURE FOR INTAKE DOOR MOTOR
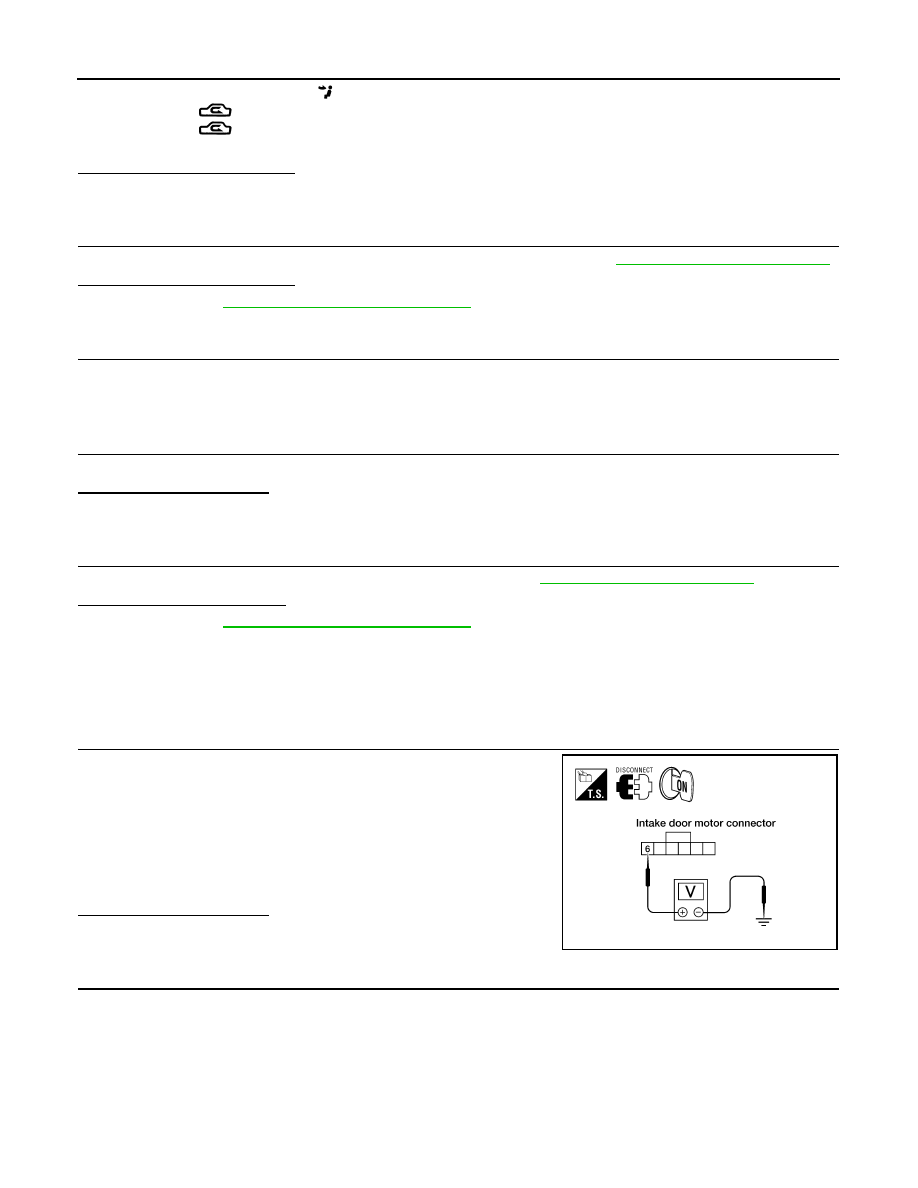
1.

CHECK INTAKE DOOR MOTOR CIRCUIT VOLTAGE

1.

Turn ignition switch OFF.

2.

Disconnect intake door motor connector.

3.

Turn ignition switch ON.

4.

Rotate the temperature control dial counterclockwise.

5.

Check voltage between intake door motor harness connector
M58 terminal 6 and ground.

Is inspection result normal?

OK

>> GO TO 3.

NG

>> GO TO 2.

2.

CHECK INTAKE DOOR MOTOR CIRCUIT FOR OPEN

6 - Ground

: Battery voltage

WJIA1324E

INTAKE DOOR MOTOR

HAC-145

< COMPONENT DIAGNOSIS >

[MANUAL AIR CONDITIONER]

C

D

E

F

G

H

J

K

L

M

A

B

HAC

N

O

P

1.

Turn ignition switch OFF.

2.

Disconnect front air control connector.

3.

Check continuity between front air control harness connector
M49 terminal 5 and intake door motor harness connector M58
terminal 6.

Is inspection result normal?

OK

>> Replace front air control connector. Refer to XXXX.

NG

>> Repair or replace harness as necessary.

3.

CHECK INTAKE DOOR MOTOR CIRCUIT VOLTAGE

1.

Rotate the temperature control dial clockwise.

2.

Check voltage between intake door motor harness connector
M58 terminal 1 and ground.

Is inspection result normal?

YES

>> Replace intake door motor. Refer to XX-XX, "*****".

NO

>> GO TO 4.

4.

CHECK INTAKE DOOR MOTOR CIRCUIT FOR OPEN

1.

Turn ignition switch OFF.

2.

Disconnect front air control connector.

3.

Check continuity between front air control harness connector
M49 (A) terminal 4 and intake door motor harness connector
M58 (B) terminal 1.

Is inspection result normal?

YES

>> Replace front air control connector. Refer to XXXX.

NO

>> Repair or replace harness as necessary.

5 - 6

: Continuity should exist.

WJIA1468E

1 - Ground

:Battery voltage

WJIA1326E

A

B

Connector

Terminal Connector

Terminal 

Continuity

Front air control: 

M49

Intake door motor: 

M58

1

Yes

WJIA1684E

HAC-146

< COMPONENT DIAGNOSIS >

[MANUAL AIR CONDITIONER]

BLOWER MOTOR

BLOWER MOTOR

System Description

INFOID:0000000001366795

Component Parts

Blower speed control system components are:

• Front air control
• Front blower motor resistor
• Front blower motor
• Front blower relay

System Operation

COMPONENT DESCRIPTION

Blower Motor Resistor

The front blower motor resistor is located on the heater and cooling
unit assembly. The front blower motor resistor grounds the front
blower motor through a series of 1, 2, or 3 resistors, depending upon
speed selected. For high speed operation the front blower motor
resistor is circumvented and the front blower motor grounds directly.

Front Blower Motor Component Function Check

INFOID:0000000001366796

INSPECTION FLOW

1.

CONFIRM SYMPTOM BY PERFORMING OPERATIONAL CHECK - FRONT BLOWER

1.

Rotate the blower control dial clockwise. Blower should operate.

2.

Rotate the blower control dial clockwise, and continue checking blower speed until all speeds are
checked.

Can the symptom be duplicated?

YES

>> GO TO 3.

NO

>> GO TO 2.

AWIIA0272GB

WJIA1487E

BLOWER MOTOR

HAC-147

< COMPONENT DIAGNOSIS >

[MANUAL AIR CONDITIONER]

C

D

E

F

G

H

J

K

L

M

A

B

HAC

N

O

P

2.

CHECK FOR ANY SYMPTOMS 

Perform a complete operational check for any symptoms. Refer to 

HAC-123, "Operational Check"

.

Does another symptom exist?

YES

>> Refer to XX-XX, "*****". 

NO

>> System OK.

3.

CHECK FOR SERVICE BULLETINS

Check for any service bulletins.

>> GO TO 4.

4.

CHECK BLOWER MOTOR OPERATION

Check and verify blower motor operates in all speeds.
Does blower motor operate in all speeds?

YES

>> GO TO 5.

NO

>> Refer to 

HAC-147, "Front Blower Motor Diagnosis Procedure"

.

5.

CHECK ENGINE COOLANT TEMPERATURE SENSOR CIRCUIT 

Perform diagnostic procedure for the coolant temperature sensor circuit. Refer to XX-XX, "*****".

Is the inspection result normal?

YES

>> GO TO 6. 

NO

>> Repair or replace harness as necessary.

6.

RECHECK FOR ANY SYMPTOMS 

Perform a complete operational check for any symptoms. Refer to 

HAC-123, "Operational Check"

.

Does another symptom exist?

YES

>> Refer to 

HAC-171, "Symptom Matrix Chart"

NO

>> Replace front air control. Refer to XX-XX.

Front Blower Motor Diagnosis Procedure

INFOID:0000000001366797

SYMPTOM: Blower motor operation is malfunctioning under starting
blower speed control.

1.

DIAGNOSTIC PROCEDURE

1.

Turn ignition switch ON.

2.

Turn the front blower switch to each of its four speeds.

WJIA1503E

HAC-148

< COMPONENT DIAGNOSIS >

[MANUAL AIR CONDITIONER]

BLOWER MOTOR

Does blower motor rotate normally at each speed?

YES or NO

YES

>> Inspection End.

NO

>> 1.

Does not rotate at any speed, GO TO 2.

2.

Does not rotate at 1 - 3 speed, GO TO 13.

3.

Does not rotate at 4 speed, GO TO 16.

2.

CHECK FUSES

1.

Check 15A fuses (Nos. 24 and 27, located in the fuse and fusible link box). Refer to XX-XX.

2.

Check 10A fuse [No. 8, located in the fuse block (JB)]. Refer to XX-XX.

Is inspection result normal?

YES

>> GO TO 3.

NO

>> GO TO 8.

3.

CHECK FRONT BLOWER MOTOR POWER SUPPLY

1.

Turn ignition switch OFF.

2.

Disconnect front blower motor harness connector.

3.

Turn ignition switch ON.

4.

Select any front blower speed except OFF.

5.

Check voltage between front blower motor harness connector
M62 terminal 2 and ground.

Is inspection result normal?

YES

>> GO TO 12.

NO

>> GO TO 4.

4.

CHECK FRONT BLOWER MOTOR RELAY

1.

Turn Ignition switch OFF.

2.

Check front blower motor relay. Refer to 

HAC-151, "Front Blower Motor Component Inspection"

.

Is inspection result normal?

YES

>> GO TO 5.

NO

>> Replace front blower motor relay.

5.

CHECK FRONT BLOWER MOTOR RELAY POWER SUPPLY (SWITCH SIDE)

Check voltage between front blower motor relay harness connector
E54 terminals 7 and 5 and ground.

Is inspection result normal?

YES

>> GO TO 6.

NO

>> Repair harness or connector.

6.

CHECK FRONT BLOWER MOTOR RELAY POWER SUPPLY (COIL SIDE)

2 - Ground

: Battery voltage

WJIA1331E

A

Condition

Voltage (Ap-

prox.)

(+)

Front air control 

connector

Terminal 

(-)

M54

5 Ground

Blower motor 

relay power 

supply

Battery voltage

M54

7 Ground

Blower motor 

relay power 

supply

Battery voltage

WJIA1634E

BLOWER MOTOR

HAC-149

< COMPONENT DIAGNOSIS >

[MANUAL AIR CONDITIONER]

C

D

E

F

G

H

J

K

L

M

A

B

HAC

N

O

P

1.

Turn ignition switch ON.

2.

Check voltage between front blower motor relay harness con-
nector E54 terminal 1 and ground.

Is inspection result normal?

YES

>> GO TO 7.

NO

>> Repair or replace harness as necessary.

7.

CHECK FRONT BLOWER MOTOR POWER FROM RELAY TO FRONT BLOWER MOTOR

1.

Turn ignition switch OFF.

2.

Check continuity between front blower motor relay harness con-
nector E54 terminals 6 and 3 and front blower motor harness
connector M62 terminal 2.

Is inspection result normal?

YES

>> Repair or replace harness as necessary.

NO

>> Repair harness or connector between the front blower

motor relay and the front blower motor.

8.

REPLACE FUSE

Refer to XX-XX, "*****".
Does fuse No. 24 or 27 open when the front blower motor is turned on?

YES or NO

YES

>> GO TO 10.

NO

>> GO TO 9.

9.

REPLACE FUSE

Refer to XX-XX, "*****".
Does fuse No. 8 open when the ignition switch is turned ON?

YES or NO

YES

>> Repair or replace harness as necessary.

NO

>> Inspection End.

10.

CHECK FRONT BLOWER MOTOR POWER SUPPLY CIRCUIT FOR SHORT

1.

Turn ignition switch OFF.

2.

Disconnect front blower motor connector.

3.

Check continuity between front blower motor harness connector
M62 terminal 2 and ground.

Is inspection result normal?

YES

>> GO TO 11.

NO

>> Repair or replace harness as necessary.

A

Condition

Voltage (Ap-

prox.)

(+)

Front air control 

connector

Terminal 

(-)

M54

1 Ground

Blower motor 

relay power 

supply (coil 

side)

Battery voltage

WJIA0504E

3, 6 - 2

: Continuity should exist.

WJIA1333E

2 - Ground

: Continuity should not exist.

WJIA0649E

HAC-150

< COMPONENT DIAGNOSIS >

[MANUAL AIR CONDITIONER]

BLOWER MOTOR

11.

CHECK FRONT BLOWER MOTOR RELAY (SWITCH SIDE) POWER SUPPLY CIRCUIT FOR SHORT

1.

Disconnect front blower motor relay connector.

2.

Check continuity between the front blower motor relay harness
connector E54 terminal 7 and terminal 5 and ground.

Is inspection result normal?

YES

>> Check front blower motor. Refer to 

HAC-147, "Front

Blower Motor Diagnosis Procedure"

.

NO

>> Repair harness or connector.

12.

CHECK FRONT BLOWER MOTOR

1.

Turn ignition switch OFF.

2.

Check front blower motor. Refer to 

HAC-151, "Front Blower Motor Component Inspection"

.

Is inspection result normal?

YES

>> GO TO 13.

NO

>> Replace front blower motor. Refer to XXXX.

13.

CHECK FRONT BLOWER MOTOR RESISTOR

Check front blower motor resistor. Refer to 

HAC-151, "Front Blower Motor Component Inspection"

.

Is inspection result normal?

YES

>> GO TO 14.

NO

>> Replace front blower motor resistor. Refer to XXXX.

14.

CHECK FRONT BLOWER SWITCH

Check front blower switch. Refer to 

HAC-151, "Front Blower Motor Component Inspection"

.

Is inspection result normal?

YES

>> GO TO 15.

NO

>> Replace front blower switch. Refer to XXXX.

15.

CHECK FRONT BLOWER MOTOR GROUND CIRCUIT TO FRONT BLOWER MOTOR RESISTOR

1.

Disconnect front blower motor resistor harness connector.

2.

Check continuity between front blower motor connector M62 (A)
terminal 1 and front blower motor resistor harness connector
M122 (B) terminal 3.

Is inspection result normal?

YES

>> Repair harness or connector between front blower

switch connector M51 terminal 8 and ground.

NO

>> Repair harness or connector between front blower motor resistor and front blower motor.

16.

CHECK FRONT BLOWER SWITCH

Check front blower switch. Refer to 

HAC-151, "Front Blower Motor Component Inspection"

.

Is inspection result normal?

YES

>> Repair harness or connector between front blower motor switch connector M51 terminal 8 and

front blower motor resistor connector M122 terminal 3.

NO

>> Replace front blower switch. Refer to XXXX.

SYMPTOM: Blower motor operation is malfunctioning.

7, 5 - Ground

: Continuity should not exist.

WJIA1334E

A

B

Connector

Terminal Connector

Terminal 

Continuity

Front blower motor: 

M62

Front blower mo-

tor resistor: M122

3

Yes

WJIA1676E

BLOWER MOTOR

HAC-151

< COMPONENT DIAGNOSIS >

[MANUAL AIR CONDITIONER]

C

D

E

F

G

H

J

K

L

M

A

B

HAC

N

O

P

Front Blower Motor Component Inspection

INFOID:0000000001366798

COMPONENT INSPECTION

Front Blower Motor Relay

Check continuity between terminals by supplying 12 volts and
ground to coil side terminals of relay.

Front Blower Motor

Confirm smooth rotation of the blower motor.
• Ensure that there are no foreign particles inside the blower unit.
• Apply 12 volts to terminal 2 and ground to terminal 1 and verify that

the motor operates freely and quietly.

Front Blower Switch

Check continuity between terminals at each switch position.

LJIA0068E

WJIA1508E

WJIA0508E


Content      ..     448      449      450      451     ..