Nissan Teana J32. Manual - part 551
EXL-174
< ON-VEHICLE MAINTENANCE >
[XENON TYPE]
HEADLAMP AIMING ADJUSTMENT
Aiming Adjustment Procedure (Low Beam)
INFOID:0000000003774533
1.
Place the screen.
NOTE:
• Stop the vehicle at the perpendicular angle to the wall.
• Set the screen so that it is perpendicular to a level load surface.
2.
Face the vehicle squarely toward the screen and make the distance between the headlamp center and
the screen 10 m (32.8 ft).
3.
Start the engine and illuminate the headlamp (LO).
NOTE:
Block light from the headlamp that is not being adjusted with a thick fabric or another object, so that it
does not reach the adjustment screen.
CAUTION:
Do not cover lens surface with tape, etc. because it is made from plastic.
4.
Use the aiming adjustment screw to adjust the elbow point projected by the low beams on the screen, so
that it is within the aiming adjustment area.
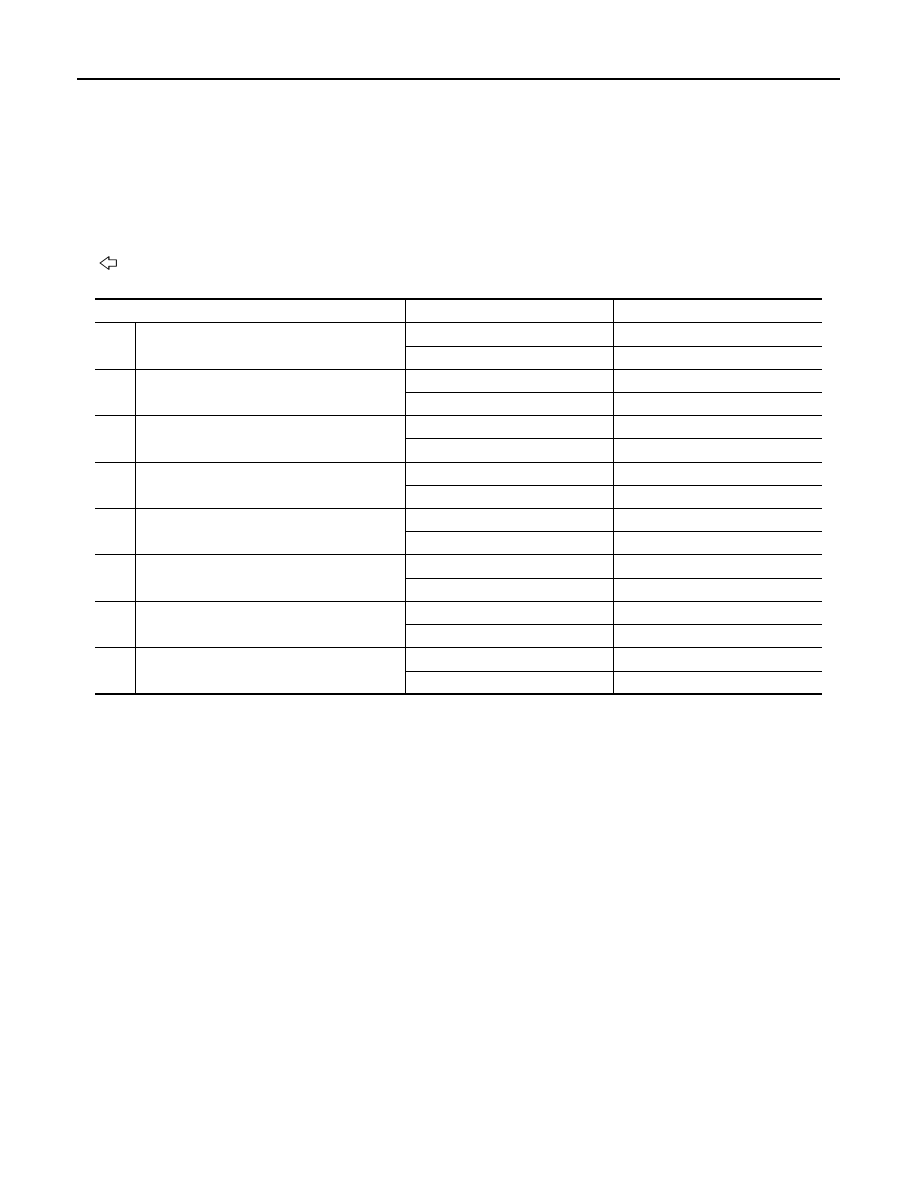
A.
Headlamp (LO) RH
(UP/DOWN) adjustment screw
B.
Headlamp (HI) RH
(UP/DOWN) adjustment screw
C.
Headlamp (LO) RH
(UP-OUTSIDE/DOWN-INSIDE)
adjustment screw
D.
Headlamp (HI) RH
(UP-INSIDE/DOWN-OUTSIDE)
adjustment screw
E.
Headlamp (LO) LH
(UP/DOWN) adjustment screw
F.
Headlamp (HI) LH
(UP/DOWN) adjustment screw
G.
Headlamp (LO) LH
(UP-OUTSIDE/DOWN-INSIDE)
adjustment screw
H.
Headlamp (HI) LH
(UP-INSIDE/DOWN-OUTSIDE)
adjustment screw
: Vehicle center
Adjustment screw
Screw driver rotation
Facing direction
A
Headlamp (LO) RH
(UP/DOWN)
Clockwise
UP
Counterclockwise
DOWN
B
Headlamp (HI) RH
(UP/DOWN)
Clockwise
UP
Counterclockwise
DOWN
C
Headlamp (LO) RH
(UP-OUTSIDE/DOWN-INSIDE)
Clockwise
DOWN-INSIDE
Counterclockwise
UP-OUTSIDE
D
Headlamp (HI) RH
(UP-INSIDE/DOWN-OUTSIDE)
Clockwise
DOWN-OUTSIDE
Counterclockwise
UP-INSIDE
E
Headlamp (LO) LH
(UP/DOWN)
Clockwise
UP
Counterclockwise
DOWN
F
Headlamp (HI) LH
(UP/DOWN)
Clockwise
UP
Counterclockwise
DOWN
G
Headlamp (LO) LH
(UP-OUTSIDE/DOWN-INSIDE)
Clockwise
DOWN-INSIDE
Counterclockwise
UP-OUTSIDE
H
Headlamp (HI) LH
(UP-INSIDE/DOWN-OUTSIDE)
Clockwise
DOWN-OUTSIDE
Counterclockwise
UP-INSIDE