Nissan X-Trail 32. Manual - part 711


  Главная      Nissan     Nissan X-Trail 32 - Service Manual


поиск по сайту            


содержание   ..  709  710  711  712   ..


Nissan X-Trail 32. Manual - part 711


DIFFERENTIAL ASSEMBLY

DLN-255

< UNIT DISASSEMBLY AND ASSEMBLY >

[REAR FINAL DRIVE: R145]

C

E

F

G

H

I

J

K

L

M

A

B

DLN

N

O

P

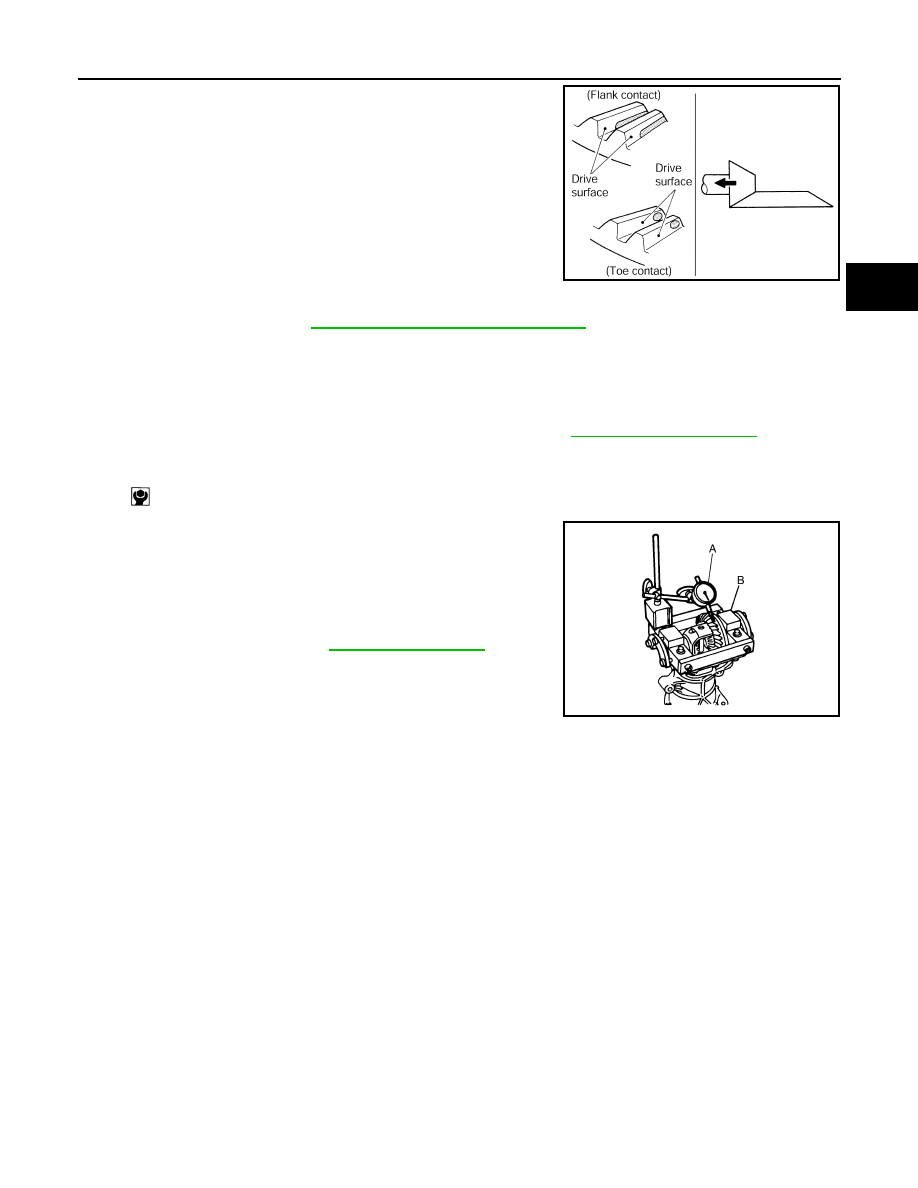
• If the tooth contact is near the flank (flank contact), or near the

toe (toe contact), thin drive pinion gear adjusting shim to move
drive pinion farther from drive gear.
For selecting adjusting shim, refer to the latest parts informa-
tion.

BACKLASH

1.

Remove rear cover. Refer to 

DLN-247, "Disassembly and Assembly"

.

2.

Following the procedure below, install the dummy cover set (SST: KV389L0010) to gear carrier.

a.

Set dummy cover shims to the right and left side bearing adjusting shims.

b.

Temporarily tighten dummy cover to gear carrier.

c.

Position dummy cover spacers to dummy cover.

d.

Tighten rear cover mounting bolts to the specified torque. Refer to 

DLN-246, "Exploded View"

.

e.

Tighten dummy cover spacer mounting bolts evenly to the specified torque.

3.

Fit a dial indicator (A) to the drive gear face to measure the
backlash.

• If the backlash is outside of the specified value, change the

thickness of side bearing adjusting shims.

Inspection

INFOID:0000000011008630

INSPECTION AFTER DISASSEMBLY

Drive Gear and Drive Pinion

• Clean up the disassembled parts.
• If the gear teeth never mesh or line-up correctly, determine the cause and adjust or replace as necessary.
• If the gears are worn, cracked, damaged, pitted or chipped (by friction) noticeably, replace with new drive

gear and drive pinion as a set.

Bearing

• Clean up the disassembled parts.
• If any chipped (by friction), pitted, worn, rusted or scratched marks, or unusual noise from the bearing is

observed, replace as a bearing assembly (as a new set).

PDIA0441E

: 5.9 N·m (0.6 kg-m, 52 in-lb)

B

: Dummy cover set (SST: KV389L0010)

Standard

Backlash

: Refer to 

DLN-263, "Backlash"

.

When the backlash is large:

Make drive gear back adjusting shims thicker, and drive 
gear front adjusting shims thinner. For selecting ad-
justing shim, refer to the latest parts information.

When the backlash is small:

Make drive gear back adjusting shims thinner, and 
drive gear front adjusting shims thicker. For selecting 
adjusting shim, refer to the latest parts information.

JSDIA5306ZZ

DLN-256

< UNIT DISASSEMBLY AND ASSEMBLY >

[REAR FINAL DRIVE: R145]

DIFFERENTIAL ASSEMBLY

Oil Seal

• Whenever disassembled, replace.
• If wear, deterioration of adherence (sealing force lips), or damage is detected on the lips, replace them.

Differential Assembly

DIFFERENTIAL CASE

• Clean up the disassembled parts.
• If any wear or crack on the contact sides of the differential case is found, replace.

SIDE GEAR AND PINION MATE GEAR

• Clean up the disassembled parts.
• If any cracks or damage on the surface of the tooth is found, replace.
• If any worn or chipped mark on the contact sides of the thrust washer is found, replace.

SIDE GEAR THRUST WASHER AND PINION MATE THRUST WASHER

• Clean up the disassembled parts.
• If it is chipped (by friction), damaged, or unusually worn, replace.

DRIVE PINION

DLN-257

< UNIT DISASSEMBLY AND ASSEMBLY >

[REAR FINAL DRIVE: R145]

C

E

F

G

H

I

J

K

L

M

A

B

DLN

N

O

P

DRIVE PINION

Exploded View

INFOID:0000000011008631

Stud bolt

Connector bracket

Reamer bolt

Electric controlled coupling assem-
bly

Wave spring

Drive pinion oil seal

Drive pinion lock nut

Pinion front bearing

Gear carrier

Collapsible spacer

Drive pinion adjusting shim

Pinion rear bearing

Drive pinion

Drive gear

Differential case

Side bearing

Side bearing adjusting shim

Side oil seal

Rear cover

Stud bolt

Gasket

Drain plug

Filler plug

Pinion mate thrust washer

Pinion mate gear

Side gear thrust washer

Side gear

Pinion mate shaft

Lock pin

Oil seal lip

Screw hole

: N·m (kg-m, in-lb)

: N·m (kg-m, ft-lb)

: Always replace after every disassembly.

: Select with proper thickness.

: Apply gear oil.

*: Apply anti-corrosion oil.

: Apply multi purpose grease.

JSDIA5442GB

DLN-258

< UNIT DISASSEMBLY AND ASSEMBLY >

[REAR FINAL DRIVE: R145]

DRIVE PINION

Disassembly and Assembly

INFOID:0000000011008632

DISASSEMBLY

1.

Remove electric controlled coupling assembly. Refer to 

DLN-243, "Disassembly and Assembly"

.

2.

Remove differential assembly. Refer to 

DLN-247, "Disassembly and Assembly"

.

3.

Remove drive pinion oil seal, using oil seal remover (commercial service tool).

4.

Fit drive pinion socket (A) onto drive pinion spline. Remove drive
pinion lock nut, using the pinion nut wrench (B).

5.

Press drive pinion assembly out of gear carrier.

CAUTION:

Never drop drive pinion assembly.

6.

Remove pinion front bearing inner race.

7.

Remove collapsible spacer.

8.

Remove pinion rear bearing inner race from drive pinion, using
the separator (A) and the puller (B).

9.

Using a brass rod or equivalent (A), tap pinion front bearing
outer race evenly from the 2 cutouts on gear carrier and remove
pinion front bearing outer race.

CAUTION:

Be careful not to damage gear carrier.

: Apply Genuine Liquid Gasket, Three Bond 1217 or equivalent.

: Apply Genuine High Strength Thread Locking Sealant, Loctite 270 or equivalent.

A

: Drive pinion socket (SST: KV38109500)

B

: Pinion nut wrench (SST: KV38109400)

JSDIA0265ZZ

JSDIA5295ZZ

A

: Separator (commercial service tool)

B

: Puller (commercial service tool)

JSDIA5296ZZ

JSDIA5297ZZ


содержание   ..  709  710  711  712   ..