Nissan Qashqai J11. Manual - part 1418


  Index      Nissan     Nissan Qashqai J11 - Service and Repair Manual


Search            


Content   ..  1416  1417  1418  1419   ..


Nissan Qashqai J11. Manual - part 1418


REAR DOOR

DLK-941

< REMOVAL AND INSTALLATION >

[TYPE 6]

C

D

E

F

G

H

I

J

L

M

A

B

DLK

N

O

P

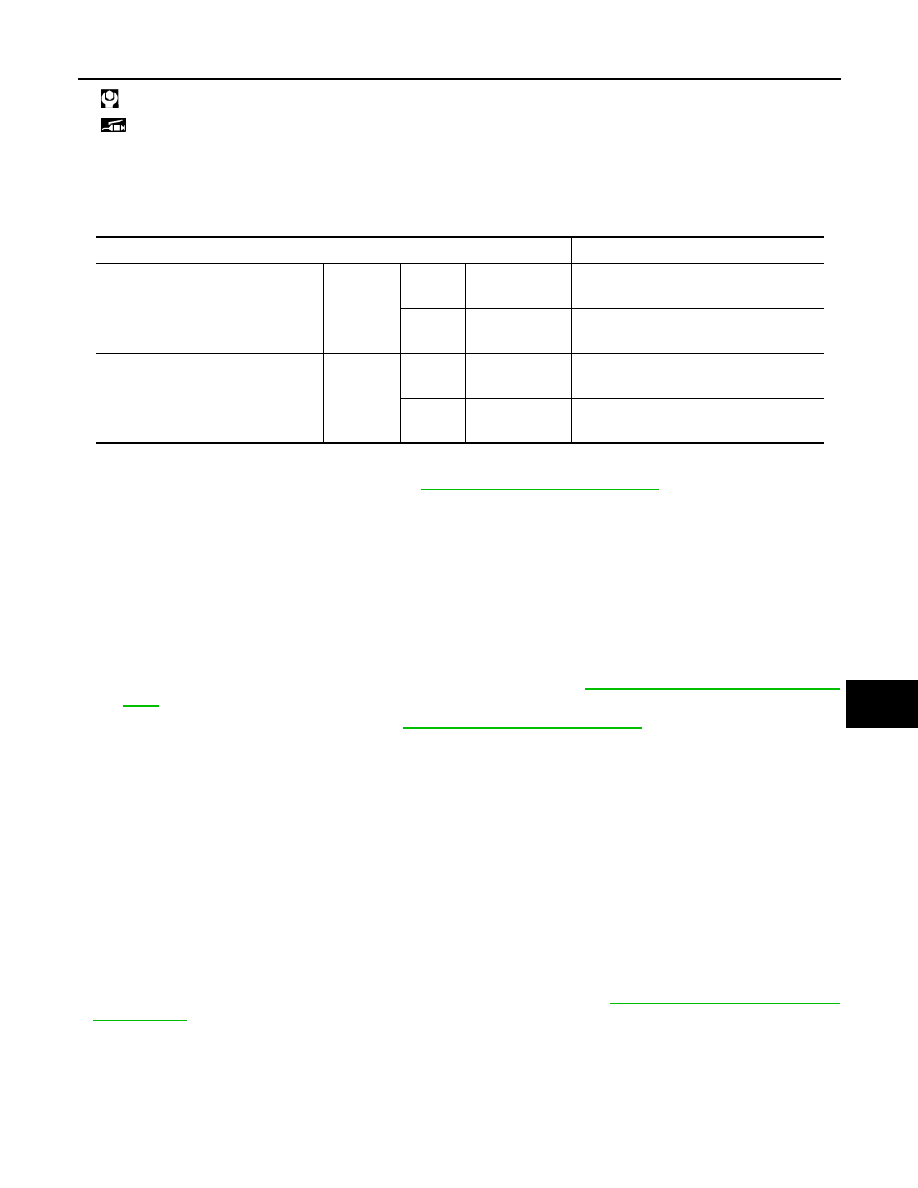
Fitting Adjustment Standard

Check the clearance and surface height between rear door and each part by visually and touching. 
If the clearance and the surface height are out of specification, adjust them according to the procedures
shown below.

Unit: mm [in]

Fitting Adjustment Procedure

1.

Remove center pillar lower garnish. Refer to 

INT-18, "Removal and Installation"

.

2.

Loosen door hinge mounting nuts on door side.

3.

Adjust the surface height of rear door according to the fitting standard dimension.

4.

Temporarily tighten door hinge mounting nuts on door side.

5.

Loosen door hinge mounting nuts and bolts on body side. 

6.

Raise rear door at rear end to adjust clearance of rear door according to the fitting standard dimension.

7.

After adjustment tighten bolts and nuts to the specified torque.

CAUTION:

• After installation, apply touch-up paint (the body color) onto the head of hinge mounting bolts

and nuts.

• Check door hinge rotating part for poor lubrication. Refer to 

DLK-937, "DOOR HINGE : Inspec-

tion"

.

8.

Install center pillar lower garnish. Refer to 

INT-18, "Removal and Installation"

.

DOOR STRIKER ADJUSTMENT

Adjust door striker so that it becomes parallel with door lock insertion direction.

DOOR STRIKER

DOOR STRIKER : Removal and Installation

INFOID:0000000010678871

REMOVAL

Remove TORX bolts, and then remove door striker.

INSTALLATION

Note the following items, and install in the reverse order of removal.

CAUTION:

• Never reuse mounting TORX bolt. Always replace it with a new one when it is removed.
• Check rear door open/close, lock/unlock operation after installation.
• After installation, be sure to perform the fitting adjustment. Refer to 

DLK-940, "DOOR ASSEMBLY :

Adjustment"

.

DOOR HINGE

DOOR HINGE : Removal and Installation

INFOID:0000000010678872

CAUTION:

• Perform work with 2 workers, because of its heavy weight.

: N·m (kg-m, ft-lb)

: Body grease

Portion

Standard

Front door – Rear door

B – B

J

Clearance

3.3 – 5.3

[0.130 – 0.209]

K

Surface 

height

(

1.0) – (+1.0)

[(

0.039) – (+0.039)]

Rear door – Body side panel

C – C

L

Clearance

3.5 – 5.5

[0.138 – 0.217]

M

Surface 

height

(

1.0) – (+1.0)

[(

0.039) – (+0.039)]

DLK-942

< REMOVAL AND INSTALLATION >

[TYPE 6]

REAR DOOR

• When removing and installing rear door assembly, support door with a jack and shop cloth to pro-

tect door and body.

REMOVAL

1.

Remove rear door assembly. Refer to 

DLK-939, "DOOR ASSEMBLY : Removal and Installation"

.

2.

Remove door hinge mounting bolts of vehicle body side, and then remove door hinge (lower).

3.

Remove center pillar lower garnish. Refer to 

INT-18, "Removal and Installation"

.

4.

Remove door hinge mounting nuts of vehicle body side, and then remove door hinge (upper).

INSTALLATION

Note the following items, and install in the reverse order of removal.

CAUTION:

• Apply anticorrosive agent onto the mounting surface.
• Check front door open/close, lock/unlock operation after installation.
• After installation, perform the fitting adjustment. Refer to 

DLK-935, "DOOR ASSEMBLY : Adjust-

ment"

.

• After installation, apply touch-up paint (the body color) onto the head of door hinge mounting nuts.
• After installation, check door hinge rotating part for poor lubrication. Refer to 

DLK-942, "DOOR

HINGE : Inspection"

.

DOOR HINGE : Inspection

INFOID:0000000010678873

Check door hinge rotating part for poor lubrication. Apply body grease if necessary.
• Door hinge (upper)

• Door hinge (lower)

DOOR CHECK LINK

DOOR CHECK LINK : Removal and Installation

INFOID:0000000010678874

REMOVAL

1.

Fully close the rear door glass.

2.

Remove rear door finisher. Refer to 

INT-15, "REAR DOOR FINISHER : Removal and Installation"

.

3.

Remove rear door speaker.

a.

Disconnect rear door speaker harness connector.

b.

Remove rear door speaker mounting bolts, and then remove rear door speaker.

4.

Remove check link mounting bolts of vehicle body side.

: Body grease

JMKIB0329ZZ

: Body grease

JMKIB0321ZZ

REAR DOOR

DLK-943

< REMOVAL AND INSTALLATION >

[TYPE 6]

C

D

E

F

G

H

I

J

L

M

A

B

DLK

N

O

P

5.

Remove check link mounting bolts of door side.

6.

Take door check link out from the hole of door panel.

INSTALLATION

Note the following items, and install in the reverse order of removal.

CAUTION:

• Check front door open/close operation after installation.
• After installation, check door check link rotating part for poor lubrication. Refer to 

DLK-943, "DOOR

CHECK LINK : Inspection"

.

DOOR CHECK LINK : Inspection

INFOID:0000000010678875

Check door hinge rotating part for poor lubrication. Apply body
grease if necessary.

: Body grease

JMKIB0322ZZ

DLK-944

< REMOVAL AND INSTALLATION >

[TYPE 6]

BACK DOOR

BACK DOOR

Exploded View

INFOID:0000000010678876

BACK DOOR ASSEMBLY

BACK DOOR ASSEMBLY : Removal and Installation

INFOID:0000000010678877

CAUTION:

• Perform work with 2 workers, because of its heavy weight.
• Use protective tape or shop cloth to protect from damage during removal and installation.

1.

Back door hinge

2.

Stud ball

3.

Back door stay

4.

Back door weather-strip

5.

Stud ball

6.

Back door bumper rubber

7.

Back door striker

8.

TORX bolt

9.

Back door panel

A.

Center mark

B.

Seam

: Always replace after every disassembly.

: N·m (kg-m, in-lb)

: Body grease

: Indicates that the part is connected at points with same symbol in actual vehicle.

JMKIB3637GB


Content   ..  1416  1417  1418  1419   ..