Nissan Juke F15. Manual - part 813


  Index      Nissan     Nissan Juke F15 (2015 year) - Service and Repair Manual


Search            


Content   ..  811  812  813  814   ..


Nissan Juke F15. Manual - part 813


TIGHTENING TORQUE OF STANDARD BOLTS

GI-21

< HOW TO USE THIS MANUAL >

C

D

E

F

G

H

I

J

K

L

M

B

GI

N

O

P

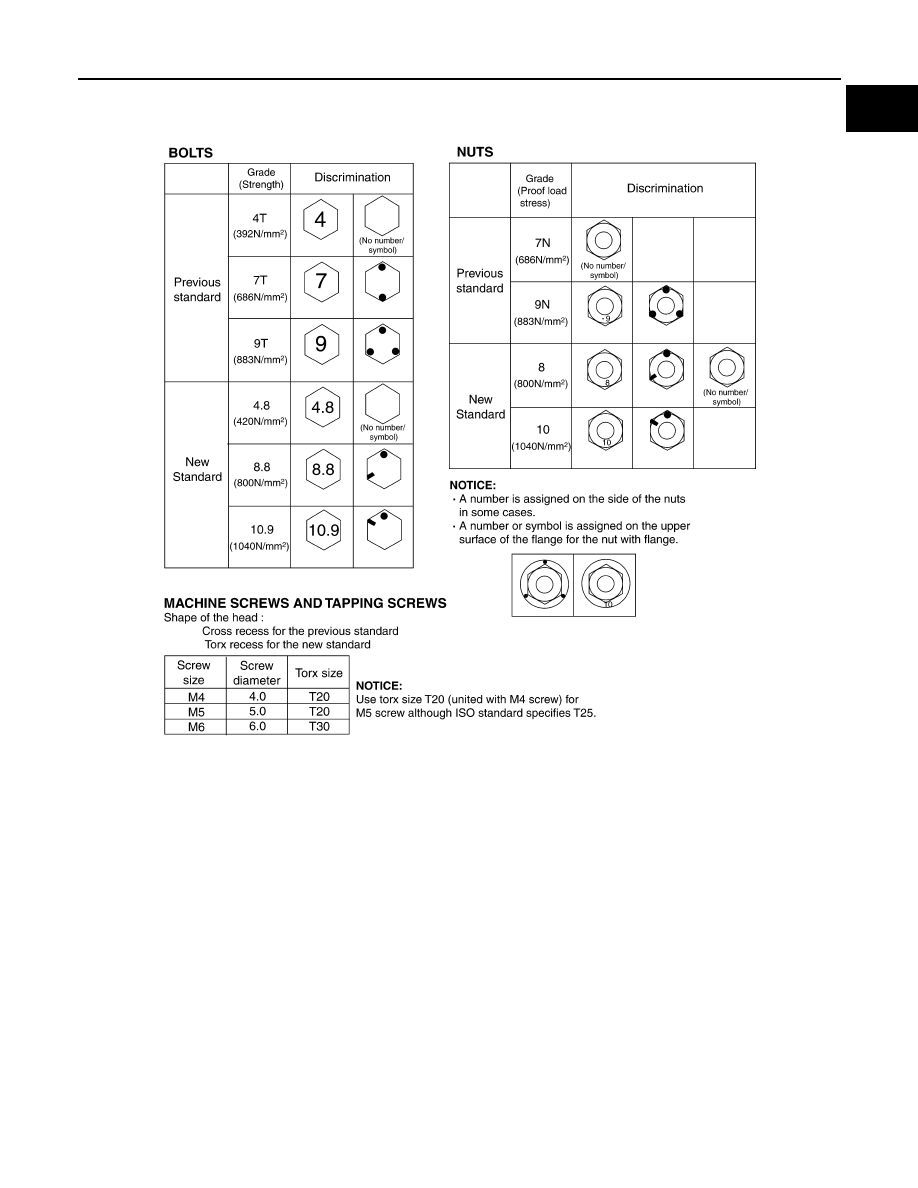
DISCRIMINATION OF BOLTS AND NUTS

SAIA0453E

GI-22

< HOW TO USE THIS MANUAL >

RECOMMENDED CHEMICAL PRODUCTS AND SEALANTS

RECOMMENDED CHEMICAL PRODUCTS AND SEALANTS

Recommended Chemical Products and Sealants

INFOID:0000000012196776

Refer to the following chart for help in selecting the appropriate chemical product or sealant.

Product Description

Purpose

Nissan North America 

Part No. (USA)

Nissan Canada Part 

No. (Canada)

Aftermarket Cross-

reference Part Nos.

1

Rear View Mirror Adhe-
sive

Used to permanently re-
mount rear view mirrors to 
windows.

999MP-AM000P

99998-50505

Permatex 81844

2

Anaerobic Liquid Gas-
ket

For metal-to-metal flange 
sealing.
Can fill a 0.38 mm (0.015 
inch) gap and provide in-
stant sealing for most pow-
ertrain applications.

999MP-AM001P

99998-50503

Permatex 51813 and 
51817

3

High Performance 
Thread Sealant

Provides instant sealing on 
any threaded straight or 
parallel threaded fitting. 
(Thread sealant only, no 
locking ability.)
• Do not use on plastic.

999MP-AM002P

999MP-AM002P

Permatex 56521

4

Silicone RTV

Gasket Maker

999MP-AM003P
(Ultra Grey)

99998-50506
(Ultra Grey)

Permatex Ultra Grey 
82194;
Three Bond 
1207,1215, 1216, 
1217F, 1217G and 
1217H
Nissan RTV Part No. 
999MP-A7007

Gasket Maker for Maxima/
Quest 5-speed automatic 
transmission
(RE5F22A)

Three Bond 1281B 
or exact equivalent in 
its quality

5

High Temperature, 
High Strength Thread 
Locking Sealant (Red)

Threadlocker

999MP-AM004P

999MP-AM004P

Permatex 27200;
Three Bond 1360, 
1360N, 1305 N&P, 
1307N, 1335, 
1335B, 1363B, 
1377C, 1386B, D&E 
and 1388
Loctite 648

6

Medium Strength 
Thread Locking Seal-
ant (Blue)

Threadlocker (service tool 
removable)

999MP-AM005P

999MP-AM005P

Permatex 24200, 
24206, 24240, 
24283 and 09178;
Three Bond 1322, 
1322N, 1324 D&N, 
1333D, 1361C, 
1364D, 1370C and 
1374

PRECAUTIONS

GI-23

< PRECAUTION >

C

D

E

F

G

H

I

J

K

L

M

B

GI

N

O

P

PRECAUTION

PRECAUTIONS

Description

INFOID:0000000012196777

Observe the following precautions to ensure safe and proper servicing. These precautions are not

described in each individual section.

Precaution for Supplemental Restraint System (SRS) "AIR BAG" and "SEAT BELT 
PRE-TENSIONER"

INFOID:0000000012196778

The Supplemental Restraint System such as “AIR BAG” and “SEAT BELT PRE-TENSIONER”, used along

with a front seat belt, helps to reduce the risk or severity of injury to the driver and front passenger for certain

types of collision. This system includes seat belt switch inputs and dual stage front air bag modules. The SRS

system uses the seat belt switches to determine the front air bag deployment, and may only deploy one front

air bag, depending on the severity of a collision and whether the front occupants are belted or unbelted.

Information necessary to service the system safely is included in the “SRS AIR BAG” and “SEAT BELT” of this

Service Manual.

WARNING:

Always observe the following items for preventing accidental activation.

• To avoid rendering the SRS inoperative, which could increase the risk of personal injury or death in

the event of a collision that would result in air bag inflation, it is recommended that all maintenance

and repair be performed by an authorized NISSAN/INFINITI dealer.

• Improper repair, including incorrect removal and installation of the SRS, can lead to personal injury

caused by unintentional activation of the system. For removal of Spiral Cable and Air Bag Module,

see “SRS AIR BAG”.

• Never use electrical test equipment on any circuit related to the SRS unless instructed to in this Ser-

vice Manual. SRS wiring harnesses can be identified by yellow and/or orange harnesses or harness

connectors.

PRECAUTIONS WHEN USING POWER TOOLS (AIR OR ELECTRIC) AND HAMMERS

WARNING:

Always observe the following items for preventing accidental activation.

• When working near the Air Bag Diagnosis Sensor Unit or other Air Bag System sensors with the

ignition ON or engine running, never use air or electric power tools or strike near the sensor(s) with

a hammer. Heavy vibration could activate the sensor(s) and deploy the air bag(s), possibly causing

serious injury.

• When using air or electric power tools or hammers, always switch the ignition OFF, disconnect the

battery or batteries, and wait at least 3 minutes before performing any service.

Precaution for Procedure without Cowl Top Cover

INFOID:0000000012196779

When performing the procedure after removing cowl top cover, cover

the lower end of windshield with urethane, etc to prevent damage to

windshield.

Precautions For Xenon Headlamp Service

INFOID:0000000012196780

WARNING:

Comply with the following warnings to prevent any serious accident.

PIIB3706J

GI-24

< PRECAUTION >

PRECAUTIONS

• Disconnect the battery cable (negative terminal) or the power supply fuse before installing, remov-

ing, or touching the xenon headlamp (bulb included). The xenon headlamp contains high-voltage

generated parts.

• Never work with wet hands.

• Check the xenon headlamp ON-OFF status after assembling it to the vehicle. Never turn the xenon

headlamp ON in other conditions. Connect the power supply to the vehicle-side connector.

(Turning it ON outside the lamp case may cause fire or visual impairments.)

• Never touch the bulb glass immediately after turning it OFF. It is extremely hot. 

CAUTION:

Comply with the following cautions to prevent any error and malfunction.

• Install the xenon bulb securely. (Insufficient bulb socket installation may melt the bulb, the connec-

tor, the housing, etc. by high-voltage leakage or corona discharge.)

• Never perform HID circuit inspection with a tester.

• Never touch the xenon bulb glass with hands. Never put oil and grease on it.

• Dispose of the used xenon bulb after packing it in thick vinyl without breaking it. 

• Never wipe out dirt and contamination with organic solvent (thinner, gasoline, etc.).

Precautions for Removing Battery Terminal

INFOID:0000000012816368

When disconnecting the battery terminal, pay attention to the following.

• Always use a 12V battery as power source.

• Never disconnect battery terminal while engine is running.

• When removing the 12V battery terminal, turn OFF the ignition

switch and wait at least 30 seconds.

• For vehicles with the engine listed below, remove the battery termi-

nal after a lapse of the specified time:

NOTE:

ECU may be active for several tens of seconds after the ignition switch is turned OFF. If the battery terminal

is removed before ECU stops, then a DTC detection error or ECU data corruption may occur.

• After high-load driving, if the vehicle is equipped with the V9X engine, turn the ignition switch OFF and wait

for at least 15 minutes to remove the battery terminal.

NOTE:

• Turbocharger cooling pump may operate in a few minutes after the ignition switch is turned OFF.

• Example of high-load driving

- Driving for 30 minutes or more at 140 km/h (86 MPH) or more.

- Driving for 30 minutes or more on a steep slope.

• For vehicles with the 2-batteries, be sure to connect the main battery and the sub battery before turning ON

the ignition switch.

NOTE:

If the ignition switch is turned ON with any one of the terminals of main battery and sub battery discon-

nected, then DTC may be detected.

• After installing the 12V battery, always check "Self Diagnosis Result" of all ECUs and erase DTC.

NOTE:

The removal of 12V battery may cause a DTC detection error.

D4D engine

: 20 minutes

YS23DDT

: 4 minutes

HRA2DDT

: 12 minutes

YS23DDTT

: 4 minutes

K9K engine

: 4 minutes

ZD30DDTi

: 60 seconds

M9R engine

: 4 minutes

ZD30DDTT

: 60 seconds

R9M engine

: 4 minutes

V9X engine

: 4 minutes

YD25DDTi

: 2 minutes

SEF289H


Content   ..  811  812  813  814   ..