Nissan Juke F15. Manual - part 1114


  Index      Nissan     Nissan Juke F15 (2015 year) - Service and Repair Manual


Search            


Content   ..  1112  1113  1114  1115   ..


Nissan Juke F15. Manual - part 1114


FRONT SEAT

SE-21

< REMOVAL AND INSTALLATION >

C

D

E

F

G

H

I

K

L

M

A

B

SE

N

O

P

*: passenger seat only

Removal and Installation

INFOID:0000000012196880

REMOVAL

CAUTION:

Before servicing, disconnect the battery cable from negative terminal or remove the fuse.
1. Remove headrest.
2. Set the seatback vertically.
3. Slide seat to the frontmost position.
4. Remove rear outer mounting TORX bolt.
5. Remove rear inner mounting TORX bolt.
6. Slide seat to the rearmost position.
7. Remove front outer mounting TORX bolt.
8. Remove front inner mounting TORX bolt.
9. Remove seat cushion lower harness connectors and harness fixing clamps.

CAUTION:

Before performing removal operation, check the installation position of harness connectors and

harness fixing clamps.

10. Remove seat from the vehicle.

CAUTION:

When removing and installing, use shop cloths to protect parts from damage.

INSTALLATION

Note the following items, and install in the reverse order of removal.

CAUTION:

• When removing and installing, use shop cloths to protect parts from damage.

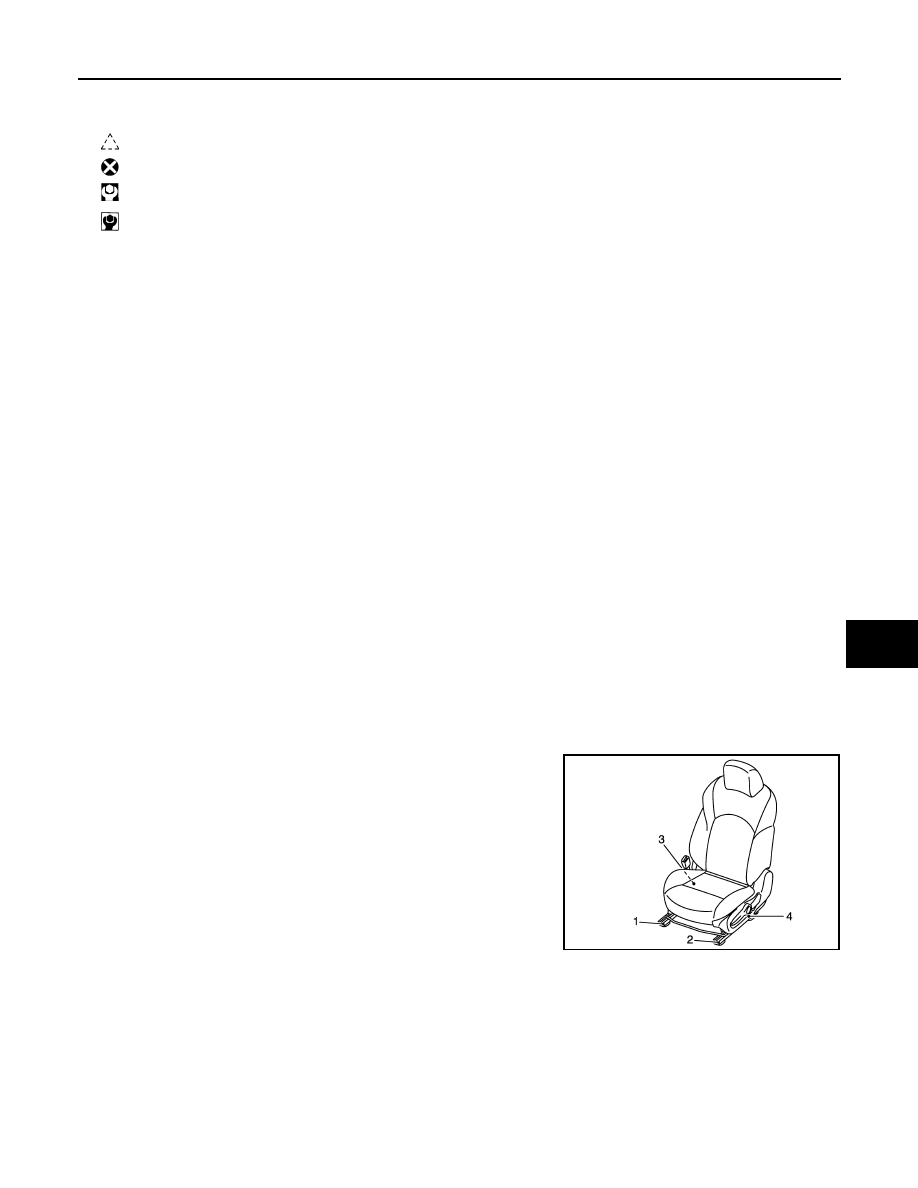
• When installing, tighten mounting TORX bolts according to

the numerical order (1, 2, 3, and 4 as shown in the figure),

starting from front inner mounting TORX bolt.

• Always fix the harness fixing clamp in position.

SEATBACK
SEATBACK : Disassembly and Assembly

INFOID:0000000012196881

DISASSEMBLY

Without RECARO seat model

CAUTION:

10. Lifter lever cap

11. Occupant sensor harness

*

12. Reclining knob

13. Frame carpet

: Pawl

: Always replace after every disassembly.

: N·m (kg-m, ft-lb)

: N·m (kg-m, in-lb)

JMJIA4591ZZ

SE-22

< REMOVAL AND INSTALLATION >

FRONT SEAT

For models with heater seat, always replace heater seat as a seatback assembly without disassem-

bling trim and pad.
1. Remove seatback retainer installed in the lower portion of seat cushion.
2. Remove harness installed in the lower portion of seat cushion.

1. Disconnect seatback heater unit harness connector

(A).(with heater seat only.)

2. Remove seatback heater unit harness connector fixing clips

and harness fixing clamp (B). (with heater seat only)

3. Disconnect side air bag module harness connector (C).

4. Remove side air bag module harness connector fixing clips

and harness fixing clamp (D).

3. Open seatback fastener (A) and remove seatback retainer (B).

4. Remove side air bag module harness fixing clamps from seat frame & adjuster assembly.
5. Use pincers, etc., to press up pawls as shown by the arrows in

the figure, and remove headrest holder from seatback.

CAUTION:

Before installing headrest holder check its orientation.

(front/rear and right/left)

6. Remove side air bag module mounting nuts.
7. Remove seatback trim and seatback pad from seat frame & adjuster assembly.

CAUTION:

Never subject side air bag module to impact by dropping or hitting.

8. Remove side air bag module from seatback pad.
9. Separate the seatback trim and seatback pad. (without heater seat only)

Remove hog rings, and separate the seatback trim and seatback pad.

CAUTION:

Before performing separating operation, check the installation position of hog rings.

10. Remove seatback silencer from seat frame & adjuster assembly.

With RECARO seat model

: Vehicle front

JMJIA4602ZZ

JMJIA4363ZZ

PIIB4084J

FRONT SEAT

SE-23

< REMOVAL AND INSTALLATION >

C

D

E

F

G

H

I

K

L

M

A

B

SE

N

O

P

1. Cut harness clip (A) and disengage side air bag harness connector (B), harness clip (C).

2. Remove lifter lever.
a. Disengage lifter lever cap fixing pawls, and then remove lifter

lever cap.

b. Remove lifter lever fixing screws (A), and then remove lifter

lever.

3. Remove seat cushion finisher fixing screws (A), and then

remove seat cushion finisher.

Passenger side

Driver side

: Clip

JMJIB0213ZZ

: Pawl

JMJIB0110ZZ

JMJIB0111ZZ

JMJIB0112ZZ

SE-24

< REMOVAL AND INSTALLATION >

FRONT SEAT

4. Remove reclining device cover fixing screw (A), and then

remove reclining device cover while disengage reclining device

cover fixing pawls.

5. Remove seatback assembly fixing screws (A), and then remove

seatback assembly.

NOTE:

• Disengage reclining knob fixing pawl, and then remove reclining

knob.

ASSEMBLY

Note the following items, and then assemble in the reverse order of disassembly.

Without RECARO seat model

CAUTION:

• For hog ring that is removed or crimped unsuccessfully, fix it by using a new hog ring. (Never reuse

hog ring.)

• Always install the hog rings in position.

With RECARO seat model

CAUTION:

• When installing seatback assembly, temporary tighten all

seatback assembly fixing bolts, and then tighten fixing bolts

according to the numerical order 1

4 indicated by as shown

in the figure, starting from front right fixing bolt.

: Pawl

JMJIB0113ZZ

JMJIB0114ZZ

: Pawl

JMJIB0115ZZ

JMJIB0116ZZ


Content   ..  1112  1113  1114  1115   ..