Mitsubishi Outlander Sport (2022 year). Manual in english - page 6
Outside rearview mirrors
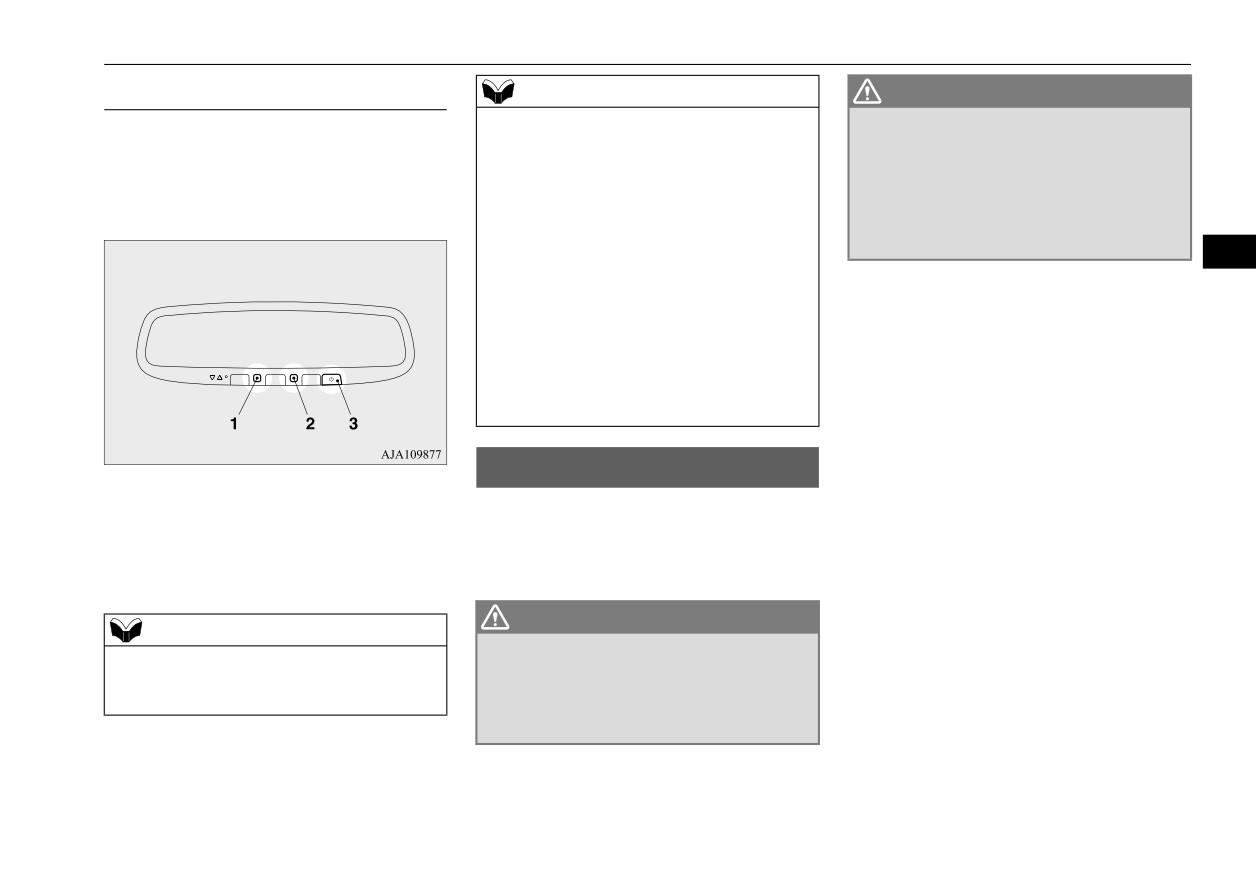
Type 3
NOTE
WARNING
z
If you want to stop automatic mode, press
z
Your passenger’s side mirror is convex.
When the headlights of the vehicles behind
the switch (3) and the indicator will go off.
The objects you see in the mirror will look
you are very bright, the reflection factor of
To return to automatic mode, press the
smaller and farther away than they
the rearview mirror is automatically changed
switch again or perform the following opera-
appear in a regular flat mirror.
to reduce the glare.
tion.
Do not use this mirror to estimate the dis-
[Except for vehicles equipped with the Free-
tance of vehicles following you when
hand Advanced Security Transmitter
changing lanes.
5
(F.A.S.T.-key)]
Turn the ignition switch to the “ON” position
after turning to “OFF” or “ACC” position.
[For vehicles equipped with the Free-hand
Advanced Security Transmitter
(F.A.S.T.-
key)]
Put the operation mode in ON after putting
the operation mode in OFF.
Outside rearview mirrors
Normally, use the automatic mode. When the
N00512200206
ignition switch is turned to the “ON” position
Adjust the outside rearview mirrors only after
or the operation mode is put in ON, the green
making any seat adjustments so as to have a
indicator
(1) illuminates and the reflection
clear view to the rear of the vehicle.
factor of the mirror is automatically changed.
WARNING
NOTE
z Do not attempt to adjust the outside rear-
z Do not hang items on, or spray glass cleaner
view mirrors while driving. This can be
on the sensors
(2), as reduced sensitivity
dangerous.
could result.
Be sure to adjust the mirrors before driv-
ing.
Features and controls
5-49

Outside rearview mirrors
For vehicles equipped with the mirror
To adjust the mirror position
NOTE
retractor switch
N00549101170
z After adjusting, return the lever to the “•”
The outside rearview mirrors can be adjusted
(OFF) position (C).
when the ignition switch or the operation
Retracting and extending the mir-
mode is in ON or ACC.
rors using the mirror retractor
Move the lever (A) to the same side as the
Retracting and extending the
switch
mirror you wish to adjust.
mirrors
5
N00549201272
With the operation mode in ON or ACC, push
Except for vehicles equipped with the mirror retractor
The outside mirror can be retracted towards
the mirror retractor switch to retract the mir-
switch
the side window to prevent damage when
rors. Push it again to extend the mirrors to
parking in tight locations.
their original positions.
Except for vehicles equipped with the
After placing the operation mode in OFF, it is
mirror retractor switch
possible to retract and extend the mirrors
using the mirror retractor switch for approxi-
Vehicles equipped with the mirror retractor switch
Push the mirror towards the back of the vehi-
mately 30 seconds.
cle with your hand to retract it in.
When extending the mirror, pull it out
towards the front of the vehicle until it clicks
to lock in place.
L- Left outside mirror adjustment
R- Right outside mirror adjustment
Press the switch (B) to adjust the mirror posi-
tion.
1-Up
2-Down
3-Right
4-Left
5-50
Features and controls
Outside rearview mirrors
CAUTION
Retracting and extending the mir-
NOTE
z
It is possible to retract and extend the mirrors
rors without using the mirror
The outside rearview mirrors can be
by hand. After retracting a mirror using the
retracted or extended by the following opera-
retractor switch (automatic exten-
mirror retractor switch, however, you should
tions, even if changing to the any of above.
sion function)
extend it by using the switch again, not by
After pressing the LOCK button on the key
hand. If you extended the mirror by hand
to lock the doors and liftgate, if the LOCK
after retracting it using the switch, it would
On vehicles equipped with the F.A.S.T.-key,
button is pressed again twice in a row within
not properly lock in position. As a result, the
the mirrors automatically retract or extend
approximately 30 seconds, the outside rear-
5
mirror could move because of the wind or
view mirrors will retract.
when the doors are locked or unlocked using
vibration while you are driving, and this may
After pressing the UNLOCK button on the
the remote control transmitter buttons or the
impair the driver’s rearward visibility.
key to unlock the doors and liftgate, if the
F.A.S.T-key operation.
UNLOCK button is pressed again twice in a
Refer to “Keyless entry system” on page 5-27
row within approximately 30 seconds, the
or
“To operate using the F.A.S.T.-key” on
outside rearview mirrors will extend again.
NOTE
page 5-16.
z
Be careful not to get your hands trapped
while a mirror is moving.
Door mirror heater
z
If you move a mirror by hand or it moves
NOTE
N00549301345
after hitting a person or object, you may not
z
Functions can be modified as stated below.
When the rear window defogger switch is
be able to return it to its original position
Please consult an authorized Mitsubishi
using the mirror retractor switch. If this hap-
Motors dealer.
pressed with the engine running, the outside
pens, push the mirror retractor switch to
• Automatically extend when the operation
rearview mirrors are defogged or defrosted.
place the mirror in its retracted position and
mode is put in ON with the driver’s door
Current will flow through the heater element
then push the switch again to return the mir-
closed, and automatically retract when the
inside the mirrors, thus clearing away frost or
ror to its original position.
operation mode is put in OFF or ACC with
condensation.
z
When freezing has occurred and mirrors fail
the driver’s door opened.
The indicator light (A) will illuminate while
to operate as intended, please refrain from
• Automatically extend when the vehicle
the defogger is on.
repeated pushing of the retractor switch as
speed reaches approximately
19 mph
The heater will be turned off automatically in
this action can result in burn-out of the mir-
(30 km/h).
approximately 20 minutes.
ror motor circuits.
• Deactivate the automatic extension func-
tion.
Features and controls
5-51

Ignition switch
[Except for vehicles equipped with the
START
Free-hand Advanced Security Transmit-
ter (F.A.S.T.-key)]
Engages the starter. Release the key when the
engine starts. It will automatically back to the
“ON” position.
NOTE
5
z Your vehicle is equipped with an electronic
immobilizer. To start the engine, the ID code
which the transponder inside the key sends
must match the one registered to the immobi-
lizer computer. (Refer to “Electronic immo-
Ignition switch
bilizer” on page 5-4.)
N00512401771
[For vehicles equipped with the Free-hand
Advanced Security Transmitter (F.A.S.T.-
OFF
ACC power auto-cutout func-
key)]
tion
For information on operations for vehicles
The engine is off. The key can be inserted and
N00539601114
equipped with the Free-hand Advanced Secu-
removed only when the switch is in this posi-
After about 30 minutes has elapsed with the
rity Transmitter
(F.A.S.T.-key), refer to
tion.
ignition switch in the “ACC” position, the
“Free-hand Advanced Security Transmitter
function automatically cuts out the power for
(F.A.S.T.-key): Engine switch” on page 5-19.
the audio system and other electric devices
ACC
that can be operated with that position.
When the ignition switch is turned from the
Allows operation of electrical accessories
“ACC” position, the power is supplied again
with the engine off.
to those devices.
ON
NOTE
z It is possible to modify functions as follows:
The engine runs and all accessories can be
used.
5-52
Features and controls

Starting the engine
NOTE
CAUTION
Tips for starting
• The time until the power cuts out can be
z
If the engine is stopped while driving, the
changed to about 60 minutes.
brake servomechanism will cease to function
z
Do not operate the starter motor continu-
• The ACC power auto-cutout function can
and braking efficiency will deteriorate. Also,
ously for longer than 15 seconds as this
be deactivated.
the power steering system will not function
could run the battery down or damage the
and it will require greater manual effort to
starter motor. If the engine does not start,
For details, we recommend you to consult an
operate the steering.
turn the ignition switch back to the “OFF”
authorized Mitsubishi Motors dealer.
z
Do not leave the key in the “ON” position for
position, wait a few seconds, and then try
5
a long time when the engine is not running,
again. Trying repeatedly with the engine
doing so will cause the battery to be dis-
or starter motor still turning will damage
To remove the key
charged.
the starter mechanism.
N00550901266
z
Do not turn the key to the “START” position
z
If the engine will not start because the bat-
1. Set the selector lever to the “P” (PARK)
when the engine is running, doing so could
tery is weak or discharged, refer to
position.
damage the starter motor.
“Jump-starting the engine” (on page 8-2)
2. Turn the key to the “OFF” position and
for instructions.
remove it.
z
A longer warm up period will only con-
Starting the engine
sume extra fuel. The engine is warmed up
N00512601904
enough for driving when the bar graph of
[For vehicles equipped with the Free-hand
engine coolant temperature display starts
Advanced Security Transmitter (F.A.S.T.-
to move. Refer to
“Interrupt display
key)]
screen (With ignition switch or operation
For information on operation for vehicles
mode in ON)” on page 5-116.
equipped with the Free-hand Advanced Secu-
rity Transmitter
(F.A.S.T.-key), refer to
WARNING
“Free-hand Advanced Security Transmitter
z Never run the engine in a closed or poorly
(F.A.S.T.-key): Starting and stopping the
ventilated area any longer than is needed
engine” on page 5-22.
to move your vehicle out of the area. Car-
bon monoxide gas, which is odorless and
[Except for vehicles equipped with the
extremely poisonous, could build up and
Free-hand Advanced Security Transmit-
cause serious injury or death.
ter (F.A.S.T.-key)]
Features and controls
5-53
Starting the engine
2. While depressing the brake pedal, press
CAUTION
NOTE
the accelerator pedal halfway and hold it
z Do not push-start the vehicle.
z The starter will not operate unless the selec-
there, then crank the engine. Release the
z Do not run the engine at high rpms or drive
tor lever is in the “P” (PARK) or “N” (NEU-
accelerator pedal, immediately after the
at high speeds until the engine has had a
TRAL) position.
engine starts.
chance to warm up.
For safety reasons, start the engine in the “P”
3. If the engine still will not start, the engine
z Release the ignition switch as soon as the
(PARK) position so that the wheels are
locked.
could be flooded with too much gasoline.
engine starts. Otherwise, the starter motor
While depressing the brake pedal, push
will be damaged.
5
the accelerator pedal all the way down
6. Turn the ignition switch to the “ON” posi-
and hold it there, then crank the engine for
tion and make certain that all warning
5 to 6 seconds. Return the ignition switch
Starting the engine
lights are functioning properly before
to the
“OFF” position and release the
starting the engine.
accelerator pedal. Wait a few seconds, and
This model is equipped with an electronically
7. Turn the ignition switch to the “START”
then crank the engine again for 5 to 6 sec-
controlled fuel injection system. This is a sys-
position without pressing the accelerator
onds while depressing the brake pedal,
tem that automatically controls fuel injection.
pedal. Release the key when the engine
but do not push the accelerator pedal.
There is usually no need to depress the accel-
starts.
Release the ignition switch if the engine
erator pedal when starting the engine.
starts. If the engine fails to start, repeat
The starter should not be run for more than
NOTE
these procedures. If the engine still will
15 seconds at a time.
z Minor noises may be heard on engine start-
not start, contact your local Mitsubishi
To prevent battery drain, wait a few seconds
up. These will disappear as the engine warms
Motors dealer or a repair facility of your
between attempts to restart the engine.
up.
choice for assistance.
1. Make sure all occupants are properly
seated with seat belts fastened.
Startability of CVT vehicle with
When the engine is hard to start
2. Insert the ignition key.
ambient temperature of -22 °F
3. Make sure the parking brake is applied.
After several attempts, you may experience
(-30 °C) or lower
4. Press and hold the brake pedal down
that the engine still does not start.
firmly with your right foot.
When the ambient temperature is
-22
°F
5. Make sure the selector lever is in the “P”
1. Make sure that all electric devices, such
(-30 °C) or lower, it may not be possible to
(PARK) position.
as lights, air conditioning blower and rear
start from a standstill even with the selector
window defogger, are turned off.
5-54
Features and controls

Continuously variable transmission (CVT)
lever in the
“D”
(DRIVE) or
“R”
The CVT selects an optimum ratio automati-
DRIVING DOWNHILL
(REVERSE) position.
cally when the selector lever is in the “D”
This occurs because the transaxle has not
(DRIVE) position, depending on the speed of
warmed up sufficiently; it does not indicate a
According to the conditions, the transmission
the vehicle and the position of the accelerator
problem. If this occurs, place the selector
will automatically shift to a lower gear ratio
pedal.
lever in the “P” (PARK) position and let the
to achieve stronger engine braking. This may
engine idle for at least 10 minutes.
help reduce your need to use the service
The transaxle will warm up, and you will be
brake.
5
able to start normally.
Do not leave the vehicle during warm-up
Selector lever operation
operation.
N00560301117
As an additional safety precaution, models
Continuously variable
equipped with a continuously variable trans-
mission have a shift-lock device that holds
transmission (CVT)
the selector lever in the “P” (PARK) position.
N00560201116
To move the selector lever from the
“P”
The CVT will automatically and continuously
(PARK) position to another position, follow
change its gear ratio depending on road and
the steps below.
driving conditions. This helps achieve
smooth driving and excellent fuel efficiency.
1. Press and hold the brake pedal down.
If your vehicle is equipped with the spor-
2. Move the selector lever to the desired
tronic steering wheel paddle shifter, you can
position.
manually shift the transmission up and down.
Refer to “Sports mode” on page 5-59.
NOTE
z The selector lever cannot be moved from “P”
(PARK) to another position if the ignition
DRIVING UPHILL
switch is set to the “OFF” or “ACC” posi-
tion, or if the key has been removed, or the
The transmission prevents unnecessary
operation mode is put in OFF or ACC, or if
upshifts even when the accelerator pedal is
the brake pedal is not pressed and held down.
released and ensures smooth driving.
Features and controls
5-55
Continuously variable transmission (CVT)
Except for vehicles equipped with sportronic
WARNING
When the selector lever cannot be
steering wheel paddle shifter
z
Always press the brake pedal when shift-
shifted from the “P” (PARK) posi-
ing the selector lever into a selector posi-
tion
tion from the “N” (NEUTRAL) position.
N00563301091
When beginning to drive, do not shift the
selector lever from the “N” (NEUTRAL)
When the selector lever cannot be shifted
position while pressing the accelerator
from the
“P” (PARK) position to another
pedal. This will cause the vehicle to
position while the brake pedal is pressed and
5
“jump” forward or backward.
held down with the ignition switch or the
For vehicles equipped with sportronic steering
operation mode in ON, the battery may be flat
wheel paddle shifter
or the shift-lock mechanism may be malfunc-
NOTE
tioning.
z
To prevent mistakes in operating the lever,
Immediately have your vehicle checked by an
make sure you stop briefly at each position.
authorized Mitsubishi Motors dealer or a
After operating, check the position in the
repair facility of your choice.
multi-information display.
If you need to move the vehicle, shift the
z
If the brake pedal is not depressed and held,
selector lever as follows.
the shift-lock device activates to prevent the
selector lever from being moved from the
1. Make sure the parking brake is fully
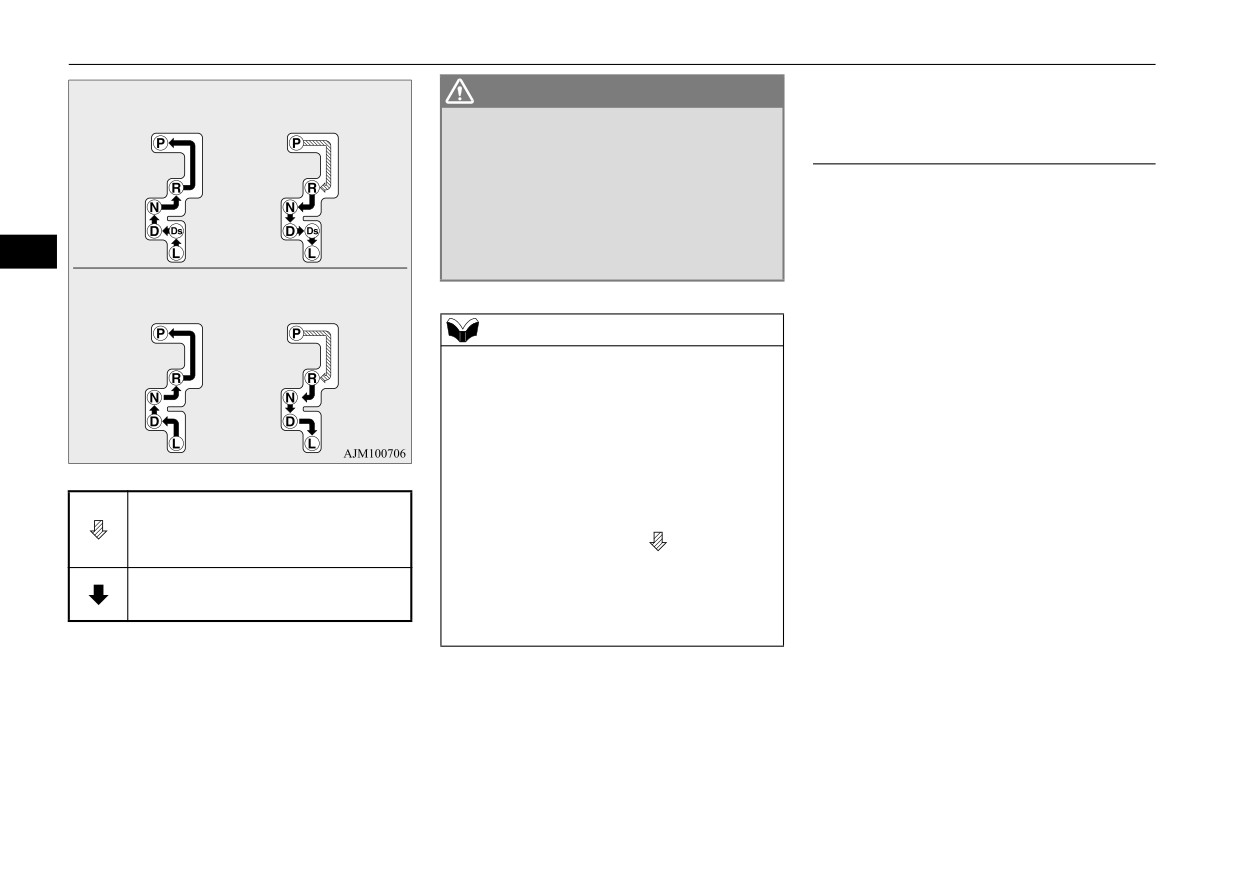
Set the selector lever in the gate to
“P” (PARK) position.
applied.
operate while the brake pedal is
2. Stop the engine if it is running.
z For a shift indicated by
in the illustra-
depressed.
3. Insert a screwdriver with a cloth over its
tion, depress the brake pedal before moving
Set the selector lever in the gate to
tip into the notch (A) of the cover. Pry
the selector lever. If you attempt to move the
operate.
gently as shown to remove the cover.
selector lever before depressing the brake
pedal, the selector lever may be immovable.
5-56
Features and controls

Continuously variable transmission (CVT)
If the ambient temperature is low, the selector
Selector lever position display
lever position display on the multi-informa-
N00560401118
tion display may blink when the selector
When the ignition switch is turned to the
lever is placed in the “D” (DRIVE), “Ds”
“ON” position or the operation mode is put in
(DOWNSHIFT & SPORTY DRIVING), “L”
ON, the position of the selector lever is indi-
(LOW) or “R” (REVERSE) position immedi-
cated in the multi-information display.
ately after the engine has been started. This
indicates that the transmission requires warm-
5
ing up. While the display is blinking, the
vehicle will not move, because the transmis-
sion keeps disengaging until the warm up is
completed even if the selector lever is placed
4. Depress the brake pedal with the right
in the “D”, “Ds”, “L” or “R” position.
foot.
5. Insert a screwdriver in the shift-lock
When the selector lever position display is
release hole (B). Shift the selector lever to
blinking, perform the following procedure:
the
“N”
(NEUTRAL) position
while
pressing the screwdriver down.
1. Depress the brake pedal with your right
foot and place the selector lever in the
“N”
(NEUTRAL) position for several
seconds.
When the selector lever position
2. Keep depressing the brake pedal and then
display blinks
place the selector lever in the
“D”
N00582900057
(DRIVE),
“Ds”
(DOWNSHIFT &
SPORTY DRIVING), “L” (LOW) or “R”
WARNING
(REVERSE) position. If the selector lever
z To avoid unintended vehicle movement,
position display stops blinking, the warm
keep brake pedal applied with your right
up is completed and the transmission will
foot and do not depress the accelerator
function normally.
pedal, while the selector lever position dis-
3. If the display is still blinking, repeat steps
play is blinking.
1 and 2 above.
Features and controls
5-57
Continuously variable transmission (CVT)
NOTE
CAUTION
“R” REVERSE
z While the selector lever position display is
• Stop your vehicle in a safe place, put the
blinking, a buzzer will sound intermittently.
selector lever in the “P” (PARK) position,
Move the lever to this position only after the
and open the engine hood with the engine
vehicle has come to a complete stop.
running to allow the engine to cool down.
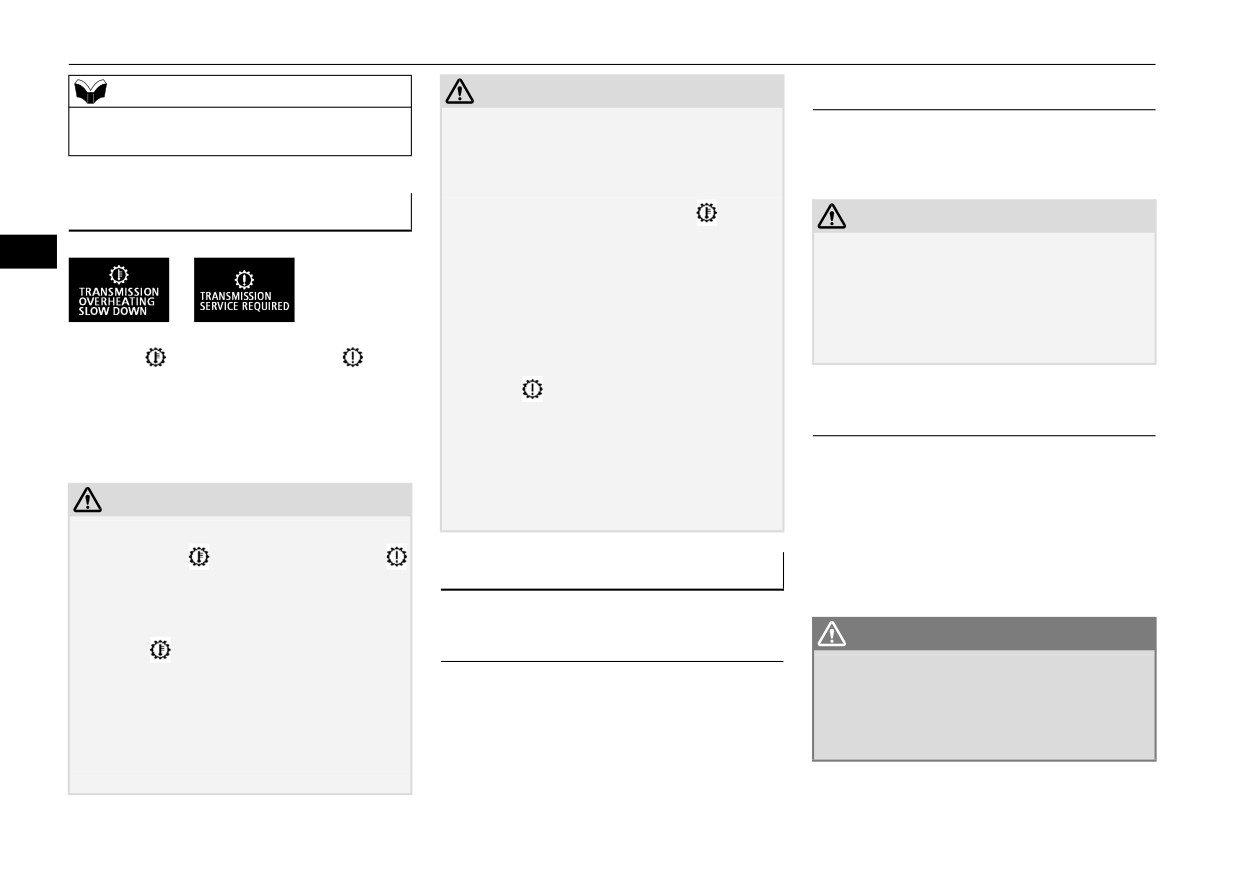
Warning display
After a while, confirm that the
warning
CAUTION
N00560501177
display is no longer showing. It is safe to
z Never shift into the
“P” (PARK) or “R”
5
continue driving if the display is no longer
(REVERSE) position while the vehicle is in
showing. If the warning display remains or
or
motion. If the lever is shifted into the “P”
flashes frequently, immediately have your
(PARK) or “R” (REVERSE) position while
vehicle inspected by an authorized
the vehicle is in motion, the transmission
Mitsubishi Motors dealer or a repair facility
may be damaged.
When the warning display or the warn-
of your choice.
ing display appears on the information screen
[When warning display is showing]
in the multi-information display while you
It may be that there is something unusual
“N” NEUTRAL
are driving, there could be a malfunction in
happening in the CVT, causing a safety
the CVT.
device to activate. Immediately have your
At this position, the transmission is disen-
vehicle inspected by an authorized
Mitsubishi Motors dealer or a repair facility
gaged. It is the same as the neutral position on
CAUTION
of your choice.
a manual transaxle and should be used when
z
If a malfunction occurs in the CVT while
the vehicle is not moving for an extended
driving, the
warning display or the
length of time during driving, such as in a
Selector lever positions
warning display will appear on the informa-
traffic jam.
tion screen in the multi-information display.
N00560601136
In this case, follow these procedures:
WARNING
“P” PARK
[When warning display is showing]
z Never move the selector lever to the “N”
The CVT fluid is overheating. The engine
(NEUTRAL) position while driving since
control may activate to lower the CVT fluid
This position locks the transmission to pre-
you could accidentally slip it into the “P”
temperature, causing the engine revolutions
vent the vehicle from moving. The engine can
(PARK) or
“R”
(REVERSE) position,
and vehicle speed to decrease, In this case,
be started from the “P” (PARK) position.
damaging the transmission.
take one of the following procedures.
• Slow down your vehicle.
5-58
Features and controls

Continuously variable transmission (CVT)
WARNING
“Ds” DOWNSHIFT & SPORTY-
Sports mode (for vehicles
z To prevent the vehicle from rolling when
DRIVING (except for vehicles
equipped with sportronic steer-
stopped on a slope, the engine should be
equipped with sportronic steering
ing wheel paddle shifter)
started in the “P” (PARK) position, not in
wheel paddle shifter)
N00560701111
“N” (NEUTRAL) position.
z To prevent rolling, always keep your foot
While the vehicle is stopped or being driven
on the brake pedal when the vehicle is in
Use when engine braking is needed, or for
with the selector lever in the “D” (DRIVE),
“N” (NEUTRAL) position, or when shift-
high-power sport drive.
sports mode can be selected by pulling one of
5
ing into or out of “N” (NEUTRAL) posi-
the sportronic steering wheel paddle shifter
tion.
towards you.
“L” LOW
In sports mode, rapid shifting is possible sim-
“D” DRIVE
ply by operating the sportronic steering wheel
This position is for driving up very steep hills
paddle shifter.
and for engine braking at low speeds when
This position is used for most city and high-
Unlike the manual transaxle, sports mode
driving down steep hills.
way driving. The transmission will automati-
allows shifting with the accelerator pedal
cally and continuously change its gear ratio
depressed.
WARNING
depending on road and driving conditions.
z This position can be used for maximum
engine braking.
CAUTION
Be very careful not to shift into
“L”
SHIFT DOWN
SHIFT UP
z To prevent transmission damage, never shift
(LOW) suddenly.
into the “D” (DRIVE) position from the “R”
Sudden engine braking may cause the
(REVERSE) position while the vehicle is in
tires to skid.
motion.
Select this position according to the road
conditions and vehicle speed.
Features and controls
5-59
Continuously variable transmission (CVT)
+ (SHIFT UP)
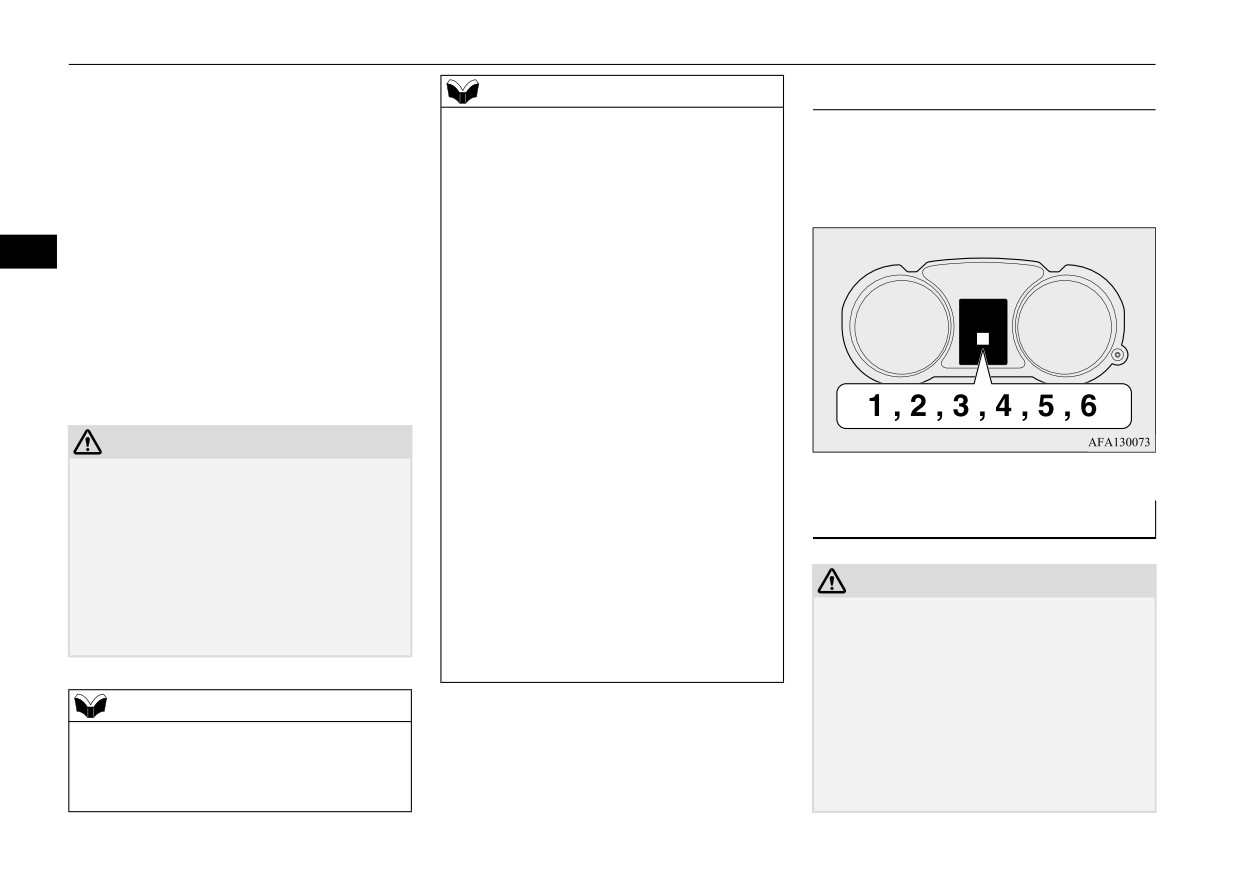
NOTE
Sports mode display
Transmission shifts up once by each opera-
z
Shift ranges can only be selected in a for-
N00560901126
tion.
ward direction from 1st to 6th. To reverse or
In sports mode, the currently selected shift
park the vehicle, move the selector lever to
- (SHIFT DOWN)
range is displayed on the information screen
the “R” or “P” position.
Transmission shifts down once by each oper-
in the multi-information display.
z
To maintain good running performance, the
ation.
transmission may refuse to perform an
upshift when the sportronic steering wheel
5
To return to “D” (DRIVE) operation, pull the
paddle shifter on the “+ (SHIFT UP)” side is
sportronic steering wheel paddle shifter on
pulled at certain vehicle speeds. Also, to pre-
the + (SHIFT UP) side for longer than 2 sec-
vent over-revving of the engine, the trans-
onds.
mission may refuse to perform a downshift
When returning to “D” (DRIVE) operation,
when the sportronic steering wheel paddle
the selector lever position display will change
shifter on the “- (SHIFT DOWN)” side is
to the “D” (DRIVE) position.
pulled at certain vehicle speeds. When this
happens, a buzzer sounds to indicate that a
downshift is not going to take place.
CAUTION
z
In sports mode, downward shifts are made
z
In sports mode, the driver must execute
automatically when the vehicle slows down.
upward shifts in accordance with prevailing
When the vehicle stops, 1st position is auto-
road conditions, taking care to keep the
matically selected.
Operation of the CVT
engine speed below the red zone.
Also, the vehicle will automatically return to
N00560801112
z
Repeated continuous operation of the spor-
“D” (DRIVE) operation if the vehicle is
tronic steering wheel paddle shifter will con-
stopped.
CAUTION
tinuously switch shift position.
z
When the selector lever is in the “L” (LOW)
z Before selecting a position with the engine
z
Shift ranges may not change when the lateral
position, the sports mode is not selected even
running and the vehicle stationary, firmly
paddle shifters are operated at the same time.
if you operate the sportronic steering wheel
depress the brake pedal to prevent the vehi-
paddle shifter.
cle from creeping.
The vehicle will begin to move as soon as the
NOTE
CVT is engaged, especially when the engine
z
The upward shift may be made automatically
speed or idle speed is high, or with the air
in sports mode when the engine revolutions
conditioning operating.
rises and approach the tachometer’s red zone
Do not release the brake pedal until you are
(the red-colored part of the tachometer dial).
ready to drive away.
5-60
Features and controls
Continuously variable transmission (CVT)
CAUTION
Passing acceleration
CAUTION
z
Depress the brake pedal with the right foot at
z To avoid transmission overheating, never try
all times.
To gain extra acceleration in “D” (DRIVE)
to keep your vehicle stationary on a hill by
Using the left foot could cause driver move-
using the accelerator pedal. Always apply
position (when passing another vehicle) push
ment delay in case of an emergency.
the parking brake and/or service brake.
the accelerator to the floor. The CVT will
z
To prevent sudden acceleration, never run
z Do not rev the engine unnecessarily while
automatically downshift.
the engine at high rpms when shifting from
the vehicle is stationary. Unexpected acceler-
the “P” (PARK) or “N” (NEUTRAL).
ation may occur if the selector lever is in a
5
z
Operating the accelerator pedal while the
NOTE
position other than
“P”
(PARK) or
“N”
other foot is resting on the brake pedal will
z In sports mode, downshifts do not take place
(NEUTRAL).
affect braking efficiency and may cause pre-
when the accelerator is depressed all the way
mature wear of brake pads.
to the floor.
z
Use the selector lever in the correct shift
Parking
position in accordance with driving condi-
tions.
Waiting
To park the vehicle, first bring it to a com-
Never coast downhill backward in the driv-
plete stop, fully engage the parking brake,
ing shift position
{“D”
(DRIVE),
“Ds”
For short waiting periods, such as at traffic
and then move the selector lever to the “P”
(DOWN SHIFT & SPORTY DRVING), “L”
(LOW) position or sports mode} or coast
lights, the vehicle can be left in selector lever
(PARK) position.
forward in the “R” (REVERSE) position.
position and held stationary with the service
Engine stopping and increased brake pedal
brake.
When the CVT makes no speed
and steering effort could lead to an accident.
For longer waiting periods with the engine
change
z
Do not rev the engine with the brake pedal
running, place the selector lever in the “N”
pressed when the vehicle is stationary.
(NEUTRAL) position and apply the parking
This can damage the CVT.
brake, while holding the vehicle stationary
If the CVT does not shift while driving, or
Also, when you depress the accelerator pedal
with the service brake.
your vehicle does not pick up enough speed
while holding down the brake pedal with the
Prior to moving off after having stopped the
when starting on an uphill slope, it may be
selector lever in the “D” (DRIVE) position,
vehicle, make sure that the selector lever is in
that there is something unusual happening in
the engine revolutions may not rise as high
“D” (DRIVE) position or Sports mode posi-
the transmission, causing a safety device to
as when performing the same operation with
tion.
activate. Immediately have your vehicle
the selector lever in the “N” (NEUTRAL)
position.
checked at an authorized Mitsubishi Motors
dealer or a repair facility of your choice.
Features and controls
5-61
Electronically controlled 4WD system (if so equipped)
Drive mode
Function
NOTE
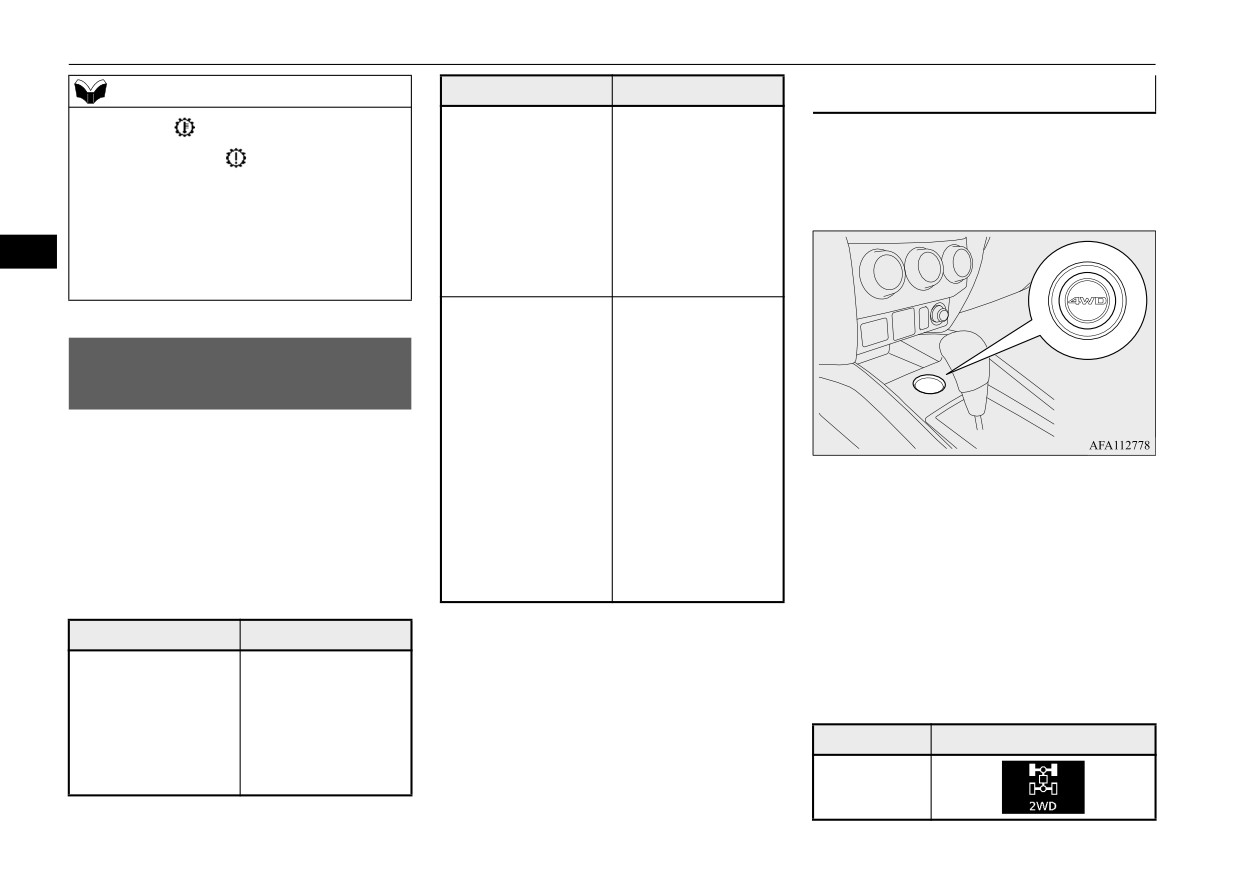
Drive mode-selector
The default mode.
z When the
warning display and “SLOW
This mode is for
The drive mode can be changed by pressing
DOWN” or the
warning display and
automatically con-
the drive mode-selector while the ignition
“SERVICE REQUIRED” appear on the
trolling the distribu-
switch or the operation mode is in ON.
information screen in the multi-information
4WD AUTO
tion of driving torque
display, there could be a malfunction in the
to all four wheels
CVT. Refer to “Continuously variable trans-
5
according to the
mission (CVT): Warning display” on page
driving conditions.
5-58.
This mode is for
driving in slippery
Electronically controlled
conditions such as on
snow-covered roads
4WD system (if so equipped)
or sand.
N00517201208
The large amount of
4WD LOCK
driving torque that is
The electronically controlled 4WD system is
applied to the rear
an all-wheel drive system that allows one of
tires enables getting
By pressing the drive mode-selector, the drive
three drive modes to be selected with a
out of slippery areas
mode can be changed in order of “2WD”,
switch, in accordance with the driving condi-
and powerful driv-
“4WD AUTO” and “4WD LOCK”.
tions.
ing is possible across
The drive mode is displayed as an interrupt
The following drive modes are available.
all ranges.
display on the information screen in the
multi-information display when the drive
Drive mode
Function
4-wheel drive operation requires special driv-
mode is changed.
ing skills.
This mode is for eco-
After a few seconds, the information screen
Carefully read the “4-wheel drive operation”
nomical driving on
will then return to its prior display.
section on page 5-64 and take care to drive
normal dry roads and
2WD
safely.
freeways.
Drive mode
Display
Driving in front-
wheel drive.
2WD
5-62
Features and controls

Electronically controlled 4WD system (if so equipped)
Normally the indicator illuminates when the
Drive mode
Display
CAUTION
ignition switch is turned to the “ON” position
z
If the selected drive mode indicator is blink-
or the operation mode is put in ON, and then
4WD AUTO
ing, the vehicle switches automatically to
the drive mode is displayed a few seconds
front-wheel drive in order to protect the
after the engine is started.
drive-system components, and drive mode
4WD LOCK
selection is no longer possible with the drive
Drive mode
mode-selector.
Drive
indicator
The warning display is also displayed in the
5
information screen in the multi-information
Mode
“4WD” indi-
“LOCK”
CAUTION
display.
z
Do not operate the drive mode-selector with
cator
indicator
Reduce speed, and if the indicator goes out
the front wheels spinning on a snowy road or
2WD
OFF
OFF
after driving a while, resume driving as
in similar conditions. The vehicle could
before.
lunge in an unexpected direction.
4WD AUTO
ON
OFF
z
Driving on dry, paved roads in
“4WD
4WD LOCK
ON
ON
LOCK” mode causes increased fuel con-
sumption, noise, vibration, and premature
tire wear.
z
Do not drive with the tires spinning in
z
If the warning display on the information
“2WD” mode.
screen in the multi-information display, a
Doing so could generate heat in the drive-
problem has occurred with the electronically
system components.
controlled 4WD system and the safety device
has activated. Immediately have your vehicle
inspected by an authorized Mitsubishi
NOTE
Motors dealer or a repair facility of your
z
The drive mode can be switched while driv-
choice.
ing or stopped.
Drive mode indicator
Features and controls
5-63

4-wheel drive operation
water because sufficient traction may not be
CAUTION
NOTE
available in certain circumstances.
z Always use tires of the same size, type, and
z
Mitsubishi Motors is not responsible to the
Please avoid driving the vehicle through areas
brand that have no wear differences. Using
operator for any damage or injury caused or
where the tires may get stuck in deep sand or
tires that differ in size, type, brand, or wear
liability incurred by improper and negligent
mud.
amount may activate the protection of the
operation of a vehicle. All techniques of
drive-system components, causing the drive
vehicle operation depend on the skill and
mode in “4WD AUTO” mode to lock or the
WARNING
experience of the operator and other partici-
“4WD” and “LOCK” indicators to blink
pating parties. Any deviation from the rec-
5
z
Do not over-rely on the 4-wheel drive vehi-
alternately.
ommended operating instructions above is at
cles. Even 4-wheel drive vehicles have lim-
their own risk.
its to the system and ability to maintain
z
Note that the stopping distance required of
control and traction. Reckless driving may
4-wheel drive operation
the 4-wheel drive vehicle differs very little
lead to accidents. Always drive carefully,
N00530601254
from that of the front-wheel drive vehicle.
taking account of the road conditions.
Your vehicle has been designed primarily for
When driving on a snow-covered road or a
z
Improperly operating this vehicle on or
slippery, muddy surface, make sure that you
use on pavement.
off-pavement can cause an accident or
keep a sufficient distance between your vehi-
But its unique 4 -wheel drive system allows
rollover in which you and your passengers
cle and the one ahead of you.
you to occasionally travel on unpaved roads,
could be seriously injured or killed.
z
The driving posture should be more upright;
to campgrounds, picnic sites, and similar
• Follow all instructions and guidelines in
adjust the seat to a good position for easy
locations.
the owner’s manual.
steering and pedal operation. Be sure to wear
Not only does this ensure better handling on
• Keep your speed low and do not drive
the seat belt.
faster than conditions.
dry, paved roads but also permits better trac-
z
After driving on rough roads, check each
tion when driving on slippery, wet or snow-
part of the vehicle and wash it thoroughly
covered roads and when moving out of mud.
with water. Refer to the
“Inspection and
NOTE
But it is not suitable for heavy off road use or
maintenance following rough road opera-
z
Driving on rough roads can be hard on a
towing in rough conditions.
tion” section and “Vehicle care and Mainte-
vehicle. Before you leave the pavement, be
nance” sections.
It is particularly important to note that
4-
sure all scheduled maintenance and service
wheel drive may not give sufficient hill
has been done, and that you have inspected
climbing ability and engine braking on steep
your vehicle. Pay special attention to the
CAUTION
slopes. You should try to avoid driving on
condition of the tires, and check the tire pres-
steep slopes.
z
Setting the drive mode-selector to
“4WD
sures.
LOCK” position to drive on dry paved road
Also, you must exercise caution when driving
will increase fuel consumption, with possible
on sand and mud and when driving through
noise and vibration generation.
5-64
Features and controls

4-wheel drive operation
Turning sharp corners
Driving on sandy or muddy
WARNING
roads
z
When attempting to rock your vehicle out
of a stuck position, be sure that the area
When turning a sharp corner in
“4WD
around the vehicle is clear of people and
LOCK” position at low speed, a slight differ-
Set the drive mode-selector to “4WD LOCK”
physical objects. The rocking motion may
ence in steering may be experienced similar
and then gradually depress the accelerator
cause the vehicle to suddenly launch for-
to feeling as if the brakes were applied. This
pedal for a smooth start. Keep the pressure on
ward/backward, causing injury or dam-
is called tight corner braking and results from
the accelerator pedal as constant as possible,
age to nearby people or objects.
each of the four tires being at a different dis-
5
and drive at low speed.
tance from the corner. The phenomenon is
typical of
4-wheel drive vehicles. If this
NOTE
CAUTION
occurs, either straighten out the steering
z
Avoid sudden braking, sudden acceleration
z
Do not force the vehicle or drive recklessly
wheel or change to another mode.
and sharp turning; such operations could
on sandy surfaces. In comparison with nor-
result in the vehicle becoming stuck.
mal road surfaces, the engine and other
z
If the vehicle becomes stuck in sandy or
On snowy or icy roads
drive-system components are put under
muddy roads, it can often be moved with a
excessive strain when driving on such a sur-
rocking motion. Move the selector lever
face. This could lead to accidents.
Set the drive mode-selector to “4WD AUTO”
alternately between the
“D” (DRIVE) and
z
If any of the following conditions occur
or “4WD LOCK” in accordance with the road
“R” (REVERSE) positions while pressing
while the vehicle is being driven, immedi-
conditions, and then gradually depress the
lightly on the accelerator pedal.
ately park your vehicle in a safe place and
accelerator pedal for a smooth start.
z
Driving on rough road can cause rust on the
follow these procedures:
vehicle; wash the vehicle thoroughly as soon
• If the engine coolant temperature display
as possible after such use.
NOTE
flashes on the information screen in the
z The use of snow tires is recommended.
multi-information display or the engine
z Maintain a safe distance between vehicles,
power drops suddenly.
Climbing/descending sharp
avoid sudden braking, and use engine brak-
Refer to “Engine overheating” on page 8-4.
ing (downshifting).
grades
• If the
“
” warning display and “SLOW
DOWN” or the “
” warning display and
Your vehicle may not provide sufficient hill
“SERVICE REQUIRED” appear on the
CAUTION
climbing ability and engine braking on steep
information screen in the multi-information
z Avoid sudden braking, sudden acceleration
slope. Avoid driving on steep slopes even
display.
and sharp turning. Skidding occurs and con-
Refer to “Warning display” on page 5-58.
trol of the vehicle could be lost.
Features and controls
5-65
Inspection and maintenance following rough road operation
though the vehicle is an 4-wheel drive vehi-
z Have an authorized Mitsubishi Motors
Inspection and maintenance
cle.
dealer replace grease in the wheel bear-
following rough road opera-
ings.
Driving through water
tion
N00537801109
N00530700098
Cautions on the handling of
If the electrical circuits become wet, further
After operating the vehicle in rough road con-
4-wheel drive vehicles
operation of the vehicle will be impossible;
ditions, be sure to perform the following
N00530800187
5
therefore, avoid driving through water unless
inspection and maintenance procedures:
absolutely necessary. If driving through water
z
Check that the vehicle has not been dam-
Tires and wheels
is unavoidable, use the following procedure:
aged by rocks, gravel, etc.
Check the depth of the water and the terrain
z
Carefully wash the vehicle with water.
Since the driving torque can be applied to the
before attempting to drive through it. Drive
Drive the vehicle slowly while lightly
four wheels, the driving performance of the
slowly to avoid creating excessive water
depressing the brake pedal in order to dry
vehicle when operating in 4-wheel drive is
splashing.
out the brakes. If the brakes still do not
greatly affected by the condition of the tires.
function properly, contact an authorized
Mitsubishi Motors dealer or a repair facil-
Pay close attention to the tires.
CAUTION
ity of your choice as soon as possible to
z
Never drive through water that is deep
z Install only the specified tires on all
have the brakes checked.
enough to cover wheel hubs, axles or exhaust
wheels. Refer to “Tires and wheels” on
z
Remove the insects, dried grass, etc. clog-
pipe. Do not change the selector lever posi-
page 11-5.
tion while driving through water.
ging the radiator core.
z Be sure all four tires and wheels are the
Frequent driving through water can
z
After driving through water, check the
same size and type.
adversely affect the life span of the vehicle;
engine, transaxle and differential oil. If
When it is necessary to replace any of the
consult an authorized Mitsubishi Motors
the oil or grease is milky or cloudy
dealer or a repair facility of your choice and
tires or wheels, replace all four.
because of water contamination, it must
take the necessary measures to prepare,
z All tires should be rotated before the wear
be replaced with new oil.
inspect, and repair the vehicle.
difference between the front and rear tires
z
Check the inside of the vehicle. If water
z
After driving through water, apply the brakes
is recognizable.
entry is found, dry the carpet etc.
to be sure they are functioning properly. If
z
Inspect the headlights. If water is in the
the brakes are wet and not functioning prop-
Good vehicle performance cannot be
headlight housing, have it drained at an
erly, dry them out by driving slowly while
expected if there is a difference in wear
authorized Mitsubishi Motors dealer or a
lightly depressing the brake pedal. Inspect
between tires. Refer to
“Tire rotation” on
each part of the vehicle carefully.
repair facility of your choice.
5-66
Features and controls
Service brake
page 9-20.
When driving down a long or steep hill, use
CAUTION
engine braking by downshifting.
z Check the tire inflation pressure regularly.
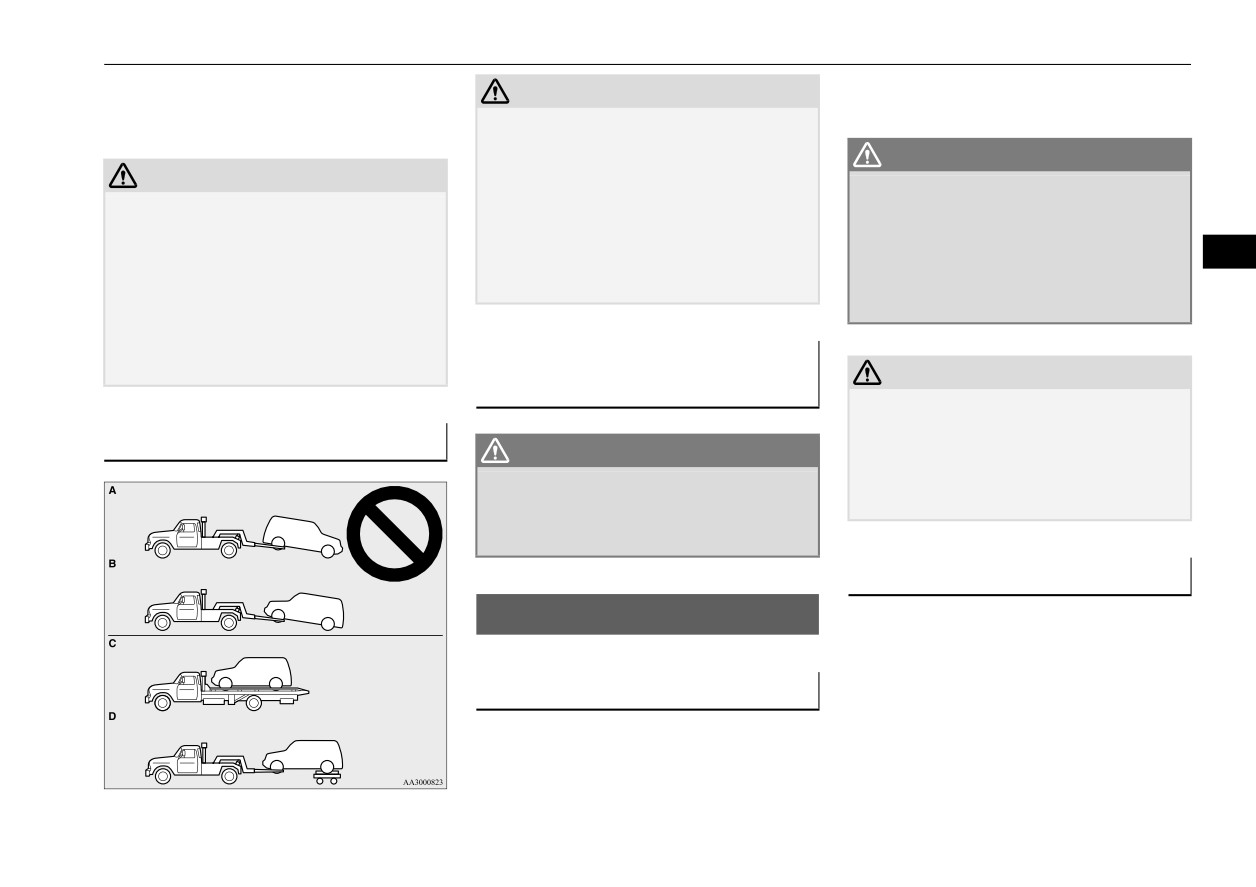
z Do not tow 4-wheel drive vehicles with the
front or rear wheels on the ground (Type A
or Type B) as illustrated. This could result in
WARNING
CAUTION
damage to the drivetrain, or unstable towing.
z
Do not leave any objects near the brake
z Always use tires of the same size, type, and
If you tow 4-wheel drive vehicles, use Type
pedal or let a floor mat slide under it;
brand that have no wear differences. Using
C or Type D equipment.
doing so could prevent the full pedal
tires of different size, type, brands or degree
z Even in “2WD” mode, the vehicle cannot be
stroke that would be necessary in an
5
of wear, will increase the differential oil tem-
towed with the front or the rear wheels on
emergency. Make sure that the pedal can
perature and result in possible damage to the
the ground.
be operated freely at all times. Make sure
driving system. Further, the drive train will
the floor mat is securely held in place.
be subject to excessive loading, possibly
leading to oil leakage, component seizure, or
Jacking up a 4-wheel drive
other serious failures.
CAUTION
vehicle
z
It is important not to drive the vehicle with
your foot resting on the brake pedal when
Towing
braking is not required. This practice can
WARNING
result in very high brake temperatures, pre-
z Do not crank the engine while jacking up
mature lining wear, and possible damage to
the vehicle.
the brakes.
The tire on the ground may turn and the
vehicle may roll off the jack.
Power brakes
N00517600436
Service brake
Your vehicle is equipped with power brakes
N00517500275
for more braking force with less brake pedal
effort.
Brake pedal
Your brakes are designed to operate at full
capacity, even if the power assist is not being
Overuse of the brake can cause weakening,
used.
resulting in poor brake response and prema-
If the power assist is not being used, the effort
ture wear of the brake pads.
needed to press the brake pedal is greater.
Features and controls
5-67
Hill start assist
If you should lose the power assist for some
Brake pad wear alarm
CAUTION
reason, the brakes will still work.
N00550700124
z
Do not overly rely on the hill start assist to
If the power brake unit or either of the two
prevent backwards movement of the vehicle.
brake hydraulic systems stops working prop-
The disc brakes have an alarm that makes a
Under certain circumstances, even when hill
erly, the rest of the brake system will still
metallic squeal when the brake pads have
start assist is activated, the vehicle may
work, but the vehicle will not slow down as
worn down enough to need service.
move backwards if the brake pedal is not suf-
quickly.
If you hear this sound, have the brake pads
ficiently depressed, if the vehicle is heavily
You will know this has happened if you find
replaced at an authorized Mitsubishi Motors
loaded, or if the road is very steep or slip-
5
dealer or a repair facility of your choice.
you need to press the brake down farther, or
pery.
harder when slowing down or stopping, or if
z
The hill start assist is not designed to keep
the brake warning light and the warning dis-
the vehicle stopped in place on uphill slopes
WARNING
play in the multi-information display come
for more than 2 seconds.
z Driving with worn brake pads will make it
on. Have the brake system repaired at an
z
When facing uphill, do not rely on using the
harder to stop, and can cause an accident.
hill start assist to maintain a stopped position
authorized Mitsubishi Motors dealer or a
as an alternative to depressing the brake
repair facility of your choice immediately.
pedal.
Hill start assist
Doing so could cause an accident.
WARNING
N00562600074
z
Do not perform the following operation
z
Never coast downhill with the engine OFF.
while the hill start assist is operating.
The hill start assist makes it easy to start off
Keep the engine running whenever your
[Except for vehicles equipped with the
on a steep uphill slope by preventing the
vehicle is in motion. If you turn off the
F.A.S.T.-key]
vehicle from moving backwards. It keeps the
engine while driving, the power brake
Turn the ignition switch to the
“OFF” or
braking force for about 2 second when you
booster will stop working and your brakes
“ACC” position.
will not work as well.
move your foot from the brake pedal to the
[Vehicles equipped with the F.A.S.T.-key]
accelerator pedal.
Put the operation mode in OFF or ACC. The
z
If the power assist is lost or if either brake
hydraulic system stops working properly,
hill start assist could stop operating, which
take your vehicle to an authorized
could result in an accident.
Mitsubishi Motors dealer or a repair facil-
ity of your choice immediately.
To operate
N00562701173
1. Stop the vehicle completely using the
brake pedal.
5-68
Features and controls

Brake assist system
2. Place the selector lever into the “D” posi-
Warning display
Brake assist system
tion.
N00562801158
N00567301103
NOTE
If an abnormal condition occurs in the sys-
The brake assist system is a device assisting
z When reversing on an uphill slope, place the
tem, the following display/indicator will turn
drivers who cannot depress the brake pedal
selector lever into the “R” position.
on.
firmly such as in emergency stop situations
and provides greater braking force.
-
ASC indicator
3. Release the brake pedal and the hill start
If the brake pedal is depressed suddenly, the
5
assist will maintain the braking force
brakes will be applied with more force than
applied while stopping for approximately
Warning display
usual.
2 seconds.
4. Depress the accelerator pedal and the hill
CAUTION
start assist gradually will decrease the
z
The brake assist system is not a device
braking force as the vehicle starts moving.
designed to exercise braking force greater
than its capacity. Make sure to always keep a
NOTE
sufficient distance between vehicles in front
z
The hill start assist is activated when all of
CAUTION
of you without relying too much on the brake
the following conditions are met.
z
If the warning is displayed, the hill start
assist system.
• The engine is running.
assist will not operate. Start off carefully.
(The hill start assist will not be activated
z
Park your vehicle in a safe place and stop the
while the engine is starting or immediately
engine.
NOTE
after the engine is started.)
Restart the engine and check whether the
z
Once the brake assist system is operational,
• The selector lever is in any position other
indicator/display goes out, in which case the
it maintains great braking force even if the
than “P” or “N”.
hill start assist is again working normally.
brake pedal is lightly released.
• The vehicle is completely stationary, with
If they remain displayed or reappear fre-
To stop its operation, completely remove
the brake pedal depressed.
quently, it is not necessary to stop the vehicle
your foot from the brake pedal.
• The parking brake is released.
immediately, but the vehicle should be
z
The hill start assist will not operate if the
inspected by an authorized Mitsubishi
accelerator pedal is depressed before the
Motors dealer or a repair facility of your
brake pedal is released.
choice as soon as possible.
z
The hill start assist also operates when
reversing on an uphill slope.
Features and controls
5-69