Mitsubishi Outlander (2022 year). Manual in english - page 3

. Adjust the seat where the child restraint
system will be installed to the most
rearward position.
WAB0070X
WAB0071X
Rear-facing web-mounted — step 2
Rear-facing rigid-mounted — step 2
2. Secure the child restraint anchor attach-
ments to the LATCH lower anchors. Check
to make sure the LATCH attachment is
properly attached to the lower anchors.
Do not attach the child restraint on the
second row center seat.
1-32
Safety — Seats, seat belts and supplemental restraint system

5. Check to make sure the child restraint is
properly secured prior to each use. If the
child restraint is loose, repeat steps
1
through 4.
REAR-FACING CHILD RE-
STRAINT INSTALLATION
USING THE SEAT BELTS
WARNING
The three-point seat belt with Automatic
Locking Retractor (ALR) must be used when
WAB0072X
WAB0145X
installing a child restraint. Failure to use the
Rear-facing — step 3
Rear-facing — step 4
ALR mode will result in the child restraint not
being properly secured. The restraint could tip
3.
For child restraints that are equipped with
4.
After attaching the child restraint, test it
over or be loose and cause injury to a child in a
webbing-mounted attachments, remove any
before you place the child in it. Push it from
sudden stop or collision.
additional slack from the anchor attach-
side to side while holding the child restraint
ments. Press downward and rearward firmly
near the LATCH attachment path. The child
in the center of the child restraint with your
restraint should not move more than 1 inch
hand to compress the vehicle seat cushion
(25 mm), from side to side. Try to tug it
and seatback while tightening the webbing
forward and check to see if the LATCH
of the anchor attachments.
attachment holds the restraint in place. If
the restraint is not secure, tighten the
LATCH attachment as necessary, or put
the restraint in another seat and test it again.
You may need to try a different child
restraint or try installing by using the
vehicle seat belt
(if applicable). Not all
child restraints fit in all types of vehicles.
Safety — Seats, seat belts and supplemental restraint system
1-33

Follow these steps to install a rear-facing child
restraint using the vehicle seat belts in the
second row seats and third row seats:
1.
Child restraints for infants must be used
in the rear-facing direction and therefore
must not be used in the front seat.
Position the child restraint on the seat.
Always follow the restraint manufacturer’s
instructions.
Adjust the seat where the child restraint
system will be installed
to the most
rearward position.
SSS0100
WAB0146X
Rear-facing — step 1
Rear-facing — step 2
Refer to all Warnings and Cautions in the
2.
Route the seat belt tongue through the child
“Child safety” (P.1-24) and “Child restraints”
restraint and insert it into the buckle until
(P.1-27) before installing a child restraint.
you hear and feel the latch engage. Be sure
to follow the child restraint manufacturer’s
Do not use the lower anchors if the combined
instructions for belt routing.
weight of the child and the child restraint
exceeds 65 lb (29.5 kg). If the combined weight
of the child and the child restraint is greater than
65 lb (29.5 kg), use the vehicle’s seat belt (not
the lower anchors) to install the child restraint.
Be sure to follow the child restraint manufac-
turer’s instructions for installation.
1-34
Safety — Seats, seat belts and supplemental restraint system

WAB0147X
WAB0148X
SSS0657
Rear-facing — step 3
Rear-facing — step 4
Rear-facing — step 5
3. Pull the shoulder belt until the belt is fully
4. Allow the seat belt to retract. Pull up on the
5. Remove any additional slack from the seat
extended. At this time, the seat belt retractor
shoulder belt to remove any slack in the
belt; press downward and rearward firmly
is in the Automatic Locking Retractor
belt.
in the center of the child restraint to
(ALR) mode
(child restraint mode). It
compress the vehicle seat cushion and
reverts to the Emergency Locking Retractor
seatback while pulling up on the seat belt.
(ELR) mode when the seat belt is fully
retracted.
Safety — Seats, seat belts and supplemental restraint system
1-35

through 6.
1.
Position the child restraint on the seat.
Always follow the child restraint manufac-
After the child restraint is removed and the seat
turer’s instructions.
belt fully retracted, the ALR mode
(child
restraint mode) is canceled.
Adjust the seat where the child restraint
system will be installed
to
the
most
FORWARD-FACING CHILD
rearward position.
RESTRAINT INSTALLATION
USING LATCH
Refer to all Warnings and Cautions in the
“Child safety” and “Child restraints” sections
before installing a child restraint.
Do not use the lower anchors if the combined
weight of the child and the child restraint
WAB0149X
exceeds 65 lb (29.5 kg). If the combined weight
Rear-facing — step 6
of the child and the child restraint is greater than
6.
After attaching the child restraint, test it
65 lb (29.5 kg), use the vehicle’s seat belt (not
before you place the child in it. Push it from
the lower anchors) to install the child restraint.
side to side while holding the child restraint
Be sure to follow the child restraint manufac-
near the seat belt path. The child restraint
turer’s instructions for installation.
should not move more than 1 inch (25 mm),
Follow these steps to install a forward-facing
from side to side. Try to tug it forward and
child restraint using the LATCH system:
check to see if the belt holds the restraint in
place. If the restraint is not secure, tighten
Before installing a child restraint system,
the seat belt as necessary, or put the restraint
remove the head restraint to obtain the correct
in another seat and test it again. You may
child restraint fit. If the head restraint is
need to try a different child restraint. Not all
removed, store it in a secure place. Be sure to
child restraints fit in all types of vehicles.
reinstall the head restraint when the child
restraint is removed. See
“Head restraints”
7.
Check to make sure that the child restraint is
(P.1-12) for head restraint adjustment informa-
properly secured prior to each use. If the
tion.
seat belt is not locked, repeat steps
1
1-36
Safety — Seats, seat belts and supplemental restraint system

WAB0150X
WAB0151X
SSS0647
Forward-facing web-mounted — step 2
Forward-facing rigid-mounted — step 2
Forward-facing — step 4
2.
Secure the child restraint anchor attach-
3.
The back of the child restraint should be
4.
For child restraints that are equipped with
ments to the LATCH lower anchors. Check
secured against the vehicle seatback.
webbing-mounted attachments, remove any
to make sure the LATCH attachment is
If the seating position is interfering with the
additional slack from the anchor attach-
properly attached to the lower anchors.
ments. Press downward and rearward firmly
proper child restraint fit, try another seating
in the center of the child restraint with your
Do not attach the child restraint on the
position or a different child restraint.
knee to compress the vehicle seat cushion
second row center seat.
and seatback while tightening the webbing
If the child restraint is equipped with a top
of the anchor attachments.
tether strap, route the top tether strap and
secure the tether strap to the tether anchor
5.
Tighten the tether strap according to the
point. See “Installing top tether strap” (P.1-
manufacturer’s instructions to remove any
slack.
38). Do not install child restraints that
require the use of a top tether strap in
seating positions that do not have a top
tether anchor.
Safety — Seats, seat belts and supplemental restraint system
1-37

7. Check to make sure the child restraint is
properly secured prior to each use. If the
child restraint is loose, repeat steps
1
through 6.
SSS0638
WAB0069X
Forward-facing — step 6
Installing top tether strap
6.
After attaching the child restraint, test it
before you place the child in it. Push it from
side to side while holding the child restraint
WARNING
near the LATCH attachment path. The child
restraint should not move more than 1 inch
Child restraint anchorages are designed to
(25 mm), from side to side. Try to tug it
withstand only those loads imposed by cor-
forward and check to see if the LATCH
rectly fitted child restraints. Under no circum-
attachment holds the restraint in place. If
stances are they to be used to attach adult seat
the restraint is not secure, tighten the
belts, or other items or equipment to the
LATCH attachment as necessary, or put
vehicle. Doing so could damage the child
restraint anchorages. The child restraint will
the restraint in another seat and test it again.
not be properly installed using the damaged
You may need to try a different child
anchorage, and a child could be seriously
restraint. Not all child restraints fit in all
injured or killed in a collision.
types of vehicles.
1-38
Safety — Seats, seat belts and supplemental restraint system

The child restraint top tether strap must be used
FORWARD-FACING CHILD
when installing the child restraint with the
RESTRAINT INSTALLATION
LATCH lower anchor attachments.
USING THE SEAT BELTS
First, secure the child restraint with the LATCH
lower anchors.
1. Remove the head restraint and store it in a
WARNING
secure place. Be sure to reinstall the head
restraint when the child restraint is re-
The three-point seat belt with Automatic
moved.
Locking Retractor (ALR) must be used when
installing a child restraint. Failure to use the
See
“Head restraints”
(P.1-12) for head
ALR mode will result in the child restraint not
restraint adjustment, removal and installa-
being properly secured. The restraint could tip
tion information.
over or be loose and cause injury to a child in a
2. Position the top tether strap over the
sudden stop or collision. Also, it can change the
SSS0640
operation of the front passenger airbag. See
seatback.
“Front passenger airbag status light” (P.1-55).
Forward-facing (front passenger seat) — step 1
3. Secure the top tether strap to the tether
Refer to all Warnings and Cautions in the
anchor point shown on the illustration.
“Child safety” and “Child restraints” sections
4. Refer to the appropriate child restraint
before installing a child restraint.
installation procedure steps in this section
Do not use the lower anchors if the combined
before tightening the tether strap.
weight of the child and the child restraint
If you have any questions when installing a
exceeds 65 lb (29.5 kg). If the combined weight
top tether strap, it is recommended that you
of the child and the child restraint is greater than
visit an authorized Mitsubishi Motors dealer
65 lb (29.5 kg), use the vehicle’s seat belt (not
for this service.
the lower anchors) to install the child restraint.
Be sure to follow the child restraint manufac-
turer’s instructions for installation.
Follow these steps to install a forward-facing
child restraint using the vehicle seat belt in the
front passenger seat, second row seats and third
row seats:
Safety — Seats, seat belts and supplemental restraint system
1-39

Before installing a child restraint system,
remove the head restraint to obtain the correct
child restraint fit. If the head restraint is
removed, store it in a secure place. Be sure to
reinstall the head restraint when the child
restraint is removed. See
“Head restraints”
(P.1-12) for head restraint adjustment informa-
tion.
1.
If you must install a child restraint in the
front seat, it should be placed in a
forward-facing direction only. Move the
seat to the rearmost position. Child
restraints for infants must be used in
the rear-facing direction and, therefore,
SSS0360B
SSS0651
must not be used in the front seat.
Forward-facing — step 3
Forward-facing — step 4
2.
Position the child restraint on the seat.
3.
Route the seat belt tongue through the child
4.
Pull the shoulder belt until the belt is fully
Always follow the child restraint manufac-
restraint and insert it into the buckle until
extended. At this time, the seat belt retractor
turer’s instructions.
you hear and feel the latch engage. Be sure
is in the Automatic Locking Retractor
. Adjust the seat where the child restraint
to follow the child restraint manufacturer’s
(ALR) mode
(child restraint mode). It
system will be installed to the most
instructions for belt routing.
reverts to Emergency Locking Retractor
rearward position.
(ELR) mode when the seat belt is fully
If the child restraint is equipped with a top
The back of the child restraint should be
tether strap, route the top tether strap and
retracted.
secured against the vehicle seatback.
secure the tether strap to the tether anchor
point
(rear seat installation only). See
“Installing top tether strap”
(P.1-42). Do
not install child restraints that require the
use of a top tether strap in seating positions
that do not have a top tether anchor.
1-40
Safety — Seats, seat belts and supplemental restraint system

SSS0652
SSS0653
WAB0152X
Forward-facing — step 5
Forward-facing — step 6
Forward-facing — step 8
5. Allow the seat belt to retract. Pull up on the
6. Remove any additional slack from the seat
8. After attaching the child restraint, test it
shoulder belt to remove any slack in the
belt; press downward and rearward firmly
before you place the child in it. Push it from
belt.
in the center of the child restraint with your
side to side while holding the child restraint
knee to compress the vehicle seat cushion
near the seat belt path. The child restraint
and seatback while pulling up on the seat
should not move more than 1 inch (25 mm),
belt.
from side to side. Try to tug it forward and
check to see if the belt holds the restraint in
7. Tighten the tether strap according to the
place. If the restraint is not secure, tighten
manufacturer’s instructions to remove any
the seat belt as necessary, or put the restraint
slack.
in another seat and test it again. You may
need to try a different child restraint. Not all
child restraints fit in all types of vehicles.
Safety — Seats, seat belts and supplemental restraint system
1-41

9. Check to make sure the child restraint is
properly secured prior to each use. If the
seat belt is not locked, repeat steps
2
through 8.
WAB0075X
WAB0069X
Forward-facing — step 10
Installing top tether strap
10. If the child restraint is installed in the front
passenger seat, place the ignition switch in
the ON position. The front passenger airbag
WARNING
status light
should illuminate. If this
light is not illuminated, see “Front passen-
Child restraint anchorages are designed to
ger airbag status light” (P.1-55). Move the
withstand only those loads imposed by cor-
child restraint to another seating posi-
rectly fitted child restraints. Under no circum-
tion. Have the system checked. It is
stances are they to be used to attach adult seat
recommended you visit an authorized
belts, or other items or equipment to the
Mitsubishi Motors dealer for this service.
vehicle. Doing so could damage the child
restraint anchorages. The child restraint will
After the child restraint is removed and the seat
not be properly installed using the damaged
belt is fully retracted, the ALR mode
(child
anchorage, and a child could be seriously
restraint mode) is canceled.
injured or killed in a collision.
1-42
Safety — Seats, seat belts and supplemental restraint system
The child restraint top tether strap must be used
and seat belt system.
BOOSTER SEATS
when installing the child restraint with the seat
belts.
Precautions on booster seats
First, secure the child restraint with the seat
belt.
WARNING
1. Remove the head restraint and store it in a
secure place. Be sure to reinstall the head
If a booster seat and seat belt are not used
restraint when the child restraint is re-
properly, the risk of a child being injured or
moved.
killed in a sudden stop or collision greatly
increases:
See
“Head restraints”
(P.1-12) for head
restraint adjustment, removal and installa-
. Make sure the shoulder portion of the belt
tion information.
is away from the child’s face and neck and
the lap portion of the belt does not cross
2. Position the top tether strap over the
the stomach.
seatback.
. Make sure the shoulder belt is not behind
3. Secure the top tether strap to the tether
the child or under the child’s arm.
anchor point shown on the illustration.
. A booster seat must only be installed in a
4. Refer to the appropriate child restraint
seating position that has a lap/shoulder
installation procedure steps in this section
belt.
before tightening the tether strap.
Booster seats of various sizes are offered by
If you have any questions when installing a
several manufacturers. When selecting any
top tether strap, it is recommended you visit
booster seat, keep the following points in mind:
an authorized Mitsubishi Motors dealer for
this service.
. Choose only a booster seat with a label
certifying that it complies with Federal
Motor Vehicle Safety Standard
213
or
Motor Vehicle Restraint Systems and Boos-
ter Seats Safety Regulations (RSSR).
. Check the booster seat in your vehicle to be
sure it is compatible with the vehicle’s seat
Safety — Seats, seat belts and supplemental restraint system
1-43

. Make sure the child’s head will be properly
supported by the booster seat or vehicle
seat.
. If the booster seat is compatible with your
vehicle, place your child in the booster seat
and check the various adjustments to be
sure the booster seat is compatible with
your child. Always follow all recommended
procedures.
LRS0453
LRS0464
All U.S. states and Canadian provinces or
territories require that infants and small
children be restrained in an approved child
restraint at all times while the vehicle is
being operated.
The instructions in this section apply to booster
seat installation in the rear seats or the front
passenger seat.
WAB0153X
1-44
Safety — Seats, seat belts and supplemental restraint system

Booster seat installation
WARNING
To avoid injury to child, do not use the lap/
shoulder belt Automatic Locking Retractor
(ALR) mode when using a booster seat with the
seat belts.
CAUTION
Do not remove the head restraint when
SSS0640
LRS0454
installing a booster seat.
Front passenger position
1.
If you must install a booster seat in the
3.
The booster seat should be positioned on the
Refer to all Warnings and Cautions in the
front seat, move the seat to the rearmost
vehicle seat so that it is stable.
“Child safety”, “Child restraints” and “Booster
position.
seats” sections earlier in this section before
Do not use the LATCH fixed booster seat on
If necessary, adjust or remove the head
installing a child restraint.
the second row center seat.
restraint to obtain the correct booster seat
fit. If the head restraint is removed, store it
Follow these steps to install a booster seat in the
2.
Position the booster seat on the seat. Only
in a secure place. Be sure to reinstall the
rear seat or in the front passenger seat:
place it in a forward-facing direction.
head restraint when the booster seat is
Always follow the booster seat manufac-
removed. See “Head restraints” (P.1-12) for
turer’s instructions.
head restraint adjustment, removal and
. Adjust the seat where the child restraint
installation information.
system will be installed to the most
If the seating position does not have a head
rearward position.
restraint and it is interfering with the proper
booster seat fit, try another seating position
or a different booster seat.
Safety — Seats, seat belts and supplemental restraint system
1-45

4.
Position the lap portion of the seat belt low
and snug on the child’s hips. Be sure to
follow the booster seat manufacturer’s
instructions for adjusting the seat belt
routing.
5.
Pull the shoulder belt portion of the seat belt
toward the retractor to take up extra slack.
Be sure the shoulder belt is positioned
across the top, middle portion of the child’s
shoulder. Be sure to follow the booster seat
manufacturer’s instructions for adjusting the
seat belt routing.
6.
Follow the warnings, cautions and instruc-
tions for properly fastening a seat belt
WAB0075X
shown in “Seat belts” (P.1-16).
7.
If the booster seat is installed in the front
passenger seat, place the ignition switch in
the ON position. The front passenger airbag
status light
may or may not illuminate
depending on the size of the child and the
type of booster seat used. See
“Front
passenger airbag status light” (P.1-55).
1-46
Safety — Seats, seat belts and supplemental restraint system
SUPPLEMENTAL RESTRAINT SYSTEM(SRS)
Front seat-mounted SRS side airbag system:
vehicle is impacted. In a rollover, the curtain
PRECAUTIONS ON SRS
This system can help cushion the impact force
airbags on both sides are designed to inflate.
This SRS section contains important informa-
to the chest and pelvic area of the driver and
Under both side-impact and rollover situations,
tion concerning the following systems:
front passenger in certain side impact collisions.
the curtain airbags will remain inflated for a
. Driver and front passenger SRS airbag
The side airbag is designed to inflate on the side
short period of time.
(Advanced Airbag System)
where the vehicle is impacted.
These supplemental restraint systems are de-
. Driver and passenger SRS knee airbag
Second-row outboard seat-mounted SRS side
signed to supplement the crash protection
. Front seat-mounted SRS side airbag
airbag system: This system can help cushion
provided by the driver, passenger and second
. Second-row outboard seat-mounted SRS
the impact force to the chest area of the second
row outboard seat belts and are not a substitute
side airbag
row outboard seat passengers in certain side-
for them. Seat belts should always be correctly
impact collisions. The side airbags are designed
worn and the occupant seated a suitable
. Front seat-mounted SRS center airbag (if so
to inflate on the side where the vehicle is
distance away from the steering wheel, instru-
equipped)
impacted.
ment panel and door finishers. (See “Seat belts”
. Side Curtain SRS airbag
Front seat-mounted SRS center airbag sys-
(P.1-16) for instructions and precautions on seat
. Seat belt pretensioner (front and second row
belt usage.)
tem (if so equipped): This system can help
outboard seats)
cushion the impact force to the head area of the
The airbags operate only when the ignition
Driver and front passenger SRS airbag
driver and front passenger in certain side-impact
switch is in the ON or START position.
system: The Advanced Airbag System can help
collisions. The center side airbag is designed to
cushion the impact force to the head and chest
After the ignition is placed in the ON
inflate if left or right side of the vehicle is
of the driver and front passenger in certain
position, the SRS airbag warning light
impacted.
illuminates. The SRS airbag warning light
frontal collisions.
Side Curtain SRS airbag system: This system
will turn off after about
7 seconds if the
Driver and passenger SRS knee airbag
can help cushion the impact force to the heads
systems are operational.
system: The SRS driver’s and front passenger’s
of occupants in front and second row outboard
knee airbags are designed to supplement the
seating positions in certain side impact or
primary protection of the driver’s and front
rollover collisions. The curtain airbags are also
passenger’s seat belt system. It can reduce the
designed to help reduce the risk of complete and
forward movement of the driver’s and front
partial ejection from the vehicle through side
passenger’s lower legs and provide increased
windows in both side impact and rollover type
overall body protection in certain moderate to
accidents. In a side-impact, the curtain airbags
severe frontal collisions.
are designed to inflate on the side where the
Safety — Seats, seat belts and supplemental restraint system
1-47

WARNING
IT IS VERY IMPORTANT TO ALWAYS
WEAR YOUR SEAT BELT PROPERLY
EVEN WITH AN AIRBAG.
— Seat belts help keep the driver
and passengers properly posi-
tioned. This reduces the risk of
injury in all collisions, and re-
duces the risk of serious injuries
or death when the airbags inflate.
During sudden braking just be-
WAB0154X
fore a collision, an unrestrained or
improperly restrained driver or
front passenger can move forward
into direct contact with, or within
close proximity to, the airbag
when it begins to inflate.
The beginning stage of airbag
inflation is the most forceful and
can cause serious injuries or death
if the occupant comes in contact
with the airbag at this time.
— Seat belts reduce the risk of
injury in rear impact collisions,
and in lowerspeed frontal colli-
sions because the airbags are not
WAB0155X
designed to inflate in those situa-
tions.
1-48
Safety — Seats, seat belts and supplemental restraint system

— Seat belts reduce the risk of being
Advanced Airbag System monitors the
thrown from your vehicle in a
severity of a collision and seat belt usage
then inflates the airbags as needed. Failure
collision or rollover.
to properly wear seat belts can increase the
The front airbags ordinarily will not
risk or severity of injury in an accident.
inflate in the event of a side impact, rear
The front passenger seat is equipped with
impact, rollover, or lower severity frontal
occupant classification sensors
(weight
collision. Always wear your seat belts to
sensors) that turn the front passenger
help reduce the risk or severity of injury in
airbag and passenger knee airbag OFF
various kinds of accidents.
under some conditions. These sensors are
The front passenger airbag and passenger
only used in this seat. Failure to be
knee airbag will not inflate if the front
properly seated and wearing the seat belt
passenger airbag status light is lit. See
can increase the risk or severity of injury
“Front passenger airbag status light” (P.1-
in an accident. See “Front passenger air-
55).
bag status light” (P.1-55).
SSS0007
The seat belts and the front airbags are
Keep hands on the outside of the steering
most effective when you are sitting well
wheel. Placing them inside the steering
back and upright in the seat with both feet
wheel rim could increase the risk that they
on the floor. The front airbags inflate with
are injured if the front airbag inflates.
great force. Even with the Advanced Air-
bag System, if you are unrestrained,
leaning forward, sitting sideways or out
of position in any way, you are at greater
risk of injury or death in a crash. You may
also receive serious or fatal injuries from
the front airbag if you are up against it
when it inflates. Always sit back against
the seatback and as far-away as practical
from the steering wheel or instrument
panel. Always use the seat belts.
The driver and front passenger seat belt
SSS0006
buckles are equipped with sensors that
detect if the seat belts are fastened. The
Safety — Seats, seat belts and supplemental restraint system
1-49

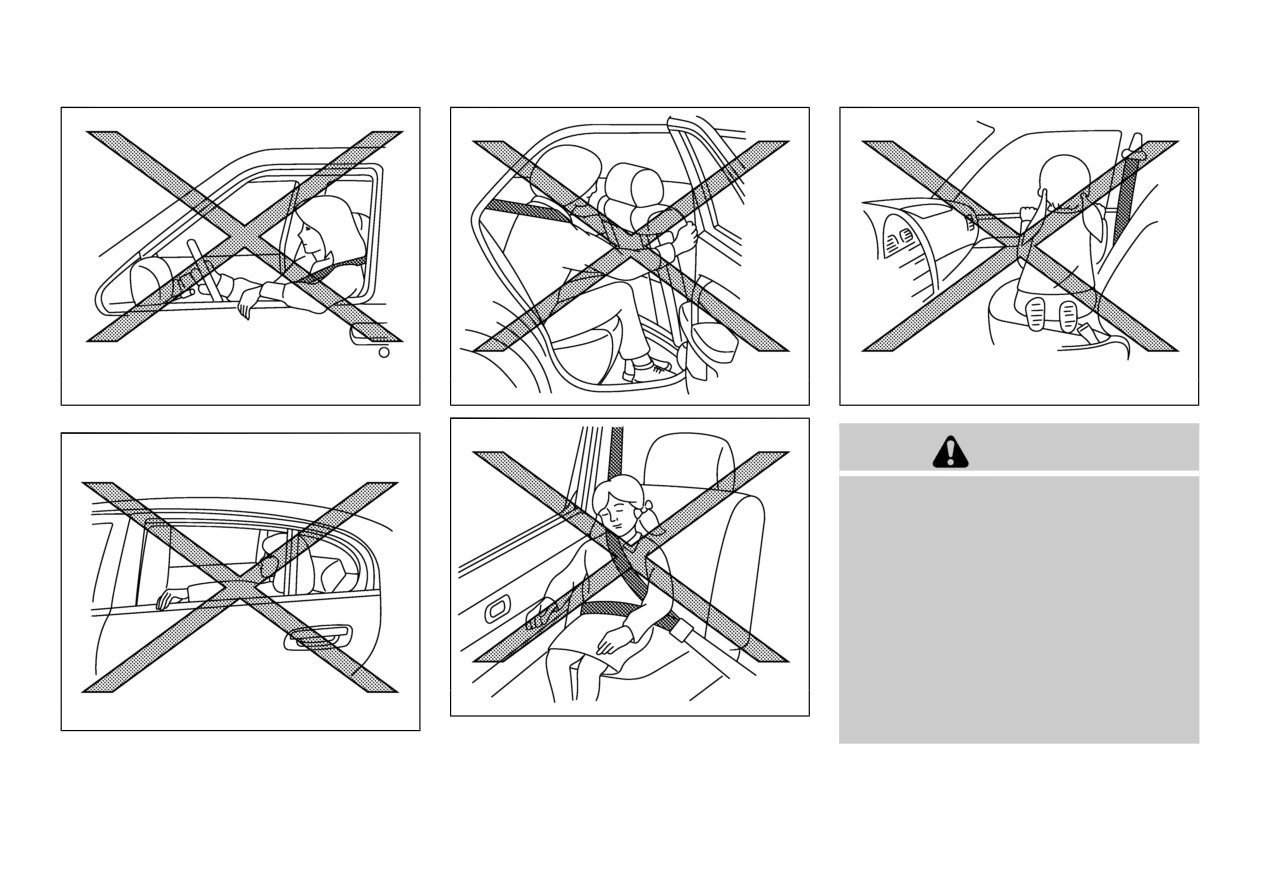
WARNING
Never let children ride unrestrained or
extend their hands or face out of the
window. Do not attempt to hold them in
your lap or arms. Some examples of
dangerous riding positions are shown in
the illustrations.
Children may be severely injured or killed
when the front airbags, side airbags or
curtain airbags inflate if they are not
properly restrained. Pre-teens and chil-
dren should be properly restrained in the
SSS0008
SSS0099
rear seat, if possible.
Even with the Advanced Airbag System,
never install a rear-facing child restraint
or infant restraint in the front seat. An
inflating front airbag could seriously in-
jure or kill your child. See
“Child re-
straints” (P.1-27) for details.
SSS0009
SSS0100
1-50
Safety — Seats, seat belts and supplemental restraint system
SSS0059A
SSS0140
SSS0159
Do not lean against doors or windows.
WARNING
Front and second row seat side aibags and
curtain airbags:
. The side airbags ordinarily will not inflate
in the event of a frontal impact, rear
impact, rollover or lower severity side
collision. Always wear your seat belts to
help reduce the risk or severity of injury in
various kinds of accidents.
. The curtain airbags ordinarily will not
inflate in the event of a front impact, rear
impact, or lower severity side collision.
SSS0162
SSS0188A
Always wear your seat belts to help reduce
the risk or severity of injury in various
Safety — Seats, seat belts and supplemental restraint system
1-51
kinds of accidents.
Do not allow a child to lean against or sit
The seat belts, the side airbags and curtain
close to the passenger door, even if the
child is seated in a child restraint system.
airbags are most effective when you are
The child’s head should also not lean
sitting well back and upright in the seat.
against or be close to the section of the
The side airbags and curtain airbags
inflate with great force. Do not allow
seatback where the side airbag and curtain
anyone to place their hand, leg or face
airbag are located. It is dangerous if the
side airbag or curtain airbag deploys.
near the side airbags on the side of the
Failure to follow all of these instructions
seatback of the front and second row seat
or near the side roof rails. Do not allow
could lead to serious injury or death to the
anyone sitting in the front seats or second
child.
row outboard seats to extend their hand
out of the window or lean against the door.
The side airbags and curtain airbags can
cause serious injury or death to anyone too
close to the airbag when it deploys. Some
examples of dangerous riding positions are
shown in the previous illustrations.
Do not place stickers, labels or additional
trim on the back of either front seat. They
can interfere with proper side airbag
deployment.
When sitting in the rear seat, do not hold
onto the seatback of the seat in front of
you. If the center airbag or the side airbags
inflate, you may be seriously injured. Be
especially careful with children, who
should always be properly restrained.
Some examples of dangerous riding posi-
tions are shown in the illustrations.
Do not use seat covers on the front and
second row seatbacks. They may interfere
with side airbag inflation.
1-52
Safety — Seats, seat belts and supplemental restraint system