Mitsubishi Mirage G4 (2022 year). Manual in english - page 2
Rear seat
WARNING
CAUTION
Trunk-through lid
z Persons who are unable to feel tempera-
z If water or any other liquid is spilled on the
N00409001062
ture change or skin pain due to age, ill-
seat, allow it to dry thoroughly before
Open the lid to gain access to the luggage
ness, injury, medication, alcohol use,
attempting to use the heater. Turn the heater
compartment from the cabin. This feature is
fatigue or other physical conditions or
off immediately if it appears to be malfunc-
useful for storing small items and carrying
who have sensitive skin may suffer burns
tioning during use.
long objects while accommodating 2 passen-
4
when using the heated seat even at low
gers in the rear seat.
temperatures. To reduce the risk of burns,
Fold down the arm rest, then pull the strap
people with such conditions must use care
Rear seat
(A) to open the lid.
when using the heated seat.
N00402501257
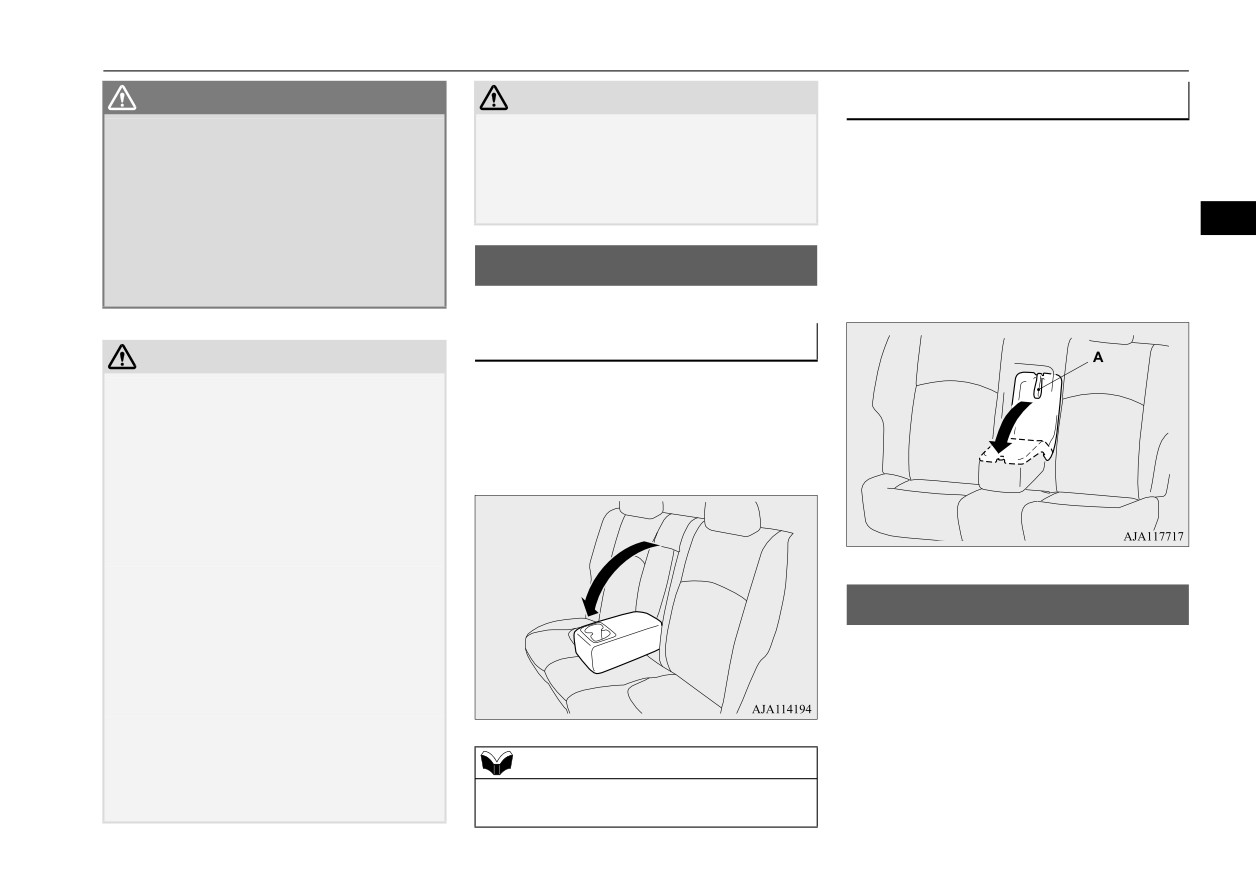
Arm rest
CAUTION
N00403001376
z
Switch off the heated seats when not in use.
To use the arm rest, tilt the arm rest down for
Operate the heaters at the “HI” position for
use as shown.
quick heating. After the seat has become
The arm rest includes a cup holder. (Refer to
warm, set the heater switch to the “LO” posi-
“Cup holder” on page 5-109).
tion to keep it warm. Slight variations in the
seat temperature may be felt while using the
heated seats. This is caused by the operation
of the heater’s internal thermostat and does
not indicate a malfunction.
z
Do not place heavy objects on the seat or
stick pins, needles, or other pointed objects
Head restraints
into the seat.
N00404301637
z
Do not place a blanket, cushion, or other
insulating material on the seat while using
Padded head restraints for the seats can
the heater; doing so can cause the heater ele-
reduce the risk of a whiplash injury if your
ment to overheat.
vehicle is hit from the rear.
z
When cleaning the seat, do not use benzine,
The head restraints are equipped in the illus-
kerosene, gasoline, alcohol, or other organic
trated position.
solvents; doing so can cause damage not
NOTE
To maximize the effectiveness of your head
only to the surface of the seat, but also to the
z
Never sit on an arm rest.
restraint, adjust the front seatback to the
heater.
Doing so could damage the arm rest.
Seat and restraint systems
4-5
Head restraints
upright position and the head restraint to the
WARNING
Adjustment of the head
proper position. Sit back against the seatback
z
Never place a cushion or similar device on
restraint height (front seats)
with your head close to the head restraint.
the seatback. This can adversely affect
head restraint performance by increasing
To reduce the risk of injury in an accident,
the distance between your head and the
restraint.
adjust the head restraint height so that the
4
center of the restraint is at your ear level
when seated. Any person too tall for the
restraint to reach their ear level when seated
should raise the restraint to the highest locked
position.
z
To raise the restraint, pull it straight up.
z
To lower the restraint, push down on it
while pressing the lock knob (A) in the
direction shown by the arrow.
WARNING
z
After adjusting the height, push down on
z
Driving without the head restraints
in
the restraint to make sure it is locked in
place can cause you and your passengers
position.
serious injury or death in an accident. To
reduce the risk of injury in an accident,
always make sure the head restraints are
installed and properly positioned when
the seat is occupied.
z
In order to minimize the risk of a neck
injury due to a rear impact, the front seat-
back must be adjusted to the upright posi-
tion and the head restraint to the proper
position before vehicle operation. The
driver should never adjust the seat while
the vehicle is in motion.
4-6
Seat and restraint systems
Seat belts
To remove
To install
CAUTION
z The shape and size of the head restraint dif-
Press the lock knob
(A) in the direction
First check that the head restraint is facing in
fers according to the seat. Always use the
shown by the arrows. Then pull the head
the right direction as shown in the previous
correct head restraint provided for the seat
restraint up and out of the seatback.
illustration, and then insert it into the seat-
and do not install the head restraint in the
back. Push the head restraint down while
wrong direction.
4
pressing the lock knob (A) until the restraint
locks into place.
CAUTION
z Check that the lock knob (A) is extended out
as shown in the illustration. Then pull the
head restraint up to make sure that it is
locked in place and will not come out of the
seatback.
WARNING
z To help minimize the risk of neck injury in
the event of an accident, the head
Seat belts
restraints must be properly installed and
N00406001566
positioned to proper height before vehicle
Seat belts are installed in your vehicle to help
operation.
reduce the risk of injury to the driver and pas-
senger in the event of an accident. Always
use the provided seat belts.
Carefully review the following information
for proper seat belt usage.
Seat and restraint systems
4-7
Seat belts
WARNING
WARNING
WARNING
z
To help reduce the risk of injury or death
z
To reduce the risk to the driver of serious
z
Children 12 years old and under should
in an accident, seat belts and child
injury or death during deployment of the
always ride in the rear seat and be prop-
restraint systems must always be used.
driver’s airbag, always properly wear the
erly restrained. This reduces their risk of
Refer to “Child restraint systems” on page
seat belt and adjust the driver’s seat as far
serious injury or death in an accident,
4-14 for additional information.
back as possible while maintaining a posi-
especially due to a deploying front passen-
4
z
Never use one seat belt for more than one
tion that still enables you to fully apply the
ger’s airbag. Refer to “Child restraint sys-
person.
pedals, easily control the steering wheel,
tems” on page
4-14 for additional
z
Never carry more people in your vehicle
and safely operate the vehicle.
information.
than there are seat belts.
z
To reduce the risk to a front seat passen-
z
Any child who is too small to properly
z
Always adjust the seat belt for a snug fit.
ger of serious injury or death from a
wear a seat belt must be properly
deploying airbag, make sure the passenger
restrained in an appropriate child
z
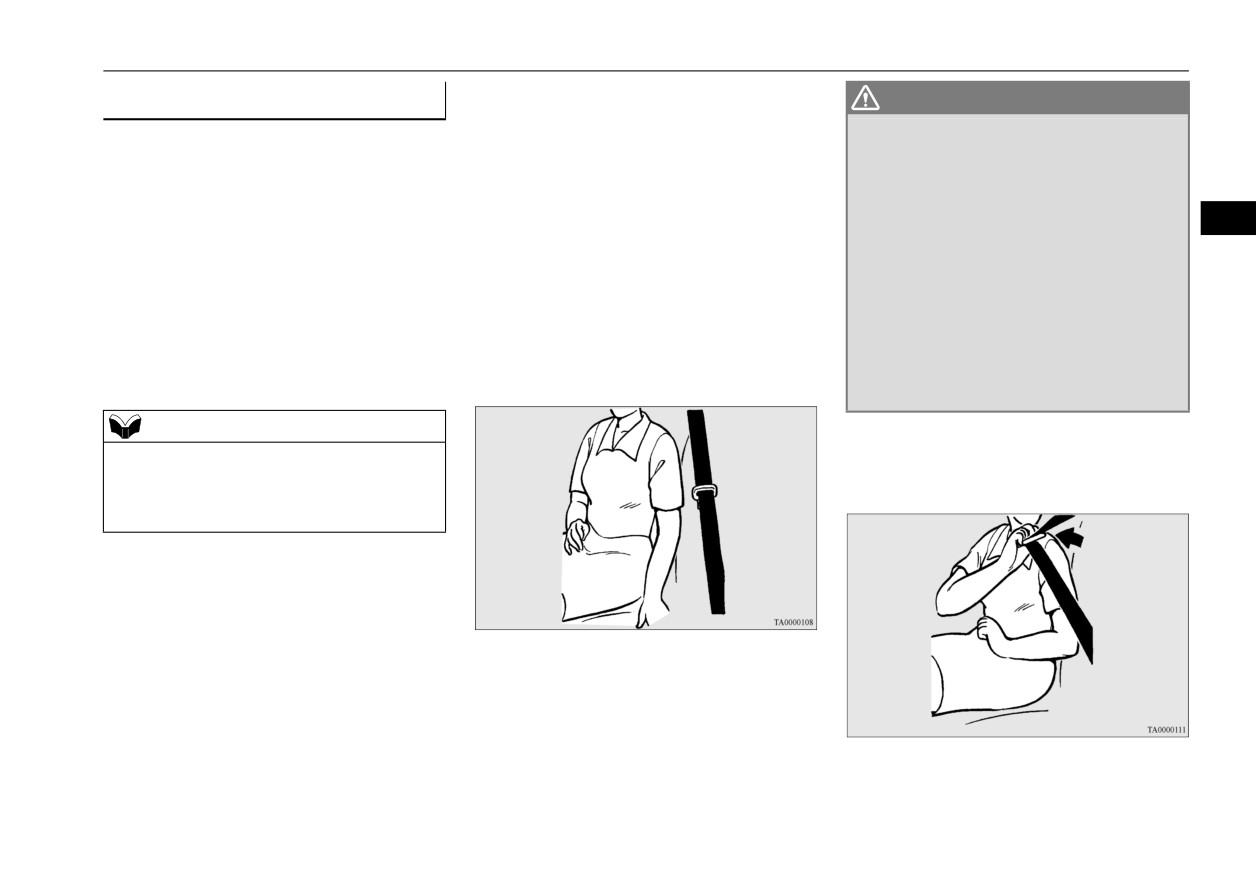
Always place the shoulder belt over your
always wears the seat belt properly,
restraint system.
shoulder and across your chest. Never put
remains seated all the way back and
z
Infants MUST be placed in a rear-facing
it behind you or under your arm.
upright in their seat, and moves the seat as
child safety seat and positioned in the rear
z
Always wear the lap belt as low as possible
far back as possible. Refer to “Supplemen-
seat.
across your hips, not around your waist.
tal Restraint System (SRS) - airbag” on
z
In the event of an accident, all seat belt
z
Never insert any foreign object, such as a
page 4-25 for additional information.
assemblies, including retractors and
piece of plastic, paper clip, button or coin,
z
Never hold an infant or child in your arms
attachment hardware, should be inspected
into the seat belt buckle.
or on your lap when riding in this vehicle
by an authorized Mitsubishi Motors
even when you are wearing your seat belt.
dealer to determine whether replacement
Never place any part of the seat belt you
is necessary.
are wearing around an infant or child.
z
Do not let children play with the seat belts.
Failure to follow these simple instructions
If children play with the seat belts by
creates a risk of serious injury or death to
wrapping them around their bodies, the
your child in the event of an accident or
seat belt may retract and become tight.
sudden stop.
This can result in a serious injury or
death, such as suffocation. This can occur
even if the vehicle is parked. If the child
z
Never modify or alter the seat belts in
cannot be released from the seat belt, use
your vehicle.
an appropriate tool such as a knife or scis-
sors to cut the seat belt.
4-8
Seat and restraint systems
Seat belts
1. Occupants should always sit back in their
Seat belt instructions
WARNING
seats with their backs against the upright
N00406201539
z
To reduce the risk of serious injury or
seatback. To reduce the risk of serious
death in the event of an accident or sud-
All seats are equipped with a seat belt which
injury or death during deployment of the
den stop, all seatbacks should be kept in
uses one combined lap-and-shoulder belt with
airbag, adjust the driver’s seat as far back
the upright position while the vehicle is in
an emergency locking retractor.
as possible while maintaining a position
motion.
that still enables you to fully apply the
4
Seat belt performance during an accident
This system is designed to provide both com-
pedals, easily control the steering wheel,
can be adversely affected if the seatbacks
fort and safety. It permits full extension and
and safely operate the vehicle. The front
are reclined. The more a seatback is
automatic retraction of the belts during nor-
passenger seat should also be moved as
reclined, the more likely seat belt perfor-
mal vehicle operation. A sensing device
mance will be adversely affected. If the
far back as possible. Refer to “Supple-
inside the belt retractor is designed to lock the
seat belt is not properly positioned against
mental Restraint System (SRS) - airbag”
retractor in the event of a sudden change in
the body during an accident, there is
on page 4-25. Also refer to “To adjust the
the vehicle’s motion.
increased risk you will slide under the belt
seat forward or backward” on page 4-3.
and receive serious injury or death.
NOTE
2. Grasp the latch plate and slide it up the
z For instructions on installing a child restraint
system using a seat belt, refer to “Installing a
webbing so that it easily pulls across your
child restraint system using the seat belt” on
body.
page 4-21.
Seat and restraint systems
4-9
Seat belts
3. Pull the seat belt out slowly while holding
4. The lap part of the belt must always be
WARNING
the latch plate. Push the latch plate into
worn low and snug across the hips. Pull
z Be sure the lap belt portion fits snugly and
the buckle until you hear a “click”. Pull
up on the shoulder portion of the belt to
is worn as low as possible across the hips,
up on the belt to be sure the latch plate is
take up any slack in the lap belt.
not around the waist. Failure to follow this
locked securely in the buckle.
instruction will increase the risk of serious
injury or death in the event of an accident.
4
z Be sure the seat belt webbing is not
twisted when worn. Twisted webbing may
adversely affect seat belt performance.
5. To release the belt, press the button on the
buckle and allow the belt to retract.
If the belt does not retract smoothly, pull it
out and check for kinks or twists in the
webbing. Then make sure it remains
untwisted as it retracts.
NOTE
NOTE
z
With the exception of the seat belt for the
NOTE
z
If the seat belt locks up and cannot be pulled
driver, the seat belts in all other seating posi-
out, pull it once with force and let it retract
tions are equipped with an Automatic Lock-
z If the seat belt (A) or ring (B) becomes dirty,
all the way.
ing Retractor (ALR) function. If you pull the
the belt may not retract smoothly. If the seat
Then, pull the belt out slowly once again.
seat belt fully out of the retractor, the retrac-
belt and ring are dirty, clean them with a
tor will switch to its ALR child restraint
mild soap or detergent solution.
installation function (see page 4-21).
When the ALR function has been activated,
the seat belt will only retract. If this happens,
let the belt fully retract, then pull the seat
belt back out, repeating steps 1 through 4.
4-10
Seat and restraint systems
Seat belts
Driver’s seat belt
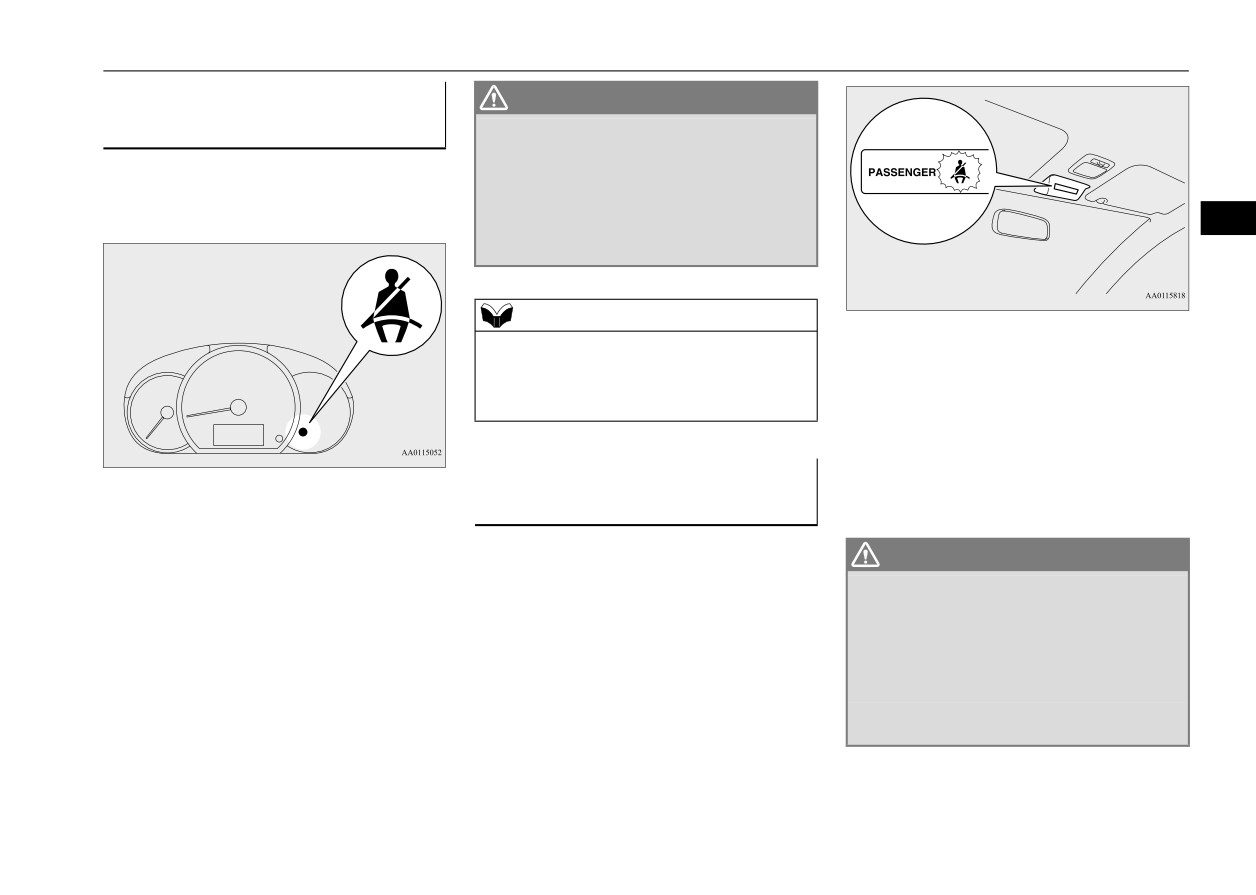
WARNING
reminder/warning light
z In order to reduce the risk of serious
injury or death in an accident, always fas-
N00418400384
ten your own seat belt. Do not allow any-
A tone and warning light are used to remind
one to ride in your vehicle unless he or she
the driver to fasten the seat belt.
is also seated and fastening a seat belt.
4
Children should additionally be restrained
in a secure child restraint system.
NOTE
z If the seat belt subsequently remains unfas-
When the ignition switch is turned to the
tened, the warning light and the tone will
“ON” position or the operation mode is put in
issue further warnings each time the vehicle
ON, this indicator normally comes on and
starts moving from a stop.
goes off a few seconds later.
The light comes on when a person sits on the
front passenger seat but does not fasten the
Front passenger seat belt warn-
seat belt. It goes off when the seat belt is sub-
If the ignition switch is turned to the “ON”
ing light
sequently fastened.
position or the operation mode is put in ON
N00418301306
without the driver’s seat belt being fastened, a
The front passenger seat belt warning light is
WARNING
warning light will come on and a tone will
located as shown in the illustration.
z When a child booster seat is used on the
sound for approximately 6 seconds to remind
front passenger seat, the front passenger
you to fasten your seat belt.
seat belt warning light will not come on, if
If the vehicle is driven with the seat belt still
the seat belt is not fastened when the
unfastened, the warning light will blink and
booster seat is used. Confirm that the
the tone will sound intermittently until the
child is wearing the seat belt properly.
seat belt is fastened.
z Do not install any accessory or sticker that
makes the light difficult to see.
Seat and restraint systems
4-11

Seat belts
Adjustable seat belt shoulder
WARNING
Installation
anchor (front seats)
z Adjust the shoulder belt anchor only when
1. Unfasten the button (A) of the seat belt
the vehicle is not in motion.
N00406300357
guide strap. Put the seat belt webbing
z Make sure the anchor is securely locked in
The seat belt anchor height can be adjusted.
through the seat belt guide strap and fas-
position after adjusting it.
To move the anchor, pull the lock knob (A)
ten the button.
4
and slide the anchor to the desired position.
Release the lock knob to lock the anchor into
Seat belt guide strap (rear seat)
position.
N00419301055
The seat belt guide straps are equipped on the
seatback.
The seat belt guide strap will provide comfort
by keeping away the belt webbing from your
neck.
CAUTION
z Make sure the part of the seat belt webbing
you inserted into the seat belt guide strap is
not twisted.
WARNING
Twisted webbing may adversely affect seat
z Always adjust the shoulder belt anchor so
belt performance.
that the shoulder belt is positioned across
the center of your shoulder without touch-
ing your neck. The shoulder belt should
not be able to fall off your shoulder. Fail-
ure to follow this instruction can adversely
affect seat belt performance and increase
the risk of serious injury or death in the
event of an accident.
4-12
Seat and restraint systems
Seat belt use during pregnancy
2. Fasten the seat belt and make sure it fits
WARNING
Seat belt pre-tensioner and
snugly across your shoulder.
z The extender should only be used if the
force limiter systems
existing belt is not long enough. Anyone
N00417701752
who can use the standard seat belt should
not use an extender. Unnecessary use of an
The driver’s and front passenger’s seats each
extender can adversely affect seat belt
have a seat belt equipped with a pre-tensioner
4
performance in an accident.
system and force limiter system.
z When not required, the extender must be
removed and stowed.
Pre-tensioner system
The driver and front passenger seat belts are
Seat belt use during preg-
equipped with a seat belt pre-tensioner sys-
nancy
tem. In a moderate-to-severe frontal or side
N00406800147
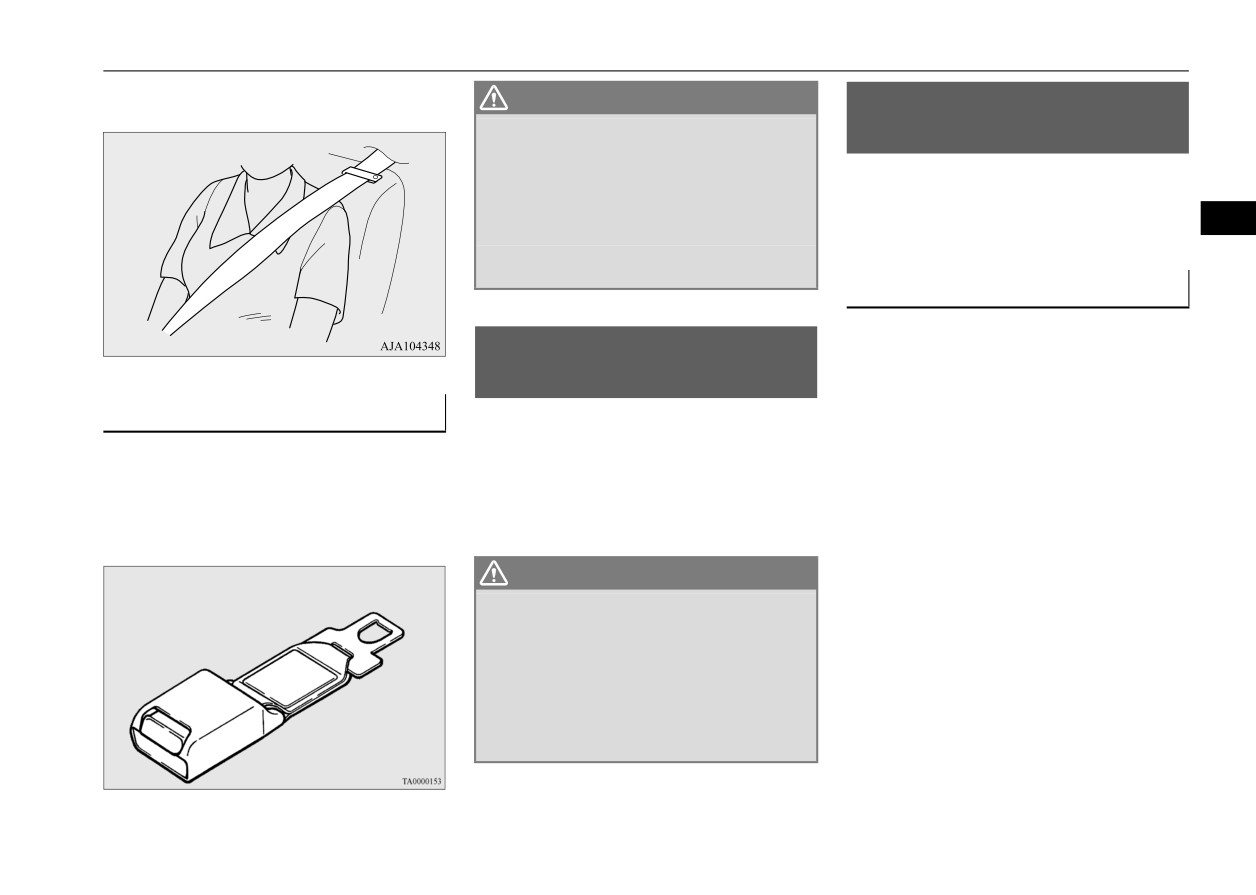
Seat belt extender
collision or when a rollover or overturning of
Seat belts work for everyone, including preg-
the vehicle is detected, the pre-tensioner sys-
N00406700205
nant women. Like all occupants, pregnant
tem operates simultaneously with the deploy-
If your seat belt is not long enough, even
women are more likely to be seriously injured
ment of the front airbags, side airbags or
when fully extended, a seat belt extender
or killed in an accident if they do not wear
curtain airbags.
must be obtained. The extender may be used
seat belts.
The seat belt pre-tensioners are located within
for either of the front seats.
the seat belt retractors (A). When activated,
the pre-tensioners quickly draw back seat belt
WARNING
webbing and increase seat belt performance.
z To reduce the risk of serious injury or
death to pregnant women and unborn
children in an accident, pregnant women
should always wear a seat belt. The lap
portion of the seat belt should be worn
snug and low across the hips and below
the rounding. Consult your doctor if you
have any additional questions or concerns.
Seat and restraint systems
4-13

Child restraint systems
the ignition switch or the operation mode is
WARNING
under the following conditions. These include
z The seat belt pre-tensioner system is
all of the items listed above and all related
designed to work only once. After the seat
wiring.
belt pre-tensioners have been activated,
[Except for vehicles equipped with the
they will not work again. They must
F.A.S.T.-key]
promptly be replaced and the entire seat
4
The ignition switch is in the
“ON” or
belt pre-tensioner system inspected by an
“START” position.
authorized Mitsubishi Motors dealer.
[Vehicles equipped with the F.A.S.T.-key]
The operation mode is in ON.
SRS warning light
The seat belt pre-tensioners will operate
The seat belt pre-tensioner
system includes
N00408700137
under the same conditions as the airbag con-
the following components:
This warning light tells you if there is a prob-
trol unit.
lem involving the SRS airbags and/or the seat
When the seat belt pre-tensioners activate,
belt pre-tensioner system. Refer to
“SRS
some smoke is released and a loud noise will
warning light” on page 4-31.
be heard. The smoke is not harmful, but care
should be taken not to intentionally inhale it,
Force limiter system
as it may cause some temporary irritation to
N00408900142
people with respiratory problems.
In the event of an accident, the seat belt force
The pre-tensioners activate in the event of a
limiter system will help reduce the force
moderate-to-severe front or side impact, even
applied to the driver and front seat passenger.
if the seat belt is not being worn. The seat belt
pre-tensioners may not activate in certain col-
1-
SRS warning light
lisions, even though the vehicle may appear
Child restraint systems
2-
Front impact sensors
to be severely damaged. Such non-activation
N00407101926
3-
Seat belt pre-tensioner
does not mean that something is wrong with
When transporting infants or small children
4-
Side impact sensors
the seat belt pre-tensioner system, but rather
in your vehicle, an appropriate child restraint
5-
Airbag control unit
that the collision forces were not severe
system must always be used. This is required
enough to activate the system.
by law in the U.S.
The airbag control unit monitors the readiness
of the electronic parts of the system whenever
4-14
Seat and restraint systems
Child restraint systems
Child restraint systems specifically designed
z
Children less than 2 years old and who
WARNING
for infants and small children are offered by
weigh 40 pounds (18 kg) or less MUST
z
Any child who is too large to use a child
several manufacturers. Choose only a child
ride in a rear-facing child safety seat that
restraint system should ride in the rear
restraint system with a label certifying that it
MUST ONLY be used in the rear seat.
seat and wear the lap-and-shoulder belt
complies with Federal Motor Vehicle Safety
z
Children older than 2 years of age and
properly. The shoulder belt must be posi-
Standard 213 (FMVSS 213) or Motor Vehicle
who weigh less than 60 pounds (27 kg) or
tioned over the shoulder and across the
Restraint Systems and Booster Seats Safety
who are less than 57 inches (145 cm) tall
4
chest, not across their neck, and with the
Regulations (RSSR). Look for the manufac-
must be in an appropriate child restraint
lap belt positioned low on the child’s hips,
turer’s statement of compliance on the box
system used only in the rear seat.
not across their stomach. If necessary, a
and child restraint system itself.
z
Children who weigh more than 60 pounds
booster seat should be used to help achieve
(27 kg) or who are more than 57 inches
a proper seat belt fit. Follow the booster
The child restraint system should be appropri-
seat manufacturer’s instructions. Only use
(145 cm) tall, regardless of age, should
ate for your child’s weight and height, and
a booster seat that is certified as comply-
use a suitable child seat or a booster seat
ing with Federal Motor Vehicle Safety
should properly fit your vehicle’s seat.
in the rear seat until the vehicle’s lap-and-
Standards or Motor Vehicle Restraint Sys-
For detailed information, refer to the instruc-
shoulder belt fits them properly.
tems and Booster Seats Safety Regula-
tion manual accompanying the child restraint
tions.
system.
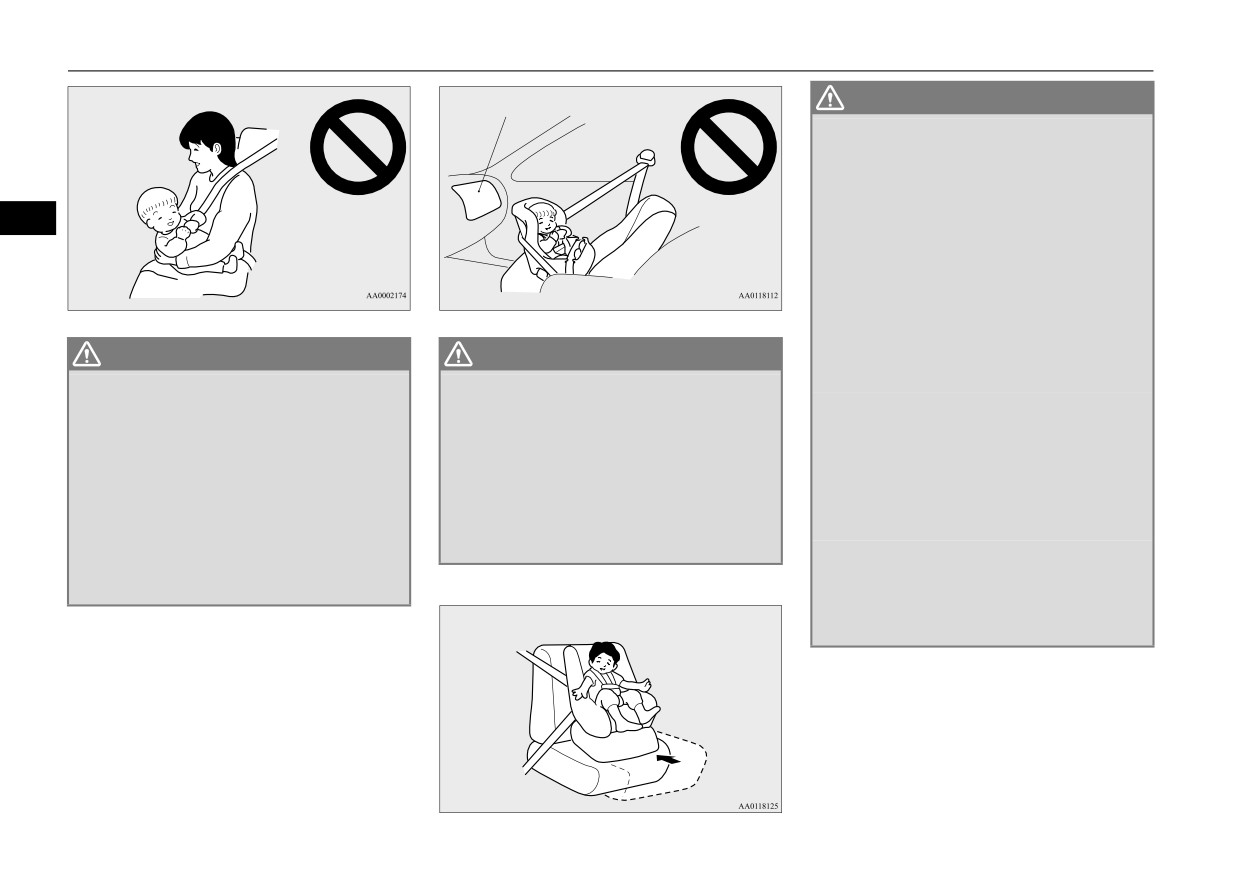
z
Never hold an infant or child in your arms
WARNING
or on your lap when riding in this vehicle,
z All children must be seated in the rear
Recommendations for child
even when you are wearing your seat belt.
seat, and properly restrained.
Never place any part of the seat belt you
restraint system selection
Accident statistics show that children of
are wearing around an infant or child.
all sizes and ages are safer when properly
Failure to follow these simple instructions
restrained in the rear seat, rather than in
All children should be properly restrained in
creates a risk of serious injury or death to
the front seat.
a restraint device that offers the maximum
your child in the event of an accident or
z Be sure to select a child restraint system
sudden stop.
protection for their size and age as specified
that is appropriate not only for the child’s
by local, state, or provincial laws.
size and age but also for your vehicle.
Be sure to check local, state, or provincial
Some child restraint systems may not fit
requirements for child size and age that may
your vehicle properly.
vary from the recommendations listed below.
Seat and restraint systems
4-15
Child restraint systems
Airbag
WARNING
z
It is important to use an approved rear-
facing infant restraint until the infant is
one year old (unless the infant outgrows
the seat sooner). This allows the infant’s
neck and spine to develop enough to sup-
4
port the weight of their head in the event
of an accident.
z
When installing a child restraint system,
follow the instructions provided by the
manufacturer and follow the directions in
this manual. Failure to do so can result in
WARNING
WARNING
serious injury or death to your child in an
accident or sudden stop.
z
Your vehicle is also equipped with a front
z
FRONT-FACING CHILD RESTRAINT
passenger’s airbag.
SYSTEMS should be used in the rear seat
z
After installation, push and pull the child
Never put REAR-FACING CHILD
whenever possible. If one must be used in
restraint system back and forth, and side
RESTRAINT SYSTEMS or INFANT
the front passenger seat, move the seat to
to side, to see that it is firmly secured. If
RESTRAINT SYSTEMS in the front pas-
the most rearward position and make sure
the child restraint system is not installed
senger seat. This places the infant too
the child stays in the child restraint sys-
securely, it may cause injury to the child
close to the passenger’s airbag. During
tem, properly restrained. Failure to follow
or other occupants in the event of an acci-
deployment of that airbag, the infant can
these instructions could result in serious
dent or sudden stop.
be seriously injured or killed. Rear-facing
injury or death to the child.
z
When not in use, keep your child restraint
child restraint systems or infant restraint
system secured with the seat belt, or
systems must only be used in the rear seat.
remove it from the vehicle, in order to pre-
vent it from being thrown around inside
the vehicle during an accident.
4-16
Seat and restraint systems
Child restraint systems
NOTE
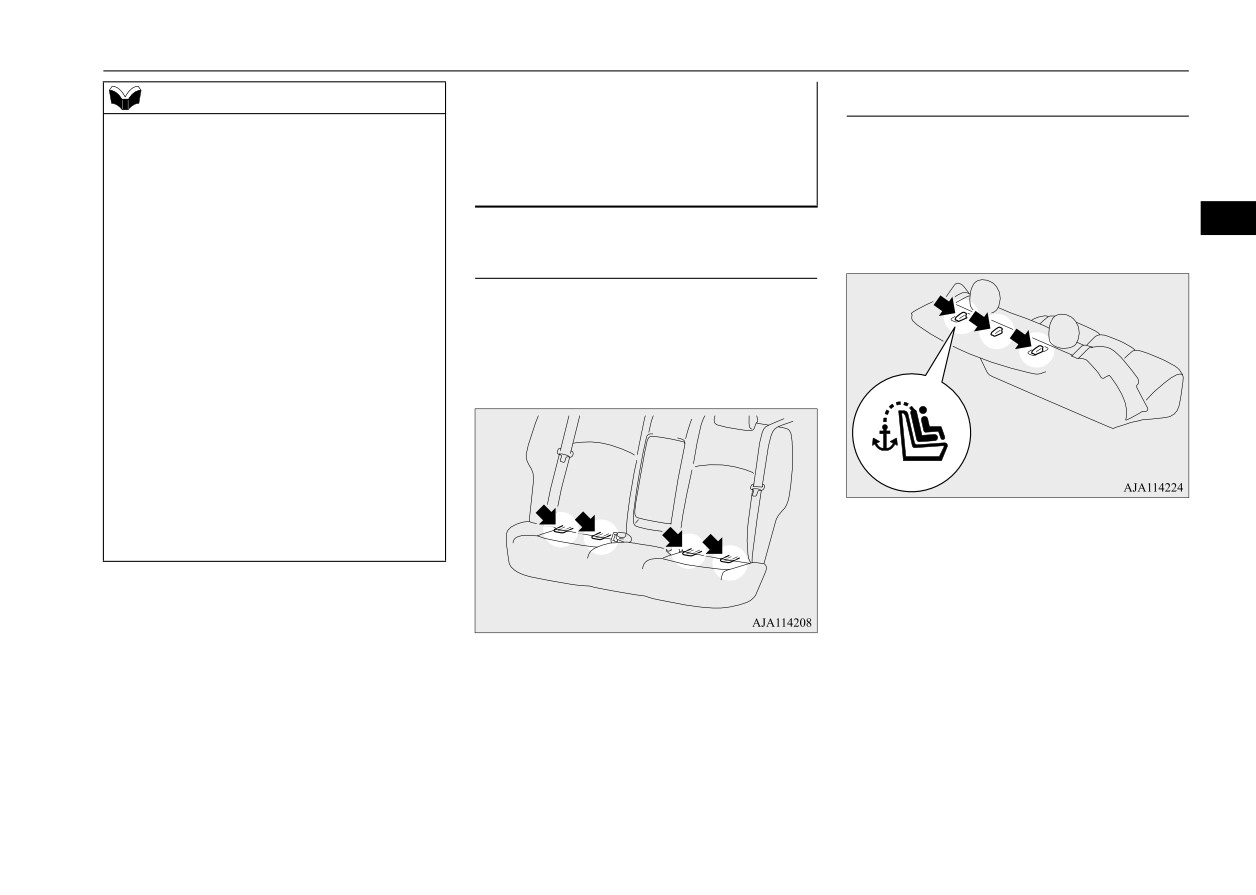
Installing a child restraint sys-
Tether anchor locations
z
Before purchasing a child restraint system,
N00418901230
tem using the LATCH (Lower
try installing it in the rear seat to ensure
Your vehicle has 3 attachment points on the
Anchors and Tethers for chil-
proper fit. Due to the location of the seat belt
rear shelf, located behind the top of your rear
buckles and the shape of the seat cushion, it
dren) system
seat. These are for securing a child restraint
may be difficult to securely install some
N00418801183
system tether strap to each of the 3 rear seat-
4
manufacturer’s child restraint systems.
ing positions in your vehicle.
If the child restraint system can be pulled
Lower anchor locations
forward or to either side easily on the seat
cushion after the seat belt has been tightened,
The outboard seating positions in the rear seat
choose another manufacturer’s child restraint
of your vehicle are equipped with lower
system.
anchors for attaching child restraint systems
Depending on the seating position in the
vehicle and the child restraint system that
compatible with the LATCH system.
you have, the child restraint system can be
attached using one of the following 2 meth-
ods:
• Attach to the lower anchorage in the rear
seat ONLY if the child restraint system is
compatible with the LATCH system (See
page 4-17).
• Attach to the seat belt (See page 4-21).
Seat and restraint systems
4-17
Child restraint systems
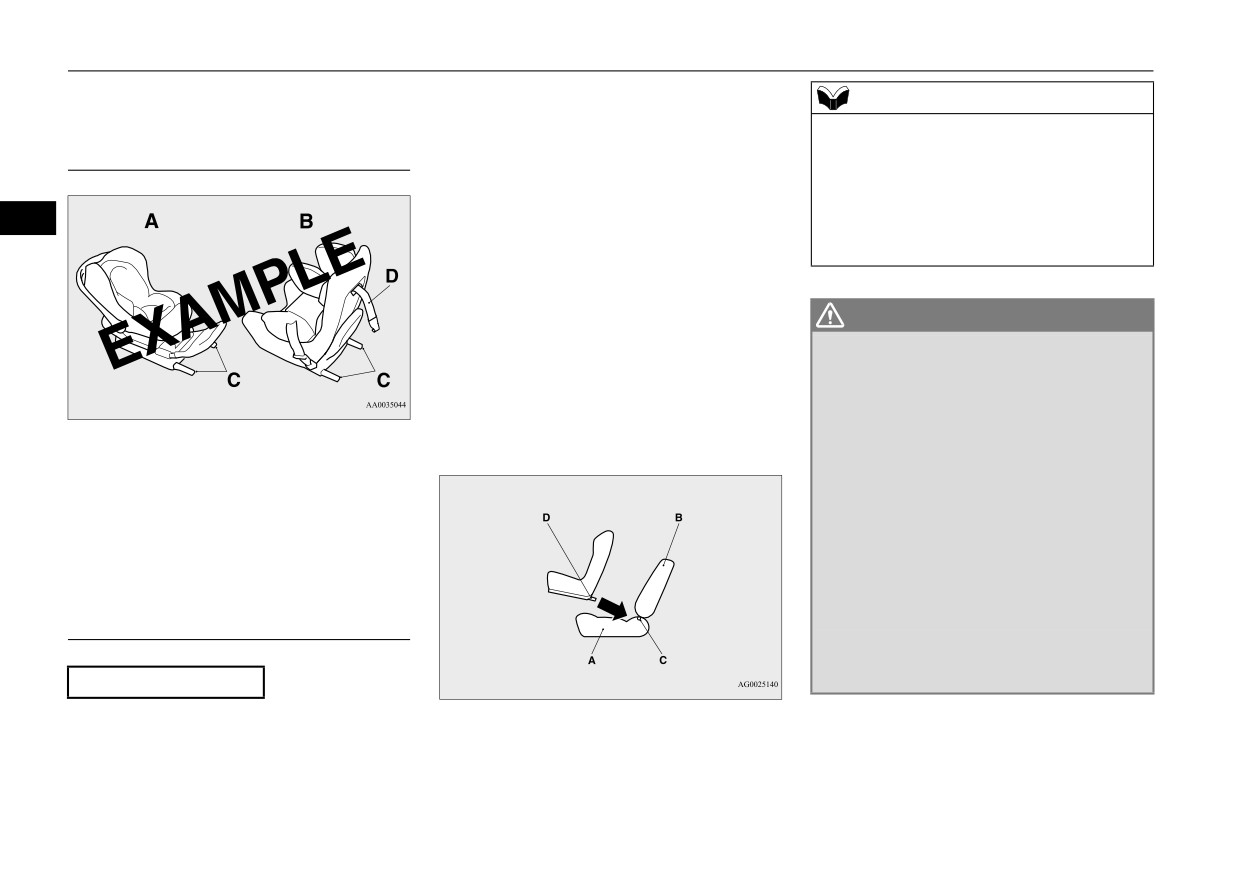
2. Open the gap a little between the seat
Examples of child restraint sys-
NOTE
cushion (A) and the seatback (B) with
tems compatible with the LATCH
z
In order to secure a child restraint system
your hand to locate the lower anchors (C).
compatible with the LATCH system, you
system
3. Push the anchor connectors (D) on the
must use the lower anchor points in the out-
N00419000202
child restraint system into the lower
board positions of the rear seat. To secure a
anchors
(C) in accordance with the
child restraint system in the center position
4
instructions provided by the child restraint
of the rear seat, you must use the vehicle’s
system manufacturer.
center seat belt.
Remember, the lower anchors provided
with your vehicle are designed to secure
suitable child restraint systems compat-
WARNING
ible with the LATCH system in the out-
z
If there is any foreign material in or
board positions of the rear seat only.
around the lower anchors, remove it
The anchor connectors are NOT
before installing the child restraint sys-
designed to secure a suitable child
tem. Also, make sure the seat belt is away
restraint system in the center position
from, not looped through or otherwise
A- Rear-facing child restraint system
interfering with, the child restraint sys-
of the rear seat.
B- Front-facing child restraint system
tem. If foreign matter is not removed
C- Child restraint system lower anchor
and/or the seat belt interferes with the
connectors
child restraint system, the child restraint
D- Tether strap
system will not be secured properly, could
(These are only examples.)
detach and move forward in the event of
sudden braking or an accident, and could
result in injury to the child or other vehi-
cle occupants.
Using the LATCH system
z
When the vehicle is moving, do not adjust
N00419101369
the seat where the child restraint system is
Except for booster seat
installed.
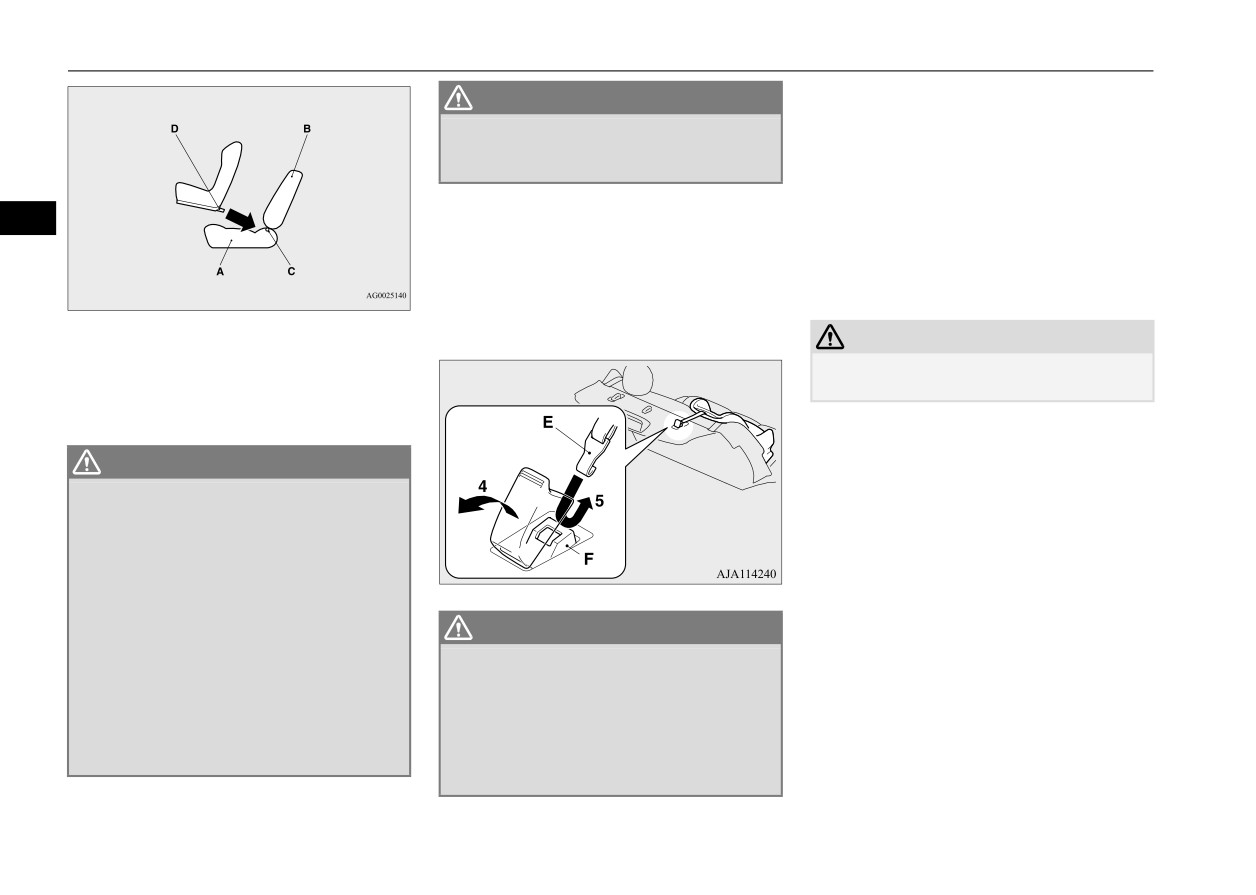
1. In order to securely fasten the tether strap,
A- Vehicle seat cushion
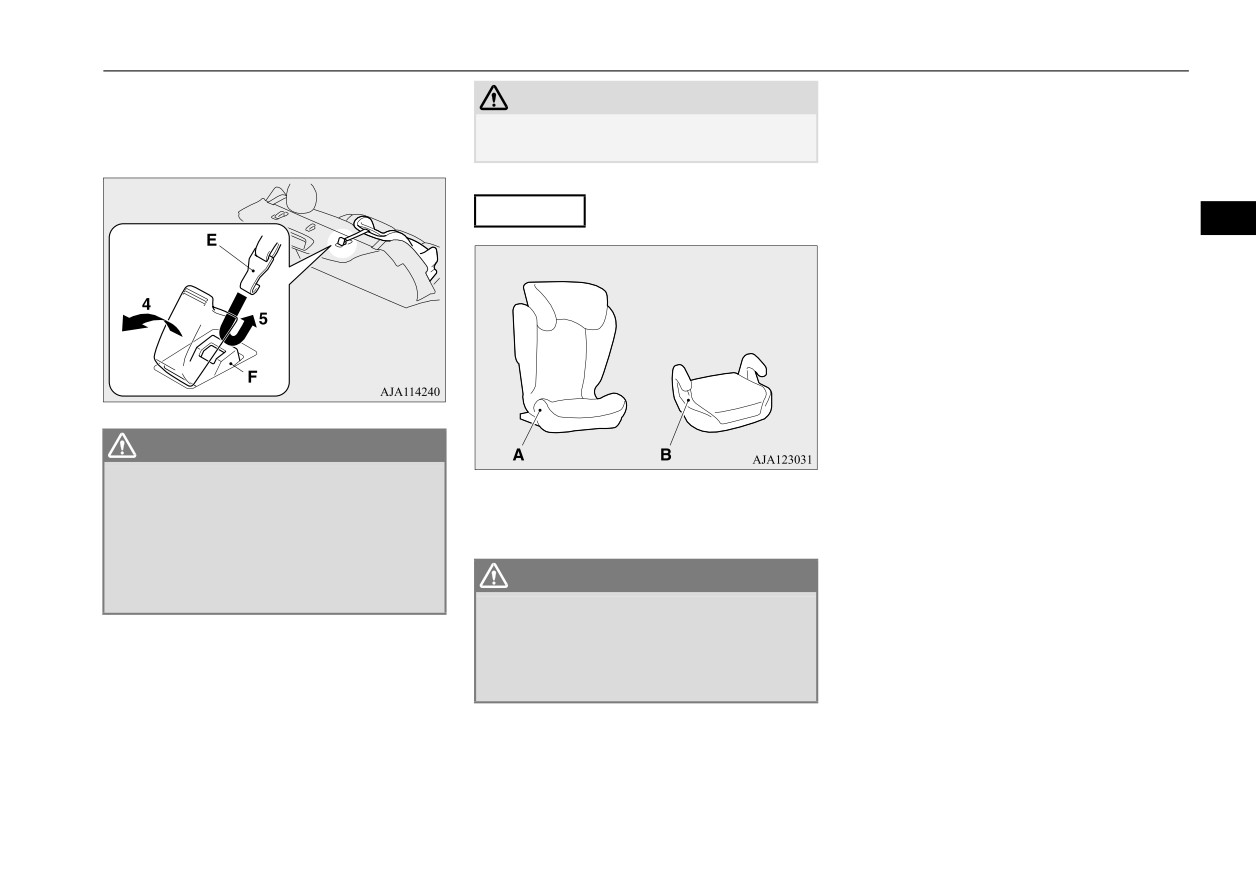
4. Open the cover for the tether anchor by
remove the head restraint from the loca-
B- Vehicle seatback
pulling it back with your hand as illus-
tion where you wish to install the child
C- Lower anchor
trated below (4).
restraint system.
D- Connector
4-18
Seat and restraint systems
Child restraint systems
5. Latch the tether strap hook (E) of the child
High back booster seat
CAUTION
restraint system to the anchor (F) as illus-
z After removing the child restraint system,
trated below (5) and tighten the top tether
1. In order to securely fasten the tether strap,
install the head restraint.
strap so it is securely fastened.
remove the head restraint from the loca-
tion where you wish to install the high
back booster seat.
Booster seat
4
2. Open the gap a little between the seat
cushion (A) and the seatback (B) with
your hand to locate the lower anchors (C).
3. Push the anchor connectors (D) on the
high back booster seat into the lower
anchors
(C) in accordance with the
instructions provided by the child restraint
system’s manufacturer.
Remember, the lower anchors (C) pro-
vided with your vehicle are designed to
WARNING
secure suitable high back booster seats
z
Child restraint system tether anchors are
compatible with the LATCH system in
A- High back booster seat
designed only to withstand loads from cor-
the outboard positions of the rear seats
rectly fitted child restraint systems. Under
B- Booster cushion
only. The anchor connectors are NOT
no circumstances are they to be used for
designed to secure a suitable high back
adult seat belts, harnesses, or for attach-
booster seat in the middle seating posi-
ing other items or equipment to the vehi-
WARNING
tion of the rear seat.
cle.
z To avoid injury to child, do not use the
lap/shoulder belt Automatic Locking
6. Before putting your child in the restraint,
Retractor (ALR) child restraint installa-
tion function when using a booster seat
push and pull the restraint in all directions
with the seat belts.
to be sure it is firmly secure. Do this
before each use. If the child restraint sys-
tem is not firmly secure, repeat steps 3
through 5.
Seat and restraint systems
4-19
Child restraint systems
6. Before putting your child in the restraint,
WARNING
push and pull the high back booster seat in
z When the vehicle is moving, do not adjust
all directions to be sure it is firmly secure.
the seat where the high back booster seat
Do this before each use. If the high back
is installed.
booster seat is not firmly secure, repeat
4. Open the cover for the tether anchor by
steps 3 through 5.
4
pulling it back with your hand as illus-
7. Sit the child in the high back booster seat.
trated below (4).
Fit the seat belt to the high back booster
5. Latch the tether strap hook (E) of the child
seat according to the child restraint sys-
restraint system to the anchor (F) as illus-
tem’s manufacturer.
trated below (5) and tighten the top tether
A- Vehicle seat cushion
strap so it is securely fastened.
CAUTION
B- Vehicle seatback
z After removing the high back booster seat,
C- Lower anchor
install the head restraint.
D- Connector
WARNING
z
If there is any foreign material in or
around the lower anchors, remove it
before installing the high back booster
seat. Also, make sure the seat belt is away
from, not looped through or otherwise
interfering with, the high back booster
seat. If foreign matter is not removed
WARNING
and/or the seat belt interferes with the
high back booster seat, the high back
z
Child restraint system tether anchors are
booster seat will not be secured properly,
designed only to withstand loads from cor-
could detach and move forward in the
rectly fitted child restraint systems.
event of sudden braking or an accident,
Under no circumstances are they to be
and could result in injury to the child or
used for adult seat belts, harnesses, for
other vehicle occupants.
attaching other items, or equipment to the
vehicle.
4-20
Seat and restraint systems

Child restraint systems
3. Sit the child in the booster cushion.
Booster cushion
Fit the seat belt to the booster cushion
according to the child restraint system’s
CAUTION
manufacturer
z Do not remove the head restraint when
installing a booster cushion.
WARNING
z
When using a child restraint in a rear
4
1. Open the gap a little between the seat
seating position, always review the
instructions provided with that restraint
cushion (A) and the seatback (B) with
to make sure it is compatible with this
your hand to locate the lower anchors (C).
vehicle and to understand how to properly
2. Push the anchor connectors (D) on the
A- Vehicle seat cushion
install it.
booster cushion into the lower anchors
B- Vehicle seatback
Child restraints, including booster seats,
(C) in accordance with the instructions
C- Lower anchor
come in different sizes and configurations.
provided by the child restraint system’s
Depending on where you place these child
D- Connector
manufacturer.
restraints, and depending on their size and
Remember, the lower anchors (C) pro-
configuration, you may not be able to
vided with your vehicle are designed to
access or properly use one or more adja-
WARNING
secure suitable booster cushions com-
cent seat belt assemblies. If this occurs,
z
If there is any foreign
material
in
or
the adjacent seating position or positions
patible with the LATCH system in the
around the lower anchors, remove it
should not be used. Failure to use a seat
outboard positions of the rear seats
before installing the booster cushion. Also,
belt or improper use of a seat belt can
only. The anchor connectors are NOT
make sure the seat belt is away from, not
result in serious injury or death should a
designed to secure a suitable booster
looped through or otherwise interfering
crash occur.
cushion in the middle seating position
with, the booster cushion. If foreign mat-
of the rear seat.
ter is not removed and/or the seat belt
interferes with the booster cushion, the
booster cushion will not be secured prop-
Installing a child restraint sys-
erly, could detach and move forward in
tem using the seat belt (with
the event of sudden braking or an acci-
emergency/automatic locking
dent, and could result in injury to the
child or other vehicle occupants.
mechanism)
z
When the vehicle is moving, do not adjust
N00407301625
the seat where the booster cushion is
With the exception of the driver, the seat belt
installed.
in all other seating positions can be converted
Seat and restraint systems
4-21

Child restraint systems
from normal Emergency Locking Retractor
2. Route the seat belt through the child
WARNING
(ELR) mode, to Automatic Locking Retractor
restraint system according to the instruc-
z
Never remove the buckle (A) for the rear
(ALR) mode. This means that when you pull
tions provided by the child restraint sys-
center seat from the rubber belt (B). If the
the seat belt fully out of the retractor, the
tem’s manufacturer. Then insert the seat
buckle is detached from the rubber belt,
retractor will switch to its ALR child restraint
belt latch plate into the buckle. Make sure
the ALR mode may become deactivated
installation function. Always use the ALR
you hear a “click” when you insert the
and a child restraint system used in the
4
child restraint installation function when you
latch plate into the buckle.
rear center seat position may not be
install a child restraint system using the seat
secured, resulting in serious injury or
belt.
death to a child using the child restraint
system and/or other occupants. Always
Children
12 years old and under should
make sure that the buckle is passed under
always be restrained in the rear seat, when-
the rubber belt as shown in the illustration
ever possible, although the front passenger
below.
seat belt can also be converted to ALR mode.
WARNING
z
When you install a child restraint system
using the seat belt, always make sure the
retractor has been switched to the ALR
child restraint installation function. The
ALR function will keep the child restraint
system tightly secured to the seat.
Failure to convert the retractor to the
ALR function may allow the child
restraint system to move forward during
sudden braking or an accident, resulting
in serious injury or death to the child or
Installation
other occupants.
1. Place the child restraint system on the seat
where you wish to install it.
To help assure proper fitting of the child
restraint system, always remove the head
restraint.
4-22
Seat and restraint systems

Child restraint systems
3. To activate the ALR child restraint instal-
5. After confirming that the belt is locked,
7. Latch the tether strap hook
(A) of the
lation function, slowly pull the shoulder
grab the shoulder part of the belt near the
child restraint system to the tether anchor
part of the belt all the way out of the
buckle and pull up to remove any slack
(B) as illustrated below (7) and tighten the
retractor until it stops. Then let the belt
from the lap part of the belt allowing the
top tether strap so it is securely fastened.
feed back into the retractor.
slack to feed into the retractor. Remember,
if the lap belt portion is not tight, the child
restraint system will not be secure. It may
4
help to put your weight on the child
restraint system and/or push on its seat-
back while pulling up on the belt (See
illustration).
4. After the belt has retracted, tug on it.
WARNING
If the belt is in the ALR function, you will
z Child restraint system tether anchors are
not be able to pull it out. If the webbing
designed only to withstand loads from cor-
can be pulled out from retractor, the ALR
rectly fitted child restraint systems. Under
function has not been activated and you
no circumstances are they to be used for
adult seat belts, harnesses, or for attach-
will need to repeat steps 3 and 4.
ing other items or equipment to the vehi-
If your child restraint system requires the use
cle.
of a tether strap, fasten the tether strap in
accordance with the following procedures.
8. Before putting your child in the restraint,
push and pull the restraint in all directions
6. Open the cover from the tether anchor
to be sure it is firmly secure. Do this
installation point by pulling it back with
before each use. If the child restraint sys-
your hand as illustrated below (6).
tem is not firmly secure, repeat steps 1
through 7.
Seat and restraint systems
4-23

Child restraint systems
High back booster seat
CAUTION
WARNING
z After removing the child restraint system, be
z Child restraint system tether anchors are
1. Place the high back booster seat on the
sure to perform the following actions.
designed only to withstand loads from cor-
seat where you wish to install it.
• Wind up the seat belt completely to deacti-
rectly fitted child restraint systems.
To help assure proper fitting of the high
vate the ALR mode.
Under no circumstances are they to be
back booster seat, always remove the head
• Install the head restraint.
used for adult seat belts, harnesses, for
4
restraint.
attaching other items, or equipment to the
If your high back booster seat requires the
vehicle.
Booster seat
use of a tether strap, fasten the tether strap
in accordance with the following proce-
4. Sit the child in the high back booster seat.
dures.
Fit the seat belt to the high back booster
2. Open the cover from the tether anchor
seat according to the child restraint sys-
installation point by pulling it back with
tem’s manufacturer.
your hand as illustrated below (2).
3. Latch the tether strap hook
(A) of the
CAUTION
child restraint system to the tether anchor
z After removing the high back booster seat,
bar (B) as illustrated below (3) and tighten
install the head restraint.
the top tether strap so it is securely fas-
tened.
Booster cushion
A- High back booster seat
B- Booster cushion
CAUTION
z Do not remove the head restraint when
installing a booster cushion.
WARNING
z To avoid injury to child, do not use the
1. Place the booster cushion on the seat
lap/shoulder belt Automatic Locking
Retractor (ALR) child restraint installa-
where you wish to install it.
tion function when using a booster seat
2. Sit the child in the booster cushion. Fit the
with the seat belts.
seat belt to the booster cushion according
to the child restraint system’s manufac-
turer.
4-24
Seat and restraint systems
Maintenance and inspection of seat belts
Children who have outgrown
WARNING
WARNING
child restraint systems
z Keep your vehicle locked and the trunk lid
z
Do not attempt to repair or replace any
closed when not in use. Keep your vehicle
part of the seat belt assemblies. This work
N00407601686
keys away from children.
should be done by an authorized
Children who have outgrown a child restraint
z Never allow children to play in the trunk
Mitsubishi Motors dealer. Failure to have
system should be seated in the rear seat and
of your vehicle.
an authorized Mitsubishi Motors dealer
wear the seat belt. If the shoulder belt crosses
perform the work could reduce the effec-
4
their face or neck, and/or the lap belt crosses
tiveness of the belts and could result in a
their stomach, a commercially available
Maintenance and inspection
serious injury or death in an accident.
booster seat must be used to raise the child so
z
Never use an organic solvent to clean the
of seat belts
that the shoulder belt crosses their shoulder
seat belt webbing. Do not attempt to
N00407001404
bleach or re-dye the seat belt webbing.
and the lap belt remains positioned low
Regularly check your seat belt buckles and
These may weaken the seat belt webbing,
across their hips. The booster seat should fit
their release mechanisms for positive engage-
increasing risk of injury or death in an
the vehicle seat and have a label certifying
ment and release of the latch plate. Check the
accident.
compliance with Federal Motor Vehicle
retractors for automatic locking when in the
Clean seat belt webbing only with mild
Safety Standards or Motor Vehicle Restraint
Automatic Locking Retractor function.
soap or detergent solution and rinse it
Systems and Booster Seats Safety Regula-
with lukewarm water, and dry the seat
tions.
belt webbing completely before retracting
The entire seat belt assembly should be
it.
replaced if the webbing shows any obvious
WARNING
cuts, tears, increase in thickness in any sec-
z
Any child who is too small to properly
tion of the webbing from broken fibers, or
wear a seat belt must be properly
severe fading from sunlight. All of these con-
Supplemental Restraint Sys-
restrained in an appropriate child
ditions indicate a weakening of the belt,
tem (SRS) - airbag
restraint system, to reduce their risk of
which may adversely affect seat belt perfor-
N00407701850
serious injury or death in an accident.
mance in an accident.
z
A child should never be left unattended in,
This vehicle is equipped with a Supplemental
or unsupervised around, your vehicle.
Restraint System (SRS), which includes air-
When you leave the vehicle, always take
bags for the driver and passengers.
the child out as well.
z
Children can die from heat stroke if left or
The SRS front airbags are designed to supple-
trapped inside the vehicle, especially on
ment the primary protection of the driver and
hot days.
front passenger seat belt systems by provid-
ing those occupants with protection against
Seat and restraint systems
4-25
Supplemental Restraint System (SRS) - airbag
head and chest injuries in certain moderate to
The SRS airbags are NOT a substitute for use
WARNING
severe frontal collisions. The SRS front air-
of the seat belts. For maximum protection in
• Seat belts reduce the risk of being
bags, together with sensors at the front of the
all types of accidents, seat belts must
thrown from your vehicle in a collision or
vehicle and sensors attached to the front
ALWAYS be worn by everyone who drives or
rollover.
seats, form an advanced airbag system.
rides in this vehicle (with infants and small
z
IT IS VERY IMPORTANT TO BE PROP-
children in an appropriate child restraint sys-
ERLY SEATED.
4
The SRS driver’s knee airbag is designed to
tem in the rear seat, and older children buck-
• A driver or front passenger sitting too
supplement the primary protection of the
led in the rear seat). Refer to “Child restraint
close to the steering wheel or instrument
driver’s seat belt system. It can reduce the
systems” on page 4-14.
panel during airbag deployment can be
forward movement of the driver’s lower legs
seriously injured or killed.
and provide increased overall body protection
• Airbags inflate very quickly and with
WARNING
in certain moderate to severe frontal colli-
great force. If the driver and front pas-
z
IT IS VERY IMPORTANT TO ALWAYS
sions.
senger are not properly seated and
WEAR YOUR SEAT BELT PROPERLY
restrained, the airbag may not provide
EVEN WITH AN AIRBAG.
The SRS side airbags and the curtain airbags
the proper protection, and can cause
• Seat belts help keep the driver and pas-
are also designed to supplement the seat belts.
serious injuries or death when it inflates.
sengers properly positioned. This
The SRS side airbags provide the driver and
• To reduce the risk to the driver of serious
reduces the risk of injury in all collisions,
front passenger with protection against chest
injury or death due to a deploying
and reduces the risk of serious injuries or
injuries by deploying the bag on the side
driver’s airbag, always properly wear
death when the airbags inflate.
impacted in moderate to severe side impact
your seat belt and adjust the driver’s seat
During sudden braking just before a col-
as far back as possible, maintaining a
collisions. The SRS curtain airbags provide
lision, an unrestrained or improperly
position that still allows the driver to
the driver and passengers on the front seat
restrained driver or passengers can move
have good control of the steering wheel,
and rear outboard seat with protection against
forward into direct contact with, or
brake, accelerator, and other vehicle con-
head injuries by deploying the curtain airbag
within close proximity to, the airbag
trols.
on the side impacted in moderate to severe
when it begins to inflate.
• To reduce the risk to the front passenger
The beginning stage of airbag inflation is
side impact collisions and by deploying both
of serious injury or death from a deploy-
the most forceful and can cause serious
curtain airbags when a rollover is detected.
ing passenger’s airbag, make sure the
injuries or death if the occupant comes in
The curtain airbags are also designed to help
passenger always wears the seat belt
contact with the airbag at this time.
reduce the risk of complete and partial ejec-
properly, remains seated upright and all
• Seat belts reduce the risk of injury in
tion from the vehicle through side windows
the way back in the seat, and positions
rear impact collisions, and in lower-
in both side impact and rollover type acci-
the seat as far back as possible.
speed frontal collisions because the air-
dents.
bags are not designed to inflate in those
situations.
4-26
Seat and restraint systems