Mitsubishi ASX (2020 year). Manual in english - page 17

Towing
The regulations concerning towing may dif-
NOTE
Towing
fer from country to country. It is recommen-
z
Full wheel covers have a symbol mark (E)
ded that you obey the regulations of the area
provided on the reverse side to show the air
where you are driving your vehicle.
valve location.
If your vehicle needs to be tow-
Before installing the wheel cover to the
ed
wheel, make sure that the opening with the
symbol mark is correctly aligned with the air
If you need to tow your vehicle, we recom-
valve.
mend that you contact a MITSUBISHI
MOTORS Authorized Service Point or tow
3. Push the underside (F) of the wheel cov-
truck company.
er into the wheel.
4. Gently push both sides (G) of the wheel
In the following cases, transport the vehicle
cover and hold them in place with both
using a tow truck.
8
knees.
z The engine runs but the vehicle does not
5. Gently tap around the circumference of
move or abnormal noise is produced.
the wheel cover at the top (H), then push
z Inspection of the vehicle’s underside re-
the wheel cover into place.
veals that oil or some other fluid is leak-
ing.
If a wheel gets stuck in a ditch, do not try to
tow the vehicle.
Please contact your MITSUBISHI MOTORS
Authorized Service Point or a commercial
tow truck service for assistance.
Only when you cannot receive a towing serv-
ice from a MITSUBISHI MOTORS Author-
ized Service Point or commercial tow truck
service, tow your vehicle carefully in accord-
ance with the instructions given in “Emergen-
cy towing” in this part.
8-20
For emergencies

Towing
Towing the vehicle by a tow
CAUTION
truck
z
[For 2WD vehicles equipped with the Active
Stability Control (ASC)]
CAUTION
If the vehicle is towed with the ignition
switch in the “ON” position or the operation
z
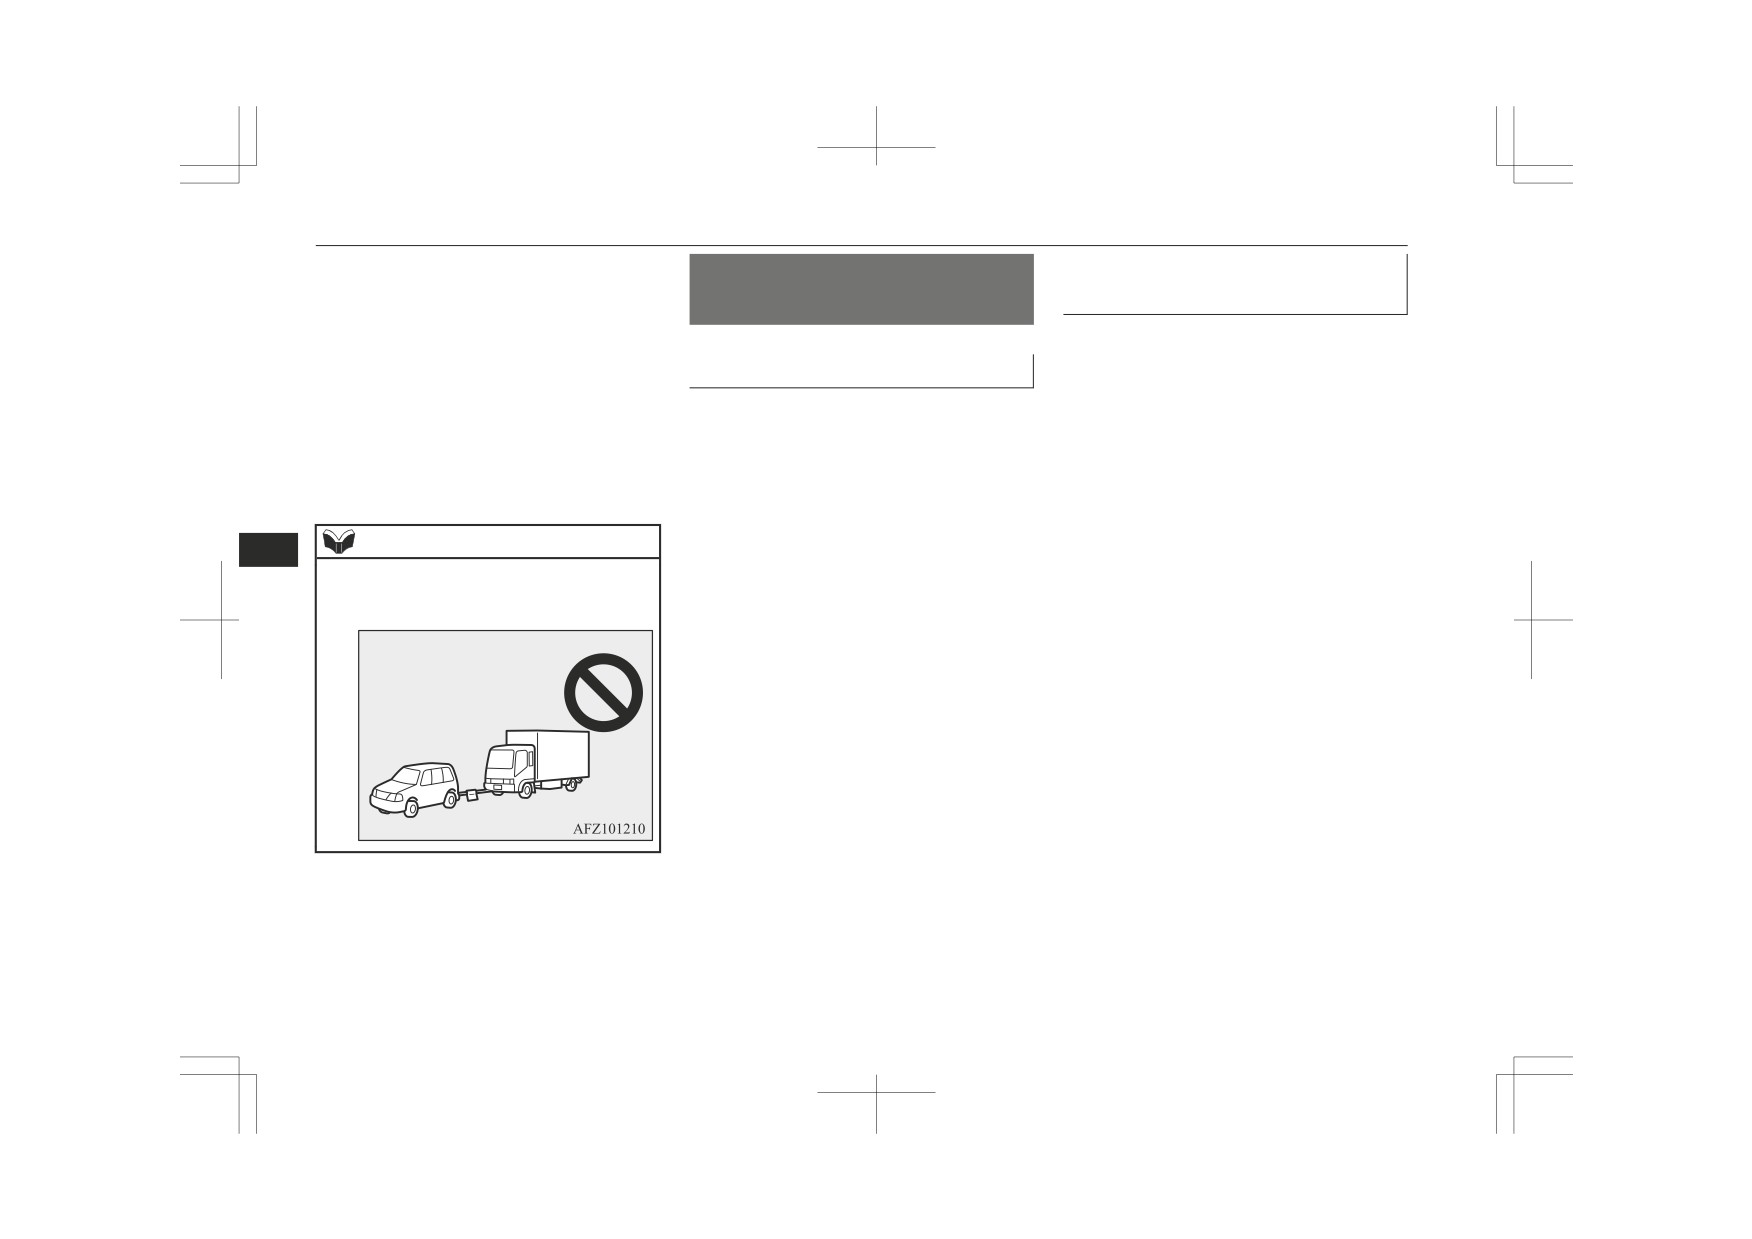
This vehicle must not be towed by a tow
mode in ON and only the front wheels or on-
truck using sling lift type equipment (Type
ly the rear wheels raised off the ground
A) as illustrated. Using a sling lift will dam-
(Type B or C), the ASC may operate, result-
age the bumper and front end.
ing in an accident.
z
Do not tow 2WD vehicles with CVT with
When towing the vehicle with the rear
Do not tow 4WD vehicles, or 2WD vehicles
the driving wheels on the ground (Type B)
wheels raised, turn the ignition switch to the
with CVT, with this style.
as illustrated.
“ACC” position or put the operation mode in
This could result in the driving system dam-
ACC.
age.
When towing the vehicle with the front
Do not tow 4WD vehicles with the front or
8
z
wheels raised, keep the ignition switch or the
rear wheels on the ground (Type B or Type
operation mode as follows.
C) as illustrated. This could result in driving
[Except vehicles equipped with keyless op-
system damage or the vehicle may jump at
Do not tow 4WD vehicles with this style.
eration system]
the carriage.
The ignition switch is in the
“LOCK” or
If you tow 4WD vehicles, use Type D or E
“ACC” position.
equipment.
[Vehicles equipped with keyless operation
z
On 2WD vehicles, if the transmission is mal-
system]
functioning or damaged, transport the vehi-
The operation mode is in OFF or ACC.
cle with the driving wheels on a carriage
(Type C, D or E) as illustrated.
Towing with rear wheels off the
z
The 4WD vehicles cannot be towed with on-
ly the front or rear tyres on the ground even
ground (Type B)
if they are in “2WD” drive mode.
Place the gearshift lever in the “N” (Neutral)
position.
For emergencies
8-21

Towing
Turn the ignition switch to the “ACC” posi-
[Except vehicles equipped with keyless
tion or put the operation mode in ACC and
operation system]
secure the steering wheel in a straight-ahead
Turn the ignition switch to the “ACC” or
position with a rope or tie-down strap. Never
“ON” position (M/T) or “ON” position
place the ignition switch in the “LOCK” po-
(CVT).
sition or put the operation mode in OFF when
[For vehicles with the keyless operation
towing.
system]
Put the operation mode in ACC or ON
Towing with front wheels off the
(M/T) or ON (CVT).
ground (Type C)
Release the parking brake.
NOTE
Place the gearshift lever in the “N” (Neutral)
NOTE
z
For vehicles equipped with the Auto Stop &
position
(M/T) or the selector lever in the
8
Go (AS&G) system, press the “AS&G OFF”
“N” (Neutral) position (CVT).
z
Do not use the tie-down hooks (B) for tow-
switch to deactivate the AS&G system be-
ing. These hooks are provided only for the
fore stopping the vehicle.
purpose of transporting the vehicle itself.
Emergency towing
Refer to “To deactivate” on page 6-20.
Using any part other than the designated
If towing service is not available in an emer-
towing hook (A) could result in damage to
gency, your vehicle may be temporarily tow-
the vehicle body.
WARNING
ed by a rope secured to the towing hook.
z
Using a wire rope, metal chain or towing bar
If your vehicle is to be towed by another ve-
can result in damage to the vehicle body. It
z
When the engine is not running, the brake
is best to use a non-metallic rope. If you use
booster and power steering system do not
hicle or if your vehicle tows another vehicle,
a wire rope, metal chain or towing bar, wrap
operate. This means higher brake depres-
pay careful attention to the following points:
it with cloth at any point where it touches
sion force and higher steering effort are
the vehicle body.
required. Therefore, vehicle operation is
If your vehicle is to be towed by
z
Take care that the tow rope is kept as hori-
more difficult than usual.
another vehicle
zontal as possible. An angled tow rope can
damage the vehicle body.
1. The front towing hook (A) is located as
CAUTION
shown in the illustration. Secure the tow
rope to the front towing hook.
2. Keep the engine running.
z
Do not leave the ignition switch in the
If the engine is not running, perform the
“LOCK” position or the operation mode in
OFF. The steering wheel will lock, causing
following operation to unlock the steer-
loss of control.
ing wheel.
8-22
For emergencies

Towing
2. Cover the end of the jack bar (C) with
CAUTION
CAUTION
cloth and use it to remove the lid from
z
For vehicles equipped with the Forward Col-
z When towing or being towed down a long
the rear bumper.
lision Mitigation system
(FCM), stop the
slope, the brakes may overheat reducing the
system to prevent an unexpected accident or
effectiveness. In this situation, have your ve-
unexpected operation during towing.
hicle transported by a tow truck.
Refer to “Forward Collision Mitigation sys-
z When a vehicle equipped with CVT is to be
tem (FCM)” on page 6-49.
towed by another vehicle with all the wheels
on the ground, make sure that the towing
speed and distance given below are never
3. Place the gearshift lever in the
“N”
exceeded, since this may cause damage to
(Neutral) position (M/T), or the selector
the transmission.
lever in the
“N”
(Neutral) position
(CVT).
Towing speed: 40 km/h (25 mph)
4. Turn on the hazard warning lamps if re-
Towing distance: 40 km (25 miles)
8
quired by law. (Follow the local driving
For the towing speed and the towing dis-
laws and regulations.)
tance, follow the
local driving laws and reg-
5. During towing make sure that close con-
3. Use the wheel nut wrench (D) to firmly
ulations.
tact is maintained between the drivers of
attach the towing hook.
both vehicles, and that the vehicles trav-
el at low speed.
If your vehicle tows another ve-
hicle
CAUTION
1. Take out the towing hook, wheel nut
wrench and jack bar.
z
The person in the vehicle being towed must
pay attention to the brake lamps of the tow-
Refer to “Tools and jack” on page 8-06.
ing vehicle and make sure the rope never be-
comes slack.
z
Avoid sudden braking, sudden acceleration
and sharp turning; such operation could
cause damage to the towing hooks or the tow
rope.
People in the vicinity could be injured as a
result.
For emergencies
8-23
Operation under adverse driving conditions
4. Always attach the tow rope to the towing
Operation under adverse
On a snow-covered or frozen
hook. Otherwise, the instructions are the
road
driving conditions
same as for “When being towed by an-
other vehicle”.
z
The use of snow tyres or tyre chains is
5. When finished towing, remove the tow-
recommended for driving on snow and
On a flooded road
ing hook, and stow it in the specified lo-
ice.
cation.
Refer to the
“Snow tyres” and “Tyre
z
Avoid flooded roads. Water could enter
Refer to “Tools and jack” on page 8-06.
chains” sections.
the brake discs, resulting in temporarily
When installing the bumper lid, align the
z
Avoid high-speed driving, sudden accel-
ineffective brakes. In such cases, lightly
hook with the cut out area on the vehi-
eration, sudden braking, and sharp turns.
depress the brake pedal to see if the
cle, and firmly insert.
brakes operate properly. If they do not,
z
Depressing the brake pedal during travel
on snowy or icy roads may cause tyre
lightly depress the pedal several times
NOTE
while driving in order to dry the brake
slippage and skidding. Tyres may slip if
8
the ability of the tyres to grip the road
Do not tow a vehicle heavier than your own
pads.
z
surface lessens. This may make it more
vehicle.
z
When driving in rain or on a road with
many puddles a layer of water may form
difficult to stop the vehicle with normal
braking operations. For vehicles with an
between the tyres and the road surface.
anti-lock brake system (ABS), firmly de-
This reduces a tyre’s frictional resistance
press and hold down the brake pedal.
on the road, resulting in loss of steering
z
Keep a larger distance than normal be-
stability and braking capability.
tween your vehicle and the vehicle in
front of you, and avoid sudden braking.
To cope with this, observe the following
z
Accumulation of ice on the braking sys-
items:
tem can cause the wheels to lock. Pull
(a) Drive your vehicle at slow
away from a standstill slowly after con-
speed.
firming safety around the vehicle.
(b) Do not drive on worn tyres.
(c) Always maintain the specified
tyre inflation pressures.
8-24
For emergencies
Operation under adverse driving conditions
CAUTION
z Do not press the accelerator pedal rapidly. If
the wheels break free of the ice, the vehicle
could suddenly start moving and possibly
cause an accident.
On a bumpy or rutted road
Drive as slow as possible when driving on
bumpy or rutted roads.
CAUTION
8
z The impact on tyres and/or wheels when
driving on a bumpy or rutted road can dam-
age the tyre and/or wheel.
For emergencies
8-25

Vehicle care precautions
Vehicle care precautions
Cleaning the interior of your
NOTE
vehicle
z Do not use cleaners, conditioners, and pro-
In order to maintain the value of your vehi-
tectants containing silicons or wax.
cle, it is necessary to perform regular mainte-
Such products, when applied to the instru-
After cleaning the interior of your vehicle
nance using the proper procedures.
ment panels or other parts, may cause reflec-
with water, cleaner or similar, wipe and dry
Always maintain your vehicle in compliance
tions on the windscreen and obscure vision.
in a shady, well-ventilated area.
Also, if such products get on the switches of
with environmental pollution control regula-
the electrical accessories, it may lead to fail-
tions.
CAUTION
ure of these accessories.
Carefully select the materials used for wash-
ing, etc., to be sure that they do not contain
z Do not use organic substances
(solvents,
corrosives.
benzine, kerosene, alcohol, petrol, etc.) or
Upholstery
If in doubt, we recommend you to consult a
alkaline or acidic solutions.
1. To maintain the value of your new vehi-
These chemicals can cause discolouring,
specialist for selection of these materials.
cle, handle the upholstery carefully and
staining or cracking of the surface.
If you use cleaners or polishing agents, make
keep the interior clean.
9
CAUTION
sure their ingredients do not include the sub-
Use a vacuum cleaner and brush to clean
stances mentioned above.
the seats. If stained, vinyl and synthetic
z Cleaning products can be dangerous. Always
leather should be cleaned with an appro-
follow the instructions of the cleaning prod-
priate cleaner. Cloth fabrics can be
uct supplier.
Plastic, vinyl leather, fabric
cleaned with either upholstery cleaner or
z To avoid damage, never use the following to
and flocked parts
clean your vehicle:
a 3% aqueous solution of neutral deter-
• Petrol
1. Gently wipe off with a sponge, gauze or
gent in lukewarm water.
• Paint Thinner
other soft cloth soaked with a 3% aque-
2. Clean the carpeting with a vacuum
• Benzine
ous solution of neutral detergent.
cleaner and remove any stains with car-
• Kerosene
2. Dip cloth in fresh water and wring it out
pet cleaner. Oil and grease can be re-
• Turpentine
well. Using this cloth, wipe off the deter-
moved by lightly dabbing with a clean
• Naphtha
gent thoroughly.
colourfast cloth and stain remover.
• Lacquer Thinner
• Carbon Tetrachloride
Genuine leather*
• Nail Polish Remover
1. Gently wipe off with gauze or other soft
• Acetone
cloth soaked with a 5 % aqueous solu-
tion of neutral detergent.
9-02
Vehicle care
Cleaning the exterior of your vehicle
2. Dip cloth in fresh water and wring it out
Use a mild car washing soap if necessary.
Cleaning the exterior of
well. Using this cloth, wipe off the deter-
Rinse thoroughly and wipe dry with a soft
your vehicle
gent thoroughly.
cloth. After washing the vehicle, carefully
3. Apply leather protecting agent to the
clean the joints and flanges of the doors, bon-
If the following is left on your vehicle, it may
genuine leather surface.
net and other sections where dirt is likely to
cause corrosion, discolouration and stains,
remain.
wash the vehicle as soon as possible.
NOTE
z Seawater, road deicing products.
CAUTION
z
If genuine leather is wet with water or is
z Soot and dust, iron powder from facto-
washed in water, wipe off water as quickly
When washing the under side of your vehi-
ries, chemical substance (acids, alkalis,
z
as possible with a dry, soft cloth. If left
coal-tar, etc.).
cle or wheel, be careful not to injure your
damp, mildew may grow.
hands.
z Droppings from birds, carcasses of in-
z
The genuine leather surface may be dam-
As your vehicle has rain sensor wipers, place
sects, tree sap, etc.
z
aged if a nylon brush or synthetic fibre is
the wiper switch lever in the “OFF” position
rubbed hard against it.
to deactivate the rain sensor before washing
z
Organic solvents such as benzine, kerosene,
Washing
the vehicle. Otherwise, the wipers will oper-
9
alcohol and petrol, acid or alkaline solvents
ate in the presence of water spray on the
Chemicals contained in the dirt and dust
may discolour the genuine leather surface.
windscreen and may get damaged as a result.
picked up from the road surface can damage
Be sure to use neutral detergents.
Refrain from excessively using a car wash as
z
Remove dirty patches or oil substances
the paint coat and body of your vehicle if left
z
its brushes may scratch the paint surface,
quickly as they can stain genuine leather.
in prolonged contact.
causing it to lose its gloss. Scratches will be
z
The genuine leather surface may harden and
Frequent washing and waxing is the best way
especially visible on darker coloured vehi-
shrink if it is exposed to direct sun for long
cles.
to protect your vehicle from this damage.
hours. When your vehicle is parked, place it
Never spray or splash water on the electrical
This will also be effective in protecting it
z
in the shade as much as possible.
components in the engine compartment. Do-
from environmental elements such as rain,
z
When the temperature of the vehicle interior
ing so could have an adverse effect on the
snow, salt air, etc.
rises in summer, vinyl products left on the
engine startability.
genuine leather seat may deteriorate and
Do not wash the vehicle in direct sunlight.
Exercise caution also when washing the un-
stick to the seat.
Park the vehicle in the shade and spray it
derbody; be careful not to spray water into
with water to remove dust. Next, using an
the engine compartment.
ample amount of clean water and a car wash-
z
Some types of hot water washing equipment
apply high pressure and heat to the vehicle.
ing brush or sponge, wash the vehicle from
They may cause heat distortion and damage
top to bottom.
to the vehicle resin parts and may result in
flooding of the vehicle interior.
Vehicle care
9-03
Cleaning the exterior of your vehicle
CAUTION
CAUTION
Waxing
Therefore:
• If your vehicle is equipped with the Radar
Waxing the vehicle will help prevent the ad-
• Maintain a distance of approx. 70 cm or
sensing misacceleration Mitigation Sys-
herence of dust and road chemicals to the
more between the vehicle body and the
tem (RMS) (Forward), turn off the sys-
paintwork. Apply a wax solution after wash-
washing nozzle.
tem.
ing the vehicle, or at least once every three
• When washing around the door glass,
Refer to “FCM and Radar sensing misac-
months to assist displacing of water.
hold the nozzle at a distance of more than
celeration Mitigation System (RMS) (For-
Do not wax your vehicle in direct sunlight.
70 cm and at right angles to the glass sur-
ward) ON/OFF switch” on page 6-54.
You should wax after the surfaces have
face.
After washing the vehicle, drive the vehicle
cooled.
z
During cold weather
slowly while lightly depressing the brake
pedal several times in order to dry out the
Salt and other chemicals spread on the roads
CAUTION
brakes.
in some areas in winter can have a harmful
Leaving the brakes wet could result in re-
z
Waxes containing high abrasive compounds
effect on the vehicle body. You should there-
duced braking performance. Also, there is a
should not be used. Such waxes remove rust
fore wash the vehicle as often as possible in
possibility that they could freeze up or be-
and stains effectively from the paintwork but
9
accordance with our care-instructions. It is
come inoperative due to rust, rendering the
they are harmful to the lustre on the painted
vehicle unable to move.
recommended to have a preservative applied
surface and the plated surface.
When using an automatic car wash, pay at-
and the underfloor protection checked before
Further, they are harmful to glossy surfaces
z
tention to the following items, referring to
and after the cold weather season.
such as grille, garnish, mouldings, etc.
the operation manual or consulting a car
After washing your vehicle, wipe off all wa-
z
Do not use petrol or paint thinners to remove
wash operator. If the following procedure is
road tar or other contamination to the pain-
terdrops from the rubber parts around the
not followed, it could result in damage to
ted surface.
doors to prevent the doors from freezing.
your vehicle.
z
Do not apply wax to sections that have a
• The outside mirrors are retracted.
black mat paint coating, as doing so could
• The wiper arms are secured in place with
NOTE
cause uneven discolouration, spots or stains.
tape.
If wax gets on such areas, wipe it off using
z To prevent freezing of the weatherstripping
lukewarm water and a soft cloth.
• If your vehicle is equipped with a rear
on the doors, bonnet, etc., they should be
spoiler or roof rails, consult a car wash
treated with silicone spray.
operator before using the car wash.
• As your vehicle has rain sensor wipers,
place the wiper switch lever in the “OFF”
position to deactivate the rain sensor.
9-04
Vehicle care

Cleaning the exterior of your vehicle
Polishing
Chrome parts
Window glass
The vehicle should only be polished if the
In order to prevent spots and corrosion of
The window glass can normally be cleaned
paintwork has become stained or lost its lus-
chrome parts, wash with water, dry thorough-
using only a sponge and water.
tre. Do not polish parts with a mat coating
ly, and apply a special protective coating.
Glass cleaner can be used to remove oil,
and the plastic bumpers. Doing so could
This should be done more frequently in win-
grease, dead insects, etc. After washing the
cause stains or damage the finish.
ter.
glass, wipe dry with a clean, dry, soft cloth.
Never use a cloth that is used for cleaning a
Cleaning plastic parts
Aluminium wheels*
painted surface to clean a window. Wax from
Use a sponge or chamois leather.
1. Remove dirt using a sponge while sprin-
the painted surface could get on the glass and
If a car wax adheres on a grey or black rough
kling water on the vehicle.
lower glass transparency and visibility.
surface of the bumper, moulding or lamps,
2. Use neutral detergent on any dirt that
the surface becomes white. In such a case,
cannot be removed easily with water.
NOTE
wipe it off using lukewarm water and soft
Rinse off the neutral detergent after
cloth or chamois leather.
washing the vehicle.
z To clean the inside of the rear window, al-
ways use a soft cloth and wipe the window
3. Dry the vehicle thoroughly using a cha-
9
glass along the demister heater element so as
mois leather or a soft cloth.
CAUTION
not to cause damage.
z Do not use a scrubbing brush or other hard
tools as they may damage the plastic part
CAUTION
Wiper blades
surface.
Do not use a brush or other hard implement
z
Use a soft cloth and glass cleaner to remove
z Do not use wax containing compound (pol-
on the wheels.
ishing powder) which may damage the plas-
grease, dead insects, etc., from the wiper
Doing so could scratch the wheels.
tic part surface.
blades. Replace the wiper blades when they
z
Do not use any cleaner that contains an abra-
z Do not bring the plastic parts into contact
sive substance or is acidic or alkaline. Doing
no longer wipe properly.
(Refer to page
with petrol, light oil, brake fluids, engine
so could cause the coating on the wheels to
10-14.)
oils, greases, paint thinners, and sulphuric
peel or become discoloured or stained.
acid (battery electrolyte) which may crack,
Do not directly apply hot water using a
Engine compartment
z
stain or discolour the plastic parts.
steam cleaner or by any other means.
If they touch the plastic parts, wipe them off
Clean the engine compartment at the begin-
z
Contact with seawater and road deicer can
with soft cloth, chamois or the like and an
ning and end of winter. Pay particular atten-
cause corrosion. Rinse off such substances
aqueous solution of neutral detergent then
tion to flanges, crevices and peripheral parts
as soon as possible.
immediately rinse the affected parts with
where dust containing road chemicals and
water.
other corrosive materials might collect.
Vehicle care
9-05
Cleaning the exterior of your vehicle
If salt and other chemicals are used on the
roads in your area, clean the engine compart-
ment at least every three months.
Never spray or splash water on the electrical
components in the engine compartment, as
this may cause damage.
Do not bring the nearby parts, the plastic
parts and so on into contact with sulphuric
acid (battery electrolyte) which may crack,
stain or discolour them.
If they are in contact, wipe off with soft
cloth, chamois or the like and an aqueous sol-
ution of neutral detergent then immediately
rinse the affected parts with plenty of water.
9
9-06
Vehicle care
Maintenance
Service precautions
10-02
Catalytic converter
10-03
Bonnet
10-03
Engine oil
10-04
Engine coolant
10-05
Washer fluid
10-06
Brake fluid/Clutch fluid*
10-07
Battery
10-08
Tyres
10-10
Wiper blade rubber replacement
10-14
General maintenance
10-16
For cold and snowy weather
10-16
10
Fusible links
10-16
Fuses
10-17
Replacement of lamp bulbs
10-23
Masking the headlamps
10-29

Service precautions
In the event a malfunction or a problem is
Service precautions
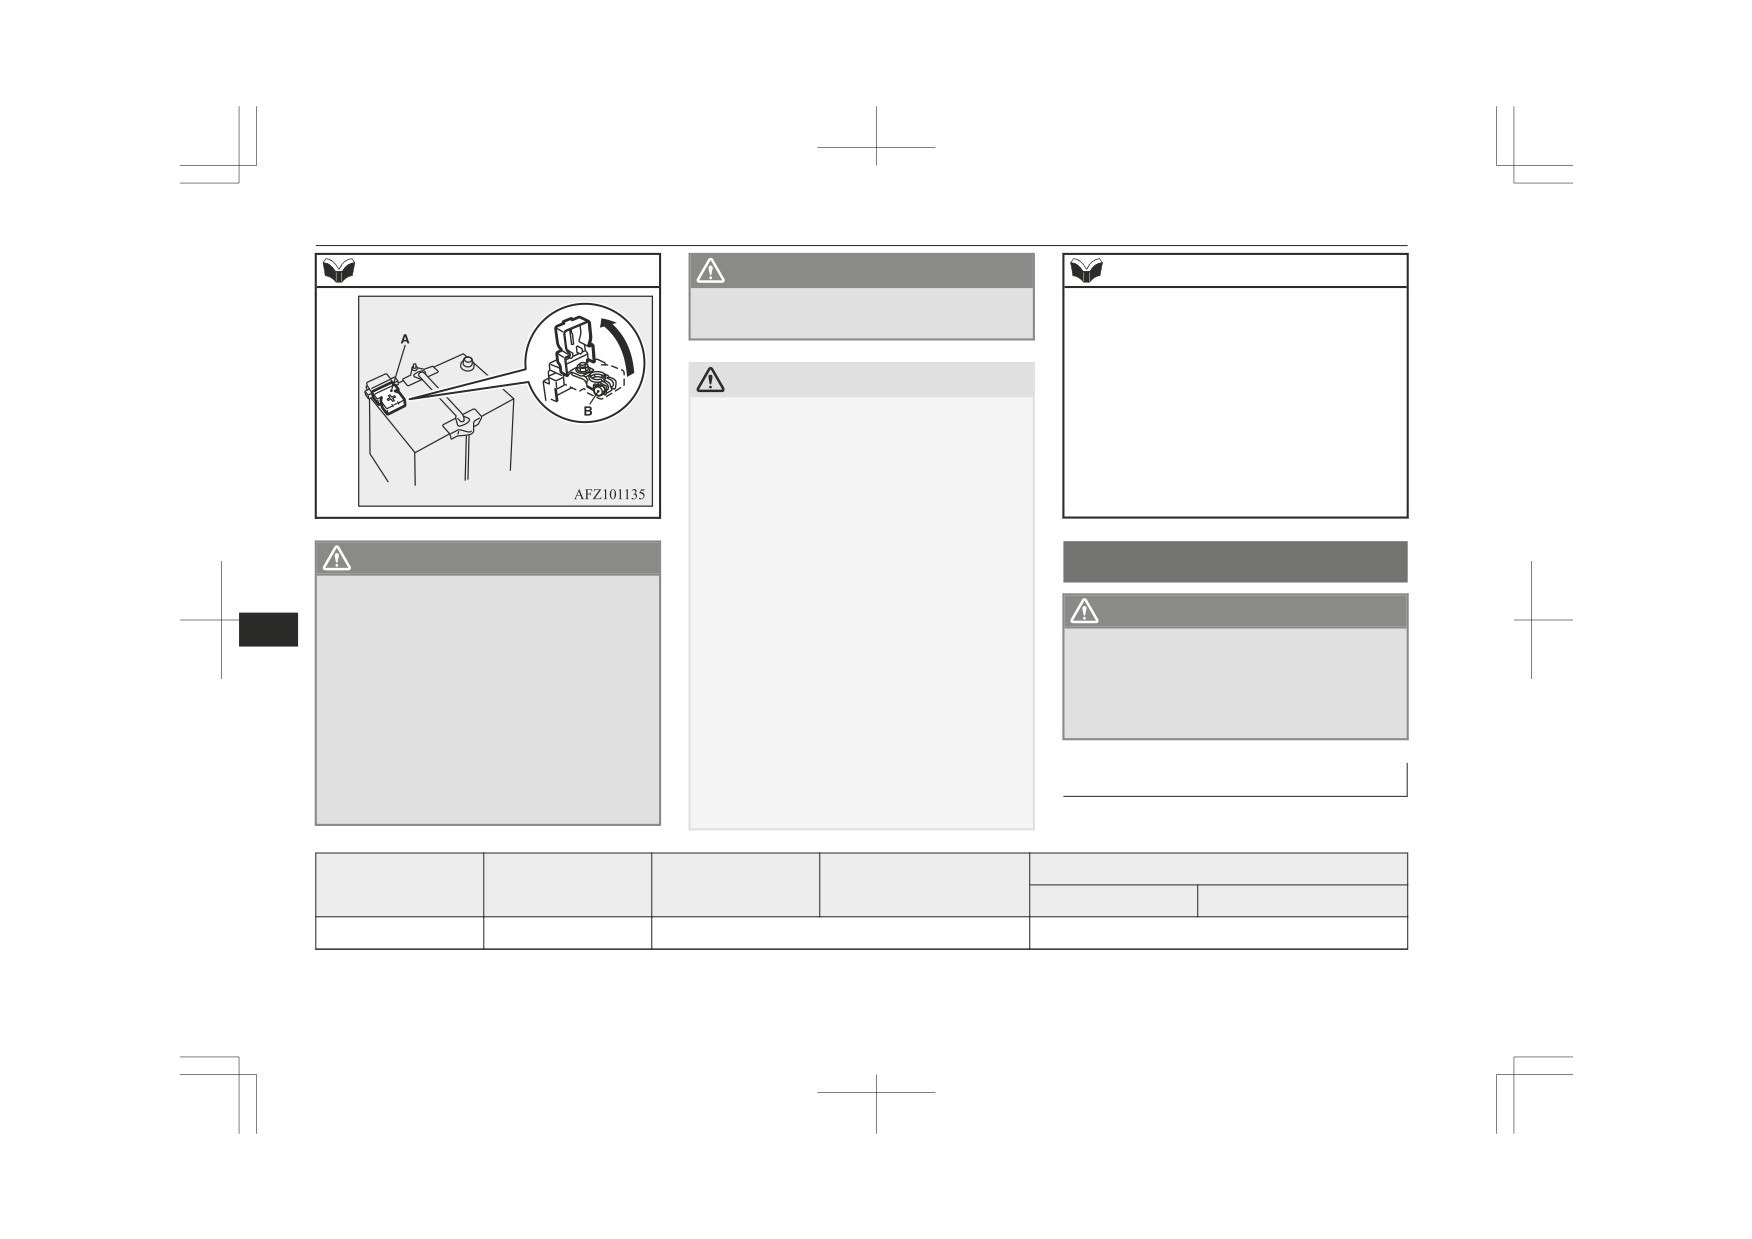
WARNING
discovered, we recommend you to have it
z
If it is necessary to do work in the engine
checked and repaired. This section contains
Adequate care of your vehicle at regular in-
compartment with the engine running, be
information on inspection maintenance pro-
tervals serves to preserve the value and ap-
especially careful that your clothing, hair,
cedures that you can do yourself. Follow the
pearance as long as possible.
etc., does not become caught by the fan,
instructions and cautions for each of the vari-
drive belts, or other moving parts.
Maintenance items as described in this own-
ous procedures.
After performing the maintenance, make
er’s manual can be performed by the owner.
z
sure that no tools or cloths are left behind
We recommend you to have the periodic in-
in the engine compartment.
spection and maintenance performed by a
If they are left behind, a fire or damage to
MITSUBISHI MOTORS Authorized Service
the vehicle may occur.
Point or another specialist.
The fan may turn on automatically even if
z
the engine is not running. Turn the igni-
tion switch to the “LOCK” position or put
the operation mode in OFF to be safe
while you work in the engine compart-
ment.
z
Do not smoke, cause sparks or allow open
10
flames around fuel or battery. The fumes
are flammable.
A- Cooling fans
z
Be extremely cautious when working
B- Caution label
around the battery. It contains poisonous
and corrosive sulphuric acid.
z
Do not get under your vehicle with just
*: Front of the vehicle
the body jack supporting it. Always use
automotive jack stands.
WARNING
z
Improper handling of components and
materials used in the vehicle can endanger
z When checking or servicing the inside of
your personal safety. We recommend you
the engine compartment, make sure the
to consult a specialist for necessary infor-
engine is switched off and has had a
mation.
chance to cool down.
10-02
Maintenance

Catalytic converter
LHD
Catalytic converter
The exhaust gas scavenging devices used
with the catalytic converter are extremely ef-
ficient for the reduction of noxious gases.
The catalytic converter is installed in the ex-
haust system.
It is important to keep the engine properly
tuned to ensure proper catalyst operation and
prevent possible catalyst damage.
RHD
WARNING
NOTE
z As with any vehicle, do not park or oper-
z
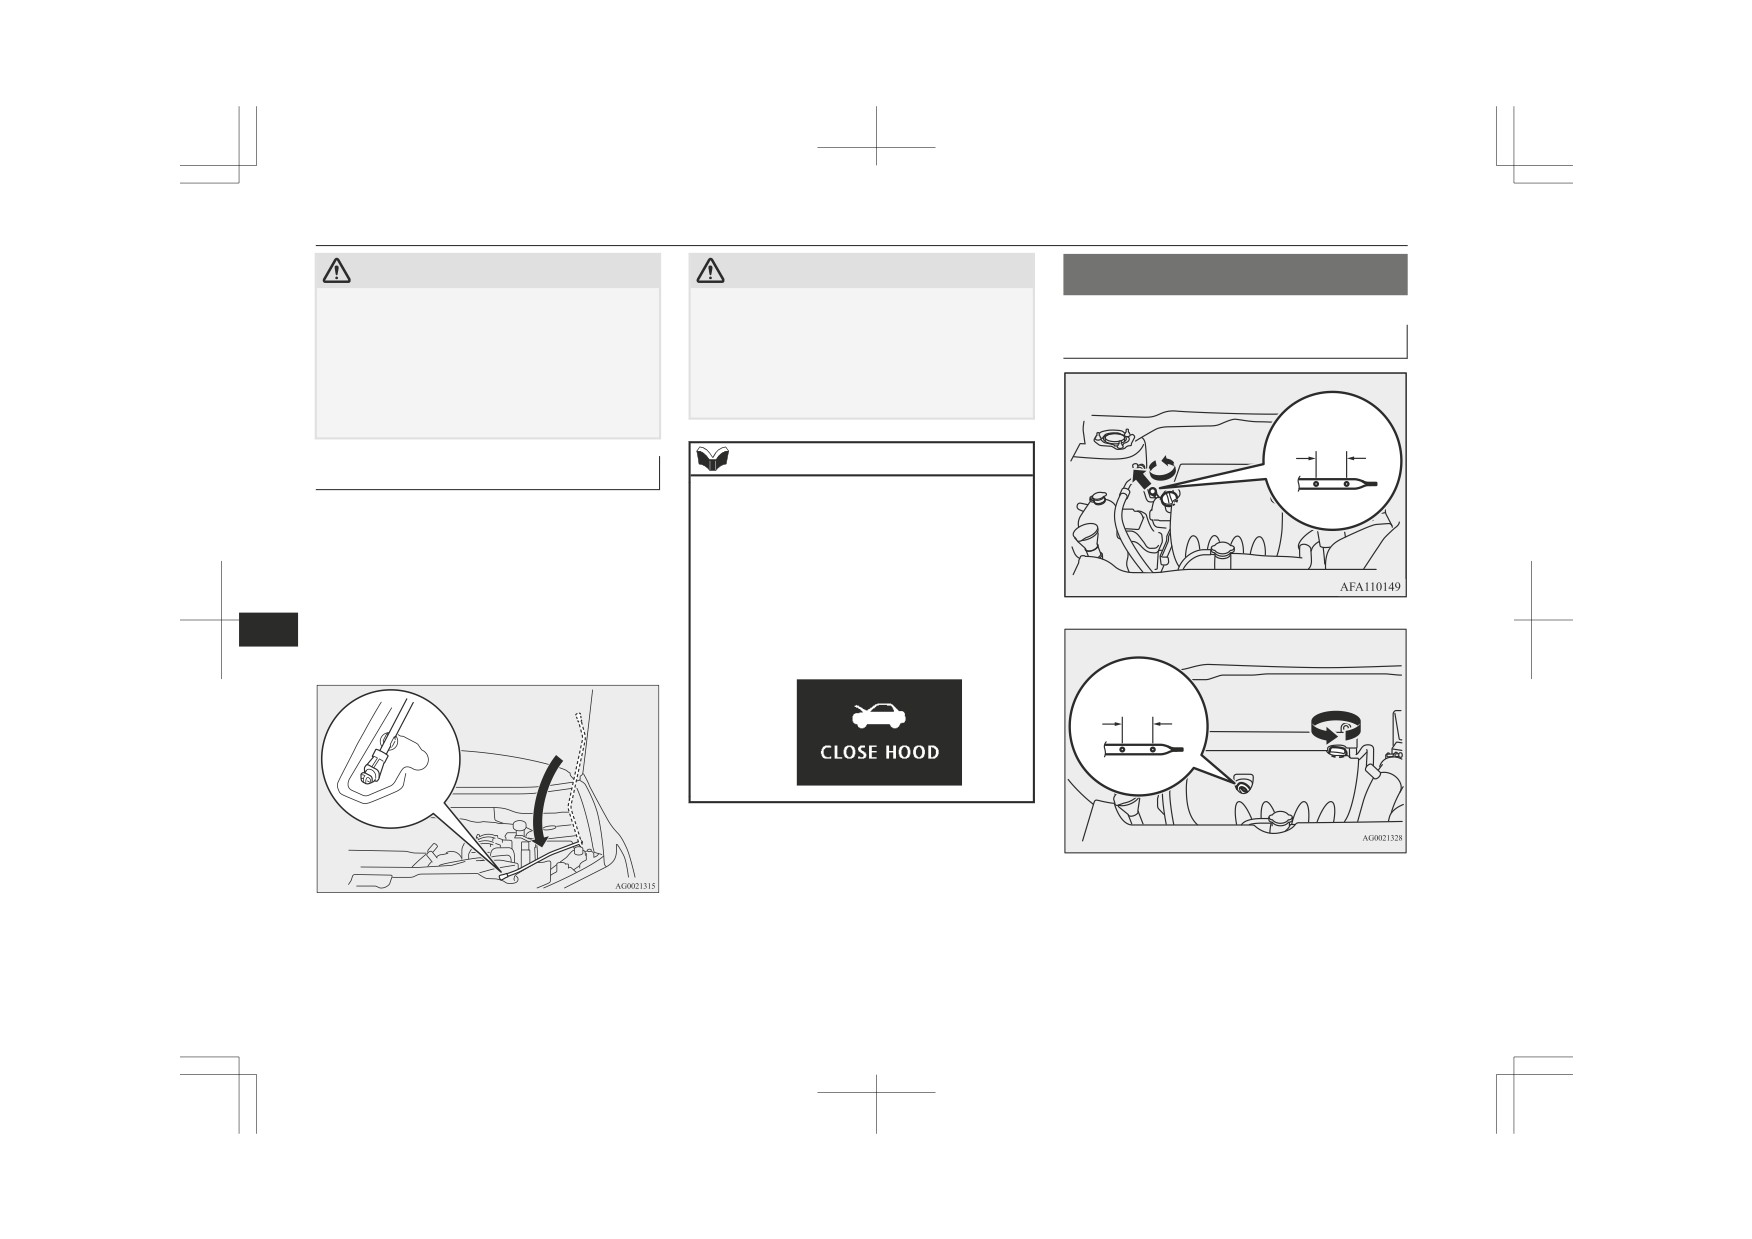
Only open the bonnet when the wipers are in
ate this vehicle in areas where combusti-
the parked position. In any other position,
ble materials such as dry grass or leaves
the wipers could damage the paint or bonnet.
can come in contact with a hot exhaust
10
since a fire could occur.
3. Support the bonnet by inserting the sup-
z Paint should not be applied to the catalyt-
port bar in its slot.
ic converter.
NOTE
2. Raise the bonnet while pressing the safe-
z Use fuel of the type recommended in “Fuel
ty lock.
selection” on page 2-02.
Bonnet
To open
1. Pull the release lever towards you to un-
lock the bonnet.
Maintenance
10-03
Engine oil
CAUTION
CAUTION
Engine oil
z Note that the support bar may disengage the
z
Be careful that hands or fingers are not trap-
bonnet if the open bonnet is lifted by a
ped when closing the bonnet.
strong wind.
Before driving, make sure that the bonnet is
To check and refill engine oil
z
z After inserting the support bar into the slot,
securely locked. An incompletely locked
make sure the bar supports the bonnet se-
bonnet can suddenly open while driving.
1600 models
curely from falling down on to your head or
This can be extremely dangerous.
body.
MAX. MIN.
NOTE
To close
z
If this does not close the bonnet, release it
1. Unlatch the support bar and clip it in its
from a slightly higher position.
holder.
z
Do not press down the bonnet hard with a
hand as it may damage the bonnet.
2. Slowly lower the bonnet to a position
z
For vehicles equipped with the security
approximately 20 cm above the closed
alarm system, if you drive with the bonnet
position, then let it drop.
left open, warning display is displayed on
10
3. Make sure the bonnet is securely locked
the information screen in the multi-informa-
by softly lifting the centre of the bonnet.
tion display.
2000 models
MAX. MIN.
The engine oil used has a significant effect on
the engine’s performance, service life and
startability. Be sure to use oil of the recom-
mended quality and appropriate viscosity.
10-04
Maintenance
Engine coolant
All engines consume a certain amount of oil
NOTE
NOTE
during normal operation. Therefore, it is im-
portant to check the oil level at regular inter-
z For information on how to dispose of used
z Use of additives is not recommended since
engine oil, refer to page 2-06.
they may reduce the effectiveness of addi-
vals or before starting a long trip.
tives already included in the engine oil. It
1. Park the vehicle on a horizontal surface.
may result in failure of the mechanical as-
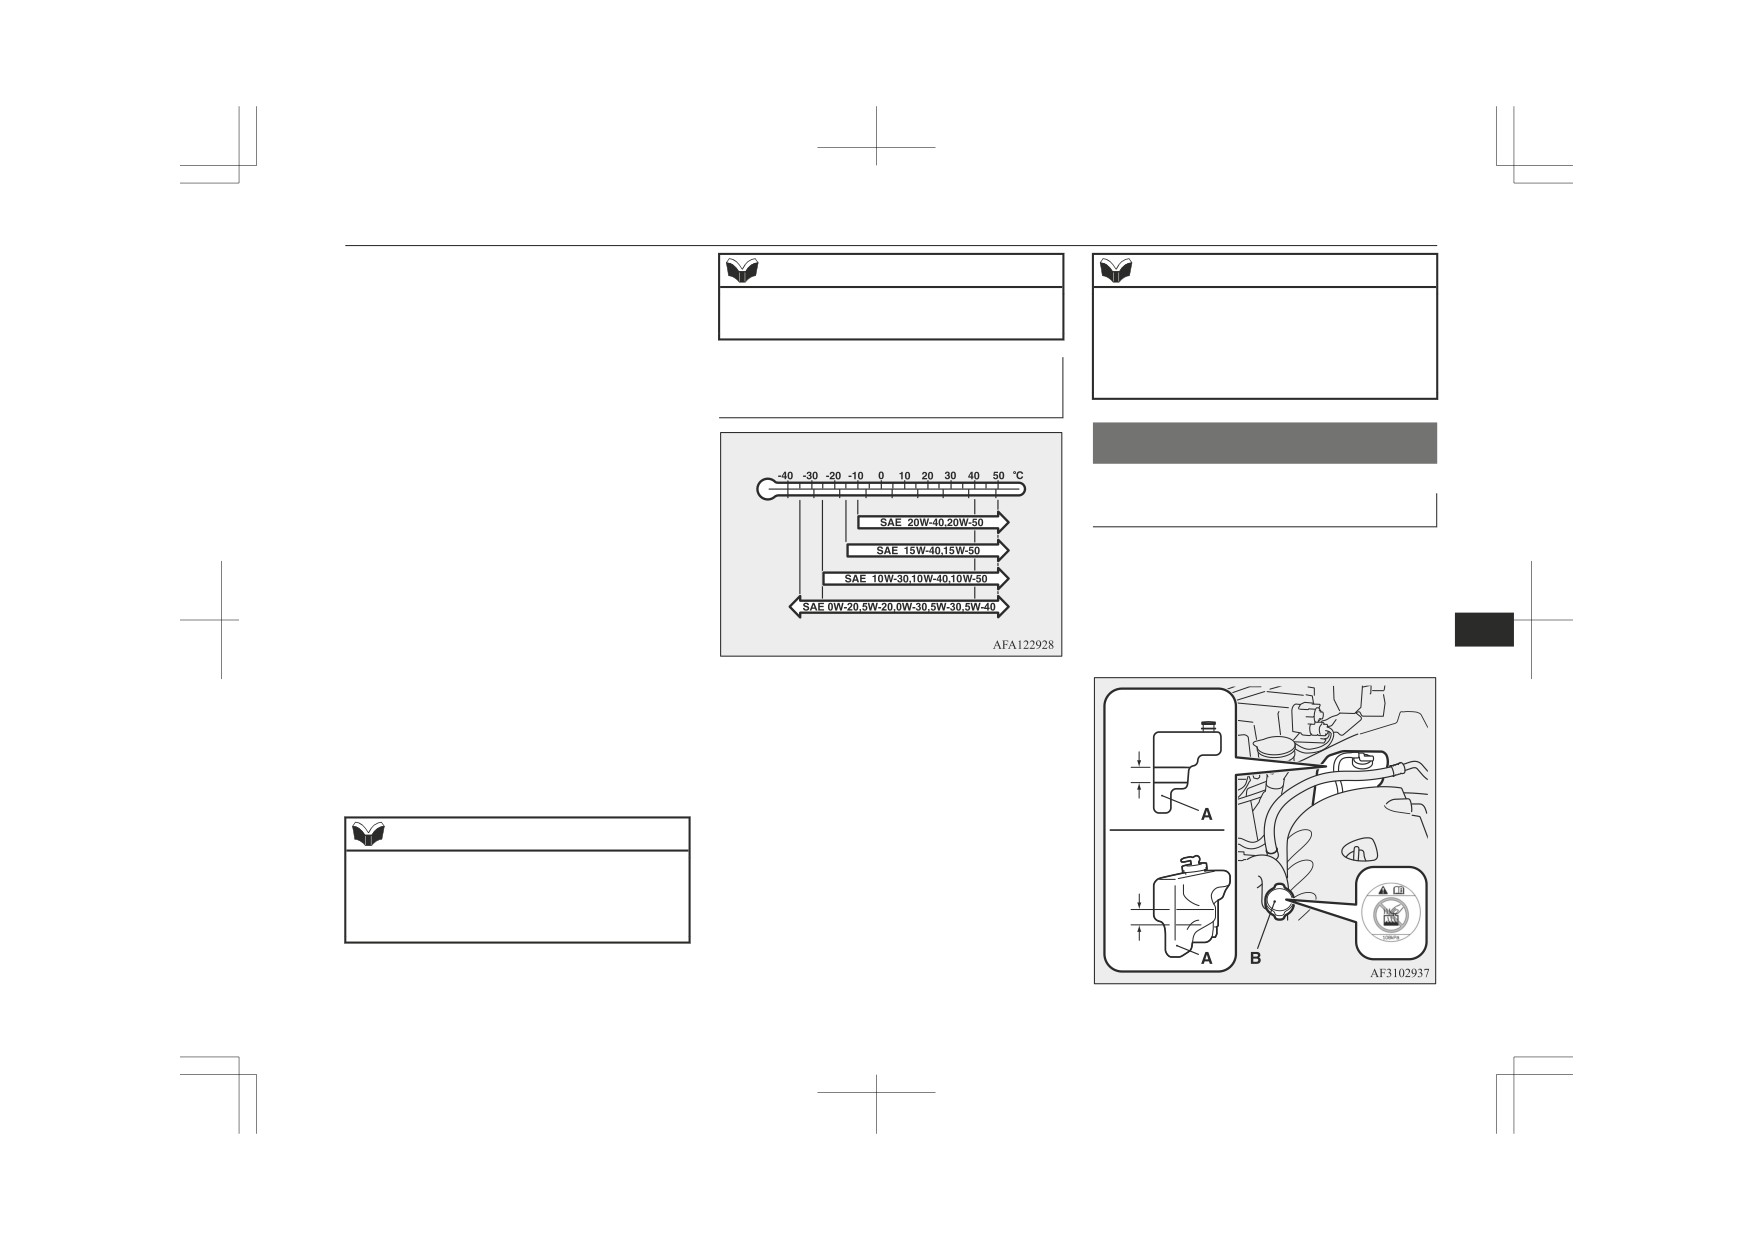
Recommended engine oil vis-
2. Switch off the engine.
sembly.
3. Wait a few minutes.
cosity
4. Remove the dipstick and wipe it with a
clean cloth.
Engine coolant
5. Reinsert the dipstick as far as it goes.
6. Remove the dipstick and read the oil lev-
el, which should always be within the
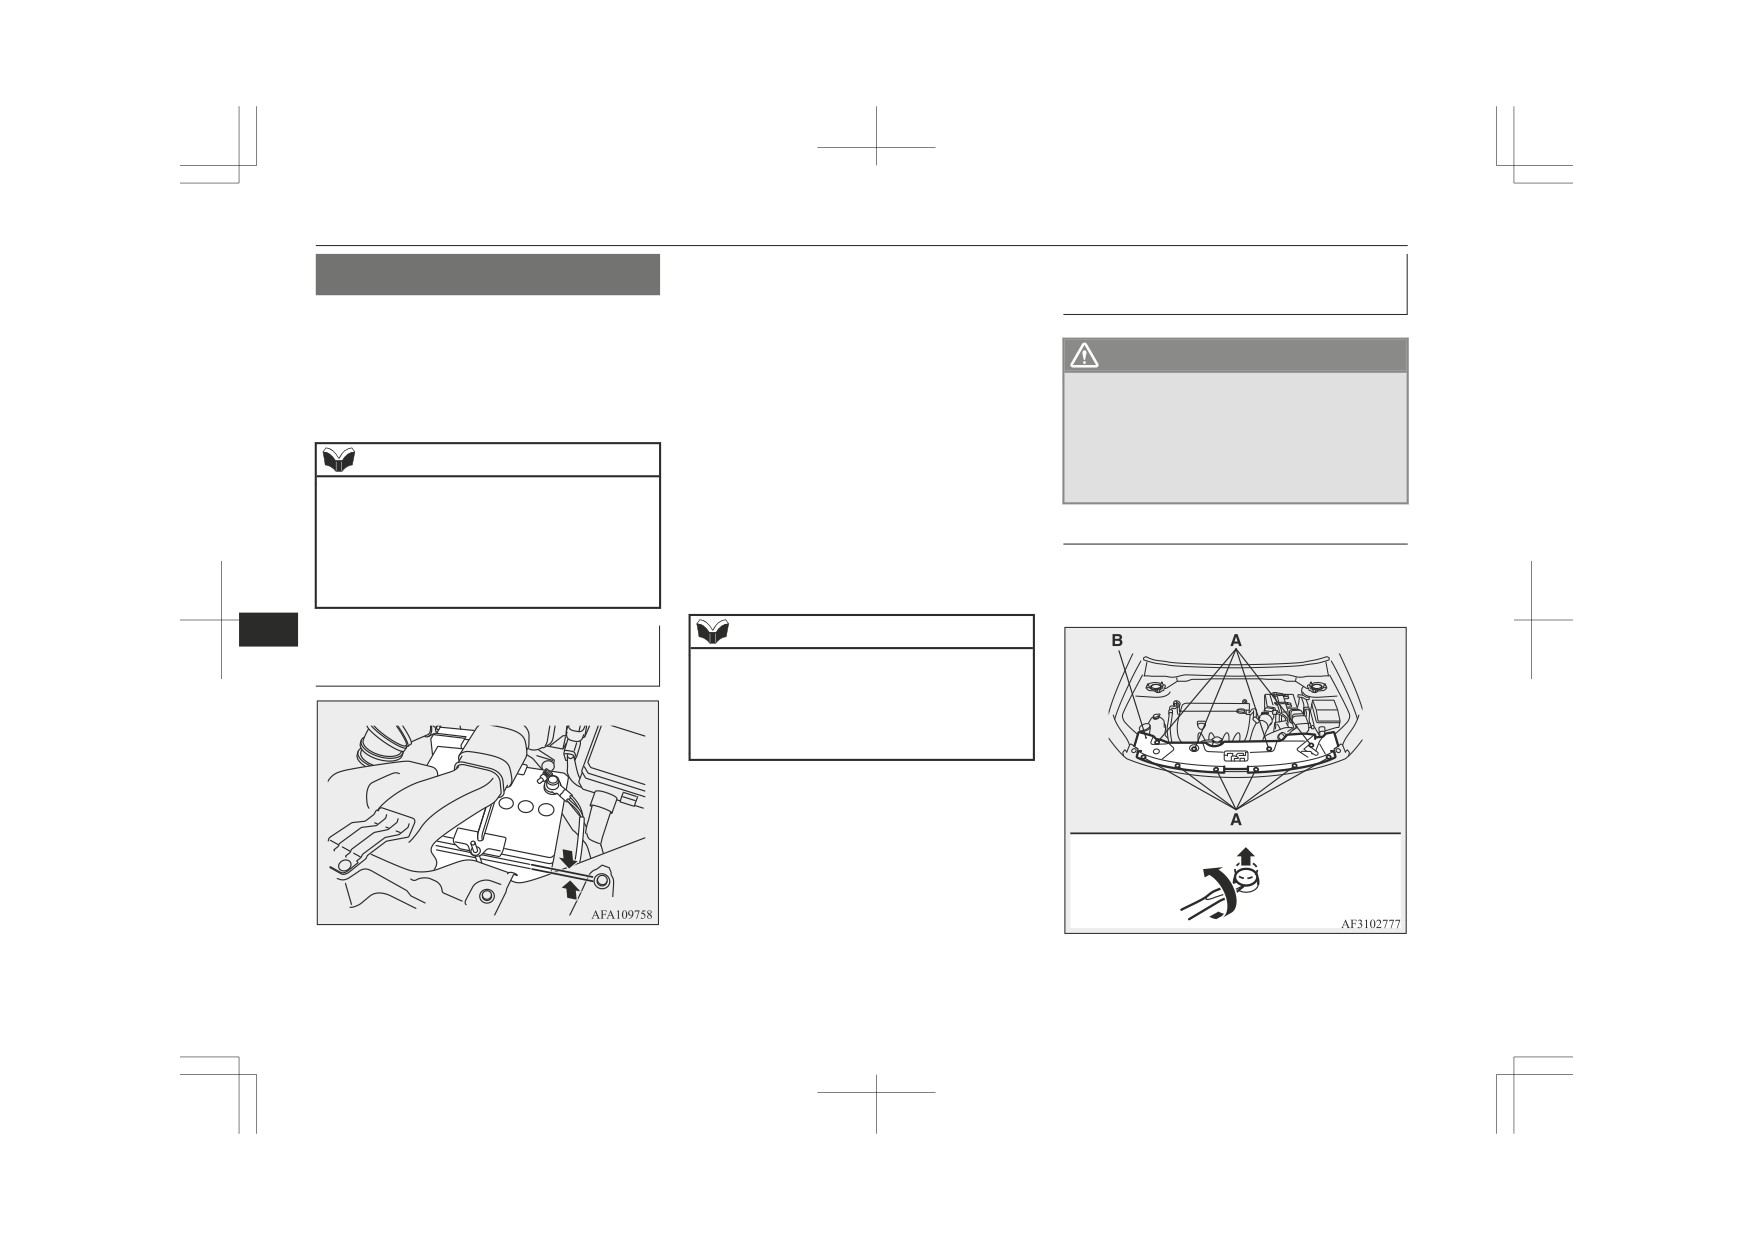
To check the coolant level
range indicated.
A transparent coolant reserve tank (A) is lo-
7. If the oil level is below the specified
cated in the engine compartment.
limit, remove the cap located on the cyl-
The coolant level in this tank should be kept
inder head cover and add enough oil to
between the
“LOW” and “FULL” marks
raise the level to within the specified
10
when measured while the engine is cold.
range. Do not overfill to avoid engine
damage. Be sure to use the specified en-
gine oil and do not mix various types of
Type 1
oil.
Use engine oil conforming to the following
8. After adding oil, close the cap securely.
classification:
FULL
9. Confirm the oil level by repeating step 4
z API classification: “For service SM” or
to 6.
higher
z ILSAC certificated oil
LOW
NOTE
z ACEA classification:
Type 2
“For service A3/B3, A3/B4, or A5/B5”
z
The engine oil will deteriorate rapidly if the
vehicle is subjected to severe conditions, re-
FULL
quiring earlier oil replacement.
Please refer to the maintenance schedule.
LOW
Maintenance
10-05
Washer fluid
To add coolant
*: Similar high quality ethylene glycol based
CAUTION
non-silicate, non-amine, non-nitrate and non-
The cooling system is a closed system and
borate coolant with long life hybrid organic
z Concentrations exceeding 60 % will result in
a reduction of both the anti-freeze and cool-
normally the loss of coolant should be very
acid technology.
ing performance thus adversely affecting the
slight. A noticeable drop in the coolant level
engine.
could indicate leakage. If this occurs, we rec-
MITSUBISHI MOTORS GENUINE Coolant
z Do not top up with water only.
ommend you to have the system checked as
has excellent protection against corrosion and
Water by itself reduces the rust-protective
soon as possible.
rust formation of all metals including alumi-
and anti-freeze qualities of the coolant and
If the level should drop below the “LOW”
nium and can avoid blockages in the radiator,
has a lower boiling point. It can also cause
damage to the cooling system if it should
level on the reserve tank, open the lid and
heater, cylinder head, engine block, etc.
freeze. Do not use tap water, as it can cause
add coolant.
Because of the necessity of this anti-corro-
corrosion and rust formation.
Also, if the reserve tank is completely empty,
sion agent, the coolant must not be replaced
remove the radiator cap (B) and add coolant
with plain water even in summer. The re-
During cold weather
until the level reaches the filler neck.
quired concentration of anti-freeze differs de-
pending on the expected ambient tempera-
If the temperatures in your area drop below
ture.
WARNING
freezing, there is the danger that the coolant
10
in the engine or radiator could freeze and
z Do not open the radiator cap (B) while the
Above -35 °C: 50 % concentration of anti-
engine is hot. The coolant system is under
cause severe damage to the engine and/or ra-
freeze
pressure and any hot coolant escaping
diator. Add a sufficient amount of anti-freeze
Below -35 °C: 60 % concentration of anti-
could cause severe burns.
to the coolant to prevent it from freezing.
freeze
The concentration should be checked before
Anti-freeze
the start of cold weather and anti-freeze add-
CAUTION
ed to the system if necessary.
The engine coolant contains an ethylene gly-
col anti-corrosion agent. Some parts of the
z Do not use alcohol or methanol anti-freeze
or any engine coolants mixed with alcohol
Washer fluid
engine are cast aluminium alloy, and periodic
or methanol anti-freeze. The use of an im-
changing of the engine coolant is necessary
proper anti-freeze can cause corrosion of the
Open the washer fluid reservoir cap and
to prevent corrosion of these parts.
aluminium components.
check the level of washer fluid with the dip-
Use
“MITSUBISHI MOTORS GENUINE
z Do not use water to adjust the concentration
stick.
SUPER LONG LIFE COOLANT PREMI-
of coolant.
UM” or equivalent*.
10-06
Maintenance

Brake fluid/Clutch fluid*
If the level is low, replenish the container
To check the fluid level
Fluid type
with washer fluid.
The fluid level must be between the “MAX”
Use brake fluid conforming to DOT3 or
and “MIN” marks on the reservoir.
DOT4 from a sealed container. The brake flu-
id is hygroscopic. Too much moisture in the
brake fluid will adversely affect the brake
system, reducing the performance.
EMPTY
WARNING
FULL
z
Take care in handling brake fluid as it is
harmful to the eyes, may irritate your
skin and will damage painted surfaces.
Wipe up spills immediately. If brake fluid
gets on your hands or in your eyes, flush
immediately with clean water. Follow up
NOTE
with a doctor as necessary.
The fluid level is monitored by a float. When
z The washer fluid container serves the wind-
10
the fluid level falls below the “MIN” mark,
screen and rear window.
the brake fluid warning lamp lights up.
CAUTION
The fluid level falls slightly with wear of the
During cold weather
z
Use only the specified brake fluid.
brake pads, but this does not indicate any ab-
Do not mix or add different brands of brake
normality.
fluid to prevent chemical reactions.
To ensure proper operation of the washers at
Do not let any petroleum-based fluid touch,
low temperatures, use a fluid containing an
The fluid in the master cylinder should be
mix with, or get into the brake fluid.
anti-freezing agent.
This will damage the seals.
checked when doing other work under the
z
Keep the reservoir tank cap closed to pre-
bonnet. The brake system should also be
Brake fluid/Clutch fluid*
vent the brake fluid from deteriorating ex-
checked for leakage at the same time.
cept maintenance.
If the fluid level falls markedly in a short
Clean the filler cap before removing and
The brake fluid and the clutch fluid share the
z
length of time, it indicates leaks from the
close the cap securely after maintenance.
reservoir tank.
brake system.
If this occurs, we recommend you to have the
vehicle checked.
Maintenance
10-07
Battery
The electrolyte level must be between the
Removing and installing the
Battery
specified limit on the outside of the battery.
upper cover and duct
Replenish with distilled water as necessary.
The condition of the battery is very important
The inside of the battery is divided into sev-
for quick starting and to keep the vehicle’s
eral compartments; remove the cap from each
WARNING
electrical system working properly. Regular
compartment and fill to the upper mark. Do
inspection and care are especially important
z Turn the ignition switch to the “LOCK”
not top up beyond the upper mark because
in cold weather.
position or put the operation mode in
spillage during driving could cause damage.
OFF.
Check the electrolyte level at least once every
Make sure that your clothes cannot be
NOTE
4 weeks, depending on the operating condi-
caught by the fan or drive belt. Personal
tions.
injury could result.
z After replacing the battery, the electronic
control system data for the automatic trans-
If the battery is not used, it will discharge by
mission, etc., will be erased. As a result,
itself with time.
To remove
shift shocks may occur.
Check it once every 4 weeks and charge with
Shift shocks will become smoother after sev-
1. Remove the clips (A), and then remove
low current as necessary.
eral changes in speed.
the upper cover (B).
10
NOTE
Checking battery electrolyte
level
z Except for diesel-powered 1600 models, to
replenish with the distilled water, remove the
upper cover and duct.
Refer to “Removing and installing the upper
cover and duct” on page 10-08.
10-08
Maintenance

Battery
2. Remove the clips (C), and then remove
2. Install the upper cover (C), and then in-
During cold weather
the air duct (D).
stall the clips (D).
The capacity of the battery is reduced at low
temperatures. This is an inevitable result of
its chemical and physical properties.
This is why a very cold battery, particularly
one that is not fully charged, will only deliver
a fraction of the starter current which is nor-
mally available.
We recommend you to have the battery
checked before the start of cold weather and,
if necessary, have it charged or replaced.
This does not only ensure reliable starting,
but a battery which is kept fully charged also
To install
has a longer life.
1. Install the air duct (A), and then tighten
NOTE
Disconnection and connection
the clips (B).
When refitting the clip, first insert part (E)
z
10
To disconnect the battery cable, stop the en-
of the clip into the hole and then press part
gine, first disconnect the negative (-) terminal
(F) into it.
and then the positive (+) terminal. When con-
necting the battery, first connect the positive
(+) terminal and then the negative (-) termi-
nal.
NOTE
z Open the terminal cover (A) before discon-
necting or connecting the positive (+) termi-
nal of the battery.
z Loosen the nut (B), and then disconnect the
battery cable from the positive (+) terminal.
Maintenance
10-09
Tyres
NOTE
WARNING
NOTE
z
Ventilate when charging or using the bat-
z Keep the terminals clean. After the battery is
tery in an enclosed space.
connected, apply terminal protection grease.
To clean the terminals, use lukewarm water.
z
Check to see if the battery is securely instal-
CAUTION
led and cannot be moved during travel. Also
check each terminal for tightness.
z
Keep it out of reach of children.
z When the vehicle is to be left unused for a
z
Never disconnect the battery with the igni-
long period of time, remove the battery and
tion switch or the operation mode in ON.
store it in a place where the battery fluid will
Doing so could damage electric components.
not freeze. The battery should be stored only
z
Never short-circuit the battery. This could
in a fully charged condition.
cause it to overheat and be damaged.
z
If the battery is to be quick-charged, first
disconnect the battery cables.
WARNING
Tyres
z
In order to prevent a short circuit, be sure to
z
Keep sparks, cigarettes, and flames away
disconnect the negative (-) terminal first.
from the battery because the battery
Always wear protective eye goggles when
WARNING
z
10
could explode.
working near the battery.
The battery electrolyte is extremely caus-
z Driving with tyres that are worn, dam-
z
z
Do not bring the nearby parts, the plastic
aged or improperly inflated can lead to a
tic. Do not allow it to come in contact with
parts and so on into contact with sulphuric
loss of control or blow out of the tyres
your eyes, skin, clothing, or the painted
acid (battery electrolyte) which may crack,
which can result in a collision with serious
surfaces of the vehicle.
stain or discolour them.
or fatal injury.
Spilt electrolyte should be flushed imme-
If they are in contact, wipe off with soft
diately with ample amounts of water.
cloth, chamois or the like and an aqueous
Irritation to eyes or skin from contact
solution of neutral detergent then immediate-
Tyre inflation pressures
with electrolyte requires immediate medi-
ly rinse the affected parts with plenty of wa-
cal attention.
ter.
At trailer towing
Item
Tyre size
Front
Rear
Front
Rear
Normal tyre
215/65R16 98H
2.4 bar (35 psi) [240 kPa]
2.4 bar (35 psi) [240 kPa]
*: Vehicles for Moldova and Ukraine
10-10
Maintenance