Mitsubishi Montero Sport (2004+). Manual - part 556


  Index      Mitsubishi     Mitsubishi Montero Sport - service repair manual 2004 year


Search            


Content   ..  554  555  556  557   ..


Mitsubishi Montero Sport (2004+). Manual - part 556


RADIO AND TAPE PLAYER

TSB Revision

CHASSIS ELECTRICAL

54-211

NOTE: After inspecting intermediate connectors C-12, C-43 
and E-43, inspect the wire. If intermediate connectors C-12, 
C-43 and E-43 are damaged, repair or replace them. Refer to 
GROUP 00E, Harness Connector Inspection 

P.00E-2

.

Q: Are the harness wires between amplifier connector E-11 

(terminal No.3 and 4) and tweeter (RH) connector F-16 
(terminal No.1 and 2) and/or front speaker (RH) 
connector C-20 (terminal No.1 and 2) in good condition?
YES : 
Go to Step 30.
NO :  Repair or replace them. Refer to GROUP 00E, 

Harness Connector Inspection 

P.00E-2

STEP 30. Check amplifier connector E-11 for loose, 
corroded or damaged terminals, or terminals pushed back 
in the connector.

Q: Is the amplifier connector E-11 in good condition?

YES : Go to Step 31.
NO :  Repair or replace them. Refer to GROUP 00E, 

Harness Connector Inspection 

P.00E-2

AC201717

8

19

7

6

5

16

15

17 18

4

3

2

10 11 12 13

1
9

14

2

1

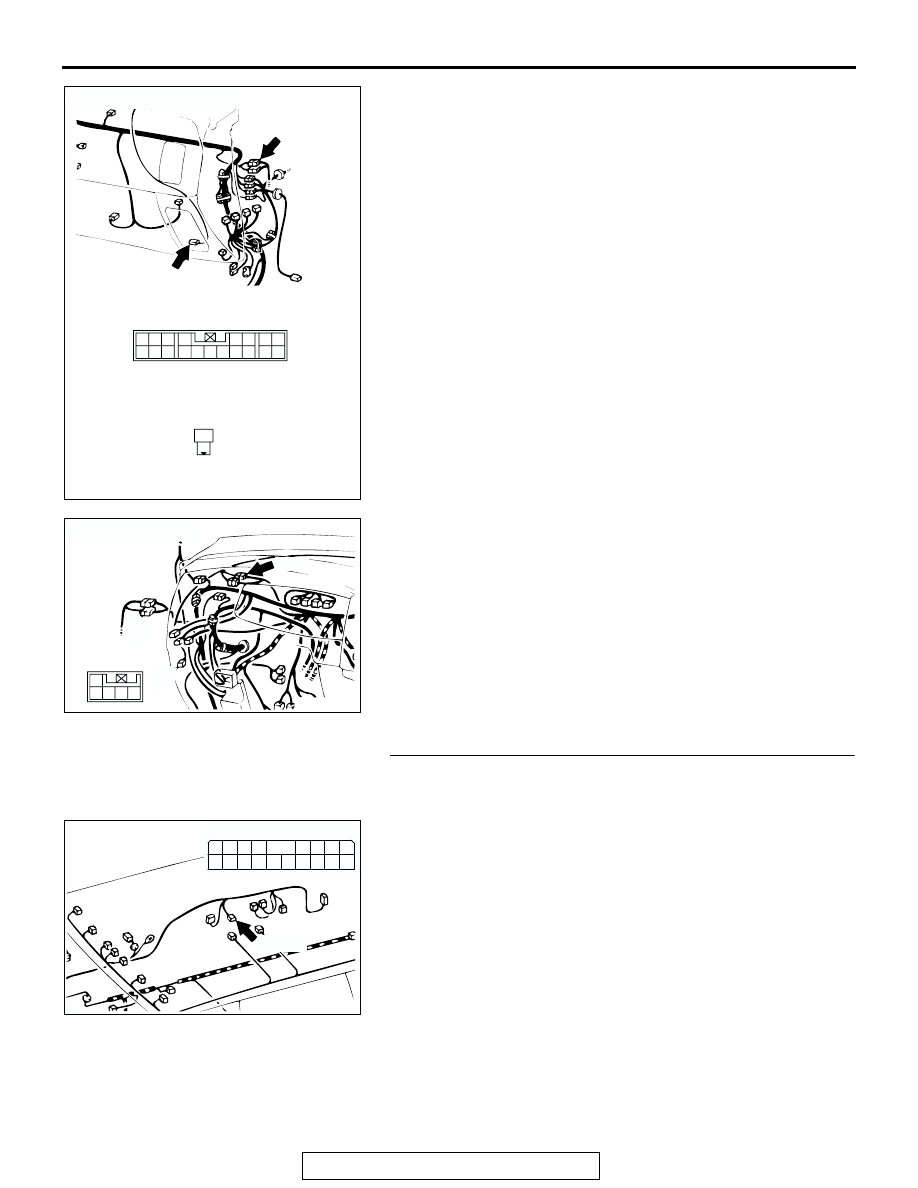
CONNECTORS: C-12, C-20

C-12

C-20 (B)

C-12

C-20 COMPONENT SIDE

AB

AC201718

4 5

3

1
2

CONNECTOR: C-43

AB

C-43

AC200776

CONNECTOR: E-11

AC

COMPONENT SIDE

3 2

1110

4

1312

1
9

5

6

1615

7

8

1817

14

E-11(B)

RADIO AND TAPE PLAYER

TSB Revision

CHASSIS ELECTRICAL

54-212

STEP 31. Recheck for malfunction.
Q: Is a malfunction eliminated?

YES : This procedure is complete. (If no malfunctions are 

found in all steps, an intermittent malfunction is 
suspected. Refer to GROUP 00, How to Use 
Troubleshooting/Inspection Service Point 

− How to 

Cope with Intermittent Malfunction 

P.00-7

.)

NO :  Go to Step 27.

STEP 32. Check the front door speaker (LH).
(1) Remove the door speaker (LH).

(2) Check that the front door speaker (LH) generates noise 

when a five-volt voltage is applied on the front door speaker 

(LH) terminal.

Q: Is the front door speaker (LH) generating noise?

YES : Go to Step 33.
NO :  Replace the front door speaker (LH). The front door 

speaker (LH) should sound.

STEP 33. Check front door speaker (LH) connector F-13 for 
loose, corroded or damaged terminals, or terminals 
pushed back in the connector.

Q: Are front door speaker (LH) connector F-13 in good 

condition?
YES : 
Go to Step 34.
NO :  Repair or replace them. Refer to GROUP 00E, 

Harness Connector Inspection 

P.00E-2

.

ACX01868AB

5V

AC201719

2

1

CONNECTOR: F-13

AB

COMPONENT
SIDE

FRONT
DOOR
(LH)

F-13 (B)

RADIO AND TAPE PLAYER

TSB Revision

CHASSIS ELECTRICAL

54-213

STEP 34. Check the harness wires between amplifier 
connector E-11 (terminal No.5 and 6) and front door 
speaker (LH) connector F-13 (terminal No.1 and 2).

NOTE: After inspecting intermediate connectors C-39 and 
E-43, inspect the wire. If intermediate connectors C-39 and 
E-43 are damaged, repair or replace them. Refer to GROUP 
00E, Harness Connector Inspection 

P.00E-2

.

Q: Are the harness wires between amplifier connector E-11 

and front door speaker (LH) connector F-13 in good 
condition?
YES : 
Go to Step 35.
NO :  Repair or replace them. Refer to GROUP 00E, 

Harness Connector Inspection 

P.00E-2

AC201714

3 2

1110

4

1312

1
9

5

6

1615

7

8

1817

14

10

4

8

7

6

5

1 2

3
9

CONNECTORS: E-11, E-43

E-11

E-43

E-11 COMPONENT SIDE

E-43

AB

AC201719

2

1

CONNECTOR: F-13

AB

COMPONENT
SIDE

FRONT
DOOR
(LH)

F-13 (B)

AC200784

8

19

7

6

5

16

15

17 18

4

3

2

10 11 12 13

1
9

14

CONNECTOR: C-39

AB

C-39

RADIO AND TAPE PLAYER

TSB Revision

CHASSIS ELECTRICAL

54-214

STEP 35. Check amplifier connector E-11 for loose, 
corroded or damaged terminals, or terminals pushed back 
in the connector.

Q: Is the amplifier connector E-11 in good condition?

YES : Go to Step 36.
NO :  Repair or replace them. Refer to GROUP 00E, 

Harness Connector Inspection 

P.00E-2

STEP 36. Recheck for malfunction.
Q: Is a malfunction eliminated?

YES : This procedure is complete. (If no malfunctions are 

found in all steps, an intermittent malfunction is 
suspected. Refer to GROUP 00, How to Use 
Troubleshooting/Inspection Service Point 

− How to 

Cope with Intermittent Malfunction 

P.00-7

.)

NO :  Go to Step 32.

STEP 37. Check the front door speaker (RH).
(1) Remove the front door speaker (RH).

(2) Check that the front door speaker (RH) generates noise 

when a five-volt voltage is applied on the front door speaker 

(RH) terminal.

Q: Is the front door speaker (RH) generating noise?

YES : Go to Step 38.
NO :  Replace the front door speaker (RH). The front door 

speaker (RH) should sound.

STEP 38. Check front door speaker (RH) connector F-25 
for loose, corroded or damaged terminals, or terminals 
pushed back in the connector.

Q: Is the front door speaker (RH) connector F-25 in good 

condition?
YES : 
Go to Step 39.
NO :  Repair or replace them. Refer to GROUP 00E, 

Harness Connector Inspection 

P.00E-2

AC200776

CONNECTOR: E-11

AC

COMPONENT SIDE

3 2

1110

4

1312

1
9

5

6

1615

7

8

1817

14

E-11(B)

ACX01868AB

5V

AC201721

2

1

CONNECTOR: F-25

COMPONENT 
SIDE

AB

FRONT 
DOOR
 (RH)

F-25 (B)


Content   ..  554  555  556  557   ..