Mitsubishi Montero Sport (2004+). Manual - part 553


  Index      Mitsubishi     Mitsubishi Montero Sport - service repair manual 2004 year


Search            


Content   ..  551  552  553  554   ..


Mitsubishi Montero Sport (2004+). Manual - part 553


RADIO AND TAPE PLAYER

TSB Revision

CHASSIS ELECTRICAL

54-199

NOTE: After inspecting intermediate connector C-39, inspect 
the wire. If intermediate connector C-39 is damaged, repair or 
replace it. Refer to GROUP 00E, Harness Connector Inspec-
tion 

P.00E-2

.

Q: Are the harness wires between radio and CD player 

connector C-62 (terminal No.5 and 13) and tweeter (LH) 
connector F-03 (terminal No.1 and 2) and/or front door 
speaker (LH) connector F-13 (terminal No.1 and 2) in 
good condition?
YES : 
Go to Step 5.
NO :  Repair or replace them. Refer to GROUP 00E, 

Harness Connector Inspection 

P.00E-2

. The front 

door speaker (LH) and/or tweeter (LH) should sound.

STEP 5. Check the radio and CD player connector C-62 for 
loose, corroded or damaged terminals, or terminals 
pushed back in the connector.

Q: Is the radio and CD player connector C-62 in good 

condition?
YES : 
Go to Step 6.
NO :  Repair or replace them. Refer to GROUP 00E, 

Harness Connector Inspection 

P.00E-2

. The front 

door speaker (LH) and/or tweeter (LH) should sound.

STEP 6. Recheck for malfunction.
Q: Is a malfunction eliminated?

YES : This procedure is complete. (If no malfunctions are 

found in all steps, an intermittent malfunction is 
suspected. Refer to GROUP 00, How to Use 
Troubleshooting/Inspection Service Point 

− How to 

Cope with Intermittent Malfunction 

P.00-7

.)

NO :  Go to Step 2.

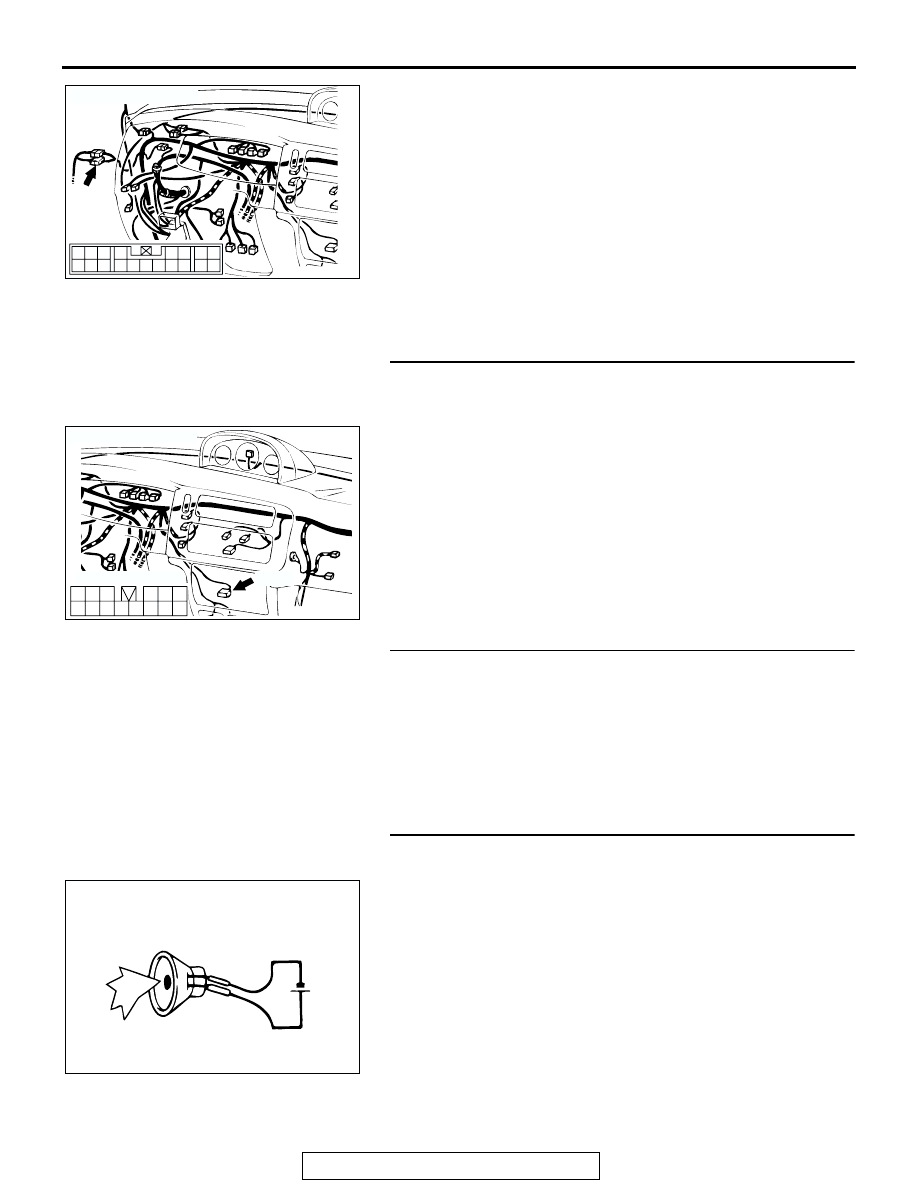
STEP 7. Check the speaker.
(1) Remove the speaker.

(2) Check that the speaker generates noise when a five-volt 

voltage is applied on the speaker terminal.

Q: Is the speaker generating noise?

YES : Go to Step 8.
NO :  Replace the speaker. The speaker should sound.

AC200784

8

19

7

6

5

16

15

17 18

4

3

2

10 11 12 13

1
9

14

CONNECTOR: C-39

AB

C-39

AC200783

1

7

2

8

10

11

5

13

6

14

12

4

9

3

CONNECTOR: C-62

COMPONENT SIDE

AB

C-62

ACX01868AB

5V

RADIO AND TAPE PLAYER

TSB Revision

CHASSIS ELECTRICAL

54-200

STEP 8. Check tweeter (RH) connector F-16 and/or front 
door speaker (RH) connector F-25 for loose, corroded or 
damaged terminals, or terminals pushed back in the 
connector.

Q: Is tweeter (RH) connector F-16 and/or front door 

speaker (RH) connector F-25 in good condition?
YES : 
Go to Step 9.
NO :  Repair or replace them. Refer to GROUP 00E, 

Harness Connector Inspection 

P.00E-2

. The front 

door speaker (RH) and/or tweeter (RH) should sound.

STEP 9. Check the harness wires between radio and CD 
player connector C-62 (terminal No.6 and 14) and tweeter 

(RH) connector F-16 (terminal No.1 and 2) and/or front door 
speaker (RH) connector F-25 (terminal No.1 and 2).

AC200785

2 1

2

1

CONNECTORS: F-16, F-25

AB

F-16

F-25 (B)

F-16

F-25

COMPONENT 
SIDE

COMPONENT
SIDE

FRONT
DOOR
(RH)

AC200785

2 1

2

1

CONNECTORS: F-16, F-25

AB

F-16

F-25 (B)

F-16

F-25

COMPONENT 
SIDE

COMPONENT
SIDE

FRONT
DOOR
(RH)

AC200783

1

7

2

8

10

11

5

13

6

14

12

4

9

3

CONNECTOR: C-62

COMPONENT SIDE

AB

C-62

RADIO AND TAPE PLAYER

TSB Revision

CHASSIS ELECTRICAL

54-201

NOTE: After inspecting intermediate connector C-12, inspect 
the wire. If intermediate connector C-12 is damaged, repair or 
replace it. Refer to GROUP 00E, Harness Connector Inspec-
tion 

P.00E-2

.

Q: Are harness wires between radio and CD player 

connector C-62 (terminal No.6 and 14) and tweeter (RH) 
connector F-16 (terminal No.1 and 2) and/or front door 
speaker (RH) connector F-25 (terminal No.1 and 2) in 
good condition?
YES : 
Go to Step 10.
NO :  Repair or replace them. Refer to GROUP 00E, 

Harness Connector Inspection 

P.00E-2

STEP 10. Check radio and CD player connector C-62 for 
loose, corroded or damaged terminals, or terminals 
pushed back in the connector.

Q: Is radio and CD player connector C-62 in good 

condition?
YES : 
Go to Step 11.
NO :  Repair or replace them. Refer to GROUP 00E, 

Harness Connector Inspection 

P.00E-2

STEP 11. Recheck for malfunction.
Q: Is a malfunction eliminated?

YES : The procedure is complete. (If no malfunctions are 

found in all steps, an intermittent malfunction is 
suspected. Refer to GROUP 00, How to Use 
Troubleshooting/Inspection Service Point 

− How to 

Cope with Intermittent Malfunction 

P.00-7

.)

NO :  Go to Step 7.

STEP 12. Check the speaker.
(1) Remove the rear speaker.

(2) Check that the speaker generates noise when a five-volt 

voltage is applied on the speaker terminal.

Q: Is the rear speaker (LH) generating noise?

YES : Go to Step 13.
NO :  Replace the speaker.

AC201697

8

19

7

6

5

16

15

17 18

4

3

2

10 11 12 13

1
9

14

CONNECTOR: C-12

AB

C-12

AC200783

1

7

2

8

10

11

5

13

6

14

12

4

9

3

CONNECTOR: C-62

COMPONENT SIDE

AB

C-62

ACX01868AB

5V

RADIO AND TAPE PLAYER

TSB Revision

CHASSIS ELECTRICAL

54-202

STEP 13. Check rear door speaker (LH) connector F-10 for 
loose, corroded or damaged terminals, or terminals 
pushed back in the connector.

Q: Is rear door speaker (LH) connector F-10 in good 

condition?
YES : 
Go to Step 14.
NO :  Repair or replace them. Refer to GROUP 00E, 

Harness Connector Inspection 

P.00E-2

. The speaker 

should sound.

STEP 14. Check the harness wires between radio and CD 
player connector C-62 (terminal No.2 and 8) and rear door 

speaker (LH) connector F-10 (terminal No.1 and 2).

AC201698

2

1

CONNECTOR: F-10

AB

COMPONENT
SIDE

REAR
DOOR 
(LH)

F-10 (B)

AC200783

1

7

2

8

10

11

5

13

6

14

12

4

9

3

CONNECTOR: C-62

COMPONENT SIDE

AB

C-62

AC201699

2

1

CONNECTOR: F-10 

REAR
DOOR
(LH)

AB

COMPONENT
SIDE

F-10 (B)


Content   ..  551  552  553  554   ..