Mitsubishi Montero (1998+). Manual - part 272


  Index      Mitsubishi     Mitsubishi Montero - service repair manual 1998 year


Search            


Content   ..  270  271  272  273   ..


Mitsubishi Montero (1998+). Manual - part 272


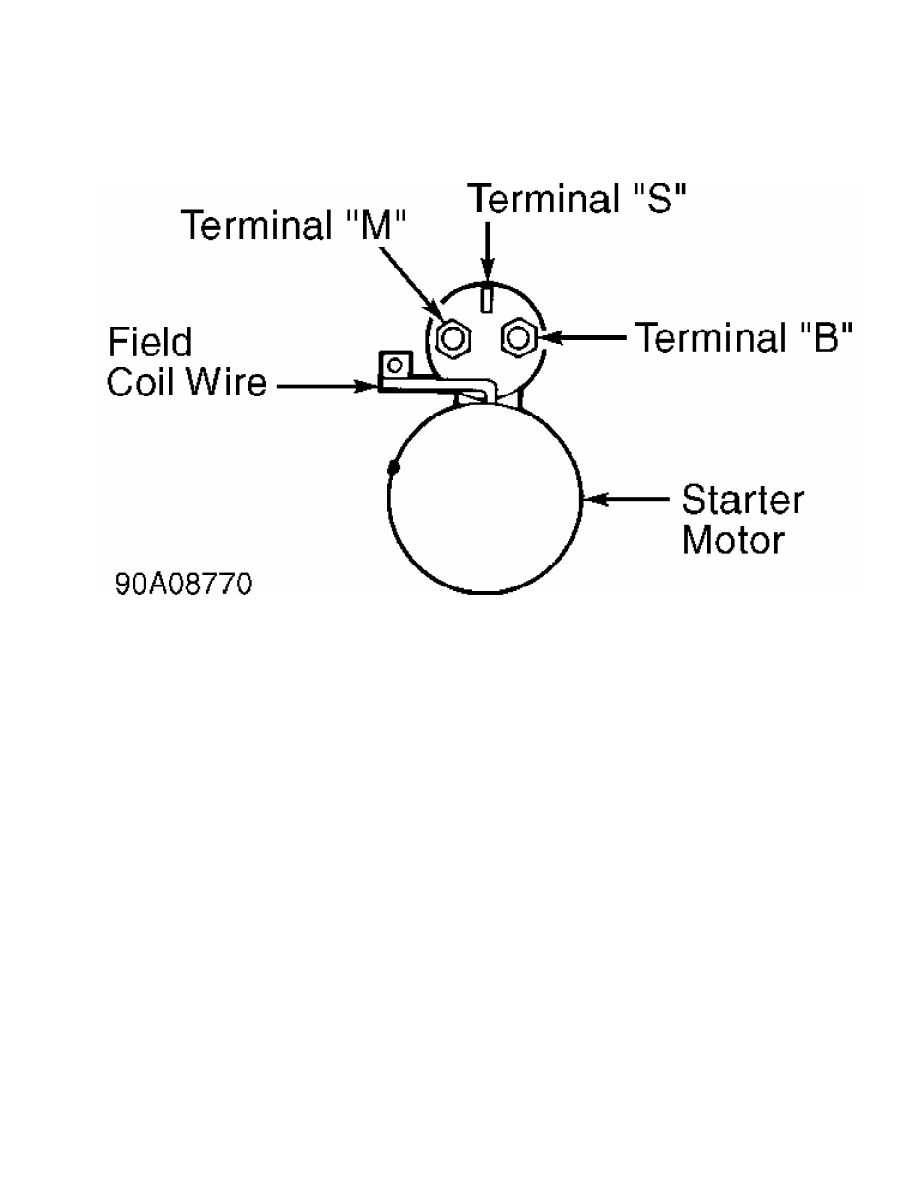
Fig. 3:  Identifying Starter Solenoid Terminals

Courtesy of Mitsubishi Motor Sales of America

         HOLD-IN COIL TEST

         1) Disconnect field coil wire from terminal "M" at starter

solenoid. See Fig. 3. Connect jumper wire between positive battery

terminal of 12-volt battery and terminal "S" of starter solenoid.

         2) Connect a second jumper wire from negative battery

terminal and touch starter case. If solenoid plunger is pulled in,

hold-in coil is good. If solenoid plunger is not pulled in, replace

solenoid.

         PINION RETURN TEST

         1) Disconnect field coil wire from terminal "M" at starter

solenoid. See Fig. 3. Connect jumper wire between positive battery

terminal of 12-volt battery and terminal "M" of starter solenoid.

         2) Connect a second jumper wire from negative battery

terminal and touch starter case. Pull pinion outward and release it.

Replace solenoid if pinion remains out.

         PINION GAP MEASUREMENT

         1) Disconnect field coil wire from terminal "M" at starter

solenoid. See Fig. 3. Connect jumper wire between positive battery

terminal of 12-volt battery and terminal "S" of starter solenoid.

         2) Connect a second jumper wire from negative battery

terminal and touch terminal "M" of starter solenoid. Using a feeler

gauge, measure clearance between pinion and stopper. See  Fig. 4.

         3) Clearance should be within specification. See

STARTER SPECIFICATIONS table. Adjust clearance by adding or removing

gaskets between solenoid and front housing.

Fig. 4:  Measuring Pinion Gap

Courtesy of Mitsubishi Motor Sales of America

         PINION TEST

         While holding pinion housing, rotate pinion. Pinion should

rotate smoothly in clockwise direction only. Inspect pinion and ring

gear for wear or burrs. If pinion does not rotate as specified or

damage is found, replace pinion.

         ARMATURE TEST

         Ensure armature is not grounded. Place armature in growler.

Hold a thin steel blade parallel and just above armature while slowly

rotating armature in growler. A shorted armature will cause blade to

vibrate and be attracted to core. Using an ohmmeter, check continuity

between armature coil cores and commutator segments (small diameter

end of armature). Continuity should not exist. Check for continuity

between segments. Continuity should exist. Replace armature as

necessary.

         BRUSH HOLDER TEST

         Using an ohmmeter, check continuity between brush holder

plate and brush holder. Continuity should not exist. Replace brush

holder as necessary.

         REMOVAL & INSTALLATION

NOTE:    On Montero with A/T, it may be necessary to disconnect

         transmission oil cooler line for starter removal.

         Removal & Installation

         Disconnect negative battery cable. If necessary, raise

vehicle on hoist. Remove starter mounting bolts and starter. To

install, reverse removal procedure.

         OVERHAUL

         Check commutator for out-of-round and proper amount of

undercut. Replace or repair armature if not within specification. See

STARTER SPECIFICATIONS table. Ensure brushes are not worn beyond wear

line (outer line closest to commutator contact surface). Check pinion

gap. See PINION GAP MEASUREMENT under BENCH TESTING. See Figs. 5 and

6.

Fig. 5:  Exploded View Of Direct Drive Starter (Typical)

Courtesy of Mitsubishi Motor Sales of America

Fig. 6:  Exploded View Of Gear Reduction Starter (Typical)

Courtesy of Mitsubishi Motor Sales of America

         STARTER SPECIFICATIONS


Content   ..  270  271  272  273   ..