Mitsubishi Montero (1991+). Manual - part 117


  Index      Mitsubishi     Mitsubishi Montero - service repair manual 1991 year


Search            


Content   ..  115  116  117  118   ..


Mitsubishi Montero (1991+). Manual - part 117


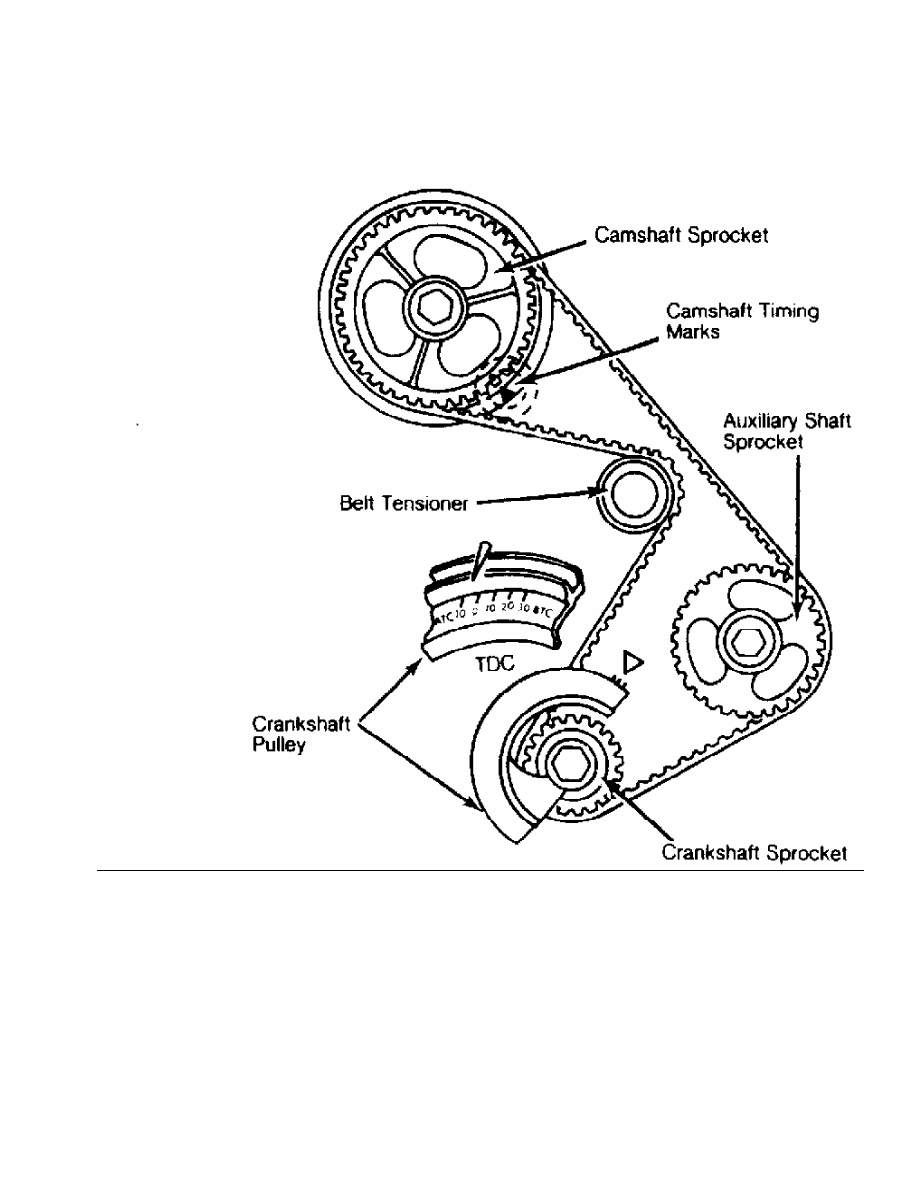
Fig. 25:  Timing Belt Sprocket Alignment - Typical

This Graphic For General Information Only

         TENSION ADJUSTMENTS

         If guide rails are used with spring loaded tensioners,

ensure at least half of original rail thickness remains. Spring

loaded tensioner should be inspected for damage.

         Ensure all timing marks are aligned. Adjust belt tension

using manufacturer’s recommendations. Belt tension may require

checking using tension gauge. See Fig. 26.

Fig. 26:  Timing Belt Tension Adjustment - Typical

This Graphic For General Information Only

         TIMING GEARS

         * PLEASE READ THIS FIRST *

NOTE:    Always refer to appropriate engine overhaul article in the

         ENGINES section for complete overhaul procedures and

         specifications for the vehicle being repaired.

         TIMING GEAR BACKLASH & RUNOUT

         On engines where camshaft gear operates directly on

crankshaft gear, gear backlash and runout must be checked. To check

backlash, install dial indicator with tip resting on tooth of camshaft

gear. Rotate camshaft gear as far as possible. Adjust indicator to

zero. Rotate camshaft gear in opposite direction as far as possible

and note reading.

         To determine timing gear runout, mount dial indicator with

tip resting on face edge of camshaft gear. Adjust indicator to zero.

Rotate camshaft gear 360 degrees and note reading. If backlash or

runout exceed specifications, replace camshaft and/or crankshaft

gear.

         REAR MAIN OIL SEAL

         * PLEASE READ THIS FIRST *

NOTE:    Always refer to appropriate engine overhaul article in the

         ENGINES section for complete overhaul procedures and

         specifications for the vehicle being repaired.

         INSTALLATION

         One-Piece Type Seal

         For one-piece type oil seal installation, coat block contact

surface of seal with sealer if seal is not factory coated. Ensure seal

surface is free of burrs. Lubricate seal lip with engine oil and press

seal into place using proper oil seal installer. See  Fig. 27.

Fig. 27:  Installing Typical One-Piece Oil Seal

This Graphic For General Information Only

         Rope Type Seal

         For rope type rear main oil seal installation, press seal

lightly into its seat. Using seal installer, fully seat seal in

bearing cap or cylinder block.

         Trim seal ends even with block parting surface. Some

applications require sealer to be applied on main bearing cap prior

to installation. See Fig. 28.

Fig. 28:  Typical Rope Seal Installation

This Graphic For General Information Only

         Split-Rubber Type Seal

         Follow manufacturers procedures when installing split-rubber

type rear main oil seals. Installation procedures vary with engine

type. See appropriate ENGINE article in this section. See  Fig. 29.

Fig. 29:  Typical Split-Rubber Seal Installation

This Graphic For General Information Only

         OIL PUMP


Content   ..  115  116  117  118   ..