Mitsubishi Galant. Manual - part 726


  Index      Mitsubishi     Mitsubishi Galant - service repair manual 2001 year


Search            


Content   ..  724  725  726  727   ..


Mitsubishi Galant. Manual - part 726


HEATER UNIT,HEATER CORE,BLOWER ASSEMBLY, EVAPORATOR UNIT

TSB Revision

HEATING AND AIR CONDITIONING

55-30

H EATER U NIT,H EATER C O R E,B LO WER A SSEM B LY, 

EVA PO R ATO R  U NIT

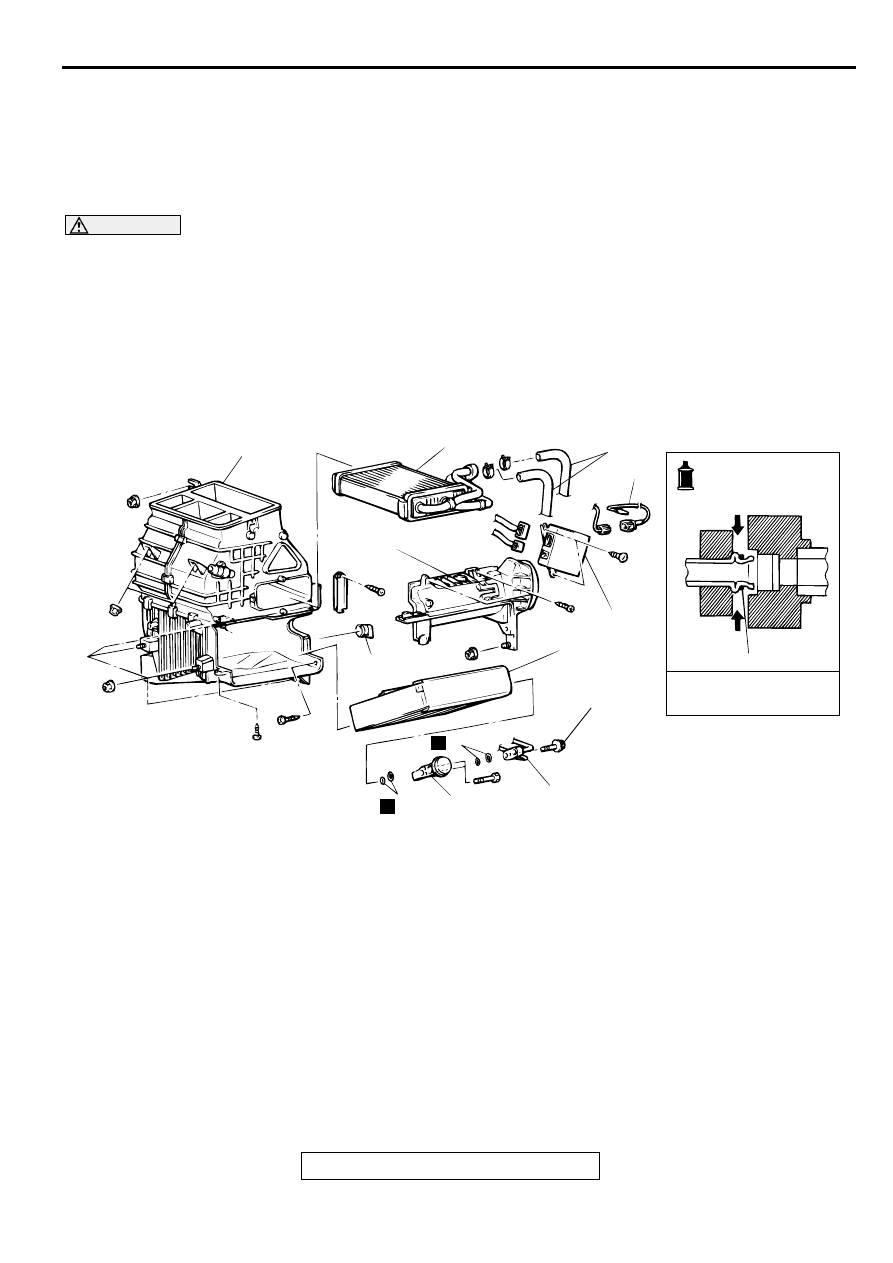
HEATER/COOLER UNIT, HEATER CORE AND EVAPORATOR UNIT

M1552011600048

REMOVAL AND INSTALLATION

WARNING

When removing and installing the heater 
unit, do not let it bump against the SRS-ECU 
or the components.

Pre-removal and Post-installation Operation

Front Driver's Side Under Cover, Center Panel 
Assembly, Glove Box and Front Passenger's 
Side Under Cover Removal and Installation 
(Refer to GROUP 52A, Instrument Panel 

P.52A-

4

.)

Under Cover Removal and Installation (Refer to 

P.52A-4

.)

Joint Duct Removal and Installation (Refer to 

P.55-32

.)

AC002946

1

2

3

4

5

6

7

8

10

9

AC

11

6

N

6

N

PIPING CONNECTION

COMPRESSOR OIL: 
SUN PAG 56

4.9 N·m
43.4 in-lb    

REMOVAL STEPS

1.

AUTOMATIC COMPRESSOR 
CONTROLLER <VEHICLES WITH 
A/C>

2.

COVER

3.

THERMISTOR SENSOR

REFRIGERANT DISCHARGING 
AND CHARGING <VEHICLES 
WITH A/C>(REFER TO 

P.55-26

.)

<<A>>

4.

A/C PIPE <VEHICLES WITH A/C>

5.

EXPANSION VALVE

6.

O-RING <VEHICLES WITH A/C>

>>A<<

7.

EVAPORATOR

8.

DRAIN HOSE <VEHICLES WITH 
A/C>]

ENGINE COOLANT DRAINING 
AND REFILLING [REFER TO 
GROUP 00E, MAINTENANCE 
SERVICE - ENGINE COOLANT 
(CHANGE) 

P.00-50

.]

9.

HEATER HOSE

RADIO AND TAPE PLAYER 
(REFER TO GROUP 54A, AUDIO 
SYSTEM - RADIO AND TAPE 
PLAYER, 

P.54A-150

.)

HEATER CONTROL ASSEMBLY 
(REFER T

P.55-26

.)

INSTRUMENT PANEL 
ASSEMBLY (REFER TO GROUP 
52A, INSTRUMENT PANE

P.52A-

4

.)

FRONT DECK CROSSMEMBER

REMOVAL STEPS (Continued)

HEATER UNIT,HEATER CORE,BLOWER ASSEMBLY, EVAPORATOR UNIT

TSB Revision

HEATING AND AIR CONDITIONING

55-31

REMOVAL SERVICE POINT

<<A>> A/C PIPE REMOVAL

CAUTION

Seal the pipes completely, otherwise the compressor oil 
and receiver will absorb water vapor easily, possibly 
damaging the compressor and deteriorating performance.
Plug the disconnected pipe and the evaporator nipple to 
prevent foreign material from getting into them.

INSTALLATION SERVICE POINT

>>A<< EVAPORATOR INSTALLATION
When replacing the evaporator, refill with a specified amount of 
compressor oil and install it.

Compressor oil: SUN PAG 56

Quantity: 60 cm

3

 (2.0 floz)

FLOOR CONSOLE (REFER TO 
GROUP 52A, FLOOR CONSOLE 

P.52A-11

.)

INSTRUMENT PANEL CENTER 
REINFORCEMENT (REFER TO 
GROUP 52A, INSTRUMENT 
PANEL 

P.52A-4

.)

FOOT DUCT (LH/RH), REAR 
HEATER DUCT <VEHICLES WITH 
REAR HEATER DUCT> AND 
FOOT CENTER DUCT (REFER 
TO 

P.55-43

.)

10. HEATER/COOLER UNIT
11. HEATER CORE

REMOVAL STEPS (Continued)

BLOWER ASSEMBLY AND RESISTOR

TSB Revision

HEATING AND AIR CONDITIONING

55-32

B LO WER A SSEM B LY A N D  RESISTO R

BLOWER ASSEMBLY AND RESISTOR

M1551002800074

REMOVAL AND INSTALLATION

AC002947

1

2

3

4

5

6

AC

6

(SLIDING
PARTS)

5

AIR PURIFIER ASSEMBLY, JOINT 
DUCT AND RESISTOR REMOVAL 
STEPS

GLOVE BOX AND FRONT 
PASSENGER'S UNDER COVER 
PLUG (REFER TO GROUP 52A, 
INSTRUMENT PANE

P.52A-4

.)

1.

AIR PURIFIER ASSEMBLY

2.

JOINT DUCT

3.

RESISTOR

UNDER COVER(REFER TO 

P.52A-4

.)

4.

BLOWER FAN AND MOTOR

AIR PURIFIER ASSEMBLY, JOINT 
DUCT AND RESISTOR REMOVAL 
STEPS

CENTER PANEL ASSEMBLY, 
FRONT DRIVER'S SIDE UNDER 
COVER AND FRONT 
PASSENGER'S SIDE UNDER 
COVER (REFER TO GROUP 52A, 
INSTRUMENT PANEL 

P.52A-4

.)

5.

INSIDE/OUTSIDE AIR 
CHANGEOVER DAMPER MOTOR

6.

BLOWER ASSEMBLY

COMPRESSOR ASSEMBLY AND TENSION PULLEY

TSB Revision

HEATING AND AIR CONDITIONING

55-33

INSPECTION

M1551002900071

RESISTOR CHECK

Use an ohmmeter to measure the resistance between the 
terminals. Check that the measured value is at the standard 
value.

Standard value:

BLOWER FAN AND MOTOR CHECK

When battery voltage is applied between the terminals, check 
that the motor operates. Also, check that there is no abnormal 
noise.

INSIDE/OUTSIDE AIR CHANGEOVER DAMPER 
MOTOR CHECK

CAUTION

Cut off the battery voltage when the damper is in the 
inside/outside air position.

CO M PR ESSO R  A SSEM BLY AN D TEN SIO N PULLEY

COMPRESSOR ASSEMBLY AND TENSION PULLEY

M1552004100052

REMOVAL AND INSTALLATION

Pre-removal Operation

Refrigerant Discharging (Refer to 

P.55-21

.)

MEASUREMENT TERMINAL

STANDARD VALUE 

Between terminals 3 and 2 (LO)

2.3

Between terminals 3 and 4 (ML)

1.1

Between terminals 3 and 1 (MH)

0.4

AC001402AB

AC001403AB

BATTERY CONNECTION 
TERMINALS 

LEVER POSITION

1-7

Move to the outside air position

1-5

Move to the inside air position

AC001404

AC001404AB

INSIDE AIR POSITION

OUTSIDE AIR
POSITION


Content   ..  724  725  726  727   ..