Mitsubishi Galant 9G. Manual - part 611


  Index      Mitsubishi     Mitsubishi Galant 9G - service repair manual


Search            


Content   ..  609  610  611  612   ..


Mitsubishi Galant 9G. Manual - part 611


OIL PAN AND OIL PUMP

TSB Revision

ENGINE OVERHAUL <3.8L ENGINE>

11D-42

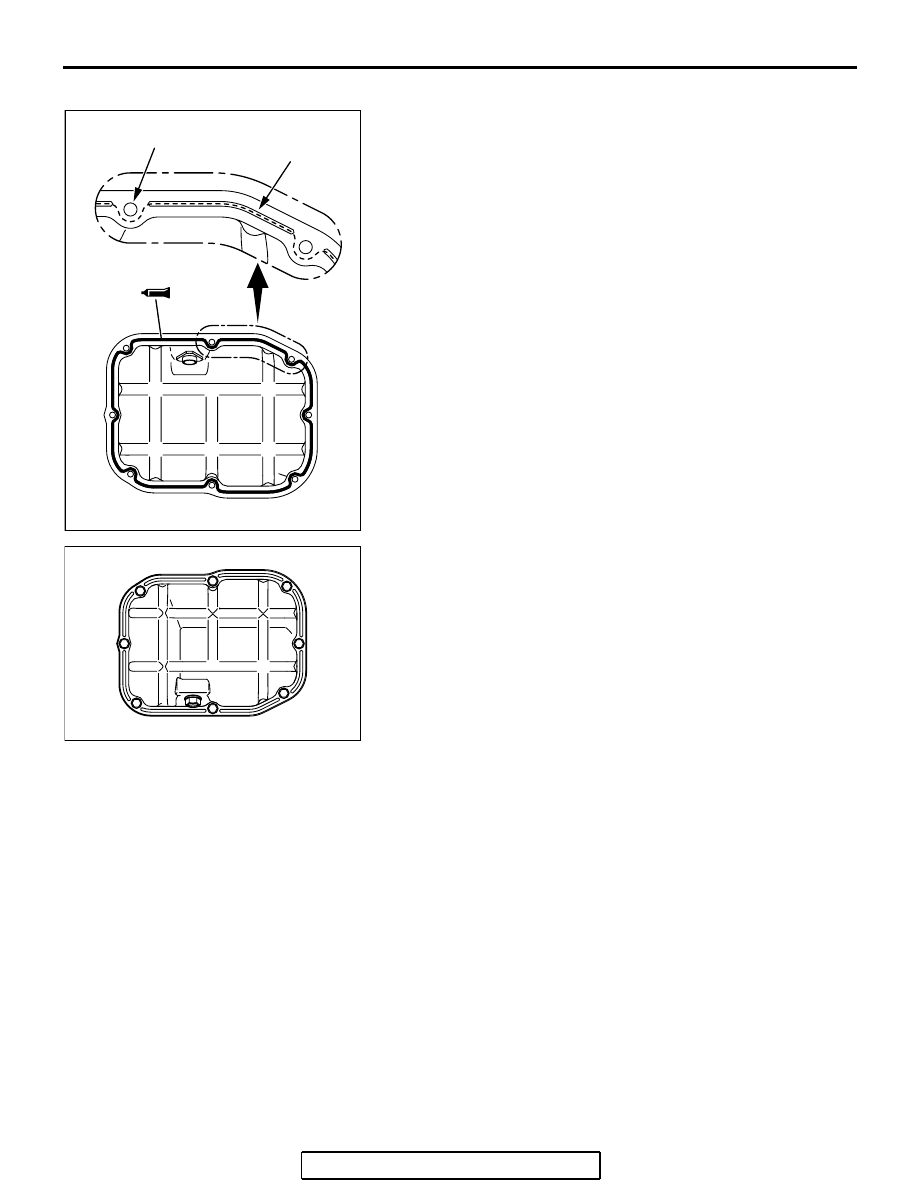
>>G<< OIL PAN, LOWER INSTALLATION

1. Clean both gasket surfaces of the upper and lower oil pans.
2. Apply a 4 mm (0.2 inch) diameter bead of sealant 

(Mitsubishi Genuine Parts number MD970389 or equivalent) 
to the lower oil pan.
Apply sealant as indicted by the broken line in the 
illustration; the grooves must be traced and the bolt holes 
must be surrounded with a bead of sealant.

3. Install the lower oil pan to the upper oil pan.

NOTE: Be sure to install the oil pan quickly while the sealant 
is wet (within 15 minutes).

4. Tighten the lower oil pan bolts in the sequence shown.

Tightening torque: 11 

± 1 Nm (95 ± 9 in-lb)

NOTE: After installation, keep the sealed area away from oil 
for approximately one hour.

.

AK302911AB

GROOVE

BOLT HOLE

AK204036AB

4

7

3

1

5

8

6

2

OIL PAN AND OIL PUMP

TSB Revision

ENGINE OVERHAUL <3.8L ENGINE>

11D-43

>>H<< DRAIN PLUG GASKET INSTALLATION

CAUTION

If the gasket is installed in the wrong direction, oil leaks 
will occur.
Install the drain plug gasket in the direction shown.

INSPECTION

M1113008200171

.

OIL PUMP

1. Check the tip clearance.

Standard value: 0.06 

 0.18 mm (0.003  0.007 inch)

2. Check the side clearance.

Standard value: 0.04 

 0.10 mm (0.002  0.003 inch)

AKX00726

DRAIN PLUG

OIL PAN 
SIDE

GASKET

OIL PAN

AB

AKX00743

AKX00744

PISTON AND CONNECTING ROD

TSB Revision

ENGINE OVERHAUL <3.8L ENGINE>

11D-44

3. Check the body clearance.

Standard value: 0.10 

 0.18 mm (0.004  0.007 inch)

Limit: 0.35 mm (0.013 inch)

PISTON AND CONNECTING ROD

REMOVAL AND INSTALLATION

M1113008400636

AKX00745

AK201085

1

2

3

4

5

6

7

8

9

10

11

12

13

14

27 ± 2 N·m
20 ± 1 ft-lb

   + 90˚ TO 94˚

AC

APPLY ENGINE OIL
TO ALL MOVING
PARTS BEFORE
INSTALLATION.

REMOVAL STEPS

>>G<<

1. CONNECTING ROD CAP NUT

<<A>>>F<<

2. CONNECTING ROD CAP

>>D<<

3. CONNECTING ROD BEARING, 

LOWER

>>E<<

4. PISTON AND CONNECTING ROD 

ASSEMBLY

>>D<<

5. CONNECTING ROD BEARING, 

UPPER

REMOVAL STEPS (Continued)

PISTON AND CONNECTING ROD

TSB Revision

ENGINE OVERHAUL <3.8L ENGINE>

11D-45

REMOVAL SERVICE POINTS

.

<<A>> CONNECTING ROD CAP REMOVAL

1. Mark the cylinder number on the side of the connecting rod 

big end for correct reassembly.

2. Keep the removed connecting rods, caps, and bearings in 

order according to the cylinder number.

.

<<B>> PISTON PIN REMOVAL

1. Remove the snap rings.

CAUTION

The clearance between the piston and the piston pin is a 
tight fit at room temperature. Therefore, be sure to heat the 
piston before pulling out the piston pin. Use care since the 
piston is hot after heating.
2. Heat the piston approximately 70

°C (158°F) and pull out the 

piston pin.

>>C<<

6. PISTON RING NO.1

>>C<<

7. PISTON RING NO.2

>>B<<

8. OIL RING
9. SNAP RING

<<B>>>A<<

10. PISTON PIN
11. SNAP RING
12. PISTON
13. CONNECTING ROD
14. BOLT

REMOVAL STEPS (Continued)

AKX00734

CYLINDER
NUMBER

AB

AKX01397

70˚C

(158˚F)

AB


Content   ..  609  610  611  612   ..