Mitsubishi Galant 9G. Manual - part 428


  Index      Mitsubishi     Mitsubishi Galant 9G - service repair manual


Search            


Content   ..  426  427  428  429   ..


Mitsubishi Galant 9G. Manual - part 428


MAINTENANCE SERVICE

TSB Revision

GENERAL

00-50

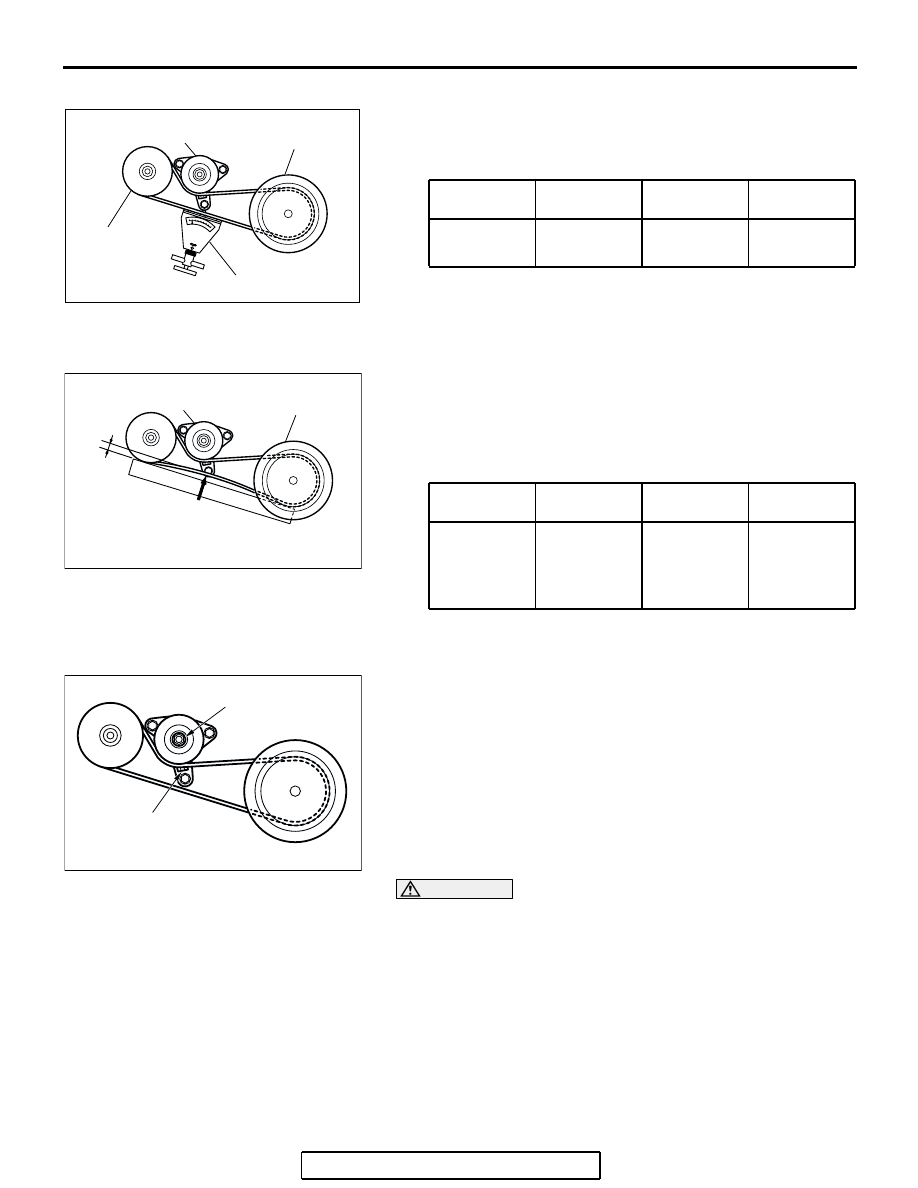
WHEN USING A TENSION GAUGE

Use a belt tension gauge to check that the belt tension is within 
the standard value.

Standard value:

.

BELT DEFLECTION CHECK

Apply approximately 98 N (22 lb) of force to the middle of the 
drive belt between the pulleys (at the place indicated by the 
arrow) and check that the amount of deflection is within the 
standard value.

Standard value:

.

if the tension or deflection is outside the standard value, adjust 
by the following procedure.
1. Loosen the tensioner pulley lock nut.
2. Adjust the belt tension to the standard value by turning the 

adjusting bolt. The tension will increase when turning the 
adjusting bolt clockwise, and decrease when turning 
counterclockwise.

3. Tighten the lock nut to the specified torque.

Tightening torque: 49 

± 9 Nm (36 ± 7 ft-lb)

4. Tighten the adjusting bolt.

Tightening torque: 5.0 

± 1.0 Nm (44 ± 9 in-lb)

CAUTION

Check after turning the crankshaft one or more rotations 
clockwise.
5. Check the belt deflection amount and tension, and readjust 

if necessary.

ITEM

WHEN 
CHECKED

DURING 
ADJUSTMENT

DURING 
REPLACEMENT

Tension N 
(lb)

294 

− 490 

(66 

− 110)

343 

− 441 

(77 

− 99)

490 

− 686 

(110 

− 154)

AC210249AB

TENSION
GAUGE

POWER 
STEERING
OIL PUMP 
PULLEY

CRANKSHAFT
PULLEY

TENSION
PULLEY

ITEM

WHEN 
CHECKED

DURING 
ADJUSTMENT

DURING 
REPLACEMENT

Deflection 
(Reference 
value) mm 
(in)

12.3 

− 16.2 

(0.48 

− 0.64)

13.2 

− 15.1 

(0.52 

− 0.59)

9.6 

− 12.3 

(0.38 

− 0.48)

AC210250AB

APPROXIMATELY
98 N (22 lb)

CRANKSHAFT
PULLEY

TENSION
PULLEY

AC210301

ADJUSTING
BOLT

LOCK NUT

AB

MAINTENANCE SERVICE

TSB Revision

GENERAL

00-51

9. EXHAUST SYSTEM (CONNECTIONS PORTION 
OF MUFFLER, MUFFLER PIPES AND 
CONVERTER HEAT SHIELDS) (CHECK AND 
SERVICE AS REQUIRED)

M1001005800299

1. Check for holes and exhaust gas leaks due to damage, 

corrosion, etc.

2. Check the joints and connections for looseness and exhaust 

gas leaks.

3. Check the rubber hangers and brackets for damage.

10. ENGINE OIL (CHANGE)

M1001002600360

Use the specified oil. (Refer to 

P.00-37

.)

WARNING

Use care as oil could be hot.

1. After warming up the engine, remove the oil filler cap.
2. Remove the drain plug to allow the engine oil to drain.
3. Install a new drain plug gasket so that it faces in the 

direction shown in the illustration, and then tighten the drain 
plug to the specified torque.

Tightening torque: 39 

± 5 Nm (29 ± 3 ft-lb)

4. Pour new engine oil in through the oil filler tube.

Specified Engine Oil: Engine oils displaying ILSAC 

certification symbol ("Starburst" symbol) or con-
forming the API classification SL, SL/CF.

Total quantity:

<2.4L Engine> 4.3 dm

3

 (4.5 quarts)

<3.8L Engine> 4.6 dm

3

 (4.9 quarts)

5. Install the engine oil filler cap.
6. Start the engine and run it at idle for a few minutes.

7. Pull out the oil dipstick slowly and check that the oil level is 

within the marks on the oil dipstick.

8. Check that the oil is not excessively dirty, that there is no 

coolant or gasoline mixed in, and that it is sufficiently thick 
and slippery.

AC305936

DRAIN PLUG
GASKET

OIL PAN SIDE

39 ± 5 N·m
29 ± 3 ft-lb

AB

<2.4L ENGINE>

AC305937

DRAIN PLUG
GASKET

OIL PAN SIDE

39 ± 5 N·m
29 ± 3 ft-lb

AB

<3.8L ENGINE>

AC205268

MAXIMUM

MINIMUM

GOOD

AB

MAINTENANCE SERVICE

TSB Revision

GENERAL

00-52

11. ENGINE OIL FILTER (REPLACE)

M1001002700345

The quality of replacement filters varies considerably. Only high 
quality filters should be used to assure most efficient service.
Genuine oil filters require that the filter is capable of withstand-
ing a pressure of 1,800 kPa (261 psi) are high quality filters and 
are recommended as follows:

Mitsubishi Oil Filter Part Number:
<2.4L Engine>

MD136466, MD322508 or MD356000

<3.8L Engine>

MD352627 or MD321589

.

Engine Oil Filter Selection

This vehicle is equipped with a full-flow, throw-away oil filter.
The same type of filter is recommended as a replacement filter 
for this vehicle. It is possible, particularly in cold weather, that 
this vehicle may develop high oil pressure for a short duration. 
Make sure that any replacement filter used on this vehicle is a 
high-quality filter. The filter must withstand a pressure of 1,800 
kPa (261 psi) [manufacturer's specifications] to avoid filter and 
ultimately engine damage. The following is a high-quality filter 
and is strongly recommended for use on this vehicle: Mitsubishi 
Engine Oil Filter Part number MD136466, MD322508 or 
MD356000 <2.4L ENGINE> and MD352627 or MD321589 
<3.8L ENGINE>.
Any replacement oil filter should be installed in accordance with 
the oil filter manufacturer's installation instructions.

.

Oil Filter Replacement

WARNING

Use care as oil could be hot.

1. Drain the engine oil by removing the oil drain plug.
2. Use an oil filter wrench to remove the engine oil filter.
3. Clean the filter bracket side mounting surface and ensure 

the old O-ring has been removed.

AC000093

MB991610 OR
GENERAL
SERVICE
TOOL

AG

MAINTENANCE SERVICE

TSB Revision

GENERAL

00-53

4. Apply a small amount of engine oil to the O-ring of the new 

oil filter.

5. Where the oil filter O-ring touches the oil pan flange, tighten 

the oil filter to the specified torque using the 
commercially-available tool.

Tightening torque:

<MD356000, MD352627 or MD321589>: Approxi-

mately 3/4 turn [14 

± 2 Nm (124 ± 18 in-lb)]

<MD136466, MD322508>: Approximately one turn 

[17 

± 3 Nm (13 ± 2 ft-lb)]

6. Add new engine oil through the oil filler.

12. TRANSMISSION FLUID

M1001002900338

TRANSMISSION FLUID CHECK

1. Drive the vehicle until the transmission fluid temperature 

rises to the normal operating temperature [70 

− 80°C (158 − 

176

°F)].

NOTE: The transmission fluid temperature is measured with 
scan tool MB991958 (MUT-III sub assembly).
NOTE: If it takes some amount of time until the transmission 
fluid reaches its normal operating temperature [70 

 80

°

(158 

 176

°

F)], check the transmission fluid level by refer-

ring to the left diagram.

2. Park the vehicle on a level surface.
3. Move the selector lever through all positions to fill the torque 

converter and the hydraulic circuits with fluid, and then move 
the selector lever to the "N" position.

4. After wiping off any dirt around the dipstick, remove the 

dipstick and check the condition of the transmission fluid.
NOTE: If the transmission fluid smells as if it is burnt, it 
means that the transmission fluid has been contaminated by 
fine particles from the bushings and friction materials. Tran-
saxle overhaul and cooler line flushing may be necessary.

5. Check transmission fluid level is at the "HOT" mark on the 

dipstick. If the transmission fluid level is less than this, add 
DIAMOND ATF SP III until the level reaches the "HOT" 
mark.
NOTE: If the transmission fluid level is too low, the oil pump 
will draw in air along with the transmission fluid, which will 
cause to form bubbles. If the transmission fluid level is too 
high, rotating components inside the transaxle will churn the 
fluid and air into a foamy liquid. Both conditions (level too 
low or too high) will cause the hydraulic pressure to drop, 
which will result in late shifting and slipping of the clutches 
and brakes.
NOTE: In either case, air bubbles can interfere with normal 
valve, clutch, and brake operation. Also, foaming can cause 
transmission fluid to escape from the transaxle vent where it 
may be mistaken for a leak.

ACX00396

O-RING

AB

AC005860

80

DIPSTICK

60

40

(176)

(140)

(104)

FLUID TEMPERATURE [˚C (˚F)]

– 30 (– 1.2)

– 20 (– 0.8)

– 10 (– 0.4)

0 (0)

10 (0.4)

FLUID LEVEL [mm (in)]

AB

AC106828AB


Content   ..  426  427  428  429   ..