Mitsubishi Lancer (4A9 engine). Manual - part 31


  Index      Mitsubishi     Mitsubishi Lancer (4A9 engine) 12GS41 & 44S - service repair manual


Search            


Content   ..  29  30  31  32   ..


Mitsubishi Lancer (4A9 engine). Manual - part 31


OIL PAN

ENGINE MECHANICAL <4A9>

11A-38

CAUTION

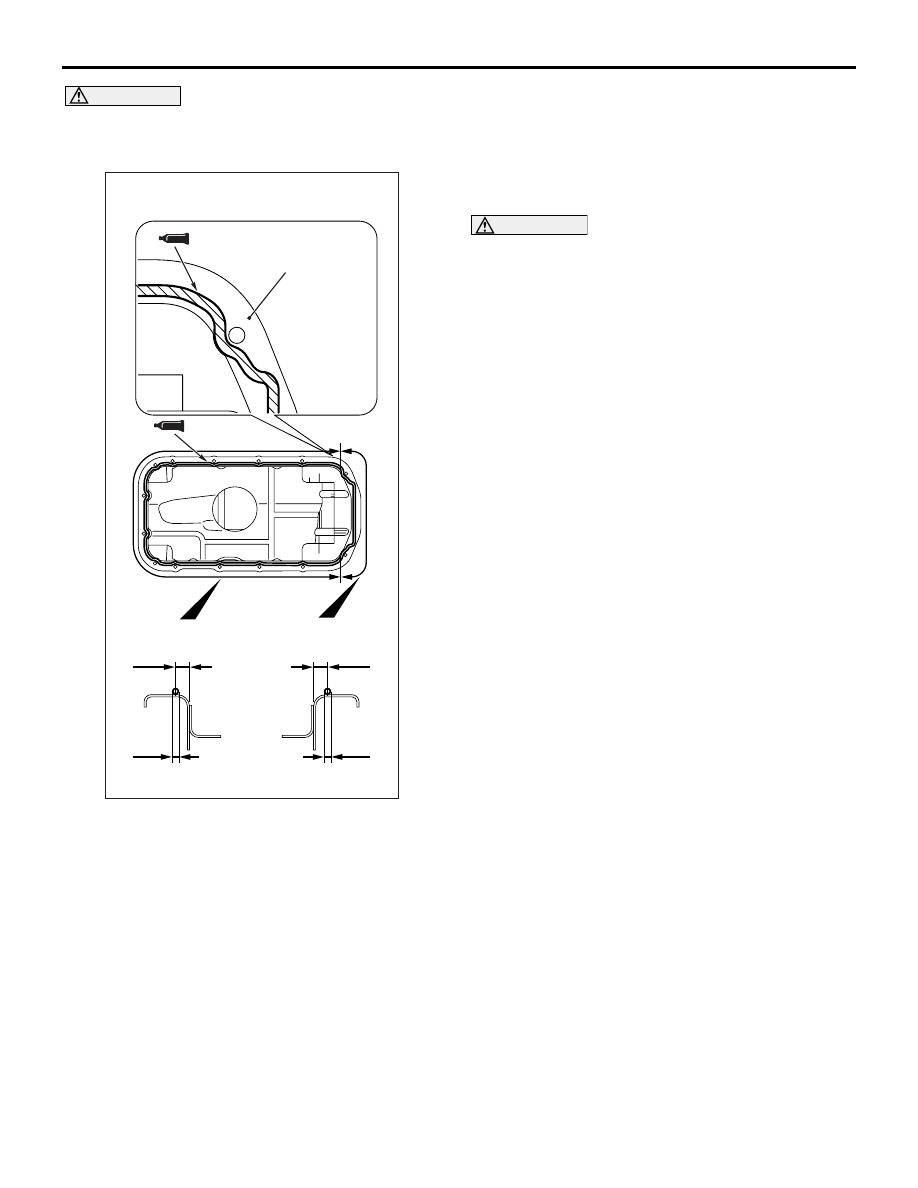
As oil leak is likely to occur at both ends of the 
rear side of the engine oil pan,  be sure to apply 
the specified sealant as shown.

AC403646

AC

5.5 mm

5.5 mm

Engine oil pan

Both engine oil pan rear side edge parts


2 mm


4 mm

2. Apply a bead of the sealant to the cylinder block 

mating surface of the engine oil pan as shown.

Specified sealant: ThreBond 1217G or equiv-
alent

NOTE: Install the engine oil pan immediately after 
the application of sealant.

CAUTION

After the installation, until a sufficient period of 
time (one hour or more) elapses, do not apply the 
engine oil or water to the sealant application area 
or start the engine.
3. Tighten the engine oil pan mounting bolts to the 

specified torque.

Tightening torque: 11 

± 3 Nm

INSPECTION

M1112002900889

• Check the engine oil pan for cracks.

• Check the engine oil pan sealant-coated surface 

for damage and deformation.

CRANKSHAFT OIL SEAL

ENGINE MECHANICAL <4A9>

11A-39

CRANKSHAFT OIL SEAL

REMOVAL AND INSTALLATION

M1112003104231

ACA00943AC

2

100 ± 5 N·m

11 ± 3 N·m

11

N

3

1

N

Seating surface: Engine oil
Thread: LOCTITE 2701 or equivalent

2, 4, 8

(Engine oil)

(Engine oil)

5

6

7

9

10

4

100 ± 5 N·m

8

100 ± 5 N·m

<Euro5-M/T>

<A/T>

<Euro4-M/T>

Crankshaft front oil seal removal 
steps 

Crankshaft damper pulley (Refer to 
)

>>

C

<<

1.

Crankshaft front oil seal
Crankshaft rear oil seal removal 
steps <Euro4-M/T> 

Transmission assembly (Refer to 
GROUP 22A 

− Transmission 

Assembly )

Clutch cover and clutch disc (Refer 
to GROUP 21E 

− Clutch )

Engine oil pan (Refer to )

<<

A

>>

>>

B

<<

2.

Flywheel bolt

>>

B

<<

3.

Flywheel assembly

>>

A

<<

11. Crankshaft rear oil seal case 

assembly
Crankshaft rear oil seal removal 
steps <Euro5-M/T> 

Transmission assembly (Refer to 
GROUP 22A 

− Transmission 

Assembly )

Clutch cover and clutch disc (Refer 
to GROUP 21E 

− Clutch )

Engine oil pan (Refer to )

Crankshaft rear oil seal removal 
steps <Euro4-M/T> (Continued)

CRANKSHAFT OIL SEAL

ENGINE MECHANICAL <4A9>

11A-40

REMOVAL SERVICE POINT

<<A>> FLYWHEEL BOLT <M/T>/DRIVE PLATE 
BOLT <A/T> REMOVAL

AK305392AF

MD998781

Cylinder block

Flywheel assembly or
Drive plate assembly

1. Fix the flywheel assembly <M/T> or drive plate 

assembly <A/T> using special tool flywheel 
stopper (MD998781).

2. Remove the flywheel bolts <M/T> or drive plate 

bolts <A/T>.

INSTALLATION SERVICE POINTS

>>A<< CRANKSHAFT REAR OIL SEAL CASE 
ASSEMBLY INSTALLATION
1. Remove sealant from the crankshaft rear oil seal 

case assembly mounting surface of the cylinder 
block, and degrease the surface where the 
sealant is applied.

AC311772

AD

Cylinder block

A

A

B

B

Section A - A

Section B - B

1 mm

3.5 mm


2 mm


2 mm

2. Apply a bead of specified sealant to the 

crankshaft rear oil seal case assembly mating 
surface of the cylinder block as shown.

Specified sealant: ThreeBond 1217G or 
equivalent

NOTE: Install the crankshaft rear oil seal case 
assembly immediately after applying sealant.

CAUTION

• Install the crankshaft rear oil seal case 

assembly not to damage the crankshaft rear 
oil seal.

• After the installation, until a sufficient period 

of time (one hour or more) elapses, do not 
apply the engine oil or water to the sealant 
application area or start the engine.

3. Install the crankshaft rear oil seal case assembly 

to the cylinder block.

4. Tighten the crankshaft rear oil seal case assembly 

mounting bolts to the specified torque.

Tightening torque: 11 

± 3 Nm

>>B<< DRIVE PLATE ASSEMBLY <A/T>/
ADAPTER PLATE <A/T>/DRIVE PLATE BOLT <A/
T>/FLYWHEEL ASSEMBLY <M/T>/FLYWHEEL 
BOLT <M/T> INSTALLATION
1. Remove the sealant, engine oil, and other 

adhering materials from the flywheel assembly 
<M/T> or drive plate assembly <A/T> installation 
face, adapter plate <A/T>, crankshaft screw hole, 
and flywheel bolts <M/T> or drive plate bolts <A/
T>.

<<

A

>>

>>

B

<<

4.

Flywheel bolt

>>

B

<<

5.

Adapter plate

>>

B

<<

6.

Flywheel assembly

>>

B

<<

7.

Adapter plate

>>

A

<<

11. Crankshaft rear oil seal case 

assembly
Crankshaft rear oil seal removal 
steps <A/T> 

Transmission assembly (Refer to 
GROUP 23C 

− Transmission 

Assembly )

Engine oil pan (Refer to )

<<

A

>>

>>

B

<<

8.

Drive plate bolt

>>

B

<<

9.

Adapter plate

>>

B

<<

10. Drive plate assembly

>>

A

<<

11. Crankshaft rear oil seal case 

assembly

Crankshaft rear oil seal removal 
steps <Euro5-M/T> (Continued)

CRANKSHAFT OIL SEAL

ENGINE MECHANICAL <4A9>

11A-41

2. Install the flywheel assembly <M/T> or drive plate 

assembly <A/T> to the crankshaft.

AK305392AF

MD998781

Cylinder block

Flywheel assembly or
Drive plate assembly

3. Fix the flywheel assembly <M/T> or drive plate 

assembly <A/T> using special tool flywheel 
stopper (MD998781) in the same manner as 
removal.

AC609795AF

4. Apply a small amount of engine oil to the 

installation face of the flywheel bolts <M/T> or 
drive plate bolts <A/T>.

5. Apply specified sealant to the flywheel bolts <M/

T> or drive plate bolts <A/T> threads.

Specified sealant: LOCTITE 2701 or equiva-
lent

AC701224

1

2

3

4

5

6

AB

6. Tighten the flywheel bolts <M/T> or drive plate 

bolts <A/T> to the specified torque in two or three 
steps in the order shown in the illustration.

Tightening torque: 100 

± 5 Nm

>>C<< CRANKSHAFT FRONT OIL SEAL 
INSTALLATION

AC311773

AB

MB990699

(Engine oil)

Oil seal

MB991993

Crankshaft

1. Apply a small amount of engine oil to the outer 

circumference of special tool crankshaft front oil 
seal guide (MB991993) and install it to the 
crankshaft.

2. Apply a small amount of engine oil to the entire 

inner circumference of the oil seal lip.

CAUTION

When installing the crankshaft front oil seal, be 
careful to avoid damage to the crankshaft front 
oil seal.
3. Using special tool differential oil seal installer 

(MB990699), drive the oil seal so that it is flush 
with the timing chain case assembly.


Content   ..  29  30  31  32   ..