Mitsubishi Lancer Evolution 8 MR. Manual - part 22
 

  Index      Mitsubishi     Mitsubishi Lancer Evolution 8 MR - service repair manual 2004 year


Search            


Content   ..  20  21  22  23   ..


Mitsubishi Lancer Evolution 8 MR. Manual - part 22


EXTERIOR – FRONT BUMPER

51-2

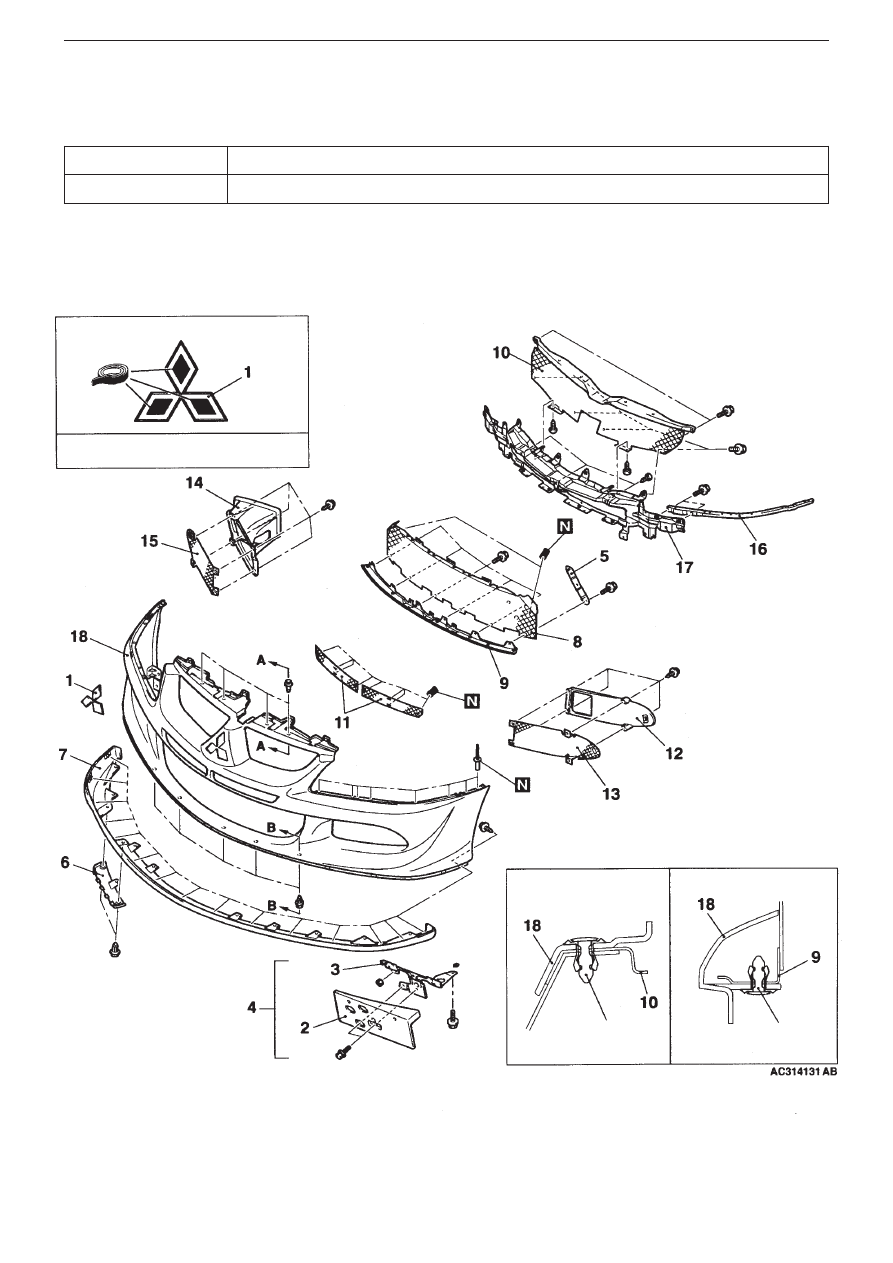
Front bumper

Adhesives

Locations used

Brand

Three diamonds badge

Double-sided tape: ordinary tape, widely available on the market (width 20mm, thickness 0.8mm)

Front Bumper

Dismantling · Assembling

Locations where double-sided tape is applied

Double-sided tape: ordinary tape, widely available
on the market (width 20mm, thickness 0.8mm)

Cross-section A-A

Cross-section B-B

Clip

Clip


EXTERIOR – FRONT BUMPER

51-3

Dismantling procedure

1. Three diamonds badge
2. Licence plate garnish
3. Licence plate bracket
4. Licence plate bracket ASSY
5. Front bumper plate
6. Cover
7. Front air dam panel
8. Front bumper lower plate ASSY
9. Front bumper lower reinforcement 

ASSY

10. Front bumper upper plate ASSY

11. Bumper net
12. Front bumper side cover
13. Bumper side net (LH)
14. Oil cooler duct
15. Bumper side net (RH)

Water spray hose and nozzle (ref.
Section 15)

16. Front bumper side plate ASSY
17. Front bumper upper reinforcement

ASSY

18. Front bumper facing 

4

A

3

3

A

4

Important notes on dismantling

Front bumper side plate removal

Same as for existing front bumper rivet removal.

Important notes on assembly

Fitting front bumper side plate

Same as for existing front bumper rivet fitting.

4

A

3

3

A

4

EXTERIOR - MARKINGS

51-4

Markings

Removal and fixing

1. Three diamonds badge

2. EVOLUTION MR mark

Important fitting notes

Fixing the markings

1. Positions

(1) Three diamonds badge

Boot lid press line

Vehicle centre point

4

A

3

4

A

3

4

A

3

EXTERIOR - MARKINGS

51-5

(2) EVOLUTION MR MARK

Boot lid end line

Boot lid end line

2. Important fixing notes

(1) Clean and remove any grease from the body surface where markings will be

affixed, using unleaded petrol.

(2) Remove the paper backing on the rear of the markings, and fix in position.
(3) Remove the ‘application’ tape.

Note

Do this job in an ambient temperature of 20 - 38˚C in a dust free location.

If temperature is less than 20˚C, warm up the markings and the body where
they will be fitted to between 20 – 30
˚C.

Stick the markings on and press firmly so that no air bubbles get trapped.

RJSY402025–46


Content   ..  20  21  22  23   ..