Mitsubishi Eclipse. Manual - part 880
 

  Index      Mitsubishi     Mitsubishi Eclipse - service repair manual 2004 year


Search            


Content   ..  878  879  880  881   ..


Mitsubishi Eclipse. Manual - part 880


ROCKER ARMS AND CAMSHAFT

TSB Revision

ENGINE OVERHAUL <3.0L>

11D-29

CAUTION

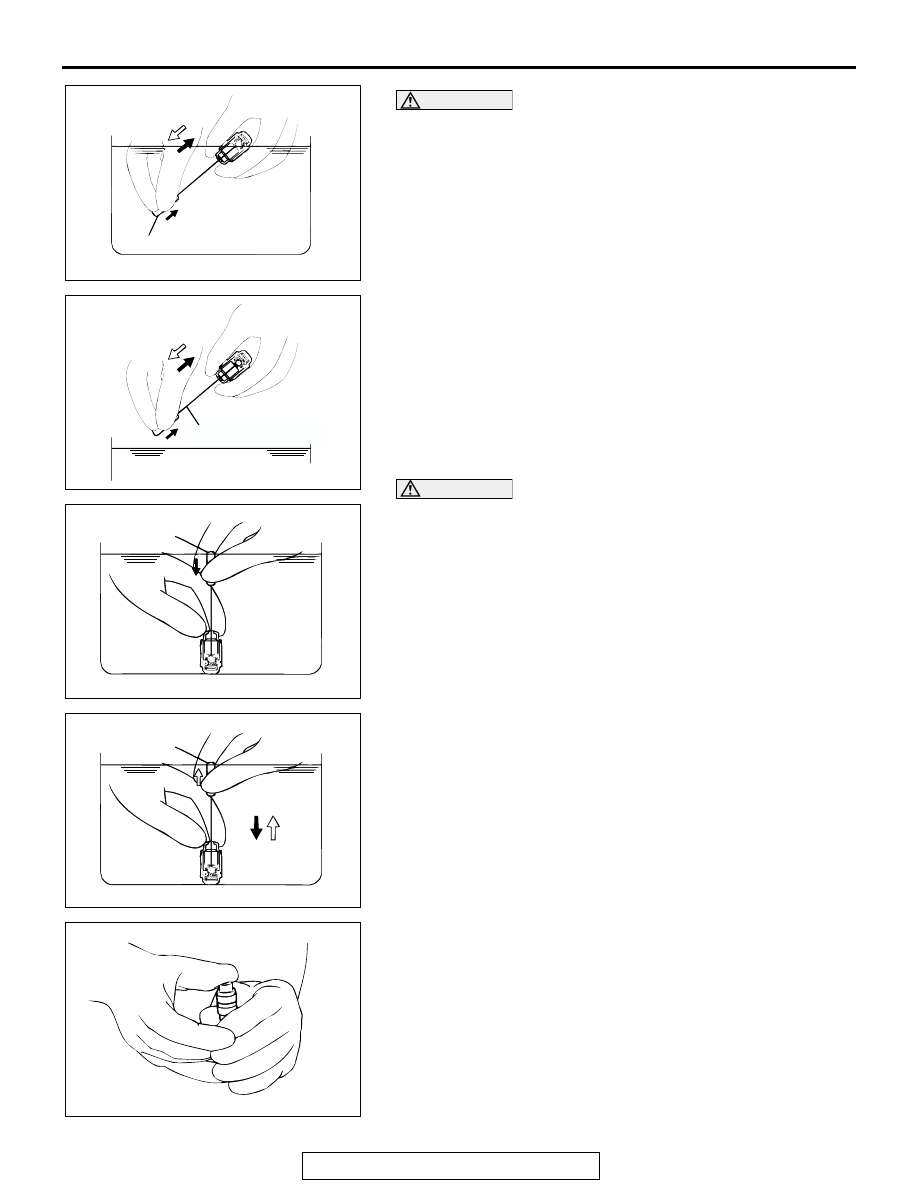
The steel ball spring is extremely weak, so the lash 
adjuster's functionality may be lost if the air bleed wire is 
pushed in hard.
5. Place the lash adjuster in container B. Then, gently push 

down the internal steel ball using wire [0.5 mm (0.020 inch) 
in diameter] or special tool MD998442 and move the plunger 
through five to ten strokes until it slides smoothly. This 
operation will clean the lash adjuster's pressure chamber.

6. Remove the lash adjuster from the container. Then, push 

down the steel ball gently and push the plunger to eliminate 
diesel fuel from the pressure chamber.

CAUTION

Do not use container C for cleaning. If cleaning is per-
formed in container C, foreign matter could enter the pres-
sure chamber when the chamber is filled with diesel fuel.
7. Place the lash adjuster in container C. Then, gently push 

down the internal steel ball using wire [0.5 mm (0.020 inch) 
in diameter] or special tool MD998442.

8. Stand the lash adjuster with its plunger at the top, then push 

the plunger downward firmly until it moves through its 
greatest possible stroke. Return the plunger slowly, then 
release the steel ball and allow the pressure chamber to fill 
with diesel fuel.

9. Remove the lash adjuster from the container, then stand the 

lash adjuster with its plunger at the top. Push the plunger 
firmly and check that it does not move. Also, check that the 
lash adjuster's height matches that of a new lash adjuster.
NOTE: If the lash adjuster contracts or moves, perform the 
operations (7) through (9) again to fill it with diesel fuel com-
pletely. Replace the lash adjuster if it still contracts or moves 
after performing these steps.

AKX00628

WIRE OR MD998442

DIESEL FUEL

AB

AKX00629

DIESEL FUEL

AB

WIRE OR MD998442

AKX00630

WIRE OR MD998442

DIESEL FUEL

AB

AKX00631

WIRE OR MD998442

DIESEL
FUEL

AB

AKX00627

CYLINDER HEAD AND VALVES

TSB Revision

ENGINE OVERHAUL <3.0L>

11D-30

10.Stand the lash adjuster upright to prevent diesel fuel from 

spilling out. Do not allow the lash adjuster to become 
contaminated by dirt or other foreign matter. Fit the lash 
adjuster onto the engine as soon as possible.

CYLINDER HEAD AND VALVES

REMOVAL AND INSTALLATION

M1113006900486

AKX00644

108 ± 5 N·m
80 ± 4 ft-lb

    0 N·m
    0 in-lb

108 ± 5 N·m
80 ± 4 ft-lb

1

5

2

6

7

13

3

14

9

11

16

17

19

12

10

21

18

22

20

8

4

AE

APPLY ENGINE OIL
TO ALL MOVING
PARTS BEFORE
INSTALLATION.

15

REMOVAL STEPS

<<A>> >>D<<

1. CYLINDER HEAD BOLT

>>D<<

2. WASHER
3. CYLINDER HEAD ASSEMBLY
4. CYLINDER HEAD GASKET

<<B>> >>C<<

5. RETAINER LOCK
6. VALVE SPRING RETAINER

>>B<<

7. VALVE SPRING
8. INLET VALVE

<<B>> >>C<<

9. RETAINER LOCK
10.VALVE SPRING RETAINER

>>B<<

11.VALVE SPRING

12.EXHAUST VALVE

>>A<<

13.VALVE STEM SEAL
14.VALVE SPRING SEAT

>>A<<

15.VALVE STEM SEAL
16.VALVE SPRING SEAT
17.INLET VALVE GUIDE
18.SNAP RING
19.EXHAUST VALVE GUIDE
20.INLET VALVE SEAT
21.EXHAUST VALVE SEAT
22.CYLINDER HEAD

REMOVAL STEPS (Continued)

CYLINDER HEAD AND VALVES

TSB Revision

ENGINE OVERHAUL <3.0L>

11D-31

Required Special Tools:

• MD998051: Cylinder Head Bolt Wrench

• MD998772: Valve Spring Compressor

• MD998774: Valve Stem Seal Installer

REMOVAL SERVICE POINTS

.

<<A>> CYLINDER HEAD BOLT REMOVAL
Using special tool MD998051, loosen the cylinder head bolts. 
Loosen each bolt evenly, little by little, by two or three steps.

.

<<B>> RETAINER LOCK REMOVAL
1. Set special tool MD998772 as illustrated to compress the 

valve spring. Remove the retainer locks.

2. Relieve the spring tension and remove the valve, retainer, 

spring, etc.
Store removed valves, springs and other parts, tagged to 
indicate their cylinder number and location for assembly.

INSTALLATION SERVICE POINTS

.

>>A<< VALVE STEM SEAL INSTALLATION
1. Install the valve spring seat.

AKX00616

MD998051

AB

AKX00617

MD998772

AB

AKX00642

EXHAUST

RUBBER COLOR:
GRAY

RUBBER COLOR:
GRAY GREEN

INTAKE

AB

CYLINDER HEAD AND VALVES

TSB Revision

ENGINE OVERHAUL <3.0L>

11D-32

CAUTION

The valve stem seal for the exhaust side is different than 
the intake side. They are identified by their respective rub-
ber colors. When installing, do not confuse them.

CAUTION

The special tool must be used to install the valve stem 
seal. Improper installation could result in oil leaking past 
the valve guide.
2. Using special tool MD998774, install a new stem seal to the 

valve guide.

.

>>B<< VALVE SPRING INSTALLATION
Install the valve spring with its ID color painted end (larger pitch 
side) upward (toward the valve spring retainer).

.

>>C<< RETAINER LOCK INSTALLATION

CAUTION

Do not compress the valve spring excessively. It can dam-
age the stem seal.
1. Set special tool MD998772 as illustrated to compress the 

valve spring. Install the retainer locks.

2. Relieve the spring tension and check that the retainer locks 

are seated correctly.

.

AKX00618AB

MD998774

AKX00718

SPRING SEAT

SPRING 
RETAINER

IDENTIFI-
CATION 
COLOR

STEM SEAL

AB

AKX00617

MD998772

AB


Content   ..  878  879  880  881   ..