Mitsubishi 380. Manual - part 752


  Index      Mitsubishi     Mitsubishi 380 - service repair manual 2005 year


Search            


Content   ..  750  751  752  753   ..


Mitsubishi 380. Manual - part 752


ON-VEHICLE SERVICE

TSB Revision

ENGINE MECHANICAL <3.8L ENGINE>

11A-10

COMPRESSION PRESSURE CHECK

M1111002601112

Required Special Tool:
 : Diagnostic Tool (MUT-III)  
1. Before inspection, check that the engine oil, starter and 

battery are normal. Also, set the vehicle in the following 
condition:

• Engine coolant temperature: 80 − 95°C (176 − 203°F)

• Lights and all accessories: OFF

• Transmission: P range

2. Remove all of the ignition coils and spark plugs.
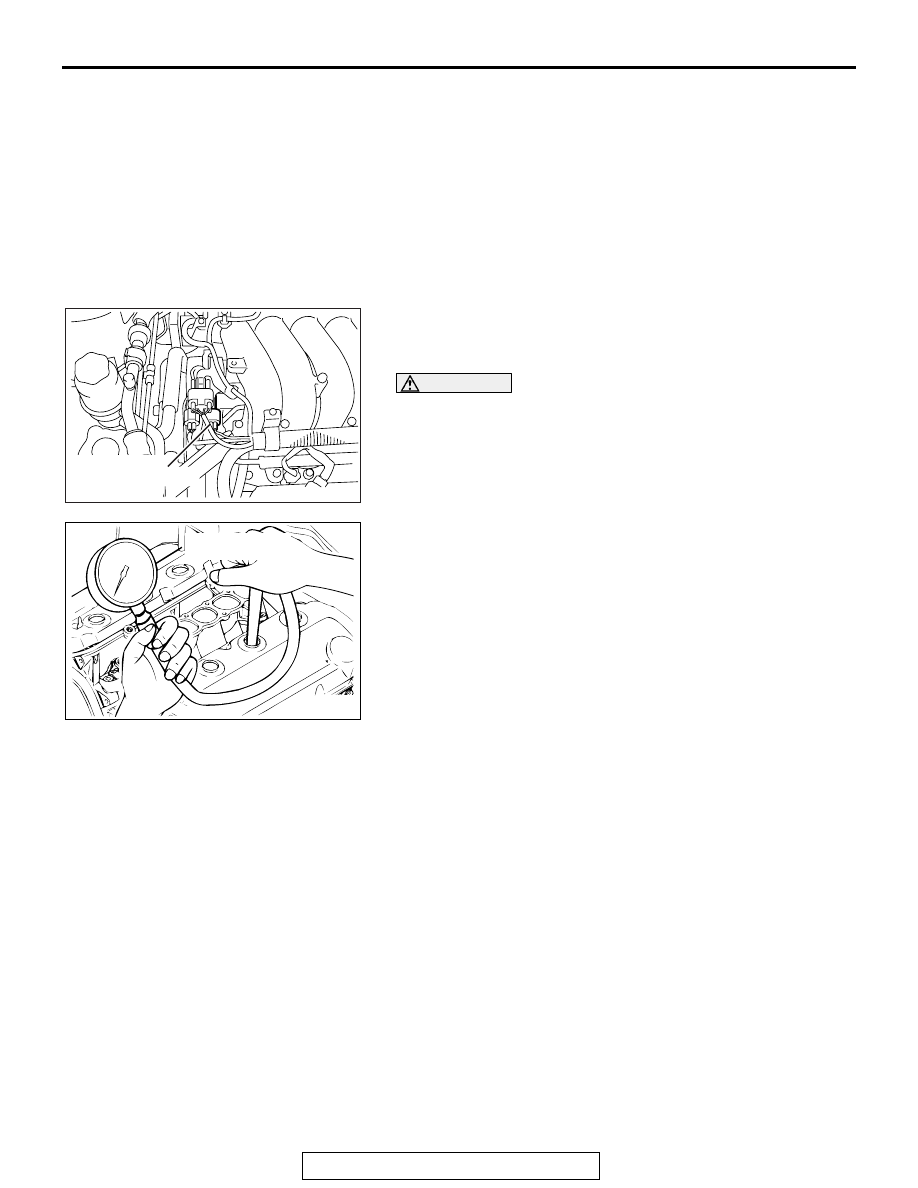
3. Disconnect the crankshaft position sensor connector.

NOTE:  Doing this will prevent the engine control unit from 
carrying out ignition and fuel injection.

WARNING

Keep your distance from the spark plug hole when 
cranking. Oil, fuel, etc., may spray out from the spark 
plug hole and may cause serious injury.

4. Cover the spark plug hole with a shop towel etc., during 

cranking. After the engine has been cranked, check for 
foreign material adhering to the shop towel.

5. Set compression gauge to one of the spark plug holes.

6. Crank the engine with the throttle valve fully open and 

measure the compression pressure.

Standard value (at engine speed of 200 r/min): 1,550 
kPa (225 psi)

Minimum limit (at engine speed of 200 r/min): 1,110 
kPa (161 psi)

7. Measure the compression pressure for all the cylinders, and 

check that the pressure differences of the cylinders are 
below the limit.

Limit: 98 kPa (14 psi)

8. If there is a cylinder with compression or a compression 

difference that is outside the limit, pour a small amount of 
engine oil through the spark plug hole, and repeat the 
operations in steps 6 to 8.

(1) If the compression increases after oil is added, the cause 

of the malfunction is a worn or damaged piston ring 
and/or cylinder inner surface.

(2) If the compression does not rise after oil is added, the 

cause is a burnt or defective valve seat, or pressure is 
leaking from the gasket.

9. Connect the crankshaft position sensor connector.

10.Install the spark plugs and ignition coils.

AK303010

CRANKSHAFT

POSITION SENSOR

CONNECTOR

AB

AKX00436

COMPRESSION

GAUGE

AB

ON-VEHICLE SERVICE

TSB Revision

ENGINE MECHANICAL <3.8L ENGINE>

11A-11

11.Use the Diagnostic Tool (MUT-III) to erase the diagnostic 

trouble codes.

NOTE: This will erase the diagnostic trouble code resulting 
from the crankshaft position sensor connector being discon-
nected.

MANIFOLD VACUUM CHECK

M1111002700848

1. Start the engine and allow it to warm up until the 

temperature of the engine coolant reaches 80 

− 95°C (176 − 

203

°F).

2. Connect an engine tachometer.
3. Disconnect the ventilation hose from the positive crankcase 

ventilation (PCV) valve, and connect a vacuum gauge to the 
ventilation hose.

4. Plug the PCV valve.

5. Start the engine and check that idle speed is within 

specification. Then check the vacuum gauge reading.

Idle speed: 680 

± 100 r/min

Minimum limit: 60 kPa (18 in Hg)

LASH ADJUSTER CHECK

M1111002900400

If an abnormal noise (chattering noise) suspected to be caused 
by malfunction of the lash adjuster is produced immediately 
after starting the engine and does not disappear, perform the 
following check.

NOTE: An abnormal noise due to malfunction of the lash 
adjuster is produced immediately after starting the engine and 
changes with the engine speed, irrespective of the engine load.
If, the abnormal noise is not produced immediately after start-
ing the engine or does not change with the engine speed, or it 
changes with the engine load, the lash adjuster is not the cause 
for the abnormal noise.

00DB076A

MB991910

DATA LINK

CONNECTOR

MB991824

MB991827

AK301335AB

VACUUM 

GAUGE

POSITIVE CRANKCASE

VENTILATION VALVE

VENTILATION HOSE
PLUG

ON-VEHICLE SERVICE

TSB Revision

ENGINE MECHANICAL <3.8L ENGINE>

11A-12

NOTE: When the lash adjuster is malfunctioning, the abnormal 
noise is rarely eliminated by continuing the warming-up of the 
engine at idle speed.
However, the abnormal noise may disappear only when seizure 
is caused by oil sludge in the engine whose oil is not main-
tained properly.
1. Start the engine.

2. Check if the abnormal noise produced immediately after 

starting the engine, changes with the change in the engine 
speed.
If the abnormal noise is not produced immediately after 
starting the engine or it does not change with the engine 
speed, the lash adjuster is not the cause for the noise. 
Therefore, investigate other causes. The abnormal noise is 
probably caused by some other parts than the engine proper 
if it does not change with the engine speed. (In this case, the 
lash adjuster is in good condition.)

3. With the engine idling, change the engine load (shift from N 

to D range, for example) to make sure that there is no 
change in the level of abnormal noise.
If there is a change in the level of abnormal noise, suspect a 
tapping noise due to worn crankshaft bearing or connecting 
rod bearing (In this case, the lash adjuster is in good 
condition.).

4. After completion of warm-up, run the engine at idle to check 

for abnormal noise.
If the noise is reduced or disappears, clean the lash adjuster 
(Refer to GROUP 11B, Engine Overhaul  

− Rocker Arms 

and Camshaft 

− Inspection 

P.11B-23

). As it is suspected 

that the noise is due to seizure of the lash adjuster. If there is 
no change in the level of the abnormal noise, proceed to 
step 5.

5. Run the engine to bleed the lash adjuster system (Refer to 

P.11A-11

.).

6. If the abnormal noise does not disappear after air bleeding 

operation, clean the lash adjuster (Refer to GROUP 11B, 
Engine Overhaul  

− Rocker Arms and Camshaft − Inspection 

P.11B-23

).

.

Bleeding lash adjuster system

NOTE: Parking the vehicle on a grade for a long time may 
decrease oil in the lash adjuster, causing air to enter the high 
pressure chamber when starting the engine.

NOTE: After parking for many hours, oil may run out from the 
oil passage and take time before oil is supplied to the lash 
adjuster, causing air to enter the high pressure chamber.

NOTE:  In the above cases, abnormal noise can be eliminated 
by bleeding the lash adjuster system.

ON-VEHICLE SERVICE

TSB Revision

ENGINE MECHANICAL <3.8L ENGINE>

11A-13

1. Check engine oil and add or change oil if required.

NOTE: If the engine oil level is low, air is sucked from the oil 
screen, causing air to enter the oil passage.

NOTE: If the engine oil level is higher than specification, oil 
may be stirred by the crankshaft, causing oil to be mixed 
with a large quantity of air.

NOTE: If oil is deteriorated, air is not easily separated from 
oil, increasing the quantity of air contained in oil.

NOTE: If air mixed with oil enters the high pressure chamber 
inside the lash adjuster from the above causes, air in the 
high pressure chamber is compressed excessively while the 
valve is opened, resulting in an abnormal noise when the 
valve closes. This is the same phenomenon as that 
observed when the valve clearance has become excessive. 
The lash adjuster can resume normal function when air 
entered the lash adjuster is removed.

2. Idle the engine for one to three minutes to warm it up.
3. Repeat the operation pattern, shown in left figure, at no load 

to check for abnormal noise. (Usually the abnormal noise is 
eliminated after repetition of the operation 10 to 30 times. If, 
however, no change is observed in the level of abnormal 
noise after repeating the operation more than 30 times, 
suspect that the abnormal noise is due to some other 
factors.)

4. After elimination of abnormal noise, repeat the operation 

shown in left figure five more times.

5. Run the engine at idle for one to three minutes to make sure 

that the abnormal noise has been eliminated.

AKX00328

GOOD

MINIMUM

MAXIMUM

AB

AKX00329

HIGH-

PRESSURE

CHAMBER

AB

AKX00330

OPEN THROTTLE

VALVE GRADUALLY

CLOSE

THROTTLE VALVE

APPROXI-

MATELY

3,000 r/min

IDLING

OPERATION

ONCE

15 s

15 s

AIR BLEEDING OPERATION PATTERN

AB


Content   ..  750  751  752  753   ..