Mazda RX-8 (2011 year). Instruction - part 15


  Index      Mazda     Mazda RX-8 - instruction 2011 year in english


Search            


Content   ..  13  14  15  16   ..


Mazda RX-8 (2011 year). Instruction - part 15


Black plate (232,1)

qRadio Reception

AM characteristics

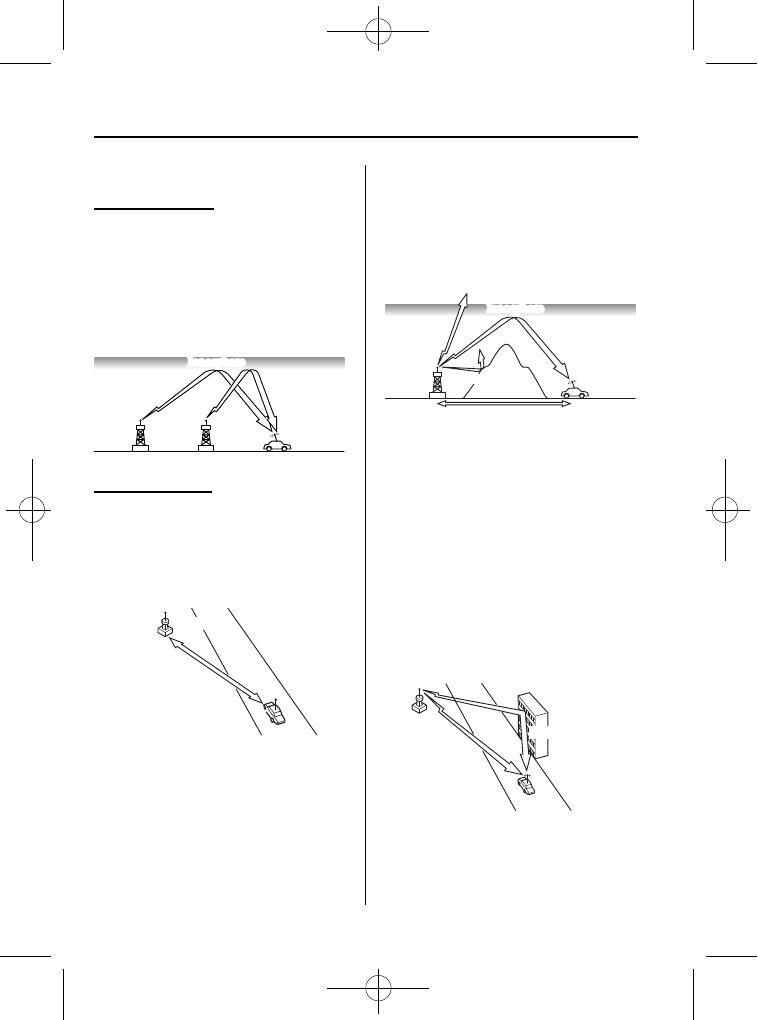
AM signals bend around such things as
buildings or mountains and bounce off the
ionosphere. Therefore, they can reach
longer distances than FM signals. Because
of this, two stations may sometimes be
picked up on the same frequency at the
same time.

Station 2

Station 1

Ionosphere

FM characteristics

An FM broadcast range is usually about
40

―50 km (25―30 miles) from the

source. Because of extra coding needed to
break the sound into two channels, stereo
FM has even less range than monaural
(non-stereo) FM.

FM Station

40—50km 
(25—30 miles)

Signals from an FM transmitter are similar
to beams of light because they do not
bend around corners, but they do reflect.
Unlike AM signals, FM signals cannot
travel beyond the horizon. Therefore, FM
stations cannot be received at the great
distances possible with AM reception.

AM wave

FM wave

FM wave

100—200 km (60—120 miles)

Ionosphere

Atmospheric conditions can also affect
FM reception. High humidity will cause
poor reception. However, cloudy days
may provide better reception than clear
days.

Multipath noise

Since FM signals can be reflected by
obstructions, it is possible to receive both
the direct signal and the reflected signal at
the same time. This causes a slight delay
in reception and may be heard as a broken
sound or a distortion. This problem may
also be encountered when in close
proximity to the transmitter.

Reflected wave

Direct

6-16

Interior Comfort

Audio System

RX-8_8BQ7-EA-10H_Edition1 Page232
Wednesday, July 14 2010 11:51 AM

Black plate (233,1)

Flutter/Skip noise

Signals from an FM transmitter move in
straight lines and become weak in valleys
between tall buildings, mountains, and
other obstacles. When a vehicle passes
through such an area, the reception
conditions may change suddenly, resulting
in annoying noise.

Weak signal noise

In suburban areas, broadcast signals
become weak because of distance from
the transmitter. Reception in such fringe
areas is characterized by sound breakup.

Strong signal noise

This occurs very close to a transmitter
tower. The broadcast signals are
extremely strong, so the result is noise and
sound breakup at the radio receiver.

Station drift noise

When a vehicle reaches the area of two
strong stations broadcasting at similar
frequencies, the original station may be
temporarily lost and the second station
picked up. At this time there will be some
noise from this disturbance.

Station 2 
88.3 MHz

Station 1 
88.1 MHz

Interior Comfort

Audio System

6-17

RX-8_8BQ7-EA-10H_Edition1 Page233
Wednesday, July 14 2010 11:51 AM

Black plate (234,1)

qOperating Tips for CD Player/In-

Dash CD Changer

Condensation phenomenon

Immediately after turning on the heater
when the vehicle is cold, the CD or
optical components (prism and lens) in the
CD player/In-dash CD changer may
become clouded with condensation. At
this time, the CD will eject immediately
when placed in the unit. A clouded CD
can be corrected simply by wiping it with
a soft cloth. Clouded optical components
will clear naturally in about an hour. Wait
for normal operation to return before
attempting to use the unit.

Handling the CD player/In-dash CD
changer

The following precautions should be
observed.

l

Do not spill any liquid on the audio
system.

l

Do not insert any objects, other than
CDs, into the slot.

l

The CD revolves at high speed within
the unit. Defective (cracked or badly
bent) CDs should never be used.

l

Do not use non-conventional discs
such as heart-shaped, octagonal discs,
etc. The disc may not eject resulting in
a malfunction.

l

If the memory portion of the CD is
transparent or translucent, do not use
the disc.

Transparent

6-18

Interior Comfort

Audio System

RX-8_8BQ7-EA-10H_Edition1 Page234
Wednesday, July 14 2010 11:51 AM

Black plate (235,1)

l

A new CD may have rough edges on
its inner and outer perimeters. If a disc
with rough edges is used, proper
setting will not be possible and the CD
player/In-dash CD changer will not
play the CD. In addition, the disc may
not eject resulting in a malfunction.
Remove the rough edges in advance by
using a ball-point pen or pencil as
shown below. To remove the rough
edges, rub the side of the pen or pencil
against the inner and outer perimeter of
the CD.

l

When driving over uneven surfaces,
the sound may jump.

l

The CD player/In-dash CD changer has
been designed to play CDs bearing the
identification logo as shown below. No
other discs can be played.

l

Use discs that have been legitimately
produced. If illegally-copied discs such
as pirated discs are used, the system
may not operate properly.

l

Be sure never to touch the signal
surface when handling the CDs. Pick
up a CD by grasping the outer edge or
the edge of the hole and the outer edge.

l

Do not stick paper or tape on the CD.
Avoid scratching the reverse side (the
side without a label). The disc may not
eject resulting in a malfunction.

l

Dust, finger smudges, and dirt can
decrease the amount of light reflected
from the signal surface, thus affecting
sound quality. If the CD should
become soiled, gently wipe it with a
soft cloth from the center of the CD to
the edge.

Interior Comfort

Audio System

6-19

RX-8_8BQ7-EA-10H_Edition1 Page235
Wednesday, July 14 2010 11:51 AM

Black plate (236,1)

l

Do not use record sprays, antistatic
agents, or household spray cleaners.
Volatile chemicals such as benzine and
thinner can also damage the surface of
the CD and must not be used. Anything
that can damage, warp, or fog plastic
should never be used to clean CDs.

l

Insert discs one by one. If two discs are
inserted at the same time, the system
may not operate properly.

l

The CD player/In-dash CD changer
ejects the CD if the CD is inserted
upside down. Also dirty and/or
defective CDs may be ejected.

l

Do not insert cleaning discs in the CD
player/In-dash CD changer.

l

Do not insert any disc with a peel-off
seal affixed to it.

l

This unit may not be able to play
certain CD-R/CD-RWs made using a
computer or music CD recorder due to
disc characteristics, scratches,
smudges, dirt, etc., or due to dust or
condensation on the lens inside the
unit.

l

Storing CDs in the vehicle exposed to
direct sunlight or high temperature may
damage the CD-R/CD-RWs, and make
them unplayable.

l

CD-R/CD-RW exceeding 700 MB
cannot be played.

l

This unit may not be able to play
certain discs made using a computer
due to the application (writing
software) setting used. (For details,
consult the store where the application
was purchased.)

l

It is possible that certain text data, such
as titles, recorded on a CD-R/CD-RW
may not be displayed when musical
data (CD-DA) is playing.

l

The period from when a CD-RW is
inserted to when it begins playing is
longer than a normal CD or CD-R.

l

Completely read the instruction manual
and cautions for CD-R/CD-RWs.

l

Do not use discs with cellophane tape
adhering, partially peeled off labels, or
adhesive material exuding from the
edges of the CD label. Also, do not use
discs with a commercially-available
CD-R label affixed. The disc may not
eject resulting in a malfunction.

qOperating tips for MP3

NOTE

Supply of this product only conveys a license
for private, non-commercial use and does not
convey a license nor imply any right to use this
product in any commercial (i.e. revenue-
generating) real time broadcasting (terrestrial,
satellite, cable and/or any other media),
broadcasting/streaming via the Internet,
intranets and/or other networks or in other
electronic content distribution systems, such as
pay-audio or audio-on-demand applications.
An independent license for such use is
required. For details, please visit
http://www.mp3licensing.com.

l

This audio system handles MP3 files
that have been recorded on CD-R/CD-
RW/CD-ROMs. Discs that have been
recorded using the following formats
can be played:

l

ISO 9660 level 1

l

ISO 9660 level 2

l

Joliet extended format

l

Romeo extended format

l

This unit handles MP3 files
conforming to the MP3 format
containing both header frames and data
frames.

l

This unit can play multi-session
recorded discs that have up to 40
sessions.

6-20

Interior Comfort

Audio System

RX-8_8BQ7-EA-10H_Edition1 Page236
Wednesday, July 14 2010 11:51 AM

Black plate (237,1)

l

This unit can play MP3s with sampling
frequencies of 16/22.05/24/32/44.1/48
kHz.

l

This unit can play MP3 files that have
been recorded in bit rates of 8 kbps to
320 kbps. Nonetheless, to insure
enjoyment of music with consistent
sound quality, it is recommended to use
discs that have been recorded at a bit
rate of 128 kbps or more.

l

If a disc has both music data (CD-DA)
and MP3 files, playback of the two file
types differs depending on how the
disc was recorded.

l

Packet written discs cannot be played
on this unit.

l

This unit does not play CDs recorded
using MP3i (MP3 interactive), MP3
PRO and RIFF MP3 formats.

About folders and files

l

The order of hierarchy for MP3 files
and folders during playback or other
functions is from shallow to deep. The
arrangement and playing order of a
recorded disc containing MP3 files is
as follows:

l

File number
A numerical file number is assigned
to each file in a folder in the order of
hierarchy from shallow to deep.

l

Folder number
A numerical folder number is
assigned to each folder in the order
of hierarchy from shallow to deep.

NOTE

Folders and tracks (files) within the same
hierarchy play in the order they were written to
the disc depending on the write software.

05

06

01

02

04

03

1

5

4

2

3

Folder 
No.

Level1Level2Level3 Level4

Playback may not occur in the above 
hierarchy depending on the audio unit.

: Track (File)

: Folder

l

The folder order is automatically
assigned and this order cannot be
optionally set.

l

Any folder without an MP3 file will be
ignored. (It will be skipped and the
folder number will not be displayed.)

l

MP3 files not conforming to the MP3
format containing both header frames
and data frames will be skipped and
not played.

l

This unit will play MP3 files that have
up to eight levels. However, the more
levels a disc has, the longer it will take
to initially start playing. It is
recommended to record discs with two
levels or less.

l

A single disc with up to 512 files can
be played and a single folder with up to
255 files can be played.

l

When naming an MP3 file, be sure to
add an MP3 file extension (.mp3) after
the file name.

Interior Comfort

Audio System

6-21

RX-8_8BQ7-EA-10H_Edition1 Page237
Wednesday, July 14 2010 11:51 AM

Black plate (238,1)

l

The maximum number of characters
that can be used for file names is as
follows. However, this unit will only
display up to 30 characters, including
the file extension (.mp3).

Maximum number of

characters in a file name

(including a separator

“.”

and the three letters of the

file extension)

ISO9660 level 1

12

*

ISO9660 level 2

31

*

Joliet extended
format

64

Romeo extended
format

128

* English one-byte characters (capitalized only) and

underbar

“_” are available.

CAUTION

This unit can only play MP3 files that
have an MP3 file extension (.mp3)
attached. Do not attach an MP3 file
extension to any other type file as it
could cause noise to be emitted or a
malfunction in the unit.

About ID3 Tag display

l

This unit can only display ID3 Tag
album, track and artist names that have
been input using Ver.1.0/1.1/2.2/2.3
formats. Any other data that may have
been input cannot be displayed.

l

This unit can only display English
(including numerals) one-byte
characters. Use only English (including
numerals) one-byte characters when
inputting ID3 tags. Two-byte characters
and some special symbols cannot be
displayed.

Specialized glossary

MP3

Abbreviation for

“MPEG Audio Layer 3”.

A technical standard for audio
compression as decided by an ISO
(International Organization for
Standardization) MPEG working group.
Use of MP3 allows for audio data to be
compressed to approximately a tenth of
the source data size.

ISO 9660

An international standard for logical
formatting of CD-ROM files and folders.
It is divided into three separate levels
based on differences in file naming
procedures, data configuration and other
characteristics.

Multi-session

A session is the complete amount of data
recorded from the beginning to the end of
a single period of CD-ROM, CD-R/CD-
RW data recording. Multi-session refers to
the existence of data from two or more
sessions on a single disc.

Sampling

Refers to the process of encoding analog
audio data at regular intervals and
converting it to digital data. The sampling
rate refers to the number of times a
sample is taken in one second and is
expressed in Hz units. Increasing the
sampling rate improves the sound quality
but also increases the data size.

6-22

Interior Comfort

Audio System

RX-8_8BQ7-EA-10H_Edition1 Page238
Wednesday, July 14 2010 11:51 AM

Black plate (239,1)

Bit rate

Refers to the volume of data per second,
expressed in bps (bits per second).
Generally, the larger the number of the
transfer bit rate when compressing an
MP3 file, the more information regarding
musical reproduction it carries, and
therefore the better the sound quality.

Packet writing

A general term for the method, similar to
that used for floppy discs or hard drives,
of recording the required file in a single
increment on a CD-R and similar.

ID3 Tag

ID3 tag is a method for storing
information related to the music in an
MP3 file. Information such as track, artist
and album name can be stored. This
content can be freely edited using ID3
editing function software.

VBR

Abbreviation for Variable Bit Rate. While
CBR (Constant Bit Rate) is generally
used, VBR varies the bit rate for audio
compression according to compression
conditions and this allows for
compression with preference given to
sound quality.

Interior Comfort

Audio System

6-23

RX-8_8BQ7-EA-10H_Edition1 Page239
Wednesday, July 14 2010 11:51 AM

Black plate (240,1)

MEMO

6-24

RX-8_8BQ7-EA-10H_Edition1 Page240
Wednesday, July 14 2010 11:51 AM

Black plate (242,1)

qPower/Volume/Sound Controls

Audio control dial

Power/Volume dial

Power ON/OFF

Switch the ignition to ACC or ON.

Press the power/volume dial to turn the
audio system on.
Press the power/volume dial again to turn
the audio system off.

NOTE

To prevent the battery from being discharged,
do not leave the audio system on for a long
period of time when the engine is not running.

Volume adjustment

To adjust the volume, turn the power/
volume dial.

Turn the power/volume dial to the right to
increase volume, to the left to decrease it.

Audio sound adjustment

1. Press the audio control dial to select the

function. The selected function will be
indicated.

6-26

Interior Comfort

Audio System

RX-8_8BQ7-EA-10H_Edition1 Page242
Wednesday, July 14 2010 11:51 AM

Black plate (243,1)

*

*

*

Standard audio-equipped model

Bose Sound System-equipped model

*

*

*

*

* Depending on the mode selected, the

indication changes.

2. Turn the audio control dial to adjust the

selected functions as follows:

Standard audio-equipped model

Indication

Turn Left Turn Right

Select mode

Decrease

bass

Increase

bass

Decrease

treble

Increase

treble

Shift the

sound to the

front

Shift the

sound to the

rear

Shift the

sound to the

left

Shift the

sound to the

right

off

on

off

on

Bose

®

Sound System-equipped model

Indication

Turn Left Turn Right

off

on

off

on

Decrease

bass

Increase

bass

Decrease

treble

Increase

treble

Shift the

sound to the

front

Shift the

sound to the

rear

Shift the

sound to the

left

Shift the

sound to the

right

off

on

off

on

Interior Comfort

Audio System

6-27

RX-8_8BQ7-EA-10H_Edition1 Page243
Wednesday, July 14 2010 11:51 AM

Black plate (244,1)

NOTE

l

Depending on the type of audio unit, the
order in which the functions appear differs.

l

About 5 seconds after selecting any mode,
the volume function will be automatically
selected. To reset bass, treble, fade, and
balance, press the audio control dial for 2
seconds. The unit will beep and

“CLEAR”

will be displayed.

Automatic Level Control (ALC)
(Standard audio-equipped model)

The automatic level control (ALC) is a
feature that automatically adjusts audio
volume and sound quality according to
the vehicle speed.
The volume increases in accordance with
the increase in vehicle speed, and
decreases as vehicle speed decreases.

Select the desired ALC mode.

Mode

Volume change

No change

Minimum

Medium

Maximum

Turn the audio control dial to select ALC
OFF or ALC LEVEL1

―7 modes. The

selected mode will be indicated.

*

AudioPilot

®

2 (Bose

®

Sound System-

equipped model)

AudioPilot

®

2 automatically adjusts audio

volume and sound quality in accordance
with the level of noise entering the vehicle
interior while driving. When AudioPilot

®

2 is turned on, the system automatically
calculates the conditions for optimum
hearing of sound which may be difficult
to hear depending on exterior noise.
* AudioPilot

®

2 is a registered trademark

of Bose Corporation.

*

Centerpoint

®

(Bose

®

Sound System-

equipped model)

Centerpoint

®

offers you the experience of

5.1-channel surround sound in your
vehicle even with your conventional 2-
channel stereo CDs.

6-28

Interior Comfort

Audio System

RX-8_8BQ7-EA-10H_Edition1 Page244
Wednesday, July 14 2010 11:51 AM

Black plate (245,1)

Centerpoint

®

can be set on or off.

NOTE

l

Centerpoint

®

operates optimally with a 2-

channel stereo CD. MP3 audio files can be
played, however, MP3 audio files encoded
with high compression may result in poor
sound quality.

l

Centerpoint

®

is available for 2-channel

stereo audio except for AM radio/FM radio/
SIRIUS digital satellite radio/AUX.

* Centerpoint

®

is a registered trademark

of Bose Corporation.

BEEP setting

The beep-sound when operating the audio
system can be set on or off.

ILLM EFT setting (Illumination setting
during operation)

The audio system illumination during
operation can be set on or off.

Interior Comfort

Audio System

6-29

RX-8_8BQ7-EA-10H_Edition1 Page245
Wednesday, July 14 2010 11:51 AM

Black plate (246,1)

qOperating the Radio

Seek tuning 
button

Scan button

Manual tuning dial

Band selector button

Channel preset buttons

Auto memory 
button

Radio ON

Press a band selector button (

) to

turn the radio on.

Band selection

Successively pressing the band selector
button (

) switches the bands as

follows: FM1

→FM2→AM.

The selected mode will be indicated. If
FM stereo is being received,

“ST” will be

displayed.

NOTE

If the FM broadcast signal becomes weak,
reception automatically changes from
STEREO to MONO for reduced noise, and the
“ST” indicator will go out.

Tuning

The radio has the following tuning
methods: Manual, Seek, Scan, Preset
channel, and Auto memory tuning. The
easiest way to tune stations is to set them
on preset channels.

NOTE

If the power supply is interrupted (fuse blows
or the battery is disconnected), the preset
channels will be erased.

Manual tuning

Turning the manual tuning dial will
change the frequency higher or lower.

Seek tuning

Pressing the seek tuning button ( ,

)

will cause the tuner to seek a higher or
lower frequency automatically.

6-30

Interior Comfort

Audio System

RX-8_8BQ7-EA-10H_Edition1 Page246
Wednesday, July 14 2010 11:51 AM

Black plate (247,1)

NOTE

If you continue to press and hold the button,
the frequency will continue changing without
stopping.

Scan tuning

Press the scan button (

) to

automatically sample strong stations.
Scanning stops at each station for about 5
seconds. To hold a station, press the scan
button (

) again during this interval.

Preset channel tuning

The 6 preset channels can be used to store
6 AM and 12 FM stations.

1. To set a channel first select AM, FM1,

or FM2. Tune to the desired station.

2. Depress a channel preset button for

about 2 seconds until a beep sound is
heard. The preset channel number and
station frequency will be displayed.
The station is now held in the memory.

3. Repeat this operation for the other

stations and bands you want to store.
To tune one in the memory, select AM,
FM1, or FM2 and then press its
channel preset button. The station
frequency and the channel number will
be displayed.

NOTE

If the power supply is interrupted (fuse blows
or the battery is disconnected), the preset
channels will be erased.

Auto memory tuning

This is especially useful when driving in
an area where the local stations are not
known. Additional AM/FM stations can
be stored without disturbing the
previously set channels.

Press and hold the auto memory button
(

) for about 2 seconds until a beep

sound is heard; the system will
automatically scan and temporarily store
up to 6 stations with the strongest
frequencies in each selected band in that
area.

After scanning is completed, the station
with the strongest frequency will be tuned
and its frequency displayed.
Press and release the auto memory button
(

) to recall stations from the auto-

stored stations. One stored station will be
selected each time; its frequency and
channel number will be displayed.

NOTE

If no stations can be tuned after scanning
operations,

“A” will be displayed.

Interior Comfort

Audio System

6-31

RX-8_8BQ7-EA-10H_Edition1 Page247
Wednesday, July 14 2010 11:51 AM


Content   ..  13  14  15  16   ..