Mazda CX-9 (2019 year). Instruction - part 14


  Index      Mazda     Mazda CX-9 - instruction 2019 year in english


Search            


Content   ..  12  13  14  15   ..


Mazda CX-9 (2019 year). Instruction - part 14


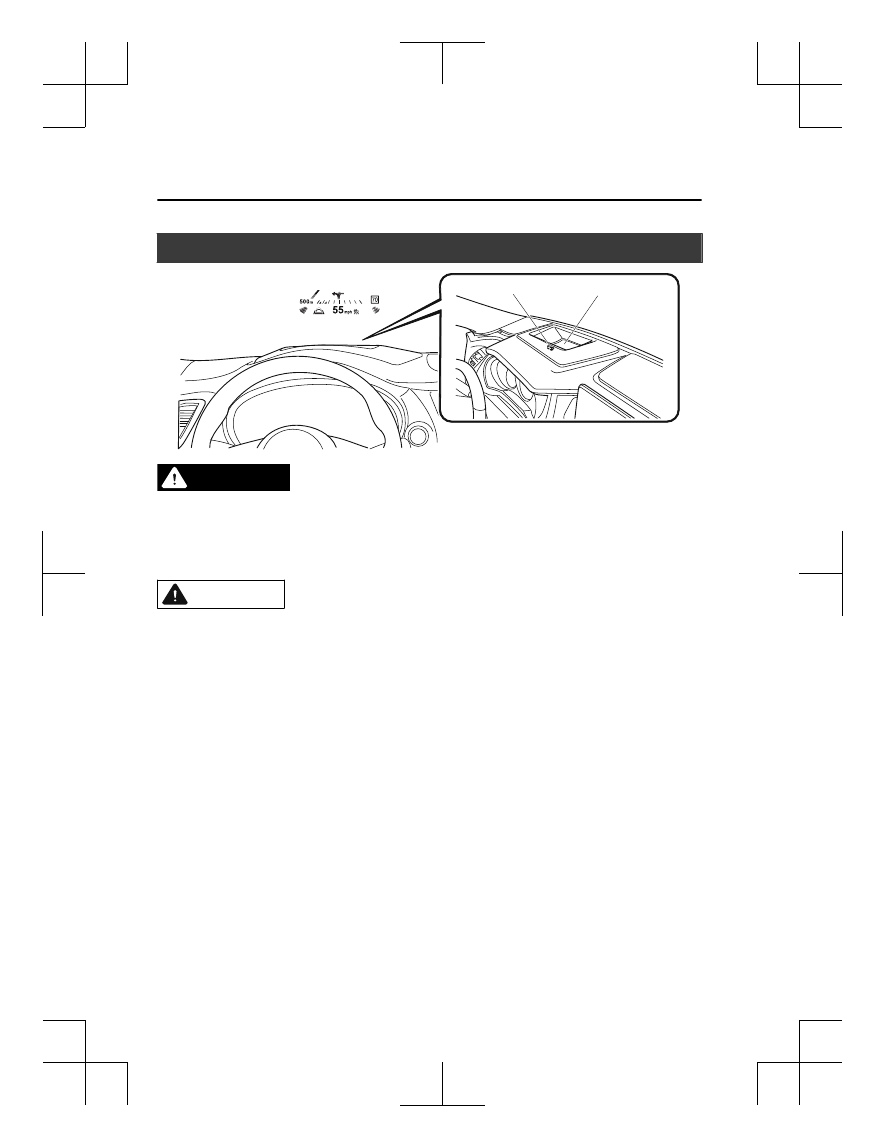
Active Driving Display

*

Optical receiver

Dust-proof sheet

WARNING

Always adjust the display brightness and position with the vehicle stopped:
Adjusting the display brightness and position while driving the vehicle is dangerous as doing
so could distract your attention from the road ahead and lead to an accident.

CAUTION

Do not place beverages near the active driving display. If water or other liquids are splashed

on the active driving display, it could cause damage.

Do not place objects above the active driving display or apply stickers to the dust-proof

sheet/optical receiver as they will cause interference.

A sensor is integrated to control the display's luminosity. If the optical receiver is covered,

the display's luminosity will lower making the display difficult to view.

Do not allow intense light to hit the optical receiver. Otherwise, it could cause damage.

NOTE

Wearing polarized sunglasses will reduce the visibility of the active driving display due to
the characteristics of the display.

If the battery has been removed and re-installed or the battery voltage is low, the adjusted
position may deviate.

The display may be difficult to view or temporarily affected by weather conditions such as
rain, snow, light, and temperature.

If the audio system is removed, the active driving display cannot be operated.

When Driving

Instrument Cluster and Display

4-56

*Some models.

CX-9_8HB2-EA-18G_Edition1

2018-5-11 13:09:27

The active driving display indicates the following information:

Blind Spot Monitoring (BSM) Operation Conditions and Warnings
Refer to Blind Spot Monitoring (BSM) on page 4-114.

Distance Recognition Support System (DRSS) Operation Conditions and Warnings
Refer to Distance Recognition Support System (DRSS) on page 4-126.

Traffic Sign Recognition System (TSR) traffic signs and Warnings
Refer to Traffic Sign Recognition System (TSR) on page 4-120.

Mazda Radar Cruise Control with Stop & Go function (MRCC with Stop & Go function)
Operation Conditions and Warnings
Refer to Mazda Radar Cruise Control with Stop & Go function (MRCC with Stop & Go
function) on page 4-134.

Lane-keep Assist System (LAS) & Lane Departure Warning System (LDWS) Operation
Conditions and Warnings
Refer to Lane-keep Assist System (LAS) & Lane Departure Warning System (LDWS) on
page 4-147.

Advanced Smart City Brake Support (Advanced SCBS) Warnings
Refer to Advanced Smart City Brake Support (Advanced SCBS) on page 4-158.

Smart City Brake Support (SCBS) Warnings
Refer to Smart City Brake Support (SCBS) on page 4-161.

Smart Brake Support (SBS) Warnings
Refer to Smart Brake Support (SBS) on page 4-164.

Cruise Control Operation Conditions
Refer to Cruise Control on page 4-203.

Navigation Guidance (vehicles with navigation system)

Speed limit indicator (vehicles with navigation system)

Vehicle Speed

Each setting/adjustment for the active driving display can be performed on the center
display.
1. Select the 

 icon on the home screen and display the Settings screen.

2. Select the AD-Disp tab.
3. Select the desired item and perform the setting/adjustment.

Method for adjusting screen brightness (automatically/manually)

Screen brightness initial settings (automatic adjustment is selected)

Screen brightness adjustment (manual adjustment is selected)

Display position of active driving display (display height)

When Driving

Instrument Cluster and Display

4-57

CX-9_8HB2-EA-18G_Edition1

2018-5-11 13:09:27

Active driving display angle adjustment (display angle correction)

Active driving display ON/OFF (indication)

Navigation guidance ON/OFF

Reset settings (reset)

NOTE

The desired driving position (display position, brightness level, display information) can
be called up after programming the position.
Refer to Driving Position Memory on page 2-11.

When Driving

Instrument Cluster and Display

4-58

CX-9_8HB2-EA-18G_Edition1

2018-5-11 13:09:27

Automatic Transaxle Controls

Lock-release button

Indicates the selector lever can be shifted freely into any position.

Indicates that you must hold in the lock-release button to shift.

Indicates that you must depress the brake pedal and hold in the lock-release 
button to shift (The ignition must be switched ON). 

Various Lockouts: 

NOTE
The Sport AT has an option that is not included in the traditional automatic transaxle that
gives the driver the option of selecting each gear instead of leaving it to the transaxle to
shift gears. Even if you intend to use the automatic transaxle functions as a traditional
automatic, you should also be aware that you can inadvertently shift into manual shift mode
and an inappropriate gear may be retained as the vehicle speed increases. If you notice the
engine speed going higher or hear the engine racing, confirm you have not accidentally
slipped into manual shift mode (page 4-62).

When Driving

Automatic Transaxle

4-59

CX-9_8HB2-EA-18G_Edition1

2018-5-11 13:09:27

Shift-Lock System

The shift-lock system prevents shifting out
of P unless the brake pedal is depressed.
 
To shift from P:
1. Depress and hold the brake pedal.
2. Start the engine.
3. Press and hold the lock-release button.
4. Move the selector lever.

NOTE

When the ignition is switched to ACC or
the ignition is switched off, the selector
lever cannot be shifted from P position.

The ignition cannot be switched to OFF
if the selector lever is not in P position.

▼ Shift-Lock Override

If the selector lever will not move from P
using the proper shift procedure, continue
to hold down the brake pedal.
1. Remove the shift-lock override cover

using a cloth-wrapped flat head
screwdriver.

2. Insert a screwdriver and push it down.

Cover

3. Press and hold the lock-release button.
4. Move the selector lever.
Take the vehicle to an Authorized Mazda
Dealer to have the system checked.

Transaxle Ranges

The shift position indication in the
instrument cluster illuminates.
Refer to Indication/Indicator Lights on
page 4-25, 4-41, 4-53.

The selector lever must be in P or N
position to operate the starter.

P (Park)

P locks the transaxle and prevents the
front wheels from rotating.

WARNING

Always set the selector lever to P position
and set the parking brake:
Only setting the selector lever to the P
position without using the parking brake to
hold the vehicle is dangerous. If P fails to
hold, the vehicle could move and cause an
accident.

CAUTION

Shifting into P, N or R while the vehicle is

moving can damage your transaxle.

Shifting into a driving gear or reverse

when the engine is running faster than
idle can damage the transaxle.

R (Reverse)

In position R, the vehicle moves only
backward. You must be at a complete stop
before shifting to or from R, except under
rare circumstances as explained in
Rocking the Vehicle (page 3-49).

When Driving

Automatic Transaxle

4-60

CX-9_8HB2-EA-18G_Edition1

2018-5-11 13:09:27

NOTE
(With parking sensor system)
When the selector lever is shifted to the R
position with the ignition switched ON, the
parking sensor system is activated and a
beep sound is heard.
Refer to Parking Sensor System on page
4-220.

N (Neutral)

In N, the wheels and transaxle are not
locked. The vehicle will roll freely even
on the slightest incline unless the parking
brake or brakes are on.

WARNING

If the engine is running faster than idle, do
not shift from N or P into a driving gear:
It's dangerous to shift from N or P into a
driving gear when the engine is running
faster than idle. If this is done, the vehicle
could move suddenly, causing an accident
or serious injury.

Do not shift into N when driving the
vehicle:
Shifting into N while driving is dangerous.
Engine braking cannot be applied when
decelerating which could lead to an
accident or serious injury.

CAUTION

Do not shift into N when driving the
vehicle. Doing so can cause transaxle
damage.

NOTE
Apply the parking brake or depress the
brake pedal before moving the selector
lever from N position to prevent the
vehicle from moving unexpectedly.

D (Drive)

D is the normal driving position. From a
stop, the transaxle will automatically shift
through a 6-gear sequence.

M (Manual)

M is the manual shift mode position.
Gears can be shifted up or down by
operating the selector lever. Refer to
Manual Shift Mode on page 4-62.

▼ Shift Position Indication

Instrument Cluster (Type A)

Instrument Cluster (Type B/C)

The selector position is indicated when the
ignition is switched ON.

Gear position indication

In manual shift mode, the “M” of the shift
position indication illuminates and the
numeral for the selected gear is displayed.

When Driving

Automatic Transaxle

4-61

CX-9_8HB2-EA-18G_Edition1

2018-5-11 13:09:27

▼ Active Adaptive Shift (AAS)

Active Adaptive Shift (AAS)
automatically controls the transaxle shift
points to best suit the road conditions and
driver input. This improves driving feel.
The transaxle may switch to AAS mode
when driving up and down slopes,
cornering, driving at high elevations, or
depressing the accelerator pedal quickly
while the selector lever is in the D
position. Depending on the road and
driving conditions/vehicle operations, gear
shifting could be delayed or not occur,
however, this does not indicate a problem
because the AAS mode will maintain the
optimum gear position.

Manual Shift Mode

The manual shift mode gives you the feel
of driving a manual transaxle vehicle by
allowing you to operate the selector lever
manually. This allows you to control
engine rpm and torque to the drive wheels
much like a manual transaxle when more
control is desired.
To change to manual shift mode, shift the
lever from D to M.
 

NOTE
Changing to manual shift mode while
driving will not damage the transaxle.

To return to automatic shift mode, shift the
lever from M to D.

NOTE

If you change to manual shift mode
when the vehicle is stopped, the gear
will shift to M1.

If you change to manual shift mode
without depressing the accelerator pedal
when driving in D range, 5th gear/6th
gear, the gear will shift to M4/M5.

▼ Indicators

Manual shift mode indication

In manual shift mode, the “M” of the shift
position indication in the instrument panel
illuminates.

When Driving

Automatic Transaxle

4-62

CX-9_8HB2-EA-18G_Edition1

2018-5-11 13:09:27

Gear position indication

The numeral for the selected gear
illuminates.
 

Manual shift mode 
indication

Gear position 
indication

Manual shift mode 
indication

Gear position 
indication

Instrument Cluster (Type A)

Instrument Cluster (Type B/C)

NOTE

If the gears cannot be shifted down
when driving at higher speeds, the gear
position indication will flash twice to
signal that the gears cannot be shifted
down (to protect the transaxle).

If the automatic transaxle fluid (ATF)
temperature becomes too high, there is
the possibility that the transaxle will
switch to automatic shift mode,
canceling manual shift mode and
turning off the gear position indication
illumination. This is a normal function
to protect the AT. After the ATF
temperature has decreased, the gear
position indication illumination turns
back on and driving in manual shift
mode is restored.

▼ Manually Shifting Up

You can shift gears up by operating the
selector lever.
M1 → M2 → M3 → M4 → M5 → M6

To shift up to a higher gear, tap the
selector lever back   once.
 

NOTE

When driving slowly, the gears may not
shift up.

Do not drive the vehicle with the
tachometer needle in the RED ZONE
while in manual shift mode. In addition,
manual shift mode switches to automatic
shift mode while the accelerator pedal is
completely depressed.
This function is canceled while the TCS
is turned off. However, if the vehicle is
continuously driven at a high rpm, the
gears may automatically shift up to
protect the engine.

When Driving

Automatic Transaxle

4-63

CX-9_8HB2-EA-18G_Edition1

2018-5-11 13:09:27

▼ Manually Shifting Down

You can shift gears down by operating the
selector lever.
M6 → M5 → M4 → M3 → M2→ M1
To shift down to a lower gear, tap the
selector lever forward   once.
 

WARNING

Do not use engine braking on slippery road
surfaces or at high speeds:
Shifting down while driving on wet, snowy,
or frozen roads, or while driving at high
speeds causes sudden engine braking,
which is dangerous. The sudden change in
tire speed could cause the tires to skid. This
could lead to loss of vehicle control and an
accident.

NOTE

When driving at high speeds, the gear
may not shift down.

During deceleration, the gear may
automatically shift down depending on
vehicle speed.

When depressing the accelerator fully,
the transaxle will shift to a lower gear,
depending on vehicle speed. However,
the gears do not kickdown while the TCS
is turned off.

▼ Second Gear Fixed Mode

When the selector lever is moved back 
while the vehicle speed is about 10 km/h
(6.2 mph) or less, the transaxle is set in the
second gear fixed mode. The gear is fixed
in second while in this mode for easier
acceleration from a stop and driving on
slippery roads such as snow-covered
roads.
If the selector lever is moved back   or
forward   while in the second gear fixed
mode, the mode will be canceled.

When Driving

Automatic Transaxle

4-64

CX-9_8HB2-EA-18G_Edition1

2018-5-11 13:09:27

▼ Shift Gear (Shifting) Speed Limit

For each gear position while in the manual mode, the speed limit is set as follows: When the
selector lever is operated within the range of the speed limit, the gear is shifted.
 

Shift up

The gear does not shift up while the vehicle speed is lower than the speed limit.

Shift down

The gear does not shift down while the vehicle speed exceeds the speed limit.
If the vehicle speed exceeds the speed limit and the gear does not shift down, the gear
position indication flashes 2 times to notify the driver that the gear cannot be shifted.

Kickdown

When the accelerator pedal is depressed fully while driving, the gear shifts down.
However, the gears do not kickdown while the TCS is turned off.

NOTE
The gear also shifts down using kickdown while in the second gear fixed mode.

Auto-shift down

The gear shifts down automatically depending on the vehicle speed during deceleration.

NOTE
If the vehicle comes to a stop while in the second gear fixed mode, the gear remains in
second.

When Driving

Automatic Transaxle

4-65

CX-9_8HB2-EA-18G_Edition1

2018-5-11 13:09:27

▼ Recommendations for Shifting

Upshifting

For normal acceleration and cruising, Mazda recommends these shift points:

Gear

Vehicle speed

*1

M1 to M2

24 km/h (15 mph)

M2 to M3

40 km/h (25 mph)

M3 to M4

65 km/h (40 mph)

M4 to M5

73 km/h (45 mph)

M5 to M6

81 km/h (50 mph)

*

1 Always observe local speed limit regulations.

Downshifting

When you must slow down in heavy traffic or on a steep upgrade, downshift before the
engine starts to overwork. This gives better acceleration when you need more speed.
 
On a steep downgrade, downshifting helps maintain safe speed and prolongs brake life.

When Driving

Automatic Transaxle

4-66

CX-9_8HB2-EA-18G_Edition1

2018-5-11 13:09:27

Driving Tips

WARNING

Do not let the vehicle move in a direction
opposite to the direction selected by the
selector lever:
Do not let the vehicle move backward with
the selector lever in a forward position, or
do not let the vehicle move forward with
the selector lever in the reverse position.
Otherwise, the engine may stop, causing
the loss of the power brake and power
steering functions, and make it difficult to
control the vehicle which could result in an
accident.

Passing

For extra power when passing another
vehicle or climbing steep grades, depress
the accelerator fully. The transaxle will
shift to a lower gear, depending on vehicle
speed.

NOTE

The accelerator pedal may initially feel
heavy as it is being depressed, then feel
lighter as it is depressed further. This
change in pedal force aids the engine
control system in determining how much
the accelerator pedal has been
depressed for performing kickdown, and
functions to control whether or not
kickdown should be performed.

While the selector lever is in the M
position and the TCS is turned off,
manual shift mode does not switch to
automatic shift mode even if the
accelerator pedal is completely
depressed. Operate the selector lever.

Climbing steep grades from a stop

To climb a steep grade from a stopped
position:
1. Depress the brake pedal.
2. Shift to D or M1, depending on the

load weight and grade steepness.

3. Release the brake pedal while

gradually accelerating.

Descending steep grades

When descending a steep grade, shift to
lower gears, depending on load weight and
grade steepness. Descend slowly, using the
brakes only occasionally to prevent them
from overheating.

When Driving

Automatic Transaxle

4-67

CX-9_8HB2-EA-18G_Edition1

2018-5-11 13:09:27

Lighting Control

▼ Headlights

Turn the headlight switch to turn the headlights and other exterior lights on or off.
When the lights are turned on, the lights-on indicator light in the instrument cluster turns on.
 

NOTE

If the light switch is left on, the lights will automatically switch off approximately 30
seconds after switching the ignition off.
The time setting can be changed.
Refer to Personalization Features on page 9-10.

To prevent discharging the battery, do not leave the lights on while the engine is off unless
safety requires them.

Without auto-light control

Switch Position

Ignition Position

ON

ACC or

OFF

ON

ACC or

OFF

ON

ACC or

OFF

Headlights

Off

Off

Off

Off

On

On

*2

Daytime running lights

On

*1

Off

On

*1

Off

Off

Off

Taillights
Parking lights
License plate lights
Side-marker lights

Off

Off

On

On

*2

On

On

*2

*

1 The lights are turned on while the vehicle is driven.

*

2 The lights are turned on for the specified period by the auto headlight off function.

When Driving

Switches and Controls

4-68

CX-9_8HB2-EA-18G_Edition1

2018-5-11 13:09:27

With auto-light control

Switch Position

Ignition Position

ON

ACC or

OFF

ON

ACC or

OFF

ON

ACC or

OFF

ON

ACC or

OFF

Headlights

Off

Off

Auto

*2

Auto

*4

Off

Off

On

On

*5

Daytime running lights

On

*1

Off

On

*3

Off

On

*1

Off

Off

Off

Taillights
Parking lights
License plate lights
Side-marker lights

Off

Off

Auto

*2

Auto

*4

On

On

*5

On

On

*5

*

1 The lights are turned on while the vehicle is driven.

*

2 The lights are turned on by the auto light function.

*

3 The lights are turned on while the vehicle is driven, and turned off when the headlights are turned on by the

auto light function.

*

4 The lights are turned on continuously if the ignition is switched from ON to any other position with the lights

turned on. The lights are turned on for the specified period by the auto headlight off function.

*

5 The lights are turned on for the specified period by the auto headlight off function.

Auto-light control

*

When the headlight switch is in the 

 position and the ignition is switched ON, the light

sensor senses the surrounding lightness or darkness and automatically turns the headlights
and other exterior lights on or off.

When Driving

Switches and Controls

*Some models.

4-69

CX-9_8HB2-EA-18G_Edition1

2018-5-11 13:09:27

CAUTION

Do not shade the light sensor by adhering a sticker or a label on the windshield. Otherwise

the light sensor will not operate correctly.

The light sensor also works as a rain sensor for the auto-wiper control. Keep hands and

scrapers clear of the windshield when the wiper lever is in the 

 position and the ignition

is switched ON as fingers could be pinched or the wipers and wiper blades could be
damaged when the wipers activate automatically. If you are going to clean the windshield,
be sure the wipers are turned off completely when it is particularly tempting to leave the
engine running. This is particularly important when clearing ice and snow.

NOTE

The headlights and other exterior lights may not turn off immediately even if the
surrounding area becomes well-lit because the light sensor determines that it is night time
if the surrounding area is continuously dark for several minutes such as inside long
tunnels, traffic jams inside tunnels, or in indoor parking lots.
In this case, the lights turn off if the light switch is turned to the 

 position.

If the headlight switch and the windshield wiper switch are in 

, and the wipers are

operated at low or high speed by the auto wiper control for several seconds, bad weather
conditions are determined and the headlights may be turned on.

The sensitivity of the auto-light control may be changed.
Refer to Personalization Features on page 9-10.

When Driving

Switches and Controls

4-70

CX-9_8HB2-EA-18G_Edition1

2018-5-11 13:09:27

▼ Headlight High-Low Beam

The headlights switch between high and
low beams by moving the lever forward or
backward.
 

High beam

Low beam

When the headlight high-beams are on, the
headlight high-beam indicator light is
turned on.
 

▼ Flashing the Headlights

Can be used when the ignition is switched
ON.
To flash the headlights, pull the lever fully
towards you (the headlight switch does not
need to be on).
 

OFF

Headlight 
flashing

The headlight high-beam indicator light in
the instrument cluster illuminates
simultaneously. The lever will return to
the normal position when released.
 

▼ Coming Home Light

The coming home light turns on the
headlights (low beams) when the lever is
operated.

To turn on the lights

When the lever is pulled with the ignition
switched to ACC or OFF, the low beam
headlights turn on.
The headlights turn off after a certain
period of time has elapsed after the doors
are closed.

NOTE

The time until the headlights turn off
after all of the doors are closed can be
changed.
Refer to Personalization Features on
page 9-10
.

If no operations are done for 3 minutes
after the lever is pulled, the headlights
turn off.

The headlights turn off if the lever is
pulled again while the headlights are
illuminated.

▼ Leaving Home Light

The leaving home light turns on the lights
when the transmitter unlock button is
pressed while away from the vehicle.
The following lights turn on when the
leaving home light is operated.
Low beams, Parking lights, Taillights,
License plate lights.

When Driving

Switches and Controls

4-71

CX-9_8HB2-EA-18G_Edition1

2018-5-11 13:09:27


Content   ..  12  13  14  15   ..