Mazda CX-9 Grand Touring. Manual - part 614


  Index      Mazda     Mazda CX-9 Grand Touring - service repair manual 2008 year


Search            


Content   ..  612  613  614  615   ..


Mazda CX-9 Grand Touring. Manual - part 614


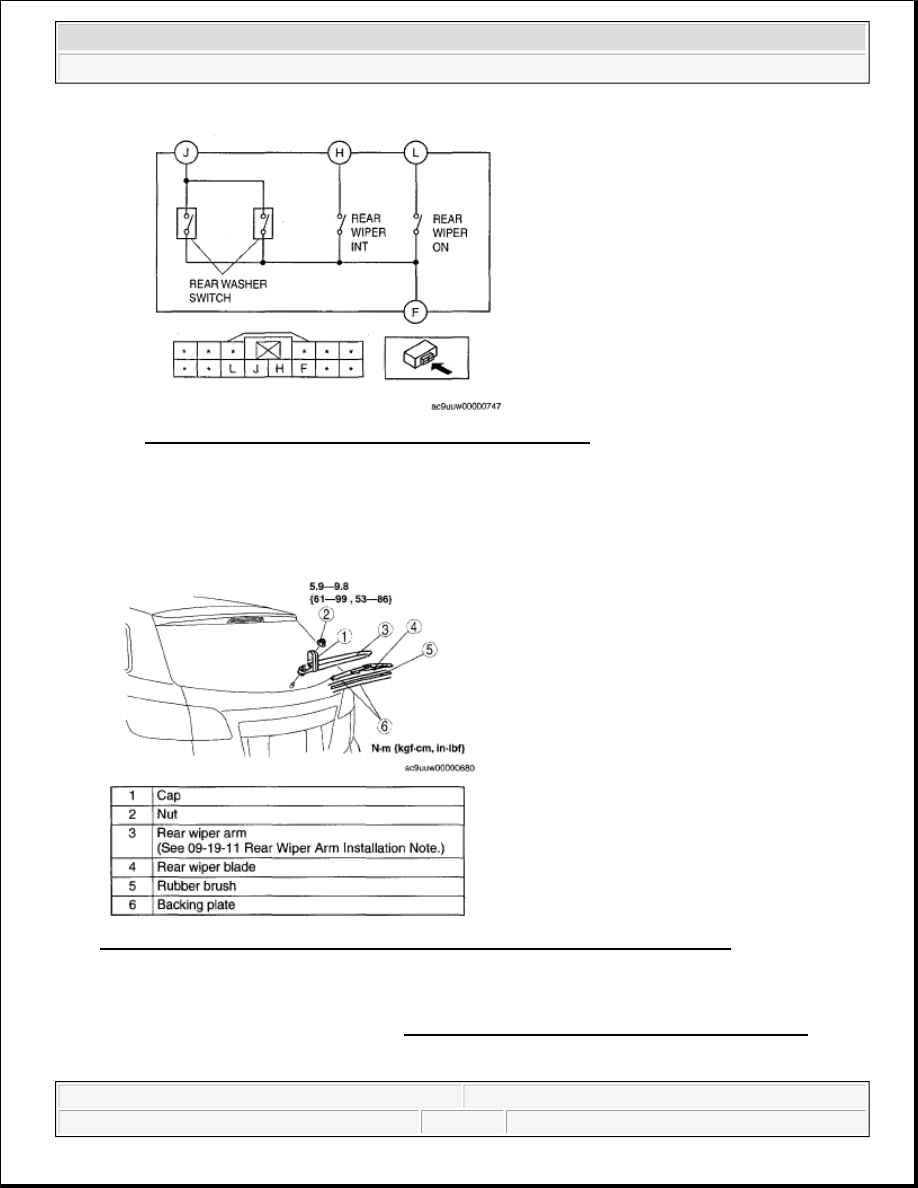
Fig. 26: Rear Wiper And Washer Switch Circuit Diagram 
Courtesy of MAZDA MOTORS CORP. 

REAR WIPER ARM AND BLADE REMOVAL/INSTALLATION 

1. Remove in the order indicated in the table. 

Fig. 27: Identifying Rear Wiper Arm, Blade Components & Torque Specifications 
Courtesy of MAZDA MOTORS CORP. 

2. Install in the reverse order of removal.  

3. Adjust the rear wiper arm and blade. (See REAR WIPER ARM AND BLADE ADJUSTMENT.)  

REAR WIPER ARM INSTALLATION NOTE 


2008 Mazda CX-9 Grand Touring 

2008 ACCESSORIES & BODY, CAB Wiper/Washer System - Mazda CX-9


Microsoft 


Sunday, November 15, 2009 10:35:20 AM

Page 18 

© 2005 Mitchell Repair Information Company, LLC. 

1. Clean the rear wiper arm connector shaft using a wire brush before installing the rear wiper arm. 

Fig. 28: Cleaning Rear Wiper Arm Connector Shaft Using Wire Brush 
Courtesy of MAZDA MOTORS CORP. 

REAR WIPER ARM AND BLADE ADJUSTMENT 

1. Turn off the rear wiper switch while operating the rear wiper motor, and then stop the rear wiper at the 

auto-stop position.  

2. Set the rear wiper arm onto the ceramic end line. 

Fig. 29: Identifying Rear Wiper Arm And Blade Adjusting Dimension 
Courtesy of MAZDA MOTORS CORP. 

REAR WIPER MOTOR REMOVAL/INSTALLATION 

1. Disconnect the negative battery cable.  

2. Remove the following parts: 

1. Rear wiper arm and blade (See REAR WIPER ARM AND BLADE 


2008 Mazda CX-9 Grand Touring 

2008 ACCESSORIES & BODY, CAB Wiper/Washer System - Mazda CX-9


Microsoft 


Sunday, November 15, 2009 10:35:20 AM

Page 19 

© 2005 Mitchell Repair Information Company, LLC. 

REMOVAL/INSTALLATION.) 

2. Liftgate upper trim (See LIFTGATE UPPER TRIM REMOVAL/INSTALLATION .)  

3. Liftgate side trim (See LIFTGATE SIDE TRIM REMOVAL/INSTALLATION .)  

4. Liftgate lower trim (See LIFTGATE LOWER TRIM REMOVAL/INSTALLATION .)  

3. Remove in the order indicated in the table. 

Fig. 30: Identifying Rear Wiper Motor Components & Torque Specifications 
Courtesy of MAZDA MOTORS CORP. 

4. Install in the reverse order of removal.  

REAR WIPER MOTOR INSPECTION 

1. Connect battery positive voltage to the rear wiper motor terminal A, and ground the rear wiper motor 

terminal B.  

2. Verify that the rear wiper motor operates. 

If there is any malfunction, replace the rear wiper motor. 

Fig. 31: Rear Wiper Motor Circuit Diagram 
Courtesy of MAZDA MOTORS CORP.


2008 Mazda CX-9 Grand Touring 

2008 ACCESSORIES & BODY, CAB Wiper/Washer System - Mazda CX-9


Microsoft 


Sunday, November 15, 2009 10:35:20 AM

Page 20 

© 2005 Mitchell Repair Information Company, LLC. 

REAR WASHER MOTOR REMOVAL/INSTALLATION

1. Disconnect the negative battery cable.  

2. Partially peel back the splash shield (RH).  

3. Remove in the order indicated in the table. 

Fig. 32: Identifying Rear Washer Motor Remove/Install Components 
Courtesy of MAZDA MOTORS CORP. 

4. Install in the reverse order of removal.  

REAR WASHER MOTOR INSPECTION 

1. Connect battery positive voltage to rear washer motor terminal A and terminal B to ground.  

2. Verify that the rear washer motor operates normally. 

If there is any malfunction, replace the rear washer motor. 

Fig. 33: Rear Washer Motor Circuit Diagram 
Courtesy of MAZDA MOTORS CORP.


2008 Mazda CX-9 Grand Touring 

2008 ACCESSORIES & BODY, CAB Wiper/Washer System - Mazda CX-9


Microsoft 


Sunday, November 15, 2009 10:35:20 AM

Page 21 

© 2005 Mitchell Repair Information Company, LLC. 


Content   ..  612  613  614  615   ..