Mazda CX-9 Grand Touring. Manual - part 421


  Index      Mazda     Mazda CX-9 Grand Touring - service repair manual 2008 year


Search            


Content   ..  419  420  421  422   ..


Mazda CX-9 Grand Touring. Manual - part 421


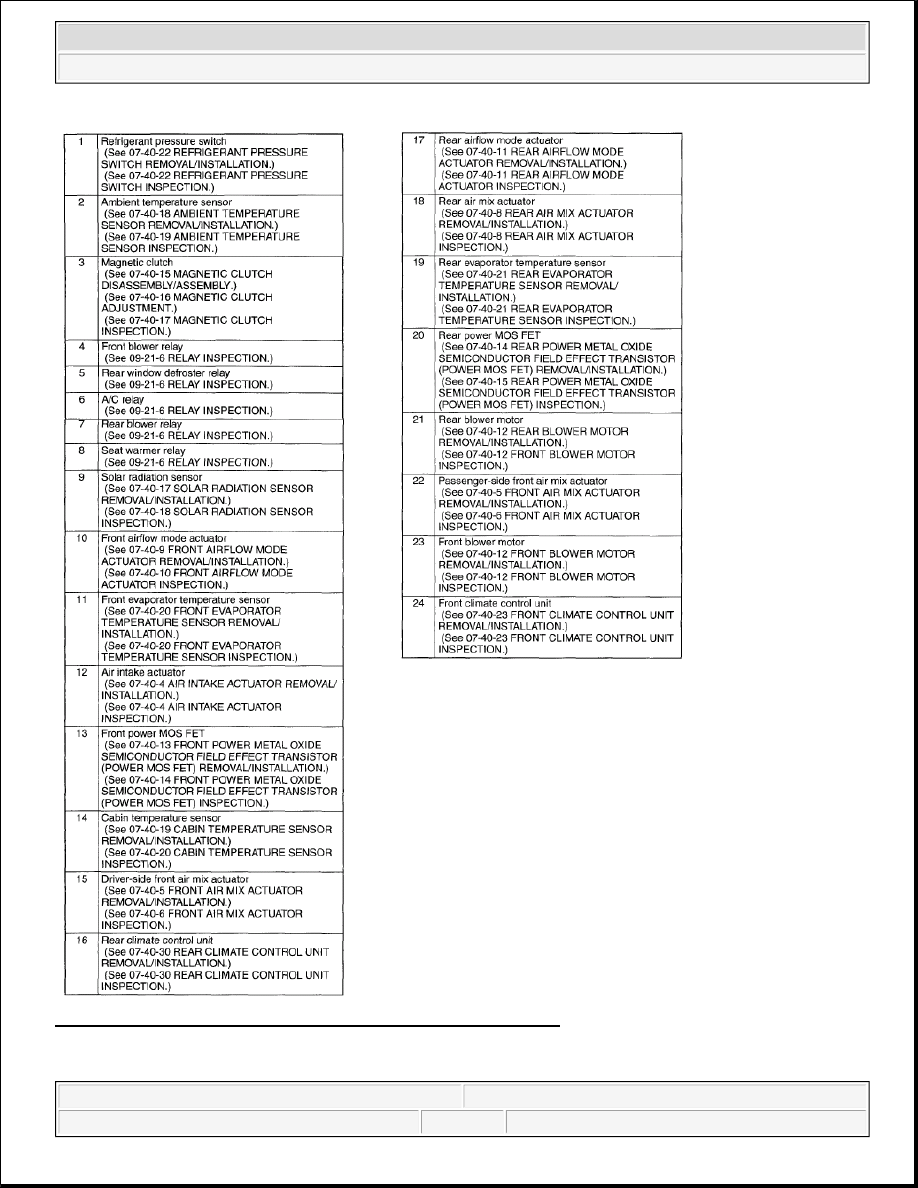
Fig. 2: Identifying HVAC Control System Location Index (2 Of 2) 
Courtesy of MAZDA MOTORS CORP. 


2008 Mazda CX-9 Grand Touring 

2008 HVAC Control System (HVAC) - Mazda CX-9


Microsoft 


Sunday, November 15, 2009 10:12:35 AM

Page 2 

© 2005 Mitchell Repair Information Company, LLC. 

AIR INTAKE ACTUATOR REMOVAL/INSTALLATION

1. Disconnect the negative battery cable.  

2. Remove the dashboard under cover. (Passenger side) (See DASHBOARD UNDER COVER 

REMOVAL/INSTALLATION .)  

3. Remove the glove compartment. (See GLOVE COMPARTMENT REMOVAL/INSTALLATION .)  

4. Insert a flathead screwdriver as shown in the figure and detach the fuse block tab by prying it in the 

direction of the arrow.  

5. Press the fuse block and remove it from the bracket.  

6. Set the fuse block out of the way. 

Fig. 3: Detaching Fuse Block Tab 
Courtesy of MAZDA MOTORS CORP. 

7. Remove in the order indicated in the table. 

Fig. 4: Identifying Air Intake Actuator Removal Order 
Courtesy of MAZDA MOTORS CORP. 

8. Install in the reverse order of removal.  

AIR INTAKE ACTUATOR INSPECTION 

1. Connect battery positive voltage to air intake actuator terminal G, connect terminal A (or C) to ground, 

and then verify that the air intake actuator operates as shown in the table. 


2008 Mazda CX-9 Grand Touring 

2008 HVAC Control System (HVAC) - Mazda CX-9


Microsoft 


Sunday, November 15, 2009 10:12:35 AM

Page 3 

© 2005 Mitchell Repair Information Company, LLC. 

If the operation condition is not normal, replace the air intake actuator.  

AIR INTAKE ACTUATOR OPERATION 

Fig. 5: Inspecting Air Intake Actuator 
Courtesy of MAZDA MOTORS CORP. 

Fig. 6: Air Intake Actuator Circuit Diagram 
Courtesy of MAZDA MOTORS CORP. 

FRONT AIR MIX ACTUATOR REMOVAL/INSTALLATION 

DRIVER SIDE 

1. Disconnect the negative battery cable.  

2. Remove the following parts: 

1. Dashboard under cover (Driver side) (See DASHBOARD UNDER COVER 

REMOVAL/INSTALLATION .)  

2. Side wall (See SIDE WALL REMOVAL/INSTALLATION .) 

Terminal

Air intake actuator operation

A

C

G

Ground

-

B+ RECIRCULATE --> FRESH

-

Ground B+ FRESH --> RECIRCULATE


2008 Mazda CX-9 Grand Touring 

2008 HVAC Control System (HVAC) - Mazda CX-9


Microsoft 


Sunday, November 15, 2009 10:12:35 AM

Page 4 

© 2005 Mitchell Repair Information Company, LLC. 

3. Console panel (LH) (See CONSOLE PANEL REMOVAL/INSTALLATION .)  

4. Hood release lever (See HOOD LATCH AND RELEASE LEVER 

REMOVAL/INSTALLATION .)  

5. Lower panel (See LOWER PANEL REMOVAL/INSTALLATION .)  

3. Remove in the order indicated in the table. 

Fig. 7: Identifying Front Air Mix Actuator Removal Order - Driver Side 
Courtesy of MAZDA MOTORS CORP. 

4. Install in the reverse order of removal.  

PASSENGER SIDE 

1. Disconnect the negative battery cable.  

2. Remove the following parts: 

1. Decoration panel (See DECORATION PANEL REMOVAL/INSTALLATION .)  

2. Front console box mat (See FRONT CONSOLE BOX MAT REMOVAL/INSTALLATION .)  

3. Indicator panel (See INDICATOR PANEL REMOVAL/INSTALLATION .)  

4. Front console box (See FRONT CONSOLE BOX REMOVAL/INSTALLATION .)  

5. Dashboard under cover (See DASHBOARD UNDER COVER REMOVAL/INSTALLATION .) 

6. Side wall (See SIDE WALL REMOVAL/INSTALLATION .)  

7. Console panel (See CONSOLE PANEL REMOVAL/INSTALLATION .)  

8. Console cover (See CONSOLE COVER REMOVAL/INSTALLATION .)  

9. Console (See CONSOLE REMOVAL/INSTALLATION .)  

10. Front scuff plate inner (See FRONT SCUFF PLATE REMOVAL/INSTALLATION .)  

11. Front side trim (See FRONT SIDE TRIM REMOVAL/INSTALLATION .)  

12. Glove compartment (See GLOVE COMPARTMENT REMOVAL/INSTALLATION .)  

13. Hood release lever (See HOOD LATCH AND RELEASE LEVER 

REMOVAL/INSTALLATION .)  

14. Lower panel (See LOWER PANEL REMOVAL/INSTALLATION .)  

15. Lower column cover (See COLUMN COVER REMOVAL/INSTALLATION .)  

16. Driver-side air bag module (See DRIVER-SIDE AIR BAG MODULE 

REMOVAL/INSTALLATION .) 


2008 Mazda CX-9 Grand Touring 

2008 HVAC Control System (HVAC) - Mazda CX-9


Microsoft 


Sunday, November 15, 2009 10:12:35 AM

Page 5 

© 2005 Mitchell Repair Information Company, LLC. 


Content   ..  419  420  421  422   ..