Mazda CX-9 Grand Touring. Manual - part 415


  Index      Mazda     Mazda CX-9 Grand Touring - service repair manual 2008 year


Search            


Content   ..  413  414  415  416   ..


Mazda CX-9 Grand Touring. Manual - part 415


8. When essentially no fuel is being discharged, stop the fuel pump.  

9. Disconnect the negative battery cable. (See BATTERY REMOVAL/INSTALLATION [MZI-3.7] .)  

10. To remove the propeller shaft, remove the following parts: 

1. Presilencer (See EXHAUST SYSTEM REMOVAL/INSTALLATION [MZI-3.7] .)  

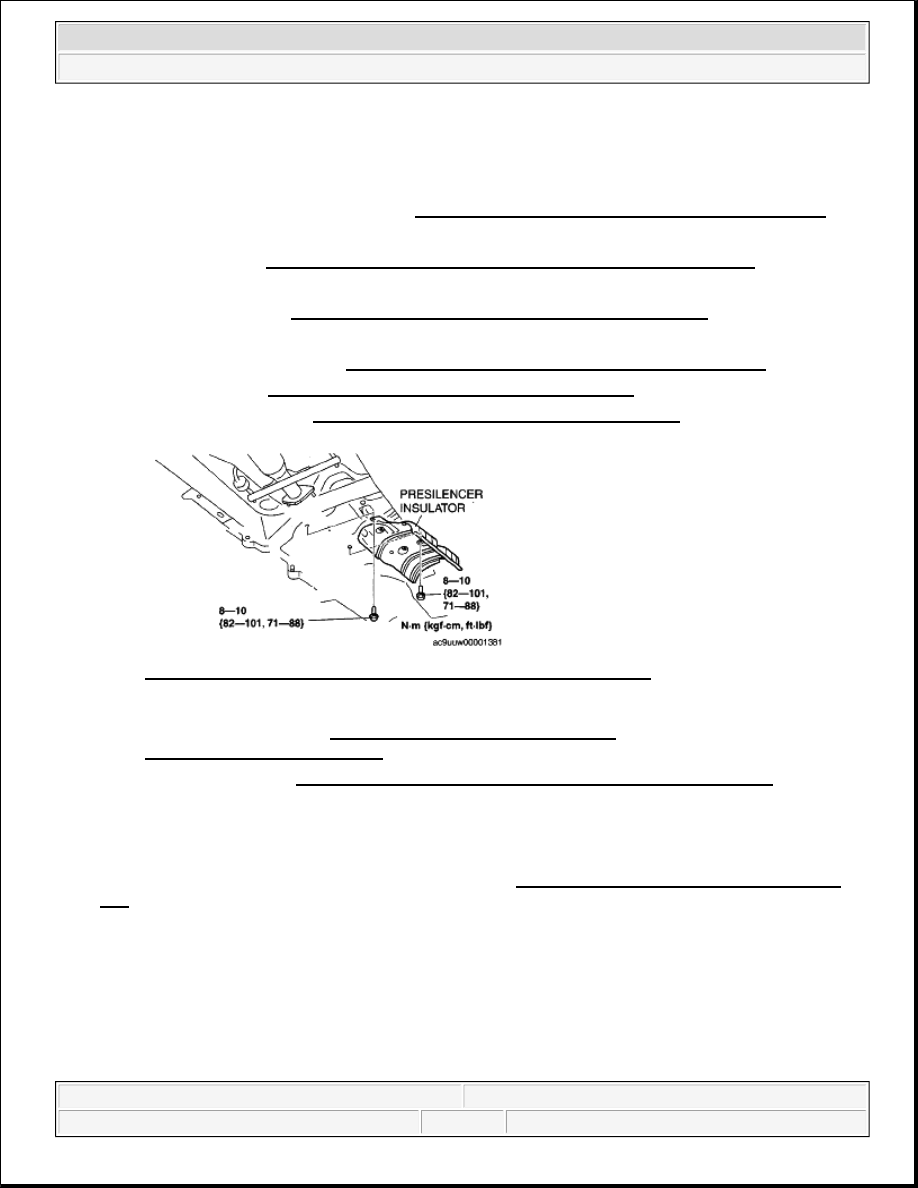
2. Presilencer insulator  

3. Propeller shaft (See PROPELLER SHAFT REMOVAL/INSTALLATION .)  

11. To remove the fuel pump unit, remove the following parts: 

1. Second-row seat (LH) (See SECOND-ROW SEAT REMOVAL/INSTALLATION .)  

2. Edge cover (See LONG SLIDER REMOVAL/INSTALLATION .)  

3. Long slider cover (See LONG SLIDER REMOVAL/INSTALLATION .) 

Fig. 19: Identifying Presilencer Insulator & Torque Specifications 
Courtesy of MAZDA MOTORS CORP. 

4. Rear heat duct No.3 (See REAR HEAT DUCT COMPONENT 

REMOVAL/INSTALLATION .)  

5. Fuel pump unit (See FUEL PUMP UNIT REMOVAL/INSTALLATION [MZI-3.7].)  

12. Siphon the fuel from the fuel tank.  

13. Remove in the order indicated in the table.  

14. Install in the reverse order of removal.  

15. Complete the "AFTER SERVICE PRECAUTION". (See AFTER SERVICE PRECAUTION [MZI-

3.7].) 

Courtesy of MAZDA MOTORS CORP. 


2008 Mazda CX-9 Grand Touring 

2008 ENGINE Fuel System (MZI-3.7) - Mazda CX-9


Microsoft 


Sunday, November 15, 2009 10:00:01 AM

Page 16 

© 2005 Mitchell Repair Information Company, LLC. 

Fig. 20: Identifying Evaporative Hose Component, Fuel Tank, Fuel Tank Bracket, Fuel-Filler Pipe 
& Torque Specifications
 
Courtesy of MAZDA MOTORS CORP. 

Fuel-filler pipe protector removal note 

1. Remove the rear tire (LH).  

2. Remove the splash shield (LH).  

3. Remove the fuel-filler pipe protector.  

Fuel-filler pipe removal note 


2008 Mazda CX-9 Grand Touring 

2008 ENGINE Fuel System (MZI-3.7) - Mazda CX-9


Microsoft 


Sunday, November 15, 2009 10:00:01 AM

Page 17 

© 2005 Mitchell Repair Information Company, LLC. 

1. Remove the rear tire (RH).  

2. Remove the spare tire.  

3. Remove the main silencer (LH). (See EXHAUST SYSTEM REMOVAL/INSTALLATION [MZI-

3.7] .)  

4. Remove the main silencer insulator (LH).  

5. To lower the rear crossmember, perform the following procedure: 

1. Set the rear ABS wheel-speed sensor out of the way. (See REAR ABS WHEEL-SPEED 

SENSOR REMOVAL/INSTALLATION [AWD] .)  

2. Rear coil spring (See REAR COIL SPRING REMOVAL/INSTALLATION .)  

3. Lowered the rear crossmember. (See REAR CROSSMEMBER REMOVAL/INSTALLATION 

[AWD] .)  

6. Remove the fuel-filler pipe.  

FUEL TANK INSPECTION [MZI-3.7] 

1. Follow "BEFORE SERVICE PRECAUTION" before performing any work operations to prevent fuel 

from spilling from the fuel system. (See BEFORE SERVICE PRECAUTION [MZI-3.7].)  

2. Disconnect the negative battery cable. (See BATTERY REMOVAL/INSTALLATION [MZI-3.7] .)  

3. To disconnect the fuel pump unit connector, remove the following parts: 

1. Second-row seat (LH) (See SECOND-ROW SEAT REMOVAL/INSTALLATION .)  

2. Edge cover (See LONG SLIDER REMOVAL/INSTALLATION .)  

3. Long slider cover (See LONG SLIDER REMOVAL/INSTALLATION .)  

4. Rear heat duct No.3 (See REAR HEAT DUCT COMPONENT 

REMOVAL/INSTALLATION .)  

5. Disconnect the fuel pump unit connector.  

4. Disconnect the quick release connector and the fuel pump unit connector. (See QUICK RELEASE 

CONNECTOR REMOVAL/INSTALLATION [MZI-3.7].)  

5. Disconnect the joint hose. (See FUEL TANK INSPECTION [MZI-3.7].)  

6. Disconnect the evaporative hose. (See FUEL TANK REMOVAL/INSTALLATION [MZI-3.7].)  

7. Remove the fuel tank with the fuel pump unit. (See FUEL TANK REMOVAL/INSTALLATION 

[MZI-3.7].)  

8. Perform the following procedure to verify the fuel tank air-tightness. 

1. Plug the fuel pump unit pipe and port B. 

2WD  

NOTE:

This inspection is for three rollover valves and fuel shut-off valve 
integrated in the fuel tank.  


2008 Mazda CX-9 Grand Touring 

2008 ENGINE Fuel System (MZI-3.7) - Mazda CX-9


Microsoft 


Sunday, November 15, 2009 10:00:01 AM

Page 18 

© 2005 Mitchell Repair Information Company, LLC. 

Fig. 21: Identifying Fuel Pump Unit & Plug (2WD) 
Courtesy of MAZDA MOTORS CORP. 

AWD  

2. Apply a pressure of 3 kPa {23 mmHg, 0.9 inHg} to port A and wait for a while.  

3. Verify that there is no air leakage from the fuel tank. 

If there is airflow, replace the fuel tank.  

9. Level the fuel tank.  

10. Apply a pressure of 3 kPa {23 mmHg, 0.9 inHg} to port B and wait for a while.  

11. With the pressure still applied, verify that there is airflow from port A and the pressure is 0-3 kPa {0-22 

mmHg, 0-0.8 inHg}. 

If malfunction, replace the fuel tank.  

12. Apply a pressure of -0.5 kPa {-3.8 mmHg, -0.1 inHg} to port B and wait for a while. 

Fig. 22: Identifying Fuel Pump Unit & Plug (4WD) 
Courtesy of MAZDA MOTORS CORP. 

13. With the pressure still applied, verify that there is airflow from port A and the pressure is -0.5-0 kPa {-

3.8-0 mmHg, -0.2-0 inHg}. 

If malfunction, replace the fuel tank. 


2008 Mazda CX-9 Grand Touring 

2008 ENGINE Fuel System (MZI-3.7) - Mazda CX-9


Microsoft 


Sunday, November 15, 2009 10:00:01 AM

Page 19 

© 2005 Mitchell Repair Information Company, LLC. 


Content   ..  413  414  415  416   ..