Mazda CX-9 Grand Touring. Manual - part 400


  Index      Mazda     Mazda CX-9 Grand Touring - service repair manual 2008 year


Search            


Content   ..  398  399  400  401   ..


Mazda CX-9 Grand Touring. Manual - part 400


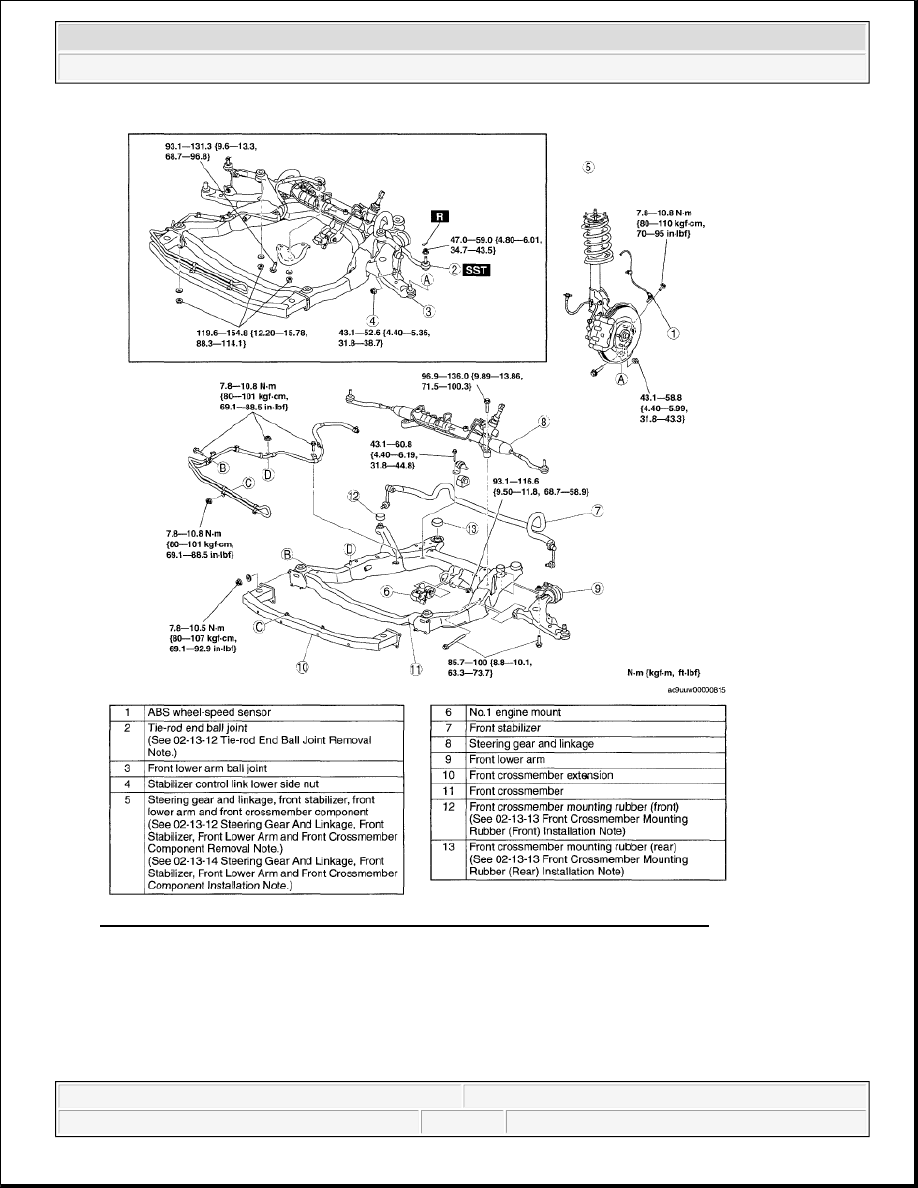
Fig. 19: Identifying Front Cross Member Components & Torque Specifications 
Courtesy of MAZDA MOTORS CORP. 

TIE-ROD END BALL JOINT REMOVAL NOTE 

1. Remove the tie-rod end ball joint locknut.  

2. Disconnect the tie-rod end ball joint using the SST.


2008 Mazda CX-9 Grand Touring 

2008 SUSPENSION Front Suspension - Mazda CX-9


Microsoft 


Sunday, November 15, 2009 10:23:19 AM

Page 13 

© 2005 Mitchell Repair Information Company, LLC. 

Fig. 20: Disconnecting Tie-Rod End Ball Joint 
Courtesy of MAZDA MOTORS CORP. 

STEERING GEAR AND LINKAGE, FRONT STABILIZER, FRONT LOWER ARM AND FRONT 
CROSSMEMBER COMPONENT REMOVAL NOTE 

1. Support the crossmember component with a jack. 

Fig. 21: Supporting Crossmember Component With Jack 
Courtesy of MAZDA MOTORS CORP. 

2. Disconnect the following parts. 

Pressure hose eye connector  

Return hose clamp (steering gear side)  

Pressure hose bracket  

Return hose clamp (tank side) 

WARNING:

Removing the crossmember component is dangerous. The 
crossmember component could fall and cause serious injury or 
death. Verify that the jack securely supports the crossmember 
component.  


2008 Mazda CX-9 Grand Touring 

2008 SUSPENSION Front Suspension - Mazda CX-9


Microsoft 


Sunday, November 15, 2009 10:23:19 AM

Page 14 

© 2005 Mitchell Repair Information Company, LLC. 

Fig. 22: Identifying Pressure Hose Eye Connector & Return Hose Clamp 
Courtesy of MAZDA MOTORS CORP. 

3. Disconnect the oil cooler bracket. 

Fig. 23: Identifying Oil Cooler Bracket 
Courtesy of MAZDA MOTORS CORP. 

4. Remove the No.1 engine mounting bracket bolts.  

5. Lower the steering gear and linkage, front stabilizer, front lower arm and front crossmember component 

slightly. 


2008 Mazda CX-9 Grand Touring 

2008 SUSPENSION Front Suspension - Mazda CX-9


Microsoft 


Sunday, November 15, 2009 10:23:19 AM

Page 15 

© 2005 Mitchell Repair Information Company, LLC. 

Fig. 24: Locating No.1 Engine Mounting Bracket Bolts 
Courtesy of MAZDA MOTORS CORP. 

FRONT CROSSMEMBER MOUNTING RUBBER (FRONT) INSTALLATION NOTE 

1. Install so that the smaller end of the outer diameter is pointing up. 

Fig. 25: Identifying Front Crossmember Mounting Rubber (Front) Installation 
Courtesy of MAZDA MOTORS CORP. 

FRONT CROSSMEMBER MOUNTING RUBBER (REAR) INSTALLATION NOTE 

1. Install so that the larger end of the outer diameter is pointing up. 

Fig. 26: Identifying Front Crossmember Mounting Rubber (Rear) Installation 
Courtesy of MAZDA MOTORS CORP. 

STEERING GEAR AND LINKAGE, FRONT STABILIZER, FRONT LOWER ARM AND FRONT 
CROSSMEMBER COMPONENT INSTALLATION NOTE 


2008 Mazda CX-9 Grand Touring 

2008 SUSPENSION Front Suspension - Mazda CX-9


Microsoft 


Sunday, November 15, 2009 10:23:19 AM

Page 16 

© 2005 Mitchell Repair Information Company, LLC. 


Content   ..  398  399  400  401   ..