Mazda RX7. Manual - part 77


  Index      Mazda     Mazda RX7 - service repair manual 1983 year


Search            


Content   ..  75  76  77  78   ..


Mazda RX7. Manual - part 77


POOR A/C COOLING - ADJUST A/C THERMOSTAT CAT. 16, NO. 006/85

Article Text (p. 2)

1983 Mazda RX7

For www.iluvmyrx7.com    

Copyright © 1998 Mitchell Repair Information Company, LLC

Monday, August 27, 2001  06:37AM

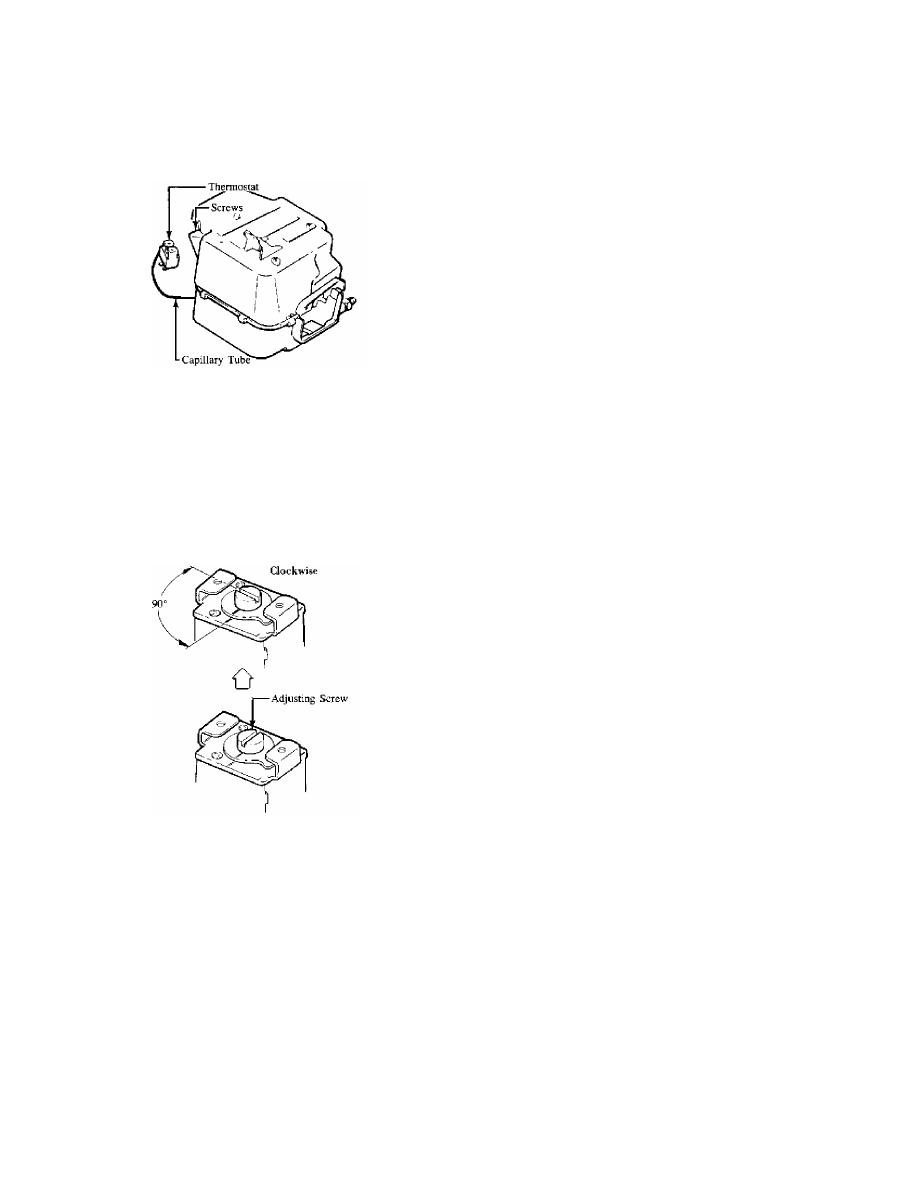
Fig. 2:  Removing 2 Screws Securing the Thermostat

   4. Turn the adjusting screw of the thermostat clockwise 90

ø

 from

      the original position.

CAUTION: Do not turn the adjusting screw more  than 90

ø

, otherwise the

         evaporator core will freeze, resulting in an adverse effect
         on the cooling performance. See Fig. 3.

   5. Reassemble in the reverse order of disassembly.

Fig. 3:  Adjusting Thermostat

END OF ARTICLE

POOR COOLING - DIAGNOSING/REPAIR A/C LEAKS CAT. 16, NO. 033/88

Article Text

1983 Mazda RX7

For www.iluvmyrx7.com    

Copyright © 1998 Mitchell Repair Information Company, LLC

Monday, August 27, 2001  06:37AM

ARTICLE BEGINNING

TECHNICAL SERVICE BULLETIN

DIAGNOSIS & REPAIR OF A/C REFRIGERANT LEAKS

Model:  ALL MODELS with A/C
Bulletin No.:  033/88
Date:  6/30/88
Category:  16
Symptom: Poor Cooling

DESCRIPTION

When diagnosing customer complaints regarding insufficient cooling and
a refrigerant leak is suspected, please follow these procedures for
locating and repairing the leak in order to prevent unnecessary
component replacement.

VERIFY THE CUSTOMER'S COMPLAINT

1.  Check the outlet air volume and temperature.  (However, the outlet
    temperature will vary according to ambient conditions. 35-45
    degrees F is normal)
2.  Verify the compressor clutch operation.  (The compressor will not
    operate if the system is empty of refrigerant.)

VERIFY THE STATE OF CHARGE AMOUNT

The following indication shows low charge condition. (Fig. 1)

Fig. 1:  A/C Sight Glass

CHECK FOR LEAK IN THE ENGINE COMPARTMENT

1.  Visually check all components for obvious leaks and signs.  Also,
    check the fittings by hand for tightness.

NOTE:
Some leaks may have an oil stain around leak area.

2.  Use the electric leak detector to locate the leak.

When using leak detector:
  a)  the system should be at least partially charged.
  b)  the detector probe should be moved slowly at a rate of about 1

POOR COOLING - DIAGNOSING/REPAIR A/C LEAKS CAT. 16, NO. 033/88

Article Text (p. 2)

1983 Mazda RX7

For www.iluvmyrx7.com    

Copyright © 1998 Mitchell Repair Information Company, LLC

Monday, August 27, 2001  06:37AM

      inch a second.

3.  Whenever possible, the detector probe should be held underneath
   the components since the refrigerant is heaver than air. (Fig. 2)

Fig. 2:  Freon Detector Inspection Angle

HINT:  Hold the electric leak detector probe near the drain hose.
Refrigerant from evaporator core may be detected through the water
drain hose.

INVESTIGATION & REPAIR

Most of the leaks from the pipe connection can be fixed with O-ring
replacement and proper torquing, but please pay attention to the
failure on pipe and components. (Fig. 3)

Fig. 3:  Damaged Component Illustration

LEAK TEST

1.  After replacing O-rings or components, evacuate the system at
    least 10 minutes and hold the vacuum further 10 minutes.
2.  If the vacuum does not drop, no leak is evident.  Charge the
    system with proper amount of refrigerant if it still leaks, check
    for leak from cooling unit area.
3.  Remove the cooling unit and look for the oil stain.

HINT:  Before removing the cooling unit, charge the system with a
leak-detector-refrigerant which contains a dye.  After operating the
system for a period of time, any leaks will be identified by a dye
stain around the leaking area.

REPAIR

Replace the O-ring at the expansion valve connection, or evaporator
core.

RECEIVER DRIER REPLACEMENT CRITERIA (CANADIAN) CAT. U, NO. 95-02

Article Text

1983 Mazda RX7

For www.iluvmyrx7.com    

Copyright © 1998 Mitchell Repair Information Company, LLC

Monday, September 03, 2001  03:25PM

ARTICLE BEGINNING

TECHNICAL SERVICE BULLETIN

RECEIVER DRIVER REPLACEMENT CRITERIA WHEN REPLACING OTHER A/C

COMPONENTS

Model(s):      All Mazda Models with A/C (Canadian)
Category:      U - Heater and Air Conditioner
Bulletin No.:  95-02
Date:          March, 1995

APPLICABLE MODELS/VINS

  All models equipped with R12 and R134a (Except 1994 and later B-
Series vehicles).

DESCRIPTION

  The following information is designed to assist dealers in
determining the necessity to replace the receiver-drier when replacing
other A/C components. Do not replace the receiver-drier unless the
following criteria have been met.

RECEIVER-DRIER REPLACEMENT CRITERIA

  Replace the receiver-drier when the A/C system has been ruptured and
all system pressure is lost.

  Receiver-drier will require replacement if the compressor oil
becomes discolored or foreign substances become visible (Refer to the
flow chart in this article).

NOTE:  Refer to section U of the workshop manual for additional
       receiver-drier diagnostic procedures.

  If an A/C component has failed, extract the compressor oil from the
failed part and inspect the oil according to the procedure described
in the following flow chart. Follow the procedure to determine if the
receiver-drier requires replacement as a precaution.

ÚÄÄÄÄÄÄÄÄÄÄÄÄÄÄÄÄÄÄÄÄÄÄÄÄÄÄ¿
³

    1) Inspect Oil for    

³

³

       Discoloration      

³

ÀÄÄÄÄÄÄÄÄÄÄÄÄÂÄÄÄÄÄÄÄÄÄÄÄÄÄÙ


³


ÚÄÄÄÄÄÄÄÄÄÄÄÄÄÄ¿


ÚÄÄÄÄÄÄÄÄÄÄÄÄÄÄÄÄ¿


ÃÄÄÄÄÄÄÄ

>

ÄÄÄÄÄÄÄÄ´

 Dark Gray or 

ÃÄÄ

>

ÄÄ´

    Replace     

³


³


³

    Black     

³


³

 Receiver-Drier 

³


³


ÀÄÄÄÄÄÄÄÄÄÄÄÄÄÄÙ


ÀÄÄÄÄÄÄÄÄÄÄÄÄÄÄÄÄÙ

ÚÄÄÄÄÄÄÄÄÄÄÄÄÁÄÄÄÄÄÄÄÄÄÄÄÄÄ¿


Content   ..  75  76  77  78   ..