Mazda RX7. Manual - part 57


  Index      Mazda     Mazda RX7 - service repair manual 1983 year


Search            


Content   ..  55  56  57  58   ..


Mazda RX7. Manual - part 57


SERVICE INDICATOR & WARNING LIGHTS

Article Text

1983 Mazda RX7

For www.iluvmyrx7.com    

Copyright © 1998 Mitchell Repair Information Company, LLC

Sunday, August 26, 2001  06:14PM

ARTICLE BEGINNING

         1983-91 MAINTENANCE
         Mazda Service Indicator & Warning Lights

         RX7

         SERVICE INDICATOR & WARNING LIGHTS

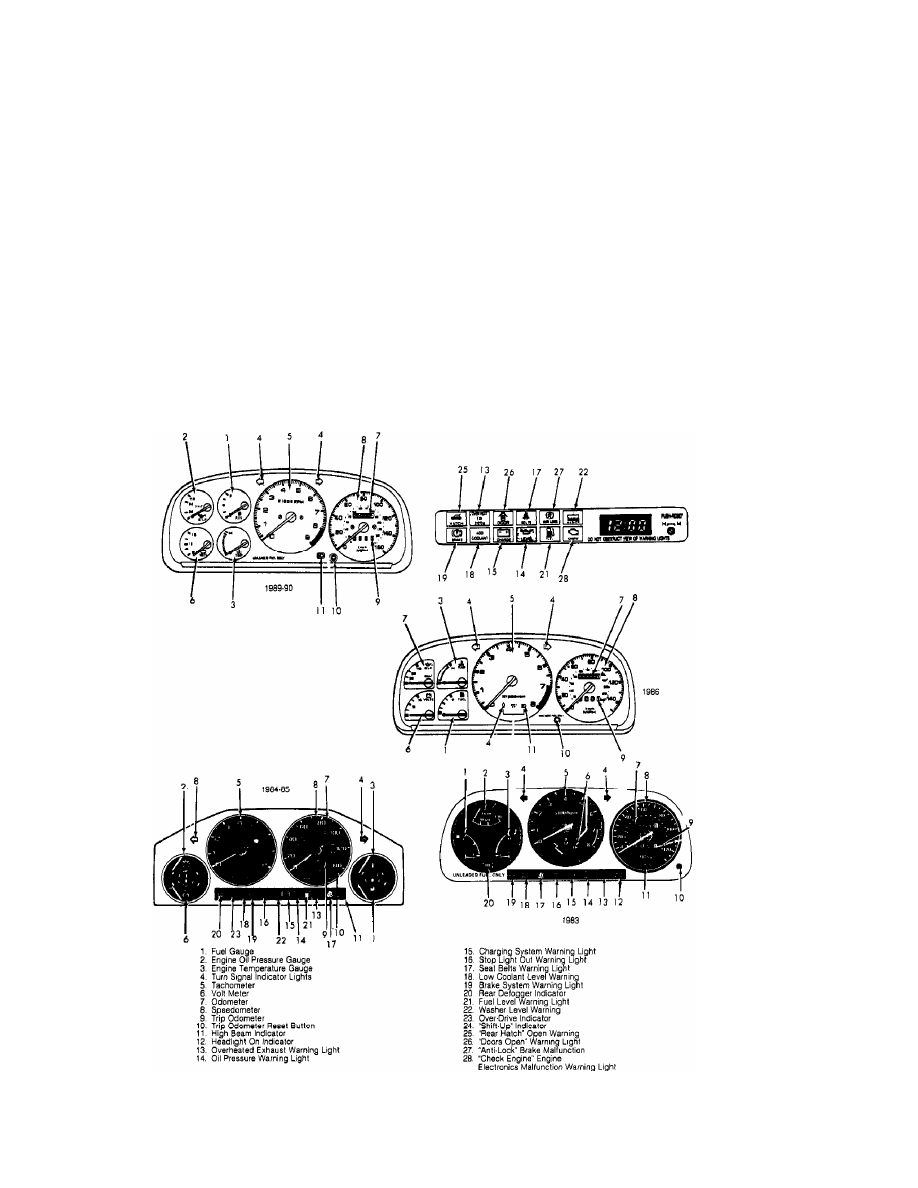
         The warning lights will come on with the ignition. Any
warning light which does not come with the ignition must be checked
and repaired.

Fig. 1:  Dash Gauges & Warning Lights
Courtesy of Mazda Motor of America Inc.

SERVICE INDICATOR & WARNING LIGHTS

Article Text (p. 2)

1983 Mazda RX7

For www.iluvmyrx7.com    

Copyright © 1998 Mitchell Repair Information Company, LLC

Sunday, August 26, 2001  06:14PM

         BRAKE SYSTEM WARNING LIGHT

         Light comes on with parking brake. If light remains on, with
parking brake off, fluid must be checked.

         SEAT BELT WARNING

         Light and beeper will go on for about 6 seconds, or until
driver's belt is locked, when ignition is turned on.

         CHARGE SYSTEM WARNING LIGHT

         Warning indicates a malfunction of either the alternator or
the electrical wiring system.

         MALFUNCTION INDICATOR LIGHT

         CHECK light indicates a fault in the electronic engine
control system, sensors or emission components.

         SUPPLEMENTAL DRIVER RESTRAINT SYSTEM WARNING LIGHT (IF

         EQUIPPED)

         AIR BAG light indicates a system malfunction by flashing or
continuous illumination.

         HEADLIGHT HIGH BEAM INDICATOR

         Indicates headlight high beam is on.

         HEADLIGHT RETRACTOR INDICATOR

         Comes on while headlights are retracting or extending. If
indicator remains on check and repair headlight retractor.

         HAZARD WARNING LIGHT

         Flashes with hazard warning lights.

         KEY REMINDER WARNING

         A beep sounds if the key is left in the ignition and the door
is opened.

END OF ARTICLE

TRANSMISSION REMOVAL & INSTALLATION - M/T

Article Text

1983 Mazda RX7

For www.iluvmyrx7.com    

Copyright © 1998 Mitchell Repair Information Company, LLC

Sunday, August 26, 2001  06:31PM

ARTICLE BEGINNING

         Manual Transmission Removal

         1983 RX7

         REMOVAL & INSTALLATION

         Removal
         1) Disconnect negative battery cable. Place gearshift lever
in neutral position, and remove gearshift knob. Remove console box (if
equipped) and gearshift lever.
         2) On RX7, remove air cleaner and upper transmission-to-
engine bolts. Raise and support vehicle and drain transmission.
Disconnect and remove drive shaft. Disconnect and/or remove under
cover, exhaust components and emission control components as required.
         3) Remove clutch slave cylinder and place out of the way
without removing hydraulic line. Disconnect and remove starter,
speedometer cable, back-up light wires and other electrical
connections.
         4) Place jack under rear of engine, protecting oil pan with
wooden block. Position transmission jack under transmission and remove
transmission-to-engine mounting bolts. If equipped, remove
transmission-to-crossmember bolts, crossmember-to-frame bolts and
crossmember. Slide transmission back until input shaft is cleared.
Remove from vehicle.

         Installation
         To install, reverse removal procedure, ensuring that splines
in input shaft align with those in clutch disc.

END OF ARTICLE

TRANSMISSION SERVICING - M/T

Article Text

1983 Mazda RX7

For www.iluvmyrx7.com    

Copyright © 1998 Mitchell Repair Information Company, LLC

Sunday, August 26, 2001  06:31PM

ARTICLE BEGINNING

         Manual Transmission Servicing

         1983 B2000 & B2200 Pickups, GLC, GLC Wagon, RX7 & 626

         LUBRICATION

         SERVICE INTERVALS

         Replace lubricant every 30,000 miles and check lubricant
level every 7,500 miles.

         FLUID LEVEL

         GLC & 626
         Remove speedometer cable and driven gear from transaxle case.
Use "L" and "F" marks on speedometer gear housing to check lubricant
level. If necessary, add oil through this opening.

         All Others
         Check lubricant level at fill hole. Lubricant level should be
to bottom of fill hole.

         FLUID TYPE

         Hypoid SAE 80W/90 (API GL-4 or GL-5)

FLUID CAPACITY

ÄÄÄÄÄÄÄÄÄÄÄÄÄÄÄÄÄÄÄÄÄÄÄÄÄÄÄÄÄÄÄÄÄÄÄÄÄÄÄÄÄÄÄÄÄÄÄÄÄÄ

Application                               Capacity

B2000 & B2200
  4-Speed ........................ 1.6 qts. (1.5L)
  5-Speed ........................ 1.8 qts. (1.7L)
GLC .............................. 3.4 qts. (3.2L)
GLC Wagon
  4-Speed ........................ 1.4 qts. (1.3L)
  5-Speed ........................ 1.8 qts. (1.7L)
RX7 .............................. 2.1 qts. (2.0L)
626 .............................. 3.6 qts. (3.4L)

ÄÄÄÄÄÄÄÄÄÄÄÄÄÄÄÄÄÄÄÄÄÄÄÄÄÄÄÄÄÄÄÄÄÄÄÄÄÄÄÄÄÄÄÄÄÄÄÄÄÄ

         ADJUSTMENT

         LINKAGE

         No external linkage adjustment is required.

END OF ARTICLE


Content   ..  55  56  57  58   ..