Mazda RX7. Manual - part 25


  Index      Mazda     Mazda RX7 - service repair manual 1983 year


Search            


Content   ..  23  24  25  26   ..


Mazda RX7. Manual - part 25


1.1L ROTARY

Article Text (p. 14)

1983 Mazda RX7

For www.iluvmyrx7.com    

Copyright © 1998 Mitchell Repair Information Company, LLC

Sunday, August 26, 2001  04:57PM

position by using a used inner oil seal so lip of inner oil seal sinks
into position approximately .016" (.4 mm) below surface of rotor.
         4) Install outer oil seal so square edge of spring fits in
stopper notch of oil seal. Slowly push oil seal in position with
fingers. Confirm smooth movement of each oil seal by pressing oil
seal.
         5) Check oil seal protrusion. Install oil seal springs and
oil seals on the other side of rotor. Take care not to deform lip of
oil seal.

         Apex, Corner & Side Seals
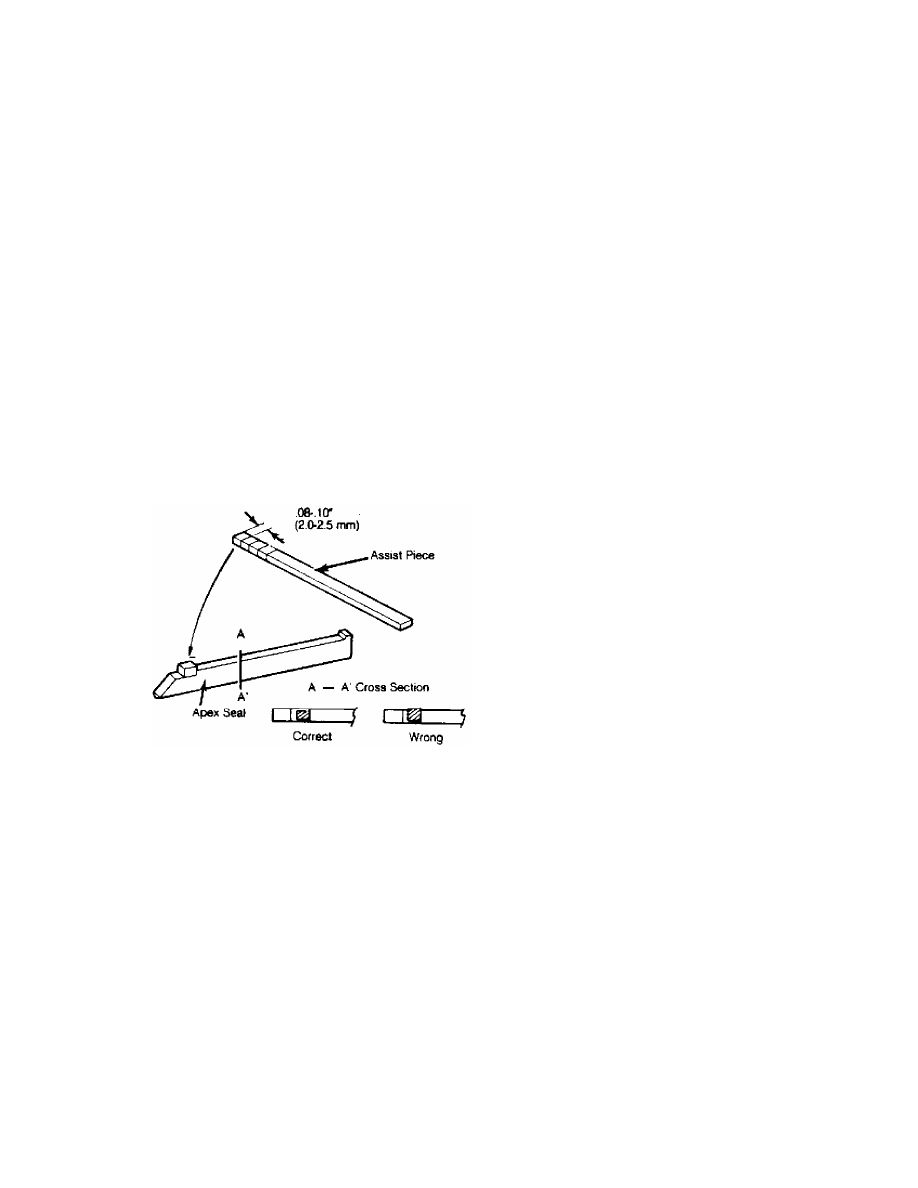
         1) Before installing apex seal, cut the assist piece to a
length of .08-.011" (2.0-2.8 mm). Peel off paper and install assist
piece of apex seal. See Fig. 20.
         2) Position apex seals without springs and side pieces into
their respective grooves so that each side piece rests on rear side of
each rotor. Install the soft seal into the corner seal.

Fig. 20:  Installing Assist Piece on Apex Seal
Check each seal for smooth movement.

         3) Place corner seals and springs into their respective
grooves, then position side seals and springs into proper grooves.
Ensure smooth movement of each seal by pressing its head.

         Installing Front Rotor
         Mount front housing on engine stand and place front rotor
assembly on housing. Use care not to drop seal into port. Mesh
internal and stationary gears so that one rotor apex is set to one of
4 positions shown in Fig. 21.

1.1L ROTARY

Article Text (p. 15)

1983 Mazda RX7

For www.iluvmyrx7.com    

Copyright © 1998 Mitchell Repair Information Company, LLC

Sunday, August 26, 2001  04:57PM

Fig. 21:  Positioning Rotor Apex for Reassembly
Use care not to drop seal into port.

         Installing Eccentric Shaft
         Lubricate front rotor journal and main journal on shaft with
engine lubricant. Being careful not to damage rotor and main bearings,
insert eccentric shaft.

         Installing Front Rotor Housing
         1) As front and rear rotor housings are not interchangeable,
be sure they are installed in correct sequence. Apply sealing agent to
front side of rotor housing. See Fig. 22.

Fig. 22:  Applying Sealing Agent to Rotor Assembly

         2) To provide greater durability to sealing rubbers, install
a protector behind each inner sealing rubber. See Fig. 23. Install a
new "O" ring, sealing rubbers and protector in front side of engine
housing. Apply light coat of petroleum jelly to hold seals in place.

1.1L ROTARY

Article Text (p. 16)

1983 Mazda RX7

For www.iluvmyrx7.com    

Copyright © 1998 Mitchell Repair Information Company, LLC

Sunday, August 26, 2001  04:57PM

Fig. 23:  Installing Protectors for Inner Sealing Rubbers
Apply light coat of petroleum jelly to hold seals in place.

NOTE:    Inner sealing rubber is square type. The wider white line of
         sealing rubber should face toward combustion chamber and
         seam of rubber should be placed as shown in Fig. 24. Do not
         stretch sealing rubbers.

         3) Invert front rotor housing using care that seals remain in
position, and install on front housing. Lubricate tubular dowels and
insert through front rotor housing holes.

Fig. 24:  Positioning Inner Sealing Rubber
Wider white line of sealing rubber should face toward combustion
chamber.

1.1L ROTARY

Article Text (p. 17)

1983 Mazda RX7

For www.iluvmyrx7.com    

Copyright © 1998 Mitchell Repair Information Company, LLC

Sunday, August 26, 2001  04:57PM

         4) Insert apex seal springs so that both ends of spring may
support the back side of the apex seal. Install the soft seal into
corner seal. Install corner seal springs and seals into their
respective grooves. Fit side pieces to original positions and
lubricate with engine oil.
         5) Confirm that spring is set correctly on side piece. See
Fig. 25. Confirm smooth movement of each seal by pressing on head.
         6) Apply sealing agent on the rear side of front housing in
areas shown in Fig. 22 and then place new "O" ring, sealing rubbers
and protector on rear side of front housing. Apply engine oil to
sliding surfaces of front rotor housing.

Fig. 25:  Positioning of Apex Seal and Spring
Check side piece for correct installation.

         Installing Intermediate Housing
         1) Turn front housing and rotor assembly so that top of
housing is upward. Pull eccentric shaft outward approximately 1.0" (25
mm), but not more than 1.5" (38 mm).
         2) Rotate eccentric shaft until eccentric portion points to 2
o'clock position. Install intermediate housing over eccentric shaft
and turn engine so that rear of engine is upward.

         Installing Rear Rotor & Housing
         Use same procedures up to Intermediate Housing when
installing rear rotor and rotor housing.

         Installing Rear Housing
         Position engine with rear end upward. Apply sufficient
lubricant onto stationary gear and main bearing. Install rear housing
onto rear rotor housing, and turn rear rotor slightly to engage rear
housing stationary gear with rear rotor internal gear.

         Tightening Tension Bolts
         Place a new sealing washer on each tension bolt and oil
threads of each bolt. Tighten bolts, in sequence shown in Fig. 26, in
stages until final torque is reached. After tightening, turn eccentric
shaft to make sure rotation is light and smooth.


Content   ..  23  24  25  26   ..