LEXUS GS 300 (2019 year). Instruction - part 22


  Index      Lexus     LEXUS GS 300 - instruction 2019 year in english


Search            


Content   ..  20  21  22  23   ..


LEXUS GS 300 (2019 year). Instruction - part 22


344

5-5. Using the other interior features

Other interior features

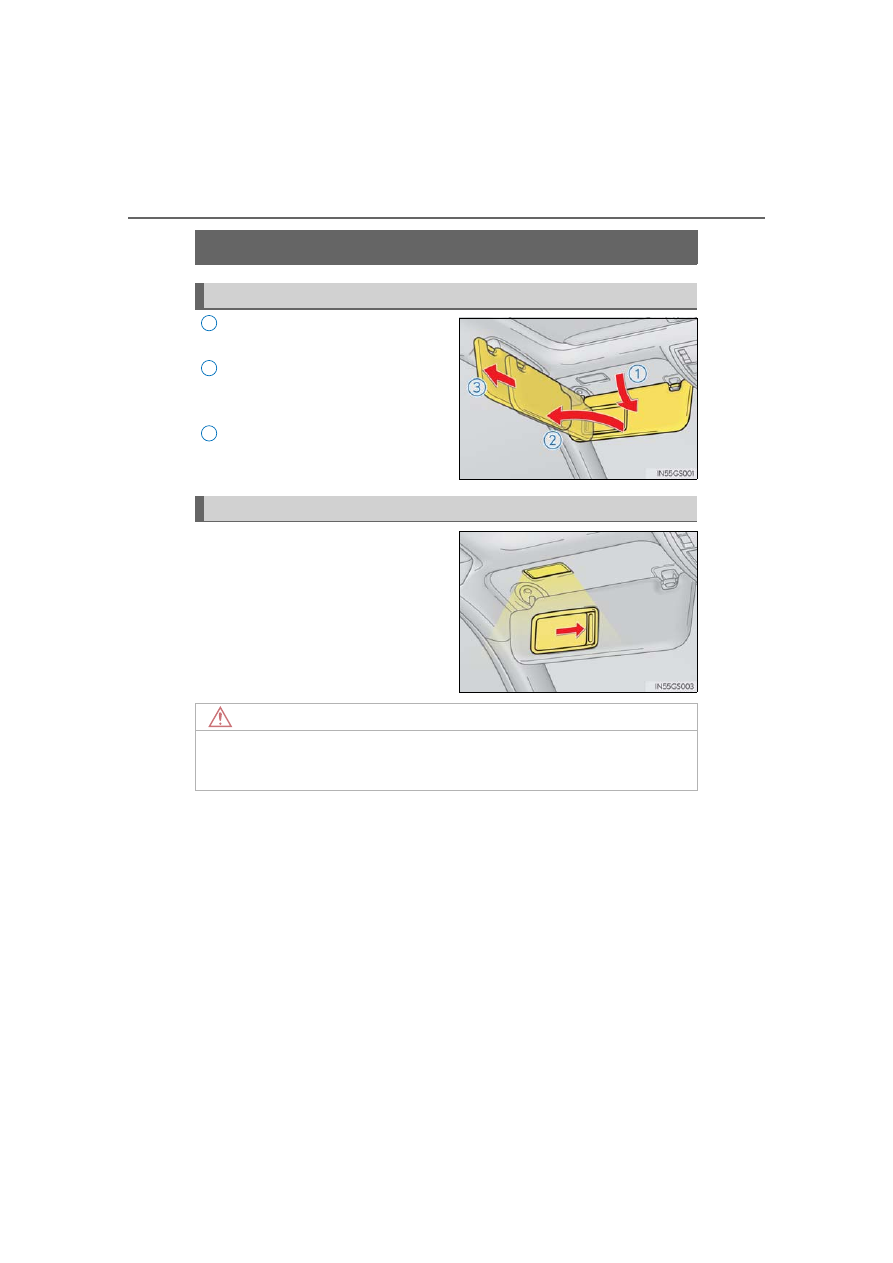
To set the visor in the forward posi-
tion, flip it down.
To set the visor in the side position,
flip down, unhook, and swing it to the
side.
To use the side extender, place the
visor in the side position, then slide it
backward. 

Slide the cover to open.

The light turns on when the cover is

opened.

Sun visors

1

2

3

Vanity mirrors

NOTICE

To prevent battery discharge, do not leave the vanity lights on for extended periods

while the engine is off.

345

5-5. Using the other interior features

5

Inte
rior fe

ature

s

The GPS clock’s time is automatically
adjusted by utilizing GPS time informa-
tion.

For details, refer to “NAVIGATION

SYSTEM OWNER’S MANUAL”.

Open the ashtray lid.

To remove the ashtray, pull the ashtray

lid upwards.

Clock

Ashtrays (if equipped)

WARNING

Keep the ashtray closed when not in use. In the event of sudden braking or sudden

swerving, an accident may occur due to an occupant being struck by the open ash-

tray or ash flying out.

To prevent fire
• Fully extinguish matches and cigarettes before putting them in the ashtray, then

make sure the ashtray is fully closed.

• Do not place paper or any other type of flammable object in the ashtray.

346

5-5. Using the other interior features

Please use as a power supply for electronic goods that use less than 12 V DC /
10 A (power consumption of 120 W).

The power outlets can be used when the engine switch is in ACCESSORY or IGNI-

TION ON mode.

Fold down the armrest for use.

Power outlets

Front

Rear

Open the lid.

NOTICE

To avoid damaging the power outlets, close the power outlet lids when the power out-

lets are not in use. 

Foreign objects or liquids that enter the power outlets may cause a short circuit.

To prevent battery discharge, do not use the power outlets longer than necessary

when the engine is off.

Armrest

NOTICE

To prevent damage to the armrest, do not apply too much load on the armrest.

347

5-5. Using the other interior features

5

Inte
rior fe

ature

s

Rear sunshade
The rear sunshade can be raised and lowered by operating the button shown
below.

Pull up the lever to release the lock.
Slide the armrest.
Raise/lower

Rear door sunshades
Pull the tab of the rear door sun-
shade and hook the shade on using
the anchors.

To retract the rear door sunshade,

unhook the shade and retract it

slowly.

Rear sunshade (if equipped)/rear door sunshades (if equipped)

From the front seats

From the rear seats (if equipped)

1

2
3

348

5-5. Using the other interior features

The rear sunshade can be used when the engine switch is in IGNITION ON mode.

The rear sunshade can be operated for approximately 1 minute even after the engine

switch is turned to ACCESSORY mode or turned off.

Reverse operation feature: To ensure adequate rear visibility, the rear sunshade auto-

matically lowers when the shift lever is shifted to R.

However, the rear sunshade is raised again if any of the following occurs:

• The button is pressed again.

*

• Shift the shift lever into P.

• The shift lever is shifted out of R, and the vehicle reaches a speed of 9 mph (15 km/h).

If the engine is off when the rear sunshade has been lowered due to the reverse opera-

tion feature, it will not be raised even when the engine is turned on again and the vehi-

cle reaches a speed of 9 mph (15 km/h). To raise the sunshade again, press the button.

*

: Occasionally, the reverse function may not be carried out after the switch has been

pressed. Repeat the above operation to operate the function.

Vehicles with rear control panel: To prevent inadvertent operation, some buttons on the

rear armrest can be locked. (

P. 329)

Vehicles with rear control panel: Control panel illumination on the rear armrest can be

turned off. (

P. 329)

Time elapsed before the reverse operation feature activates can be changed.

(Customizable features: 

P. 549)

WARNING

When the rear sunshade is being operated, do not place fingers or other objects in the

fastener section or in the opening.

They may get caught, causing injury.

NOTICE

To prevent battery discharge, do not operate the rear sunshade when the engine is

off.

Observe the following precautions to ensure normal operation of the rear sunshade

and rear door sunshades.
• Do not place excessive load on the motor or other components of the rear sun-

shade.

• Do not place objects where they may hinder opening and closing operations.

• Do not attach items to the rear sunshade and rear door sunshades.

• Keep the opening clean and clear of obstructions.

• Do not operate the rear sunshade continuously for long periods of time.

349

5-5. Using the other interior features

5

Inte
rior fe

ature

s

Long objects can be loaded into the vehicle by utilizing the trunk space and rear
seat area.

Fold down the armrest.

Fold down the handle and open the
armrest door.
The armrest door can be locked and
unlocked using the mechanical key.

Unlock
Lock

Trunk storage extension

1

2

1

2

WARNING

Ensure that the armrest door is closed when not in use.

In the event of sudden braking, items stored in the trunk may be thrown forward into

the cabin, resulting in injury.

350

5-5. Using the other interior features

The coat hooks are provided with the
rear assist grips.

An assist grip installed on the ceiling
can be used to support your body while
sitting on the seat.

Coat hooks

WARNING

Do not hang coat hangers or other hard or sharp objects on the hook. If the SRS cur-

tain shield airbags deploy, these items may become projectiles, causing death or seri-

ous injury.

Assist grips

WARNING

Do not use the assist grip when getting in or out of the vehicle or rising from your seat.

NOTICE

To prevent damage to the assist grip, do not hang any heavy object or put a heavy load

on the assist grip.

351

5-5. Using the other interior features

5

Inte
rior fe

ature

s

Garage door opener

The HomeLink

®

 wireless control system in your vehicle has 3 buttons which can

be programmed to operate 3 different devices. Refer to the programming meth-
ods on the following pages to determine the method which is appropriate for the
device.

HomeLink

®

 indicator light

Garage door operation indicators
HomeLink

®

 icon

Illuminates while HomeLink

®

 is operat-

ing.

Buttons

Before programming HomeLink

®

During programming, it is possible that garage doors, gates, or other
devices may operate. For this reason, make sure that people and objects
are clear of the garage door or other devices to prevent injury or other
potential harm.

It is recommended that a new battery be placed in the remote control
transmitter for more accurate programming.

Garage door opener motors manufactured after 1995 may be equipped
with rolling code protection. If this is the case, you may need a stepladder
or other sturdy, safe device to reach the “Learn” or “Smart” button on the
garage door opener motor.

The garage door opener can be programmed to operate garage doors, gates,
entry doors, door locks, home lighting systems, security systems, and other
devices.

Programming HomeLink

®

1

2
3

4

352

5-5. Using the other interior features

Programming HomeLink

®

Steps   through   must be performed within 60 seconds, otherwise the
indicator light will stop flashing and programming will not be able to be com-
pleted.

Press and release the HomeLink

®

 button you want to program and check

that the HomeLink

®

 indicator light flashes (orange).

Point the remote control transmit-
ter for the device at the rear view
mirror, 1 to 3 in. (25 to 75 mm)
from the HomeLink

®

 buttons.

Keep the HomeLink

®

 indicator light

in view while programming.

Program a device.

Programming a device other than an entry gate (for U.S.A. owners)

Press and hold the remote control transmitter button until the HomeLink

®

indicator light changes from slowly flashing orange to rapidly flashing
green (rolling code) or continuously lit green (fixed code), then release the
button.

Programming an entry gate (for U.S.A. owners)/Programming a device
in the Canadian market

Press and release the remote control transmitter button at 2 second inter-
vals, repeatedly, until the HomeLink

®

 indicator light changes from slowly

flashing (orange) to rapidly flashing (green) (rolling code) or continuously
lit (green) (fixed code).

1

3

1

2

3

353

5-5. Using the other interior features

5

Inte
rior fe

ature

s

Test the HomeLink

® 

operation by pressing the newly programmed button

and observing the indicator light:

Indicator light illuminates: Programming of a fixed code device has com-
pleted. The garage door or other device should operate when a Home-
Link

®

 button is pressed and released.

Indicator light flashes rapidly: The garage door opener motor or other
device is equipped with a rolling code. To complete programming, firmly
press and hold the HomeLink

®

 button for 2 seconds then release it.

If the garage door or other device does not operate, proceed to “Pro-
gramming a rolling code system”.

Repeat the steps above to program another device for any of the remaining
HomeLink

®

 buttons.

Programming a rolling code system 
2 or more people may be necessary to complete rolling code programming.

Locate the “Learn” or “Smart”
button on the garage door
opener motor in the garage.

This button can usually be found

where the hanging antenna wire is

attached to the unit. The name and

color of the button may vary by man-

ufacturer. Refer to the owner’s man-

ual supplied with the garage door

opener motor for details.

Press and release the “Learn” or
“Smart” button.
Perform   within 30 seconds
after performing  .

4

5

1

2

3

2

354

5-5. Using the other interior features

Press and hold the desired
HomeLink

®

 button (inside the

vehicle) for 2 seconds and
release it. Repeat this sequence
(press/hold/release) up to 3
times to complete programming. 
If the garage door opener motor
operates when the HomeLink

®

button is pressed, the garage
door opener motor recognizes
the HomeLink

®

 signal.

Enabling 2-way communication with a garage door (only available for com-
patible devices)
When enabled, 2-way communication allows you to check the status of the
opening and closing of a garage door through indicators in your vehicle. 
2-way communication is only available if the garage door opener motor used
is a compatible device. (To check device compatibility, refer to www.Home-
Link.com.)

Within 5 seconds after programming the garage door opener has been
completed, if the garage door opener motor is trained to HomeLink

®

,

both garage door operation indicators will flash rapidly (green) and the
light on the garage door opener motor will blink twice, indicating that 2-
way communication is enabled.

If the indicators do not flash, perform   and   within the first 10 presses of
the HomeLink

®

 button after programming has been completed.

Press a programmed HomeLink

®

 button to operate a garage door.

Within 1 minute of pressing the HomeLink

® 

button, after the garage door

operation has stopped, press the “Learn” or “Smart” button on the garage
door opener motor. Within 5 seconds of the establishment of 2-way com-
munication with the garage door opener, both garage door operation indi-
cators in the vehicle will flash rapidly (green) and the light on the garage
door opener motor will blink twice, indicating that 2-way communication is
enabled.

3

1

2

3

2
3

355

5-5. Using the other interior features

5

Inte
rior fe

ature

s

Reprogramming a single HomeLink

®

 button

When the following procedure is performed, buttons which already have
devices registered to them can be overwritten:

With one hand, press and hold the desired HomeLink

®

 button. 

When the HomeLink

®

 indicator starts flashing (orange), continue to hold

the HomeLink

®

 button and perform “Programming HomeLink

®

”  

(it

takes 20 seconds for the HomeLink

®

 indicator to start flashing).

Press the appropriate HomeLink

®

 button. The HomeLink

®

 indicator light

should turn on.

The status of the opening and closing of
a garage door is shown by the indica-
tors.

Opening
Closing

This function is only available if the

garage door opener motor used is a

compatible device. (To check device

compatibility, refer to www.Home-

Link.com.)

The indicators can operate within approximately 820 ft. (250 m) of the
garage door. However, if there are obstructions between the garage door and
the vehicle, such as houses and trees, feedback signals from the garage door
may not be received. 
To recall the previous door operation status, press and release either Home-

Link

®

 buttons 

 and 

 or 

 and 

 simultaneously. The

last recorded status will be displayed for 3 seconds.

Operating HomeLink

®

Garage door operation indicators

1

2

1

1

2

Color

Status

Orange (flashing)

Currently opening/closing

Green

Opening/closing has completed

Red (flashing)

Feedback signals cannot be received

356

5-5. Using the other interior features

Press and hold the 2 outside buttons for
10 seconds until the HomeLink

® 

indi-

cator light changes from continuously
lit (orange) to rapidly flashing (green).

If you sell your vehicle, be sure to erase

the programs stored in the HomeLink

®

memory.

Codes stored in the HomeLink

®

 memory

The registered codes are not erased even if the battery cable is disconnected.

If learning failed when registering a different code to a HomeLink

®

 button that already

has a code registered to it, the already registered code will not be erased.

Before programming

Install a new battery in the transmitter.

The battery side of the transmitter must be pointed away from the HomeLink

®

.

Certification for the garage door opener

For vehicles sold in the U.S.A., Hawaii, Guam and Puerto Rico

Erasing the entire HomeLink

®

 memory (all three codes)

357

5-5. Using the other interior features

5

Inte
rior fe

ature

s

For vehicles sold in Canada

When support is necessary
Visit on the web at www.homelink.com/lexus or call 1-800-355-3515.

WARNING

When programming a garage door or other remote control device
The garage door or other device may operate, so ensure people and objects are out of

danger to prevent potential harm.

Conforming to federal safety standards
Do not use the HomeLink

®

 compatible transceiver with any garage door opener or

device that lacks safety stop and reverse features as required by federal safety stan-

dards.

This includes any garage door that cannot detect an interfering object. A door or

device without these features increases the risk of death or serious injury.

When operating or programming HomeLink

®

Never allow a child to operate or play with the HomeLink

®

 buttons.

359

6

Maintenance and care

6-1. Maintenance and care

Cleaning and protecting 

the vehicle exterior ................360

Cleaning and protecting 

the vehicle interior..................364

6-2. Maintenance

Maintenance requirements... 367
General maintenance..............369
Emission inspection 

and maintenance (I/M) 
programs.................................... 372

6-3. Do-it-yourself maintenance

Do-it-yourself service 

precautions................................373

Hood ...............................................375
Positioning a floor jack ............ 376
Engine compartment ...............378
Tires .................................................395
Tire inflation pressure...............405
Wheels .......................................... 408
Air conditioning filter ................ 410
Electronic key battery................412
Checking and replacing 

fuses................................................414

Headlight aim (vehicles with 

single-beam headlights)........ 418

Light bulbs.....................................420


Content   ..  20  21  22  23   ..