LEXUS GS 300 (2019 year). Instruction - part 9


  Index      Lexus     LEXUS GS 300 - instruction 2019 year in english


Search            


Content   ..  7  8  9  10   ..


LEXUS GS 300 (2019 year). Instruction - part 9


136

2. Instrument cluster

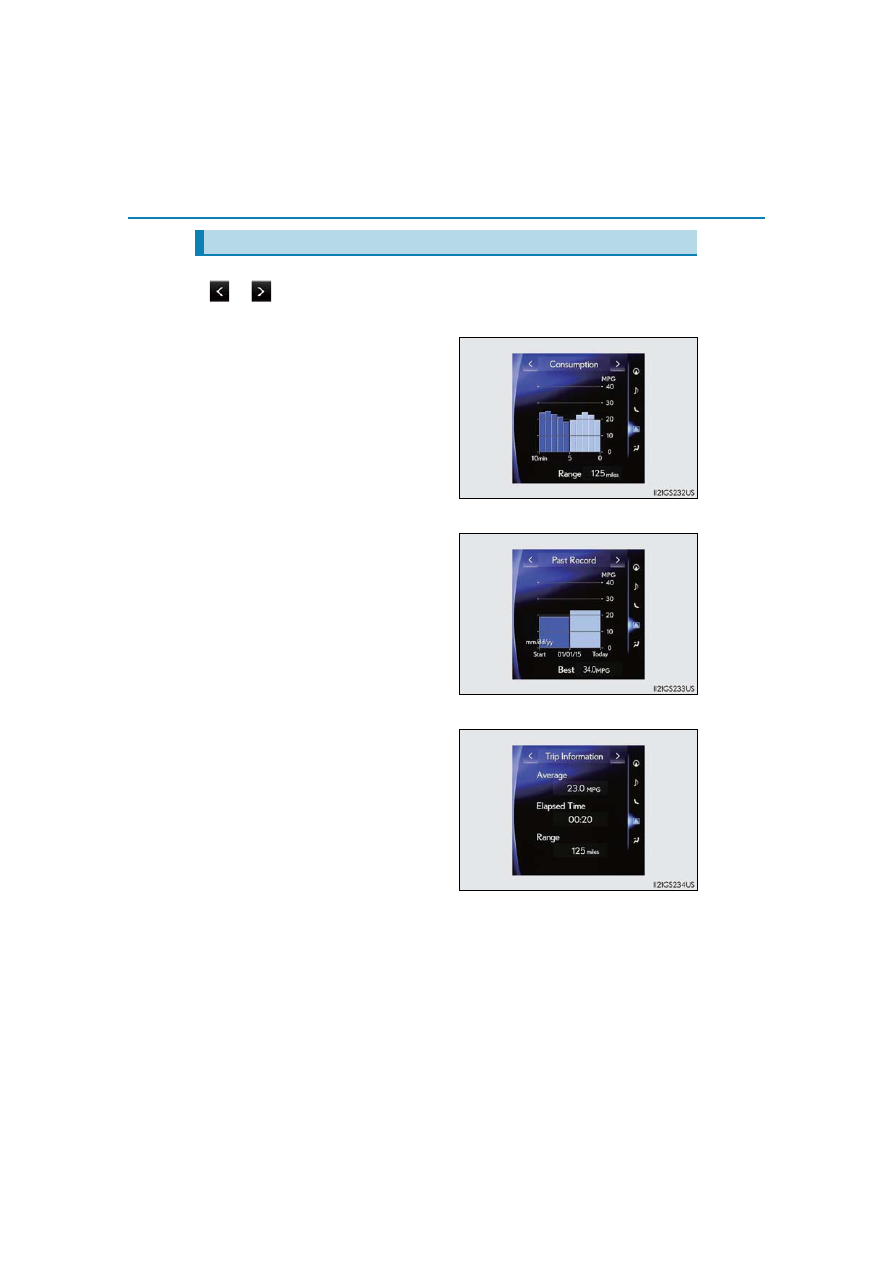
Vehicle information can be displayed on the side display (

P. 315), then select

 or 

 to select the desired screen.

Fuel consumption

Displays the average fuel consumption
for the past 10 minutes in 1 minute inter-
vals, as well as the cruising range.

Past record

Displays the average fuel consumption
and highest fuel consumption.

Trip information

Displays the cruising range, average
fuel consumption and the amount of
time elapsed since the engine was
started.

The image is an example only, and may vary slightly from actual conditions.

Using the side display (vehicles with 12.3-inch display)

137

3

Operation of

each component

3-1. Key information

Keys..................................................138

3-2. Opening, closing and locking 

the doors and trunk

Doors ............................................... 143
Trunk ................................................ 149
Smart access system 

with push-button start ............ 156

3-3. Adjusting the seats

Front seats...................................... 164
Driving position memory......... 166
Head restraints .............................. 171

3-4. Adjusting the steering wheel 

and mirrors

Steering wheel ..............................174
Inside rear view mirror ..............175
Outside rear view mirrors........177

3-5. Opening, closing the windows 

and moon roof

Power windows .............................181
Moon roof...................................... 184

138

3-1. Key information

Keys

The following keys are provided with the vehicle.

Electronic keys

• Operating the smart access system

with push-button start (

P. 156)

• Operating the wireless remote con-

trol function

Mechanical keys
Key number plate
Card key (electronic key) (if
equipped) 

Operating the smart access system with

push-button start (

P. 156)

Locks all the doors (

P. 143)

Unlocks all the doors
Opens the windows and moon roof
(

P. 143)

*

Opens the trunk (

P. 150)

Sounds the alarm (

P. 140)

*

: This setting must be customized at your

Lexus dealer.

The keys

1

2
3
4

Wireless remote control

1

2
3

4
5

139

3-1. Key information

3

Op
era
tio

n of
 ea

ch

 co

m

po

ne

nt

To take out the mechanical key, push
the release button and take the key out.

The mechanical key can only be

inserted in one direction, as the key only

has grooves on one side. If the key can-

not be inserted in a lock cylinder, turn it

over and re-attempt to insert it.
After using the mechanical key, store it

in the electronic key. Carry the mechan-

ical key together with the electronic key.

If the electronic key battery is depleted

or the entry function does not operate

properly, you will need the mechanical

key. (

P. 504)

Card key (if equipped)

The card key is not waterproof.

The mechanical key that is stored inside the card key should be used only if a problem

arises, such as when the card key does not operate properly.

If it is difficult to take out the mechanical key, push down the lock release button using a

pen tip etc. If it is still difficult to pull it out, use a coin etc.

Using the mechanical key

To store the mechanical key in the card key,

insert it while pressing the lock release button.

If the battery cover is not installed and the bat-

tery falls out or if the battery was removed

because the key got wet, reinstall the battery

with the positive terminal facing the Lexus

emblem.

140

3-1. Key information

Panic mode

When required to leave the vehicle’s key with a parking attendant
Turn the trunk opener main switch off, lock the glove box and armrest door as circum-

stances demand. (

P. 151, 339, 349)

Remove the mechanical key for your own use and provide the attendant with the elec-

tronic key only.

If you lose your mechanical keys
New genuine mechanical keys can be made by your Lexus dealer using the other

mechanical key and the key number stamped on your key number plate. Keep the plate

in a safe place such as your wallet, not in the vehicle. 

When riding in an aircraft
When bringing an electronic key onto an aircraft, make sure you do not press any but-

tons on the electronic key while inside the aircraft cabin. If you are carrying an electronic

key in your bag etc., ensure that the buttons are not likely to be pressed accidentally.

Pressing a button may cause the electronic key to emit radio waves that could interfere

with the operation of the aircraft. 

Electronic key battery depletion

The standard battery life is 1 to 2 years. (The card key battery life is about a year and a

half.)

If the battery becomes low, an alarm will sound in the cabin when the engine stops.

(

P. 473)

As the electronic key always receives radio waves, the battery will become depleted

even if the electronic key is not used. The following symptoms indicate that the elec-

tronic key battery may be depleted. Replace the battery when necessary. (

P. 412)

• The smart access system with push-button start or the wireless remote control does

not operate.

• The detection area becomes smaller.

• The LED indicator on the key surface does not turn on.

To avoid serious deterioration, do not leave the electronic key within 3 ft. (1 m) of the

following electrical appliances that produce a magnetic field:
• TVs

• Personal computers

• Cellular phones, cordless phones and battery chargers

• Recharging cellular phones or cordless phones

• Table  lamps

• Induction cookers

When 

 is pressed for longer than about

one second, an alarm will sound intermittently

and the vehicle lights will flash to deter any per-

son from trying to break into or damage your

vehicle.
To stop the alarm, press any button on the elec-

tronic key.

141

3-1. Key information

3

Op
era
tio

n of
 ea

ch

 co

m

po

ne

nt

Replacing the battery
P. 412

Confirmation of the registered key number
The number of keys already registered to the vehicle can be confirmed. Ask your Lexus

dealer for details.

If a wrong key is used
The key cylinder rotates freely to isolate inside mechanism.

NOTICE

To prevent key damage

Do not drop the keys, subject them to strong shocks or bend them.

Do not expose the keys to high temperatures for long periods of time.

Do not get the keys wet or wash them in an ultrasonic washer etc.

Do not attach metallic or magnetic materials to the keys or place the keys close to

such materials.

Do not disassemble the keys.

Do not attach a sticker or anything else to the surface of the electronic key.

Do not place the keys near objects that produce magnetic fields, such as TVs, audio

systems and induction cookers.

Do not place the keys near medical electrical equipment such as low-frequency ther-

apy equipment or microwave therapy equipment, and do not receive medical atten-

tion with the keys on your person.

Carrying the electronic key on your person
Carry the electronic key 3.9 in. (10 cm) or more away from electric appliances that are

turned on. Radio waves emitted from electric appliances within 3.9 in. (10 cm) of the

electronic key may interfere with the key, causing the key to not function properly.

In case of a smart access system with push-button start malfunction or other key-

related problems
Take your vehicle with all the electronic keys provided with your vehicle, including the

card key, to your Lexus dealer.

When an electronic key is lost
If the electronic key remains lost, the risk of vehicle theft increases significantly. Visit

your Lexus dealer immediately with all remaining electronic keys and the card key that

was provided with your vehicle.

142

3-1. Key information

NOTICE

Handling the card key

Do not apply excess force when inserting the mechanical key into the card key. Doing

so may damage the card key.

If the battery or card key terminals get wet, the battery may corrode.

If the key is dropped into water, or if drinking water etc. is spilled on the key, immedi-

ately remove the battery cover and wipe the battery and terminals. (To remove the

battery cover, lightly grasp and pull it.) If the battery is corroded, have your Lexus

dealer replace the battery.

Do not crush the battery cover or use a screwdriver to remove the battery cover.

Forcibly removing the battery cover may bend or damage the key.

If the battery cover is frequently removed, the battery cover may become loose.

When installing the battery, make sure to check the direction of the battery.

Installing the battery in the wrong direction may cause the battery to deplete rapidly.

The surface of the card key may be damaged, or its coating may peel off in the follow-

ing situations:
• The card key is carried together with hard objects, such as coins and keys.

• The card key is scraped with a sharp object, such as the tip of a mechanical pencil.

• The surface of the card key is wiped with thinner or benzene.

143

3-2. Opening, closing and locking the doors and trunk

3

Op
era
tio

n of
 ea

ch

 co

m

po

ne

nt

Doors

Smart access system with push-button start

Carry the electronic key to enable this function.

Grip the driver’s door handle to
unlock the door. Grip the passen-
ger’s door handle to unlock all the
doors.

*

Make sure to touch the sensor on the

back of the handle.
The doors cannot be unlocked for 3

seconds after the doors are locked.

*

: The door unlock settings can be changed. (

P. 549)

Touch the lock sensor (the indentation on the upper part of the door han-
dle) to lock all the doors.

Check that the door is securely locked.

Wireless remote control

Locks all the doors

Check that the door is securely

locked.

Unlocks all the doors

Pressing the button unlocks the

driver’s door. Pressing the button

again within 5 seconds unlocks the

other doors.
Press and hold to open the windows

and moon roof.

*

*

: This setting must be customized at your Lexus dealer.

Unlocking and locking the doors from the outside

1

2

1

2

144

3-2. Opening, closing and locking the doors and trunk

Operation signals
A buzzer sounds and the emergency flashers flash to indicate that the doors have been

locked/unlocked. (Locked: once; Unlocked: twice)

Security feature
If a door is not opened within approximately 60 seconds after the vehicle is unlocked, the

security feature automatically locks the vehicle again. 

Welcome light illumination control
The side marker, parking, tail and license plate lights automatically turn on at night when

the doors are unlocked using the entry function or wireless remote control if the light

switch is in the “AUTO” position.

When the door cannot be locked by the lock sensor on the upper part of the door han-

dle

Door lock buzzer
If an attempt to lock the doors is made when a door is not fully closed, a buzzer sounds

continuously for 5 seconds. Fully close the door to stop the buzzer, and lock the vehicle

once more.

Setting the alarm
Locking the doors will set the alarm system. (

P. 79)

If the smart access system with push-button start or the wireless remote control does

not operate properly

Use the mechanical key to lock and unlock the doors. (

P. 504)

Replace the key battery with a new one if it is depleted. (

P. 412)

If the door will not lock even when the topside

sensor area is touched, try touching both the

topside and underside sensor areas at the same

time.

145

3-2. Opening, closing and locking the doors and trunk

3

Op
era
tio

n of
 ea

ch

 co

m

po

ne

nt

Door lock switches

Locks all the doors
Unlocks all the doors

Inside lock buttons

Locks the door
Unlocks the door

The front doors can be opened by

pulling the inside handle even if the

lock buttons are in the lock position.

Move the inside lock button to the lock position.
Close the door.

The door cannot be locked if the engine switch is in ACCESSORY or IGNITION

ON mode, or the electronic key is left inside the vehicle. However, the key may not be

detected correctly and the door may be locked.

Unlocking and locking the doors from the inside

1

2

1

2

Locking the front doors from the outside without a key

1

2

146

3-2. Opening, closing and locking the doors and trunk

The door cannot be opened from inside
the vehicle when the lock is set.

Unlock
Lock

These locks can be set to prevent chil-

dren from opening the rear doors. Push

down on each rear door switch to lock

both rear doors. 

The following functions can be set or canceled:

For instructions on customizing, refer to P. 549.

Rear door child-protector lock

1

2

Automatic door locking and unlocking systems

Function

Operation

Speed linked door locking function

All doors are automatically locked when

vehicle speed is approximately 12 mph

(20 km/h) or higher.

Shift position linked door locking function

All doors are automatically locked when

shifting the shift lever to position other

than P.

Shift position linked door unlocking func-

tion

All doors are automatically unlocked

when shifting the shift lever to P.

Driver’s door linked door unlocking func-

tion

All the doors are unlocked when the

driver’s door is opened within approxi-

mately 45 seconds after turning the

engine switch off.

147

3-2. Opening, closing and locking the doors and trunk

3

Op
era
tio

n of
 ea

ch

 co

m

po

ne

nt

Switching the door unlock function
It is possible to set which doors the entry function unlocks using the wireless remote con-

trol. 

Turn the engine switch off.
When the indicator light on the key surface is not on, press and hold 

 or

 for approximately 5 seconds while pressing and holding 

The setting changes each time an operation is performed, as shown below. (When

changing the setting continuously, release the buttons, wait for at least 5 seconds, and
repeat step  .)

To prevent unintended triggering of the alarm, unlock the doors using the wireless

remote control and open and close a door once after the settings have been changed. (If
a door is not opened within 60 seconds after 

 is pressed, the doors will be locked

again and the alarm will automatically be set.)

In case that the alarm is triggered, immediately stop the alarm. (

P. 79)

Impact detection door lock release system
In the event that the vehicle is subject to a strong impact, all the doors are unlocked.

Depending on the force of the impact or the type of accident, however, the system may

not operate.

Using the mechanical key
The doors can also be locked and unlocked with the mechanical key. (

P. 504)

Conditions affecting the operation of the smart access system with push-button start

or wireless remote control
P. 158

Customization
Settings (e.g. unlocking function using a key) can be changed. 

(Customizable features: 

P. 549)

1

2

2

Multi-information 

display

Unlocking function

Beep

Holding the driver’s door handle

unlocks only the driver’s door.

Exterior: Beeps 3 times

Interior: Pings once

Holding a passenger’s door han-

dle unlocks all the doors.

Holding a door handle unlocks

all the doors.

Exterior: Beeps twice

Interior: Pings once

148

3-2. Opening, closing and locking the doors and trunk

WARNING

To prevent an accident
Observe the following precautions while driving the vehicle.

Failure to do so may result in a door opening and an occupant throwing out of the vehi-

cle, resulting in death or serious injury.

Ensure that all doors are properly closed and locked.

Do not pull the inside handle of the doors while driving. 

Be especially careful for the front doors, as the doors may be opened even if the

inside lock buttons are in locked position.

Set the rear door child-protector locks when children are seated in the rear seats. 

149

3-2. Opening, closing and locking the doors and trunk

3

Op
era
tio

n of
 ea

ch

 co

m

po

ne

nt

Trunk

Press the opener switch.

If the vehicle is equipped with a power

trunk opener and closer, the trunk lid

automatically opens fully.

Smart access system with push-button start

While carrying the electronic key, press the button.

When all the doors are unlocked with the power door lock system, the trunk can

be opened without carrying the electronic key.
If the vehicle is equipped with a power trunk opener and closer, the trunk lid auto-

matically opens fully.

The trunk can be opened using the trunk opener, entry function or wireless
remote control. 
If the vehicle is equipped with a power trunk opener and closer, the trunk can
be closed using the trunk closer.

Opening the trunk from inside the vehicle

Opening the trunk from outside the vehicle

GS350/GS300

GS F

150

3-2. Opening, closing and locking the doors and trunk

Wireless remote control

Press and hold the switch.

If the vehicle is equipped with a

power trunk lid, the trunk lid auto-

matically opens fully.

Pressing the switch closes the trunk lid
automatically. (A buzzer sounds.)

Pressing the switch while the trunk lid is

closing opens the trunk lid again.

Using the trunk grip, lower the trunk
without applying force to the side and
push the trunk down from the outside
to close it.

Trunk closer switch (vehicles with power trunk opener and closer)

When closing the trunk

151

3-2. Opening, closing and locking the doors and trunk

3

Op
era
tio

n of
 ea

ch

 co

m

po

ne

nt

The trunk opener switch can be temporarily disabled to protect luggage stored
in the trunk against theft.
Turn the main switch in the glove box off
to disable the trunk opener.

On
Off

The trunk lid cannot be opened even

with the wireless remote control or the

trunk release button.

Operation signals
Wireless remote control: A buzzer sounds to indicate that the trunk has been unlocked.

Trunk light
The trunk light turns on when the trunk is opened.

Trunk easy closer
In the event that the trunk lid is left slightly open, the trunk easy closer will automatically

close it to the fully closed position.

Function to prevent the trunk being locked with the electronic key inside 

When all doors are being locked, closing the trunk lid with the electronic key left inside

the trunk will sound an alarm.

In this case, the trunk lid can be opened pressing the trunk release button on the trunk

lid.

Even when the spare electronic key is put in the trunk with all the doors locked, the key

confinement prevention function can be activated so the trunk can be opened. In order

to prevent theft, take all electronic keys with you when leaving the vehicle.

Even when the electronic key is put in the trunk with all the doors are locked, the key

may not be detected depending on the places and the surrounding radio wave condi-

tions. In this case, the key confinement prevention function cannot be activated, causing

the doors to lock when the trunk is closed. Make sure to check where the key is before

closing the trunk.

The key confinement prevention function cannot be activated if any one of the doors is

unlocked. In this case, open the trunk using the trunk opener.

Overload protection function (vehicles with power trunk opener and closer)
The trunk lid will not operate when excessive load is present on the top of the trunk lid.

Fall-down protection function (vehicles with power trunk opener and closer)
While the trunk lid is opening automatically, applying excessive force to it will stop the

opening operation to prevent the trunk lid from rapidly falling down.

Jam protection function (vehicles with power trunk opener and closer)
While the trunk lid is closing automatically, the trunk lid will stop closing and open if

something gets caught.

Luggage security system

1

2


Content   ..  7  8  9  10   ..