Lexus RX300 (MCU15). Manual - part 584
 

  Index      Lexus     Lexus RX300 series MCU15 - service repair manual


Search            


Content   ..  582  583  584  585   ..


Lexus RX300 (MCU15). Manual - part 584


AX0B6–03

D03827

D03826

D03692

D03693

SST

D03694

–

AUTOMATIC TRANSAXLE

UNDERDRIVE PLANETARY GEAR

AX–79

U140F AX   (RM848E)

REASSEMBLY

1.

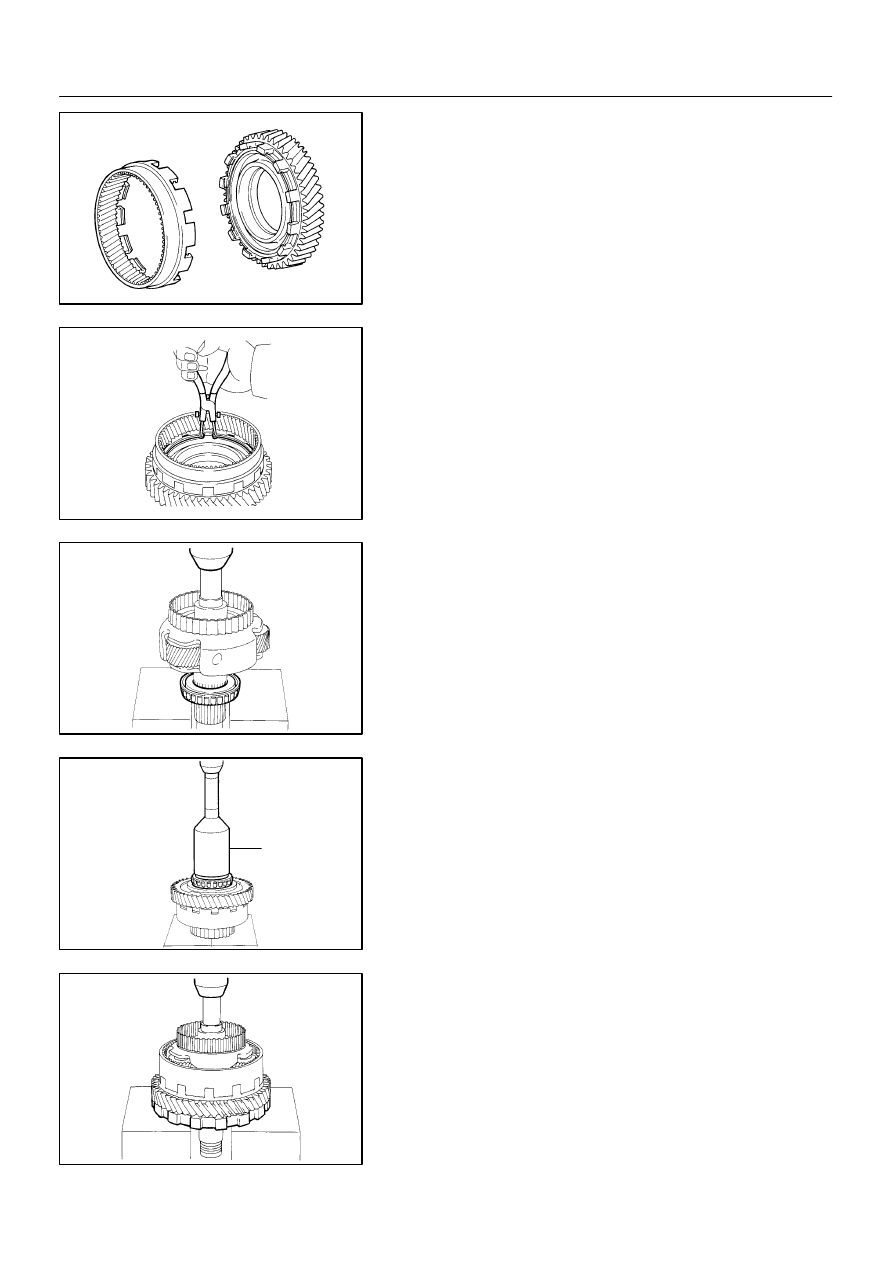
INSTALL U/D PLANETARY RING GEAR

(a)

Install the U/D planetary ring gear to the counter driven
gear.

(b)

Using snap ring pliers, install the snap ring.

2.

INSTALL U/D PLANETARY GEAR

(a)

Using a press, install the tapered roller bearing RR to the
U/D planetary gear.

NOTICE:
Press in the bearing until it becomes flat at the bottom.

(b)

Install the counter driven gear with the U/D planetary ring
gear.

(c)

Using SST and a press, install the tapered roller bearing
FR.
SST

09214–76011

NOTICE:
Press in the counter driven gear while rotating it.

(d)

Using a press, install the parking lock gear.

NOTICE:
Press in the counter driven gear while rotating it.

D03695

D03696

D03688

SST

D03685

SST

SST

D03852

AX–80

–

AUTOMATIC TRANSAXLE

UNDERDRIVE PLANETARY GEAR

U140F AX   (RM848E)

(e)

Using a press, install the differential drive pinion.

NOTICE:
Press in the counter driven gear while rotating it.
HINT:
When replacing the differential drive pinion, replace it together
with the U/D planetary gear.

(f)

Using a press, install the cylindrical roller bearing inner
race.

NOTICE:
Press in the counter driven gear while rotating it.

(g)

Clamp the U/D planetary gear in soft jaw vise.

NOTICE:
Be careful not to damage the differential drive pinion.
(h)

Using SST, install a new lock nut.
Torque: 262 N·m (2,672 kgf·cm, 194 ft·lbf)
SST

09564–16020

HINT:
Use a torque wrench with a fulcrum length of 750 mm (29.53
in.).

3.

MEASURE STARTING TORQUE OF U/D INPUT SHAFT

Using SST and a small torque wrench, measure the starting
torque of U/D input shaft.

SST

09387–00050, 09564–16020

Starting torque:
0.5 – 3.3 N·m (5 – 33 kgf·cm, 4.3 – 28.6 in.·lbf)

HINT:
Use a torque wrench with a fulcrum length 160 mm (6.3 in.).

4.

STAKE LOCK NUT

Using a pin punch and hammer, stake the lock nut.
NOTICE:
Also, make sure that there are no cracks on the nut.

AX0B0–05

D03697

Snap Ring

Plate

Disc

Snap Ring

Clutch Blancer

Piston Return Spring

U/D Clutch Piston

U/D Clutch Drum

Flange

z Non–reusable part

z O–ring

–

AUTOMATIC TRANSAXLE

UNDERDRIVE CLUTCH

AX–81

U140F AX   (RM848E)

UNDERDRIVE CLUTCH

COMPONENTS

AX0B1–03

D03699

D03700

D03701

D03702

D03703

SST

AX–82

–

AUTOMATIC TRANSAXLE

UNDERDRIVE CLUTCH

U140F AX   (RM848E)

DISASSEMBLY

1.

CHECK PISTON STROKE OF U/D CLUTCH

(a)

Install the U/D clutch to the transaxle case.

NOTICE:
Be careful not to damage the oil seal rings.
(b)

Install the dial indicator, as shown in the illustration.

(c)

Measure the U/D clutch piston stroke while applying and
releasing compressed air (392 kPa, 4.0 kgf/cm

2

, 57 psi).

Piston stroke: 1.51 – 1.77 mm (0.0594 – 0.0697 in.)

If the piston stroke is non–standard inspect the discs, plates
and flange.

2.

REMOVE FLANGE, DISC AND PLATE

(a)

Using a screwdriver, remove the snap ring.

(b)

Remove the flange, 4 discs and 4 plates from the U/D
clutch drum.

3.

REMOVE PISTON RETURN SPRING

(a)

Place SST on the clutch balancer and compress the
spring with a press.
SST

09350–32014 (09351–32070)

(b)

Using a snap ring expander, remove the snap ring.

NOTICE:

S

Stop the press when the spring sheet is lowered to the
place 1 – 2 mm (0.039 – 0.078 in.) from the snap ring
groove, preventing the spring sheet from deforming.

S

Do not expand the snap ring excessively.


Content   ..  582  583  584  585   ..