Discovery 2. Manual - part 161


  Index      Land Rover     Land Rover Discovery 2 - service manual 1999 year


Search            


Content   ..  159  160  161  162   ..


Discovery 2. Manual - part 161


REAR AXLE

REPAIRS

51-7

Seal - differential pinion 

$% 51.20.01 

Remove

1. Raise rear of vehicle. 

WARNING: Do not work on or under a 
vehicle supported only by a jack. Always 
support the vehicle on safety stands.

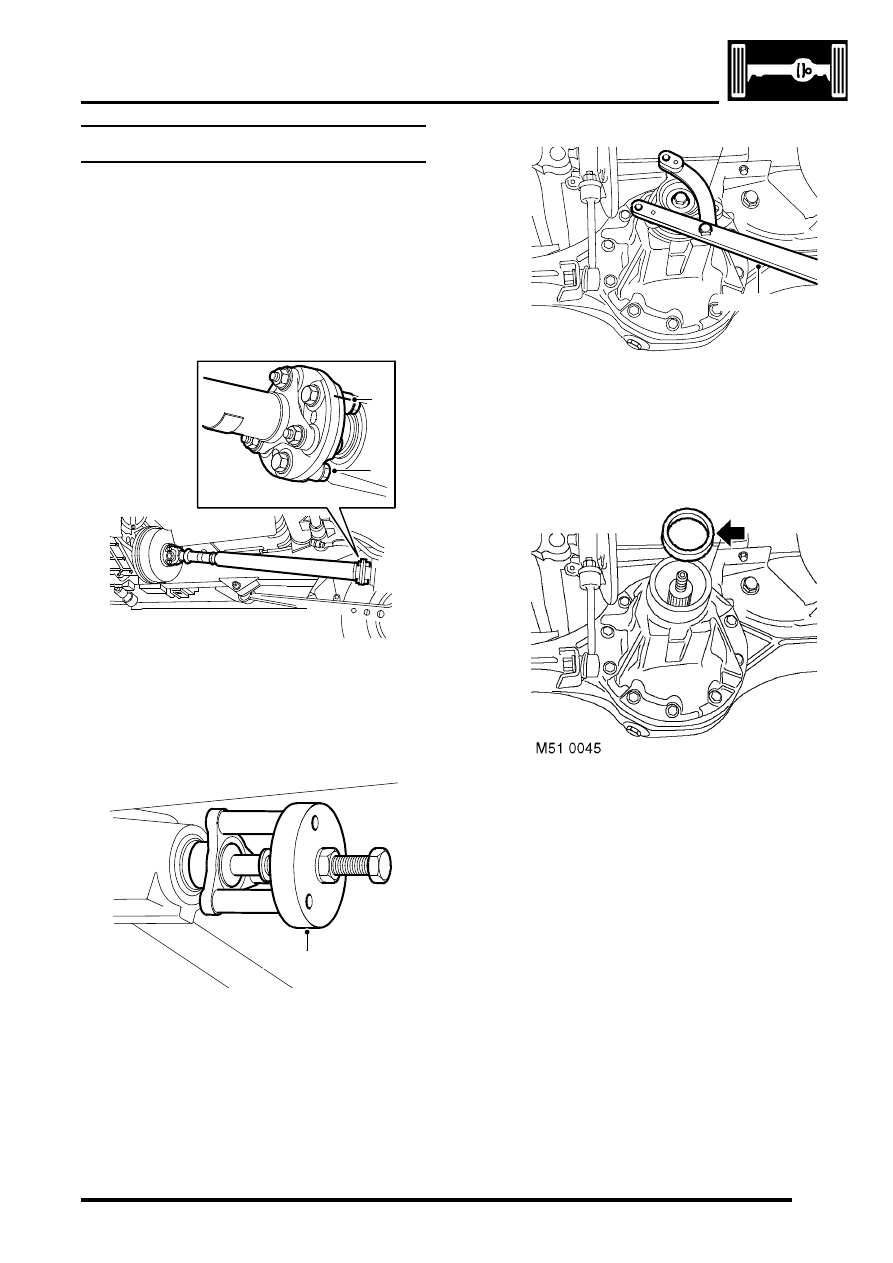
2. Reference mark rear propeller shaft for 

reassembly. 

3. Remove  3 nuts and bolts securing flexible 

coupling to pinion flange. Tie propeller shaft 
aside.

4. Using tool LRT-51-008,  extract the centralising 

peg from the pinion flange. Remove the 
centralising peg from the tool.

5. Using tool LRT-51-003  to restrain  pinion 

flange, remove bolt and washer securing pinion 
flange. Remove pinion flange. 

6. Position container to catch oil spillage 

7. Using a suitable lever, remove pinion oil seal. 

Take care to avoid damage to oil seal 
recess.

M51 0043A

2

3

M51 0056

LRT-51-008

M51 0047A

LRT-51-003

REAR AXLE

51-8

REPAIRS

Refit

1. Clean pinion oil seal recess and pinion  flange. 
2. Lubricate oil seal lip with clean differential oil. 


 + 

 CAPACITIES, FLUIDS, 

LUBRICANTS AND SEALANTS, 
Lubrication.

3. Using tool  LRT-51-010, fit pinion oil seal.

4. Fit pinion flange and securing bolt and washer. 

Using tool  LRT-51-003 to restrain pinion 
flange, tighten pinion flange securing bolt to 
100 Nm (74 lbf.ft).

5. Using a tubular drift, fit centralising peg to 

pinion flange. Ensure that large diameter part of  
centralising peg is below pinion flange 
mounting surface.

6. Position propeller shaft and align reference 

marks.

7. Fit nuts and bolts securing flexible coupling to 

pinion flange and tighten to 76 Nm (55 lbf.ft).

8. Remove stand(s) and lower vehicle.
9. Check differential oil level. 


 + 

 MAINTENANCE, PROCEDURES, 

Front and rear axle.

M51 0047A

LRT-51-003

REAR AXLE

OVERHAUL

51-9

OVERHAUL

Differential assembly 

$% 51.15.07

Disassembly

1. Remove differential assembly.
2. Secure differential assembly in a vice or stand.

3. Remove roll pins securing adjusting nuts, using 

LRT 51-018-5 loosen adjusting nuts.

4. Reference mark bearing caps to aid assembly.

5. Remove bolts securing bearing caps and 

remove caps.

6. Remove crown wheel assembly and collect 

bearing outer races.

7. Mark outer races to bearings to aid assembly.

8. Using LRT-51-003  to restrain pinion flange 

remove bolt and collect washer.

REAR AXLE

51-10

OVERHAUL

9. Remove pinion flange

NOTE: Older front differentials have a square 
flange and an extra spacer fitted, this spacer 
must be removed. Later front differentials have 
a round flange but no spacer fitted. 

10. Using a lever, remove pinion oil seal.

CAUTION: Take care to avoid damage to oil 
seal recess.

11. Carefully tap pinion from bearings and collect 

tail bearing.

12. Remove pinion tail bearing shim and record 

shim size.

13. Using a bearing puller, remove pinion head 

bearing.

14. Remove pinion bearing races.
15. Remove pinion head bearing shim and record 

shim size.


Content   ..  159  160  161  162   ..