Jeep Grand Cherokee SRT8 (2009 year). Instruction - part 17


  Index      Jeep     Jeep Grand Cherokee SRT8 - instruction 2009 year in english


Search            


Content   ..  15  16  17  18   ..


Jeep Grand Cherokee SRT8 (2009 year). Instruction - part 17


KICKER

HIGH PERFORMANCE SOUND SYSTEM

WITH DRIVER-SELECTABLE SURROUND (DSS) –
IF EQUIPPED

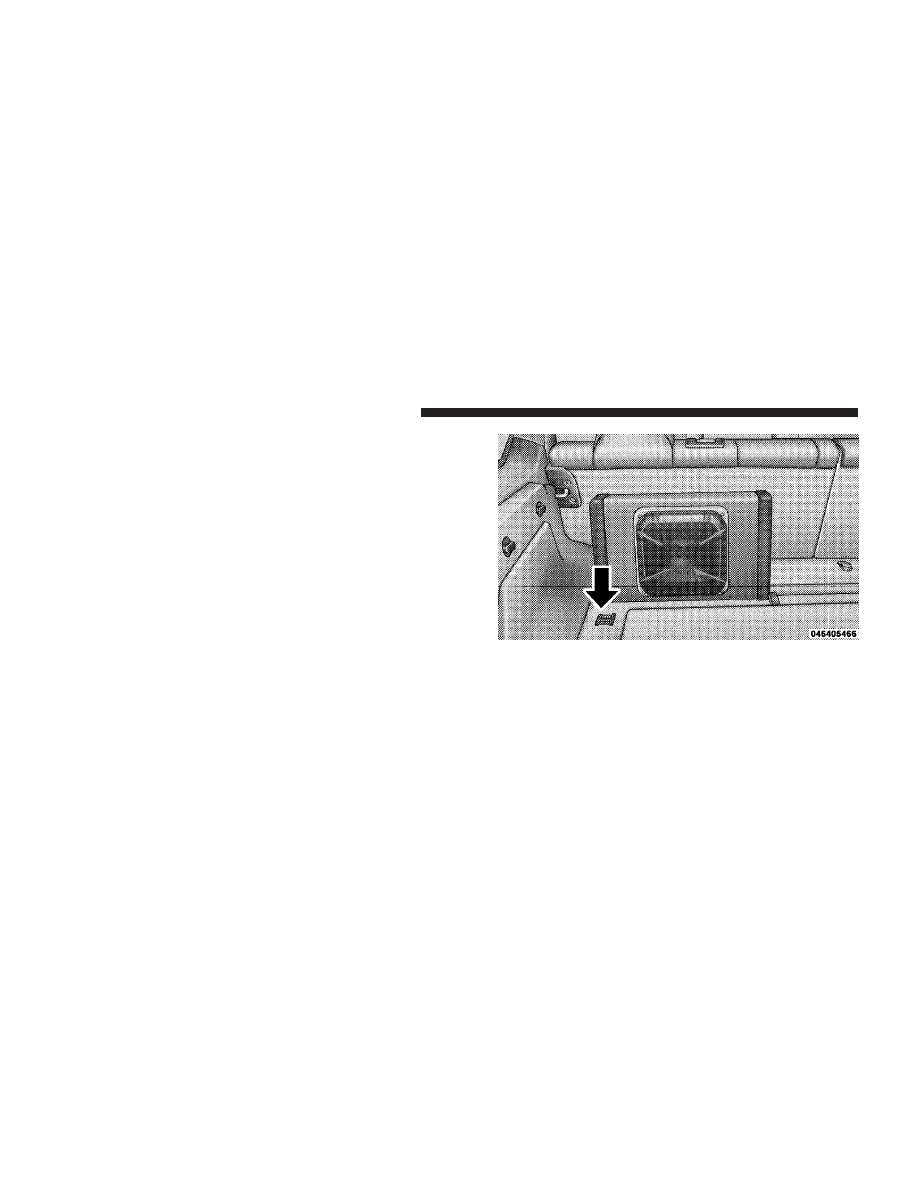
The removable subwoofer is located in the rear cargo
area, and is fastened in place using the child restraint
anchors, located on the left rear passenger seatback.

Installing The Subwoofer

1. Lower the left rear passenger seat.

2. Align the left outside edge of the subwoofer with the
outside edge of the inner cargo tie down hook.

256

UNDERSTANDING YOUR INSTRUMENT PANEL

3. Slide the subwoofer toward the front of the vehicle so
that the rear edge lines up with the end of the load floor.

4. Connect the electrical connector.

5. Fold the left rear passenger seat rearward into the
upright position. The rear tether anchors should engage
the hooks located on the back of the subwoofer.

UNDERSTANDING YOUR INSTRUMENT PANEL

257

4

Removing The Subwoofer

1. Lower the left rear passenger seat.

2. Disconnect the electrical connector.

3. Remove the subwoofer.

SIRIUS BACKSEAT TV™ — IF EQUIPPED

Satellite video uses direct satellite receiver broadcasting
technology to provide streaming video. The subscription
service provider is SIRIUS Satellite Radio. SIRIUS Back-
seat TV™ offers three video channels for family enter-
tainment, directly from its satellites and broadcasting
studios.

NOTE:

SIRIUS service is not available in Hawaii and

has limited coverage in Alaska.

Refer to your Video Entertainment System (VES)™, RER
Navigation or REN Multimedia User Manuals for de-
tailed operating instructions.

258

UNDERSTANDING YOUR INSTRUMENT PANEL

VIDEO ENTERTAINMENT SYSTEM™ (SALES
CODE XRV) — IF EQUIPPED

The optional VES™ (Video Entertainment System) con-
sists of a LCD (liquid crystal display) screen, a battery-
powered remote control, and two headsets. Refer to your
VES™ User’s Manual for detailed operating instructions.

The LCD screen is located on the headliner behind the
front seats.

Lowering the Display Screen

UNDERSTANDING YOUR INSTRUMENT PANEL

259

4

Kicker

Mobile Surround (KMS1)

– If Equipped

The VES™ for this vehicle comes equipped with Kicker
Mobile Surround (KMS1).

威 This feature offers the ulti-

mate movie experience by providing surround sound
uniquely equalized for the interior space of your vehicle.

The KMS1

威 Video Surround mode activates whenever a

video source is selected, unless the system is already in
“Audio Surround” mode. DSS modes for video sources
are “Stereo,” “Audio Surround,” and “Video Surround.”
When in Video Surround mode, balance and fade are set
automatically by the KMS1

威 system to provide the

ultimate surround sound experience.

Remote Control Location

260

UNDERSTANDING YOUR INSTRUMENT PANEL

REMOTE SOUND SYSTEM CONTROLS — IF
EQUIPPED

The remote sound system controls are located on the rear
surface of the steering wheel. Reach behind the wheel to
access the switches.

The right-hand control is a rocker-type switch with a
pushbutton in the center and controls the volume and
mode of the sound system. Pressing the top of the rocker
switch will increase the volume and pressing the bottom
of the rocker switch will decrease the volume.

Pressing the center button will make the radio switch
between the various modes available (AM/FM/TAPE/
CD, Etc.).

The left-hand control is a rocker-type switch with a
pushbutton in the center. The function of the left-hand
control is different depending on which mode you are in.

The following describes the left-hand control operation in
each mode.

Radio Operation

Pressing the top of the switch will “Seek” up for the next
listenable station and pressing the bottom of the switch
will “Seek” down for the next listenable station.

Remote Sound System Controls

UNDERSTANDING YOUR INSTRUMENT PANEL

261

4

The button located in the center of the left-hand control
will tune to the next preset station that you have pro-
grammed in the radio preset pushbutton.

CD Player

Pressing the top of the switch once will go to the next
track on the CD. Pressing the bottom of the switch once
will go to the beginning of the current track, or to the
beginning of the previous track if it is within one second
after the current track begins to play.

If you press the switch up or down twice, it plays the
second track; three times, it will play the third, etc.

The center button on the left side rocker switch has no
function for a single-disc CD player. However, when a
multiple-disc CD player is equipped on the vehicle, the
center button will select the next available CD in the
player.

CD/DVD MAINTENANCE

To keep a CD/DVD in good condition, take the following
precautions:

1. Handle the disc by its edge; avoid touching the
surface.

2. If the disc is stained, clean the surface with a soft cloth,
wiping from center to edge.

3. Do not apply paper or tape to the disc; avoid scratch-
ing the disc.

4. Do not use solvents such as benzene, thinner, cleaners,
or antistatic sprays.

5. Store the disc in its case after playing.

6. Do not expose the disc to direct sunlight.

7. Do not store the disc where temperatures may become
too high.

262

UNDERSTANDING YOUR INSTRUMENT PANEL

NOTE:

If you experience difficulty in playing a particu-

lar disc, it may be damaged (i.e. scratched, reflective
coating removed, a hair, moisture or dew on the disc)
oversized, or have theft protection encoding. Try a
known good disc before considering disc player service.

RADIO OPERATION AND CELLULAR PHONES

Under certain conditions, the cellular phone being ON in
your vehicle can cause erratic or noisy performance from
your radio. This condition may be lessened or eliminated
by relocating the cellular phone antenna. This condition
is not harmful to the radio. If your radio performance
does not satisfactorily “clear” by the repositioning of the
antenna, it is recommended that the radio volume be
turned down or off during cellular phone operation.

CLIMATE CONTROLS

Automatic Temperature Control

The Infrared Dual-Zone Climate Control System auto-
matically maintains the interior comfort level desired by
the driver and passenger. This is accomplished by a dual
sun-sensor in the top of the instrument panel, and an
infrared sensor located in the face of the control unit.
There are also various sensors monitored by this system
which take account for vehicle speed, A/C pressure,
outside temperature, and engine cooling temperature.
The infrared sensor independently measures the surface
temperature of the driver and passenger. Based on the
sensor input, the system automatically adjusts the air-
flow temperature, the airflow volume, and amount of
outside air recirculation. This maintains a comfortable
temperature even under changing conditions.

UNDERSTANDING YOUR INSTRUMENT PANEL

263

4

NOTE:

The numbers on the temperature dial represent

a comfort setting when the Mode knob is set to AUTO,
and not the actual air temperature.

Turn the mode control (on the right) knob to AUTO, and
then turn the blower control (on the left) knob to either
LO AUTO or HI AUTO. The LO AUTO position should

be used for front seat occupants only. The HI AUTO
position should be used when more airflow is desired, or
when rear seat occupants are present. Dial in the comfort
setting you would like the system to maintain by rotating
the driver’s or passenger’s control knob. Once the com-
fort level is selected, the system will maintain that level
automatically using the heating system. Should the de-
sired comfort level require air conditioning, the system
will automatically make the adjustment.

You will experience the greatest efficiency by simply
allowing the system to function automatically. Selecting
the OFF (O) position on the blower control knob stops the
system completely.

NOTE:

The temperature setting can be adjusted at any

time without affecting automatic control operation. How-
ever, if the driver and/or passenger temperature knobs
are set to the full hot or full cold positions, the air
temperature out of the ducts will be full hot or full cold

Automatic Temperature Controls

264

UNDERSTANDING YOUR INSTRUMENT PANEL

respectively. With the temperature setting in these posi-
tions, the system does not attempt automatic comfort
control.

The air conditioning in this system is auto-
matic. Pressing this button while in AUTO
mode will cause the LED to flash three times
and remain off. This indicates that the system is
in AUTO and requesting the air conditioning is
not necessary.

The system will automatically control recircu-
lation. However, pressing this button will tem-
porarily put the system in “Recirculation”
mode. This can be used when outside condi-
tions such as smoke, odors, dust, or high
humidity are present. This will cause the LED
to illuminate.

NOTE:

• The surface of the climate control panel, and the top

center of the instrument panel should be kept free of
debris due to the climate control sensor’s location.
Mud on the windshield may also cause poor operation
of this system.

• To provide you with maximum comfort in the auto-

matic mode, during cold start-ups the blower fan will
remain off until the engine warms up. However, the
fan will engage immediately if the defrost mode is
selected or if you manually select a blower speed.

• Under certain conditions (after the vehicle is turned

off) the climate control system may recalibrate and a
noise may be heard for 20 seconds. This is part of
normal operation.

Air

Condi-

tioning

Recircu-

lation

UNDERSTANDING YOUR INSTRUMENT PANEL

265

4

• Most of the time, when in Automatic operation, you

can temporarily put the system into Recirculation
mode by pressing the “Recirculation” button. How-
ever, under certain conditions in automatic the system
is blowing air out of the defrost vents. When these
conditions are present, and the “Recirculation” button
is pressed, the indicator will flash and remain off. This
tells you that you are unable to go into Recirculation
mode at this time. If you would like to go to Recircu-
lation mode, you must first move your mode knob to
Panel, Panel/Floor, or Floor, then press the “Recircu-
lation” button. This feature will reduce the possibility
of window fogging.

Manual Operation
This system offers a full complement of manual override
features which consist of Blower Preferred Automatic,
Mode Preferred Automatic with Manual Air Temperature
Control, and Manual. This means the customer can
override the blower, mode, and disable the Automatic
Temperature Control completely.

NOTE:

• For vehicles equipped with Remote Start, the climate

controls will not function during Remote Start opera-
tion if the blower control is left in the “O” (Off)
position.

• Please read the Automatic Temperature Control Op-

eration Chart below for details.

266

UNDERSTANDING YOUR INSTRUMENT PANEL

UNDERSTANDING YOUR INSTRUMENT PANEL

267

4

NOTE:

Regardless of the type of operation, when a

temperature knob is set to the full clockwise or full
counterclockwise position, the system will deliver full
hot or full cold air out of the ducts, respectively.

The operator can override the AUTO mode setting and
select the direction of the air by rotating the right mode
knob to one of the following positions. When the Mode is
set to any position other than AUTO, the automatic
control of air temperature is disabled. The user must
adjust the temperature knobs to obtain the desired tem-
perature.

Defrost

Air is directed to the windshield through the
outlets at the base of the windshield. Air is also

directed to the front door windows through the side
window demister grilles. Some airflow is delivered to the
floor while in defrost so that comfort can be maintained.

NOTE:

The defrost mode is not automatically selected.

It must be manually selected, when desired.

Defrost/Floor

Air flows through the front and rear floor outlets
and the outlets at the base of the windshield. Air is
also directed to the front door windows through the

side window demister grilles. Some airflow is delivered
to the floor while in defrost so that comfort can be
maintained.

Floor

Air flows through the floor outlets located under
the instrument panel and into the rear seating area

through vents under the front seats. Some airflow is
delivered to defrost while in floor mode, so that comfort
can be maintained.

268

UNDERSTANDING YOUR INSTRUMENT PANEL

Bi-Level

Air flows both through the outlets located in the
instrument panel and those located on the floor. Air

flows through the registers in the back of the center
console, and under the front seats to the rear seat
passengers. These registers can be closed to block airflow.
The center console outlets deliver conditioned air while
the floor outlets deliver heated air.

Panel

Air flows through the outlets located in the instru-
ment panel. Air flows through the registers in the

back of the center console to the rear seat passengers.
These registers can be closed to block airflow.

Air Conditioning

Press this button to turn the air conditioning on
and off during manual operation only. Condi-
tioned outside air is then directed through the

outlets selected on the mode control dial. The button
includes an LED that illuminates when manual operation
is selected.

NOTE:

To manually control the air conditioning, the

mode selector must be moved out of the AUTO position.

Recirculation

This button can be used to block out smoke,
odors, dust, high humidity, or if rapid cooling
is desired. The “Recirculation” mode should
only be used temporarily. The button includes

an LED that illuminates, which indicates that the “Recir-
culation” mode is active. You may use this feature
separately.

UNDERSTANDING YOUR INSTRUMENT PANEL

269

4

NOTE:

Extended use of recirculation may cause the

windows to fog. If the interior of the windows begins to
fog, press the “Recirculate” button to return to outside
air. Some temperature/humidity conditions will cause
captured interior air to condense on windows and ham-
per visibility. For this reason, the system will not allow
“Recirculation” mode to be selected while in the defrost
or defrost/floor modes. Attempting to use Recirculation
while in these modes will cause the LED in the button to
blink and then turn off.

Operating Tips

Window Fogging
Windows will fog on the inside when the humidity inside
the vehicle is high. This often occurs in mild or cool
temperatures when it’s rainy or humid. In most cases,
turning the air conditioning (pressing the snowflake

button) on will clear the fog. Adjust the temperature
control, air direction, and blower speed to maintain
comfort.

As the temperature gets colder, it may be necessary to
direct air onto the windshield. Adjust the temperature
control and blower speed to maintain comfort. Higher
blower speeds will reduce fogging. Interior fogging on
the windshield can be quickly removed by selecting the
defrost mode.

Regular cleaning of the inside of the windows with a
non-filming cleaning solution (vinegar and water works
very well) will help prevent contaminates (cigarette
smoke, perfumes, etc.) from sticking to the windows.
Contaminates increase the rate of window fogging.

270

UNDERSTANDING YOUR INSTRUMENT PANEL

Summer Operation
Air conditioned vehicles must be protected with a high
quality antifreeze coolant, during the summer, to provide
proper corrosion protection and to raise the boiling point
of the coolant for protection against overheating. A 50 %
concentration is recommended. Refer to Recommended
Fluids and Genuine Parts for the proper coolant type.

When using the air conditioner in extremely heavy
traffic, in hot weather, especially when towing a trailer,
additional engine cooling may be required. If this situa-
tion is encountered, operate the transmission in a lower
gear to increase engine RPM, coolant flow and fan speed.
When stopped in heavy traffic, it may be necessary to
shift into NEUTRAL (N) and depress the accelerator
slightly for fast idle operation to increase coolant flow
and fan speed.

Your air conditioning system is also equipped with an
automatic recirculation system. When the system senses
a heavy load or high heat conditions, it may use partial
Recirculation A/C mode to provide additional comfort.

Winter Operation
When operating the system during the winter months,
make sure the air intake, located directly in front of the
windshield, is free of ice, slush, snow, or other
obstructions.

Vacation Storage
Anytime you store your vehicle, or keep it out of service
(i.e. vacation) for two weeks or more, run the air condi-
tioning system at idle for about five minutes in the fresh
air and high blower setting. This will ensure adequate
system lubrication to minimize the possibility of com-
pressor damage when the system is started again.

UNDERSTANDING YOUR INSTRUMENT PANEL

271

4


Content   ..  15  16  17  18   ..