Jeep XJ. Manual - part 426


  Index      Jeep     Jeep XJ - service repair manual 2001 year


Search            


Content   ..  424  425  426  427   ..


Jeep XJ. Manual - part 426


If the transmission is overfilled, the gears churn the
fluid into foam. This aerates the fluid and causing
the same conditions occurring with a low level. In
either case, air bubbles cause fluid overheating, oxi-
dation and varnish buildup which interferes with
valve, clutch and servo operation. Foaming also
causes fluid expansion which can result in fluid over-
flow from the transmission vent or fill tube. Fluid
overflow can easily be mistaken for a leak if inspec-
tion is not careful.

CAUSES OF BURNT FLUID

Burnt, discolored fluid is a result of overheating

which has two primary causes.

(1) A result of restricted fluid flow through the

main and/or auxiliary cooler. This condition is usu-
ally the result of a faulty or improperly installed

drainback valve, a damaged main cooler, or severe
restrictions in the coolers and lines caused by debris
or kinked lines.

(2) Heavy duty operation with a vehicle not prop-

erly equipped for this type of operation. Trailer tow-
ing or similar high load operation will overheat the
transmission

fluid

if

the

vehicle

is

improperly

equipped. Such vehicles should have an auxiliary
transmission fluid cooler, a heavy duty cooling sys-
tem, and the engine/axle ratio combination needed to
handle heavy loads.

FLUID CONTAMINATION

Transmission fluid contamination is generally a

result of:

• adding incorrect fluid

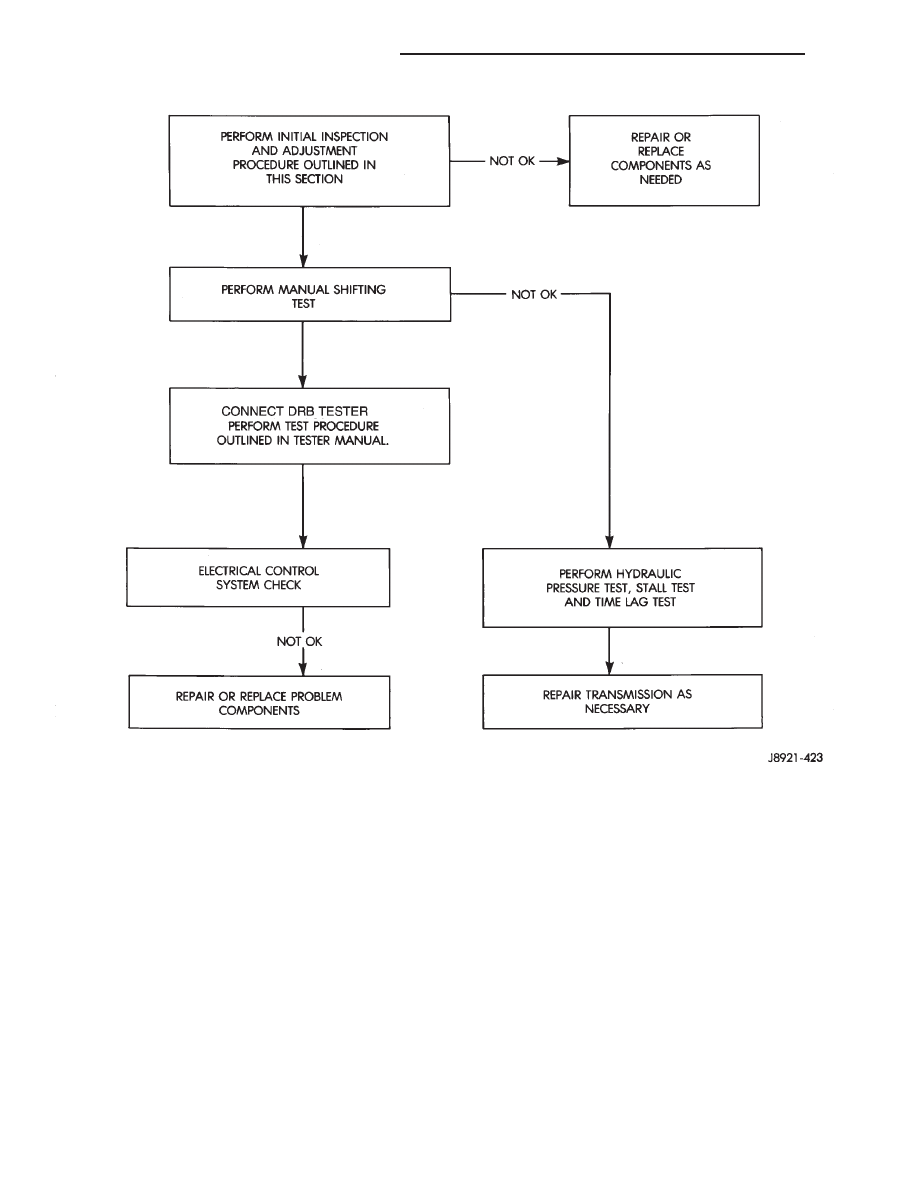
Preliminary Diagnosis Check Procedure

21 - 240

AW–4 AUTOMATIC TRANSMISSION

XJ

DIAGNOSIS AND TESTING (Continued)

• failure to clean dipstick and fill tube when

checking level

• engine coolant entering the fluid

• internal failure that generates debris

• overheat that generates sludge (fluid break-

down)

• failure to reverse flush cooler and lines after

repair

• failure to replace contaminated converter after

repair

The use of non recommended fluids can result in

transmission failure. The usual results are erratic
shifts, slippage, abnormal wear and eventual failure
due to fluid breakdown and sludge formation. Avoid
this condition by using recommended fluids only.

The dipstick cap and fill tube should be wiped

clean before checking fluid level. Dirt, grease and
other foreign material on the cap and tube could fall
into the tube if not removed beforehand. Take the
time to wipe the cap and tube clean before withdraw-
ing the dipstick.

Engine coolant in the transmission fluid is gener-

ally caused by a cooler malfunction. The only remedy
is to replace the radiator as the cooler in the radiator
is not a serviceable part. If coolant has circulated
through the transmission for some time, an overhaul
may also be necessary; especially if shift problems
had developed.

The transmission cooler and lines should be

reverse flushed whenever a malfunction generates
sludge and/or debris. The torque converter should
also be replaced at the same time.

Failure to flush the cooler and lines will result in

recontamination. Flushing applies to auxiliary cool-
ers as well. The torque converter should also be
replaced whenever a failure generates sludge and
debris. This is necessary because normal converter
flushing procedures will not remove all contami-
nants.

PRELIMINARY INSPECTION AND ADJUSTMENT

(1) Check and adjust transmission shift cable if

necessary.

(2) Verify transmission throttle cable operation.

Repair or replace cable if necessary.

(3) Check engine throttle operation. Operate accel-

erator pedal and observe injector throttle plate move-
ment. Adjust linkage if throttle plate does not reach
wide open position.

(4) Check transmission fluid level when fluid is at

normal operating temperature. Start engine. Shift
transmission through all gear ranges then back to
Neutral. Correct level is to Full or Add mark on dip-
stick with engine at curb idle speed.

(5) Check and adjust park/neutral position switch

if necessary.

(6) Check throttle position sensor adjustment and

operation. Adjust the sensor if necessary.

MANUAL SHIFTING TEST

(1) This test determines if problem is related to

mechanical or electrical component.

(2) Stop engine and disconnect transmission con-

trol module or module fuse.

(3) Road test vehicle. Shift transmission into each

gear range. Transmission should operate as follows:

• lock in Park

• back up in Reverse

• not move in Neutral

• provide first gear only with shift lever in 1–2

position

• operate in third gear only with shift lever in 3

position

• operate in overdrive fourth gear in D position
(4) If transmission operates as described, proceed

to next step. However, if forward gear ranges were
difficult to distinguish (all feel the same), or vehicle
would not back up, refer to diagnosis charts. Do not
perform stall or time lag tests.

CAUTION: Do not over speed the engine during the
next test step. Ease off the throttle and allow the
vehicle to slow before downshifting.

(5) Continue road test. Manually downshift trans-

mission from D to 3, and from 3 to 1–2 position.
Then manually upshift transmission through forward
ranges again.

(6) If transmission operation is OK, perform stall,

time lag and pressure tests. If transmission shifting
problem is encountered, refer to diagnosis charts.

(7) If a problem still exists, continue testing with

DRB scan tool.

HYDRAULIC PRESSURE TEST

Pressure Test Procedure

(1) Connect pressure test gauge to test port on

passenger side of transmission (Fig. 39). Use Adapter
7554 to connect gauge. Be sure test gauge has mini-
mum capacity of 300 psi (2100 kPa).

(2) Be sure transmission fluid is at normal operat-

ing temperature.

(3) Apply parking brakes and block wheels.

WARNING: DO NOT ALLOW ANYONE TO STAND AT
THE FRONT OR REAR OF THE VEHICLE WHILE
PERFORMING THE FOLLOWING STEPS IN THE
PRESSURE TEST.

(4) Check and adjust engine curb idle speed.
(5) Apply (and hold) service brakes.

XJ

AW–4 AUTOMATIC TRANSMISSION

21 - 241

DIAGNOSIS AND TESTING (Continued)

(6) Shift transmission into D range and note line

pressure with engine at curb idle speed. Pressure
should be 61–to–70 psi (421–to–481 kPa).

(7) Press accelerator pedal to wide open throttle

position and note line pressure. Pressure should be
173–to–209 psi (1196–to–1442 kPa).

CAUTION: Do not hold wide open throttle for more
than 3–4 seconds at a time.

(8) Shift transmission into Reverse and note line

pressure with engine at curb idle speed. Pressure
should be 75–to–90 psi (519–to–618 kPa).

(9) Press accelerator to wide open throttle position

and note line pressure in Reverse. Pressure should
be 213–to–263 psi (1471–to–1814 kPa).

CAUTION: Do not hold wide open throttle for more
than 4 seconds.

(10) If line pressure is not within specifications,

adjust transmission throttle cable and repeat pres-
sure test.

PRESSURE TEST ANALYSIS

If pressures in D and Reverse are higher than

specified in test, check for the following:

• throttle cable loose, worn, binding or out of

adjustment

• throttle valve, downshift plug, throttle cam, or

primary regulator valve are sticking, worn or dam-
aged

If pressures in D and Reverse are lower than spec-

ified in test, check for following:

• throttle cable loose, worn, binding or out of

adjustment

• throttle valve, downshift plug, or throttle cam

sticking, worn or damaged

• primary regulator valve sticking, worn, or dam-

aged

• oil pump gears or housing worn, or damaged

• overdrive clutch worn, or damaged
If pressures are low in D range only, check for fol-

lowing:

• forward clutch worn or damaged

• fluid leakage in D range circuit (component seal

and O–rings)

If pressures are low in Reverse only, check for fol-

lowing:

• shift cable and manual valve out of adjustment

• fluid leakage in reverse circuit (component seal

and O–rings)

• direct clutch worn or damaged

• first/reverse brake worn or damaged

TIME LAG TEST

This test checks general condition of the overdrive

clutch, forward clutch, rear clutch and first/reverse
brake. Condition is indicated by the amount of time
required

for

clutch/brake

engagement

with

the

engine at curb idle speed. Engagement time is mea-
sured for D and Reverse positions. A stop watch is
recommended for test accuracy.

TEST PROCEDURE

(1) Check and adjust transmission fluid level if

necessary.

(2) Bring transmission to normal operating tem-

perature.

(3) Apply parking brakes and turn off air condi-

tioning unit.

(4) Shift transfer case into 2H range.
(5) Start engine and check curb idle speed. Adjust

speed if necessary. Curb idle must be correct to
ensure accurate test results.

(6) Shift transmission into Neutral and set stop

watch.

(7) During following test steps, start stop watch as

soon as shift lever reaches D and Reverse ranges.

(8) Shift transmission into D range and record

time it takes for engagement. Repeat test two more
times.

(9) Reset stop watch and shift transmission back

to Neutral.

(10) Shift transmission into Reverse and record

time it takes for engagement. Repeat test two more
times.

Fig. 39 Pressure Test Gauge Connection

1 – PRESSURE GAUGE
2 – TEST PORT

21 - 242

AW–4 AUTOMATIC TRANSMISSION

XJ

DIAGNOSIS AND TESTING (Continued)

(11) Engagement time in D range should be a

maximum of 1.2 seconds. Engagement time for
Reverse should be a maximum of 1.5 seconds.

TIME LAG TEST ANALYSIS

If engagement time is longer than specified for D

range, check for the following:

• shift cable misadjusted

• line pressure low

• forward clutch worn

• overdrive clutch worn or damaged
If engagement time is longer than specified for

Reverse, check for the following:

• shift cable misadjusted

• line pressure low

• direct clutch worn

• first/reverse brake worn

• overdrive clutch worn or damaged

SERVICE DIAGNOSIS

DIAGNOSIS TABLE

CONDITION

POSSIBLE CAUSE

CORRECTION

VEHICLE WILL NOT BACK UP OR
MOVE FORWARD

Shift cable out of adjustment or
damaged

Adjust cable or replace cable

Valve body or primary regulator
faulty

Inspect/repair valve body

Park lock pawl faulty

Repair park pawl

Torque converter faulty

Replace torque converter

Converter drive plate broken

Replace drive plate

Oil pump intake screen blocked

Clean screen

Transmission faulty

Disassemble and repair
transmission

SHIFT LEVER POSITION
INCORRECT

Shift cable out of adjustment

Adjust cable

Manual valve and lever faulty

Repair valve body

HARSH ENGAGEMENT

Throttle cable out of adjustment

Adjust throttle cable

Valve body or primary regulator
faulty

Repair valve body

Accumulator pistons faulty

Repair pistons

Transmission faulty

Disassemble and repair
transmission

DELAYED 1-2, 2-3 OR 3-4
UP-SHIFT, OR DOWN-SHIFTS
FROM 4-3 OR 3-2 AND SHIFTS
BACK TO 4 OR 3

Electronic control problem

Locate problem with DRB Tester

Valve body faulty

Repair valve body

Solenoid faulty

Repair solenoid

SLIPS ON 1-2, 2-3 OR 3-4
UP-SHIFT, OR SLIPS OR
SHUDDERS DURING
ACCELERATION

Shift cable out of adjustment

Adjust cable

Throttle cable out of adjustment

Adjust cable

Valve body faulty

Repair valve body

Solenoid faulty

Replace solenoid

Transmission faulty

Disassemble and repair
transmission

XJ

AW–4 AUTOMATIC TRANSMISSION

21 - 243

DIAGNOSIS AND TESTING (Continued)


Content   ..  424  425  426  427   ..