Jeep XJ. Manual - part 371


  Index      Jeep     Jeep XJ - service repair manual 2001 year


Search            


Content   ..  369  370  371  372   ..


Jeep XJ. Manual - part 371


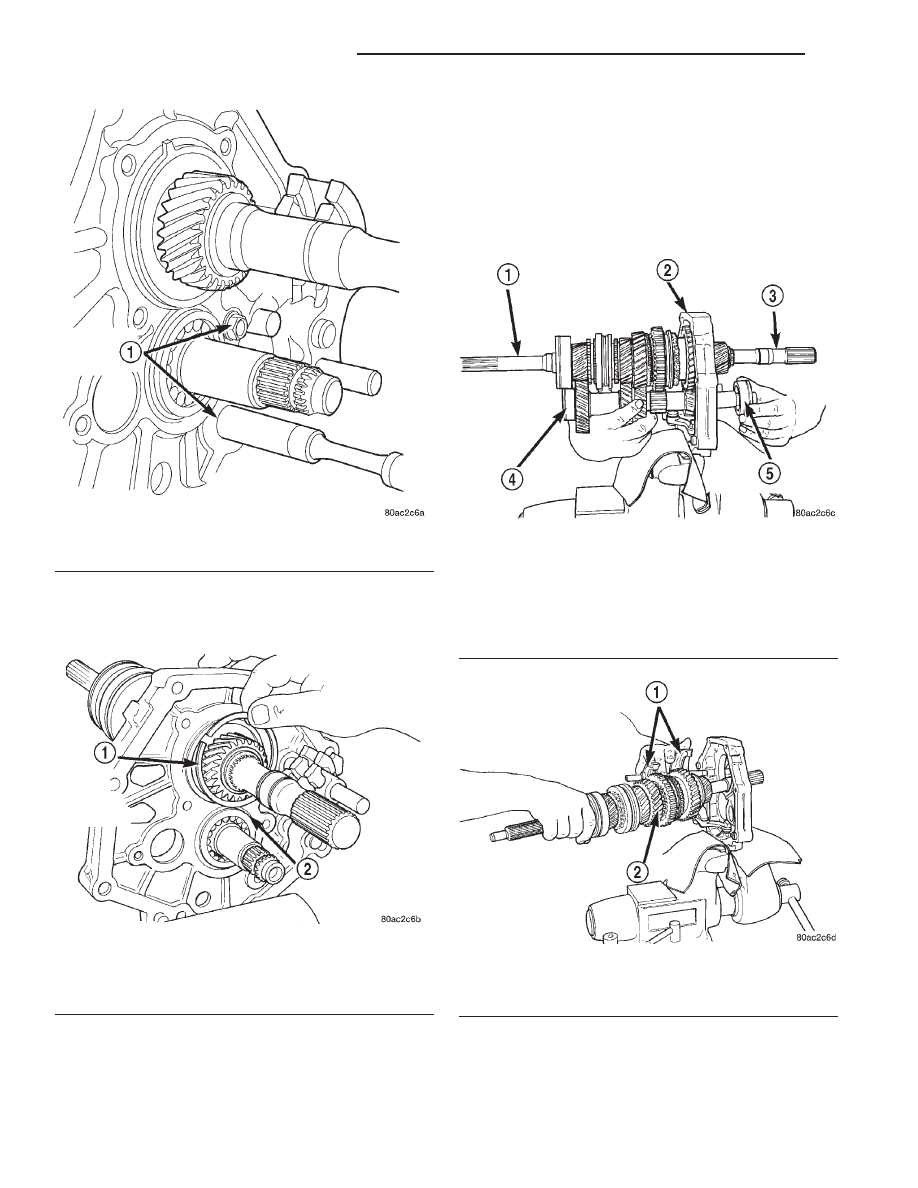
(14) Remove snap-ring holding output shaft rear

bearing into the intermediate plate (Fig. 60).

(15) Remove countershaft rear bearing snap-ring.

(16) With aid of an assistant, support the main-

shaft and countershaft. Tap on the rear of the main-
shaft and countershaft with a suitable plastic mallet.
This will release the countershaft from the counter-
shaft rear bearing and the mainshaft rear bearing

from the intermediate plate. The countershaft will
release from the countershaft bearing first and can
be removed by moving the countershaft rearward and
downward (Fig. 61).

(17) Remove the mainshaft by moving the main-

shaft forward until the mainshaft rear bearing is
clear of the intermediate plate and then rotating the
mainshaft downward out of the shift forks (Fig. 62).

(18) Remove the 3–4 shift fork from the 3–4 shift

rail (Fig. 63).

(19) Remove the snap-ring from near the end of

the 1–2 shift rail to allow the removal of the 1–2
shift fork.

Fig. 59 Remove Reverse Shift Arm Bracket Bolts

1 – REVERSE SHIFT ARM BOLTS

Fig. 60 Remove Output Shaft Rear Bearing

Snap-ring

1 – OUTPUT SHAFT REAR BEARING SNAP-RING
2 – COUNTERSHAFT REAR BEARING SNAP-RING

Fig. 61 Remove Countershaft and Countershaft

Rear Bearing

1 – INPUT SHAFT
2 – INTERMEDIATE PLATE
3 – OUTPUT SHAFT
4 – COUNTERSHAFT
5 – COUNTERSHAFT REAR BEARING

Fig. 62 Remove Mainshaft

1 – SHIFT FORKS
2 – MAINSHAFT

21 - 20

AX5 MANUAL TRANSMISSION

XJ

DISASSEMBLY AND ASSEMBLY (Continued)

(20) Remove the 1–2 shift fork from the 1–2 and

the 3–4 shift rails (Fig. 64).

(21) Remove threaded plugs from intermediate

plate. Then remove lock ball and spring from plug
holes with pencil magnet (Fig. 65). Note that the bot-
tom spring is shorter in length than the other two
springs.

(22) Remove the intermediate plate from the vise,

rotate the plate 180°, and reinstall the plate in the
vise using the same bolt and washer mounting set-
up.

CAUTION: The interlock balls and pins are different
sizes and shapes. Be sure to correctly identify
which position an item is removed from to ensure
that it is reinstalled in the same location.

Fig. 63 Remove 3–4 Shift Fork

1 – 3–4 SHIFT FORK
2 – 3–4 SHIFT RAIL
3 – 1–2 SHIFT RAIL
4 – 1–2 SHIFT FORK

Fig. 64 Remove 1–2 Shift Fork

1 – 1–2 SHIFT FORK
2 – 3–4 SHIFT RAIL
3 – 1–2 SHIFT RAIL

Fig. 65 Remove Lock Ball And Spring

1 – THREADED PLUGS
2 – LOCK BALL
3 – SPRING
4 – PENCIL MAGNET

XJ

AX5 MANUAL TRANSMISSION

21 - 21

DISASSEMBLY AND ASSEMBLY (Continued)

(23) Remove fifth gear shift rail (Fig. 66).

(24) Remove fifth gear check ball (Fig. 67) and

interlock pin.

(25) Remove reverse shift head and rail assembly

(Fig. 68).

(26) Remove snap-ring holding reverse shift rail

into intermediate plate.

(27) Remove reverse shift rail and reverse shift

fork and arm assembly from intermediate plate (Fig.
69).

Fig. 66 Remove Fifth Gear Shift Rail

1 – INTERMEDIATE PLATE
2 – FIFTH GEAR SHIFT RAIL

Fig. 67 Remove Fifth Gear Check Ball

1 – FIFTH GEAR CHECK BALL

Fig. 68 Remove Reverse Shift Head And Rail

Assembly

1 – REVERSE SHIFT HEAD AND RAIL ASSEMBLY

Fig. 69 Remove Reverse Shift Rail

1 – REVERSE SHIFT RAIL AND REVERSE FORK ASSEMBLY

21 - 22

AX5 MANUAL TRANSMISSION

XJ

DISASSEMBLY AND ASSEMBLY (Continued)

(28) Remove interlock pin from reverse shift rail

(Fig. 70).

(29) Remove reverse elongated check ball (Fig. 71).

(30) Remove snap-ring on 3–4 shift rail.
(31) Remove 1–2 shift rail from intermediate plate.
(32) Remove interlock pin from 1–2 shift rail (Fig.

72).

(33) Remove 1–2 shift rail elongated check ball

from intermediate plate (Fig. 73).

(34) Remove 3–4 shift rail from intermediate plate.

Fig. 70 Remove Interlock Pin From Reverse Shift

Rail

1 – REVERSE SHIFT RAIL
2 – INTERLOCK PIN

Fig. 71 Remove Reverse Check Ball

1 – REVERSE CHECK BALL

Fig. 72 Remove 1–2 Shift Rail Interlock Pin

1 – INTERLOCK PIN
2 – 1–2 SHIFT RAIL

Fig. 73 Remove 1–2 Check Ball

1 – 1–2 CHECK BALL
2 – 3–4 SHIFT RAIL

XJ

AX5 MANUAL TRANSMISSION

21 - 23

DISASSEMBLY AND ASSEMBLY (Continued)


Content   ..  369  370  371  372   ..