Jeep Liberty KJ. Manual - part 889


  Index      Jeep     Jeep Liberty KJ - service repair manual 2006 year


Search            


Content   ..  887  888  889  890   ..


Jeep Liberty KJ. Manual - part 889


BLOCK-ENGINE

DESCRIPTION

The cylinder block is made of cast iron. The block is a closed deck design with the left bank forward. To provide
high rigidity and improved NVH an enhanced compacted graphite bedplate is bolted to the block. The block design
allows coolant flow between the cylinders bores, and an internal coolant bypass to a single poppet inlet thermostat
is included in the cast aluminum front cover.

STANDARD PROCEDURE - CYLINDER BORE HONING

Before honing, stuff plenty of clean shop towels under
the bores and over the crankshaft to keep abrasive
materials from entering the crankshaft area.

1. Used carefully, the Cylinder Bore Sizing Hone

C-823, equipped with 220 grit stones, is the best
tool for this job. In addition to deglazing, it will
reduce taper and out-of-round, as well as removing
light scuffing, scoring and scratches. Usually, a few
strokes will clean up a bore and maintain the
required limits.

CAUTION: DO NOT use rigid type hones to remove
cylinder wall glaze.

2. Deglazing of the cylinder walls may be done if the

cylinder bore is straight and round. Use a cylinder
surfacing hone, Honing Tool C-3501, equipped with
280

grit

stones

(C-3501-3810).

about

20-60

strokes, depending on the bore condition, will be
sufficient to provide a satisfactory surface. Using
honing oil C-3501-3880, or a light honing oil, avail-
able from major oil distributors.

CAUTION: DO NOT use engine or transmission oil, mineral spirits, or kerosene.

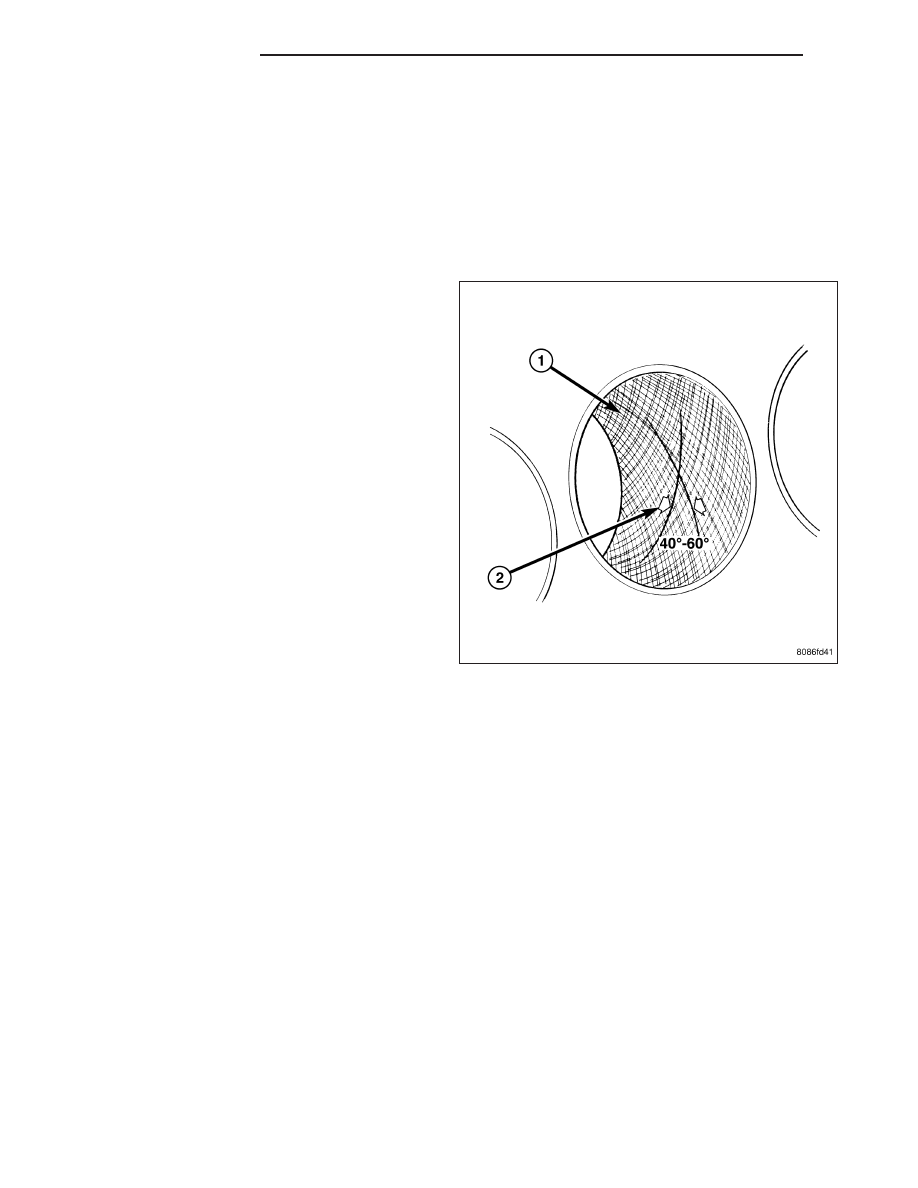
3. Honing should be done by moving the hone up and down fast enough to get a crosshatch pattern (1). The hone

marks should INTERSECT at 50° to 60° for proper seating of rings (2).

4. A controlled hone motor speed between 200 and 300 RPM is necessary to obtain the proper crosshatch angle.

The number of up and down strokes per minute can be regulated to get the desired 50° to 60° angle. Faster up
and down strokes increase the crosshatch angle.

5. After honing, it is necessary that the block be cleaned to remove all traces of abrasive. Use a brush to wash

parts with a solution of hot water and detergent. Dry parts thoroughly. Use a clean, white, lint-free cloth to check
that the bore is clean. Oil the bores after cleaning to prevent rusting.

CLEANING

Thoroughly clean the oil pan and engine block gasket surfaces.

Use compressed air to clean out:

The galley at the oil filter adaptor hole.

The front and rear oil galley holes.

The feed holes for the crankshaft main bearings.

Once the block has been completely cleaned, apply Loctite PST pipe sealant with Teflon 592 to the threads of the
front and rear oil galley plugs. Tighten the plugs to 34 N·m (25 ft. lbs.) torque.

9 - 1514

ENGINE - 3.7L

KJ

INSPECTION

1. It is mandatory to use a dial bore gauge to mea-

sure each cylinder bore diameter. To correctly
select the proper size piston, a cylinder bore
gauge, capable of reading in 0.003 mm (.0001 in.)
INCREMENTS is required. If a bore gauge is not
available, do not use an inside micrometer.

2. Measure the inside diameter of the cylinder bore at

three levels below top of bore. Start perpendicular
(across or at 90 degrees) to the axis of the crank-
shaft and then take two additional reading.

3. Measure the cylinder bore diameter crosswise to

the cylinder block near the top of the bore. Repeat
the measurement near the middle of the bore, then
repeat the measurement near the bottom of the
bore.

4. Determine taper by subtracting the smaller diame-

ter from the larger diameter.

5. Rotate measuring device 90° and repeat steps

above.

6. Determine out-of-roundness by comparing the dif-

ference between each measurement.

7. If cylinder bore taper does not exceed 0.025 mm (0.001 inch) and out-of-roundness does not exceed 0.015 mm

(0.0006 inch), the cylinder bore can be honed. If the cylinder bore taper or out- of-round condition exceeds these
maximum limits, the cylinder block must be replaced. A slight amount of taper always exists in the cylinder bore
after the engine has been in use for a period of time.

KJ

ENGINE - 3.7L

9 - 1515

CRANKSHAFT

DESCRIPTION

The crankshaft is constructed of nodular cast iron. The crankshaft is a three throw split pin design with six coun-
terweights for balancing purposes. The crankshaft is supported by four select fit main bearings with the number two
serving as the thrust washer location. The main journals of the crankshaft are cross drilled to improve rod bearing
lubrication. The number six counterweight has provisions for crankshaft position sensor target wheel mounting. The
select fit main bearing markings are located on the rear side of the target wheel. The crankshaft oil seals are one
piece design. The front oil seal is retained in the timing chain cover, and the rear seal is pressed in to a bore formed
by the cylinder block and the bedplate assembly.

9 - 1516

ENGINE - 3.7L

KJ

REMOVAL

NOTE: To remove the crankshaft from the engine, the engine must be removed from the vehicle.

1. Remove the engine (Refer to 9 - ENGINE - REMOVAL).

2. Remove the engine oil pump (Refer to 9 - ENGINE/LUBRICATION/OIL PUMP - REMOVAL).

CAUTION: DO NOT pry on the oil pan gasket when removing the oil pan, The oil pan gasket is mounted to
the cylinder block in three locations and will remain attached to block when removing oil pan. Gasket can
not be removed with oil pan.

3. Remove the bedplate mounting bolts. Note the location of the two stud bolts for installation.

4. Remove the connecting rods from the crankshaft.

CAUTION: The bedplate to cylinder block mating surface is a critical sealing surface. Do not pry on or dam-
age this surface in anyway.

NOTE: The bedplate contains the lower main bearing halves. Use care when handling bedplate as not to
drop or damage bearing halves. Installing main bearing halves in the wrong position will cause severe dam-
age to the crankshaft.

NOTE: The bedplate has pry points cast into it. Use these points only. The pry points are shown below.

5. Carefully pry on the pry points to loosen the bedplate then remove the bedplate.

CAUTION: When removing the crankshaft, use care not to damage bearing surfaces on the crankshaft.

6. Remove the crankshaft.

7. Remove the crankshaft tone wheel.

KJ

ENGINE - 3.7L

9 - 1517


Content   ..  887  888  889  890   ..