Jeep Liberty KJ. Manual - part 1299


  Index      Jeep     Jeep Liberty KJ - service repair manual 2006 year


Search            


Content   ..  1297  1298  1299  1300   ..


Jeep Liberty KJ. Manual - part 1299
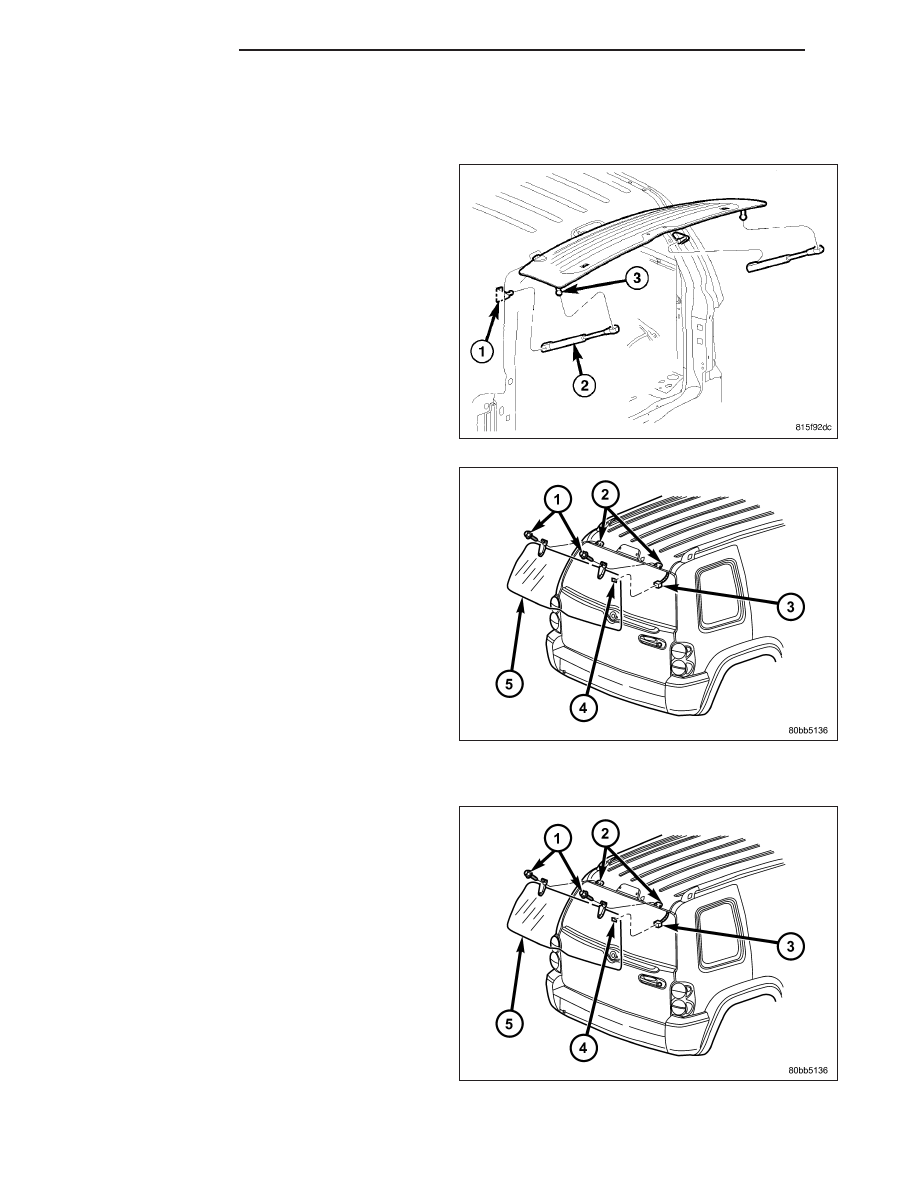


FLIP-UP GLASS

REMOVAL

1. Open the flip-up glass.

2. Using a grease pencil or equivalent, mark the posi-

tion of the hinge on the body to aid installation.

3. Remove the support cylinders (2). (Refer to 23 -

BODY/SWING GATE/FLIP-UP GLASS SUPPORT
CYLINDER - REMOVAL)

4. Disconnect the electrical connectors (3).

5. Open the glass to the full travel with the support

cylinders off.

6. Remove the bolts (1) and remove the glass (5).

INSTALLATION

1. Install the flip-up glass, pushing it as far up as it

can go and loosely install the hinge bolts (1).

2. Connect the electrical connectors (3).

3. Adjust flip-up glass fit if necessary, making sure

there are equal gaps on both sides of the glass
while pushing up on the glass and tighten the
hinge bolts to 7 N·m (60 in. lbs.). (Refer to 23 -
BODY/SWING GATE/FLIP-UP GLASS - ADJUST-
MENTS)

23 - 96

SWING GATE

KJ

4. Install the support cylinders (2). (Refer to 23 -

BODY/SWING GATE/FLIP-UP GLASS SUPPORT
CYLINDER - INSTALLATION)

ADJUSTMENTS

ADJUSTMENT

1. Verify that the flip-up glass is correctly centered in

it’s opening. (Refer to 23 - BODY/BODY STRUC-
TURE/GAP AND FLUSH - SPECIFICATIONS)

2. Confirm the flip-up glass to swing gate adjustment.

Hold a straight edge flush against the glass as indi-
cated, and record the gap/space between the
straight edge and the swing gate outer vertical
panel.

NOTE: The flush specification for the flip-up glass
to the swing gate outer panel is 0 mm - 2 mm over
flush.

3. If the flip-up glass needs to be adjusted, loosen the

two latch attaching fasteners (5) and move the
latch for or aft in small increments until desired
measurement is achieved.

4. Tighten the flip-up glass latch fasteners to 12 N·m

(9 ft. lbs.).

5. Verify correct flip-up glass closing efforts and

operation.

KJ

SWING GATE

23 - 97

FLIP-UP GLASS LATCH

REMOVAL

1. Remove the trim panel (1). (Refer to 23 - BODY/

SWING GATE/TRIM PANEL - REMOVAL)

2. Disconnect the electrical connectors (2 and 4).

3. Using a grease pencil or equivalent, mark the loca-

tion of the latch assembly (5) for installation.

4. Remove

the

nuts

(1)

and

remove

the

latch

assembly.

INSTALLATION

1. Install the latch assembly (5).

2. Install the nuts (1) and tighten to 12 N·m (9 ft. lbs.).

3. Connect the electrical connectors (2 and 4).

4. Adjust the latch to achieve the best glass fit. (Refer

to 23 - BODY/SWING GATE/FLIP-UP GLASS -
ADJUSTMENTS)

23 - 98

SWING GATE

KJ

5. Install the trim panel (1). (Refer to 23 - BODY/

SWING GATE/TRIM PANEL - INSTALLATION)

KJ

SWING GATE

23 - 99


Content   ..  1297  1298  1299  1300   ..