Jeep Grand Cherokee WK. Manual - part 459


  Index      Jeep     Jeep Grand Cherokee WK - service repair manual 2005 year


Search            


Content   ..  457  458  459  460   ..


Jeep Grand Cherokee WK. Manual - part 459


8. Return to the vehicle and firmly press, hold for two seconds and release the programmed HomeLink button.

Repeat the

(

press/hold/release

(

sequence a second time, and, depending on the brand of the garage door

opener (or other rolling code equipped device), repeat this sequence a third time to complete the programming.

9. HomeLink should now activate your rolling code equipped device.

10. To program the remaining two HomeLink buttons, begin with

9

Programming

9

step two. Do not repeat step

one.

ERASING TRANSMITTER CODES

NOTE: Individual channels cannot be erased. Erasing the transmitter codes will erase ALL programmed
codes.

To erase programming from the three buttons (individual buttons cannot be erased but can be

9

reprogrammed

9

-

note below), follow the step noted:

Press and hold the two outer HomeLink buttons and release only when the Electronic Vehicle Information Cen-
ter (EVIC) display shows “Channels Cleared” (after 20 seconds). Release both buttons. Do not hold for longer
that 30 seconds. HomeLink is now in the train (or learning) mode and can be programmed at any time, (Refer
to 8 - ELECTRICAL/OVERHEAD CONSOLE/UNIVERSAL TRANSMITTER - STANDARD PROCEDURE).

REPROGAMMING TRANSMITTER CODES

CAUTION: Vehicle exhaust contains carbon monoxide, a dangerous gas. Do not run the vehicle’s exhaust
while training the transceiver. Exhaust gas can cause serious injury or death.

CAUTION: Your motorized door or gate will open and close while you are training the Universal Transceiver.
Do not train the transceiver if people or pets are in the path of the door or gate. A moving door or gate can
cause serious injury or death to people and pets or damage to objects.

To program a device to HomeLink using a HomeLink button previously trained, follow these steps:

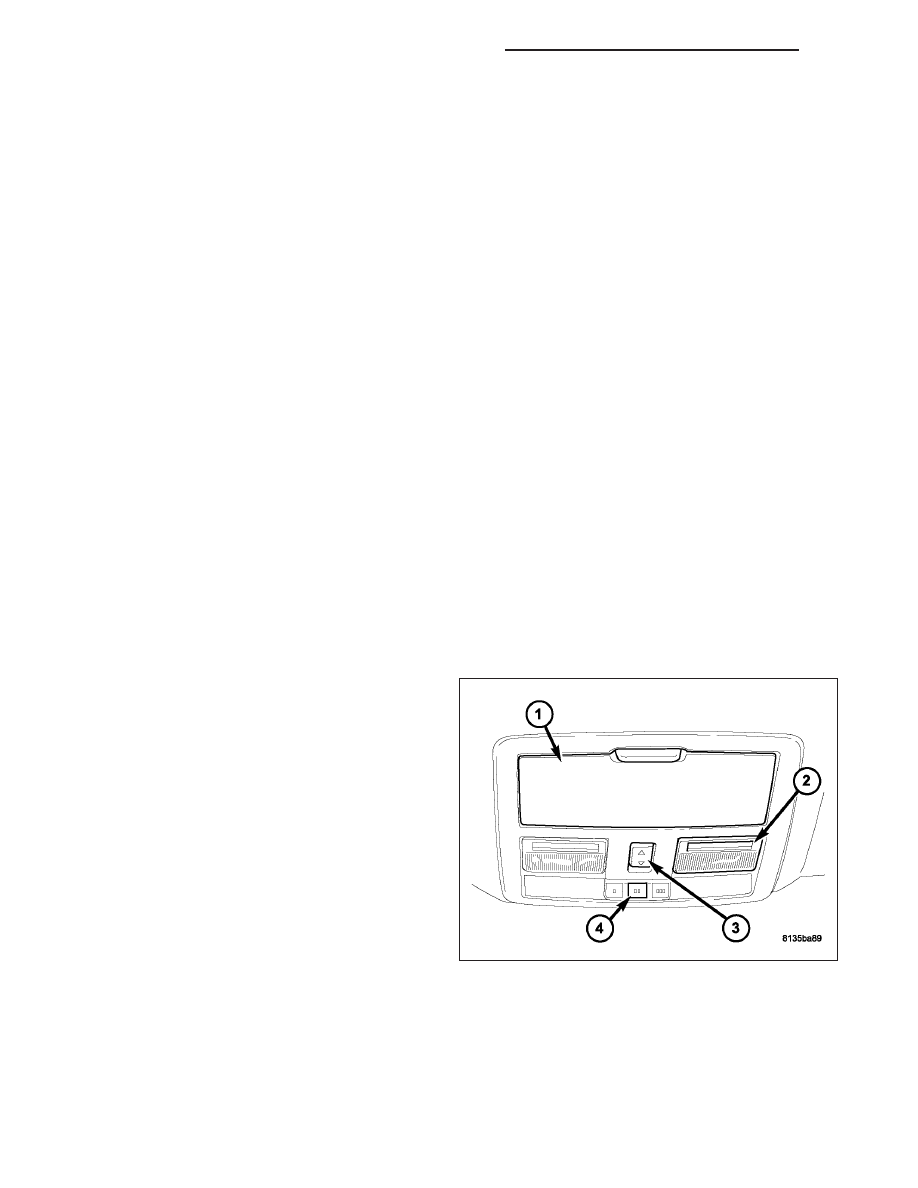
1. Press and hold the desired HomeLink button (4).
Do NOT release the button.

2. The EVIC display will show “Channel X Trans-
mit” (where X is Channel 1, 2, or 3) for 20 seconds
and then change to “Channel X Training”. Without
releasing the HomeLink button, proceed to step 3.

3. Position the end of your hand-held transmitter
1-3 inches (3-8 cm) away from the HomeLink but-
tons.

4. Simultaneously

press

and

hold

both

the

HomeLink button that you want to train and the
hand-held transmitter buttons. Do not release the
buttons until step 5 has been completed.

5. Press and hold the just trained HomeLink button
and observe the EVIC display. If the EVIC display
shows “Channel X Transmit” (where X is Channel 1,
2, or 3), programming is complete and your device should activate when the HomeLink button is pressed and
released.

NOTE: To program the remaining two HomeLink buttons, begin with

(

Programming

(

step two. Do not repeat

step one.

8M - 26

OVERHEAD CONSOLE - SERVICE INFORMATION

WK

NOTE: If your hand-held transmitter appears to program the universal transceiver, but your garage door
does not operate using the transmitter and your garage door opener was manufactured after 1995, your
garage door opener may have a multiple security code system (rolling code system). Please proceed to
steps 6–8 to complete the programming of a rolling code equipped device (most common garage door
openers require this step.

6. At the garage door opener receiver (motor-head unit) in the garage, locate the

9

learn

9

or

9

smart

9

button. This

can usually be found where the hanging antenna wire is attached to the motor-head unit.

7. Firmly press and release the

9

learn

9

or

9

smart

9

button. (The name and color of the button may vary by man-

ufacturer.)

NOTE: There are 30 seconds in which to initiate step eight.

8. Return to the vehicle and firmly press, hold for two seconds and release the programmed HomeLink but-
ton. Repeat the

(

press/hold/release

(

sequence a second time, and, depending on the brand of the garage door

opener (or other rolling code equipped device), repeat this sequence a third time to complete the programming.

9. HomeLink should now activate your rolling code equipped device.

REMOVAL

1. Disconnect and isolate the battery negative cable.

2. Remove the overhead console assembly, (Refer to

8

-

ELECTRICAL/OVERHEAD

CONSOLE

-

REMOVAL).

3. Remove the Electronic Overhead Module (EOM)

retaining screws (2) and separate the EOM from
the overhead console.

INSTALLATION

NOTE: In addition to the Universal Transmitter
operation the Electronic Overhead Module (EOM)
is responsible for some of the compass functions.
Anytime the EOM is replaced the compass vari-
ance value must be set, (Refer to 8 - ELECTRICAL/
OVERHEAD

CONSOLE/ELECTRONIC

VEHICLE

INFO CENTER - STANDARD PROCEDURE - COM-
PASS VARIATION ADJUSTMENT).

1. Position the EOM onto the overhead console

assembly and install the retaining screws (2).

2. Install the overhead console assembly, (Refer to 8 -

ELECTRICAL/OVERHEAD CONSOLE - INSTAL-
LATION).

3. Connect the battery negative cable.

WK

OVERHEAD CONSOLE - SERVICE INFORMATION

8M - 27

4. Program the universal transmitter codes, (Refer to 8 - ELECTRICAL/OVERHEAD CONSOLE/UNIVERSAL

TRANSMITTER - STANDARD PROCEDURE).

SENSOR-AMBIENT AIR TEMPERATURE

DESCRIPTION

The ambient temperature sensor is a variable resistor
type sensor. it is mounted to the lower front fascia
behind the radiator grille and in front of the engine
compartment.

The ambient temperature sensor cannot be adjusted
or repaired and, if inoperative or damaged, it must be
replaced.

OPERATION

The ambient temperature sensor is a variable resistor that operates on a five-volt reference signal sent by the Front
Control Module (FCM). The resistance in the sensor changes as temperature changes, changing the temperature
sensor signal circuit voltage to the FCM. Based upon the resistance in the sensor, the FCM senses a specific volt-
age on the temperature sensor signal circuit. The FCM then translates the voltage into a temperature reading that
it sent over the Controller Area Network (CAN) data bus to other modules utilizing temperature information.

DIAGNOSIS AND TESTING

AMBIENT TEMPERATURE SENSOR

The temperature function is supported by the ambient temperature sensor, a wiring circuit, and the Front Control
Module (FCM). If any portion of the ambient temperature sensor circuit fails or if the Controller Area Network (CAN)
data bus information is missing, a (– –) will appear in the Electronic Vehicle Information Center (EVIC) display in
place of the temperature. When the sensor is exposed to temperatures above 55° C (130° F), or if the sensor circuit
is shorted, 55° C (130° F) will appear in the EVIC display in place of the temperature. When the sensor is exposed
to temperatures below - 40° C (- 40° F) or if the sensor circuit is open, - 40° C (- 40° F) will appear in the EVIC
display.

The ambient temperature sensor circuit can also be diagnosed using the following Sensor Test, and Sensor Circuit
Test. If the temperature sensor and circuit are confirmed to be OK, but the temperature display is inoperative or
incorrect, test the EVIC operation, (Refer to 8 - ELECTRICAL/OVERHEAD CONSOLE/ELECTRONIC VEHICLE
INFO CENTER - DIAGNOSIS AND TESTING).

SENSOR TEST

1. Turn the ignition switch to the Off position. Disconnect and isolate the battery negative cable. Disconnect the

ambient temperature sensor harness connector.

2. Measure the resistance of the ambient temperature sensor. At - 40° C (- 40° F), the sensor resistance is 336

kilohms. At 55° C (130° F), the sensor resistance is 2.488 kilohms. The sensor resistance should read between
these two values. If OK, refer to Sensor Circuit Test in this group. If not OK, replace the inoperative ambient
temperature sensor.

SENSOR CIRCUIT TEST

Refer to the appropriate wiring information for complete circuit schematic or connector pin-out information.

1. Turn the ignition switch to the Off position. Disconnect and isolate the battery negative cable. Disconnect the wire

harness connectors from the ambient temperature sensor and the FCM.

8M - 28

OVERHEAD CONSOLE - SERVICE INFORMATION

WK

2. Connect a jumper wire between the two terminals in the body half of the ambient temperature sensor harness

connector.

3. Check for continuity between the sensor return circuit and the ambient temperature sensor signal circuit cavities

of the FCM harness connector. There should be continuity. If OK, go to Step 4. If not OK, repair the open sensor
return circuit or ambient temperature sensor signal circuit to the ambient temperature sensor as required.

4. Check for continuity between the ambient temperature sensor signal circuit cavity of the FCM harness connector

and a good ground. There should be no continuity. If OK, test the EVIC operation, (Refer to 8 - ELECTRICAL/
OVERHEAD CONSOLE/ELECTRONIC VEHICLE INFO CENTER - DIAGNOSIS AND TESTING). If not OK,
repair the shorted ambient temperature sensor signal circuit as required.

REMOVAL

1. Disconnect and isolate the battery negative cable.

2. Remove the grille, (Refer to 23 - BODY/EXTERIOR/GRILLE - REMOVAL).

3. Disconnect the wire harness connector from the ambient temperature sensor.

4. Release the ambient temperature sensor from the retaining bracket.

5. Remove the ambient temperature sensor from the vehicle.

INSTALLATION

1. Position the ambient temperature sensor in the vehicle.

2. Secure the ambient temperature sensor into the retaining bracket.

3. Connect the wire harness connector to the ambient temperature sensor.

4. Install the grille, (Refer to 23 - BODY/EXTERIOR/GRILLE - INSTALLATION).

5. Connect the battery negative cable.

WK

OVERHEAD CONSOLE - SERVICE INFORMATION

8M - 29


Content   ..  457  458  459  460   ..