Jeep Grand Cherokee WK. Manual - part 90
 

  Index      Jeep     Jeep Grand Cherokee WK - service repair manual 2005 year


Search            


Content   ..  88  89  90  91   ..


Jeep Grand Cherokee WK. Manual - part 90


DIFFERENTIAL-ELSD

OPERATION

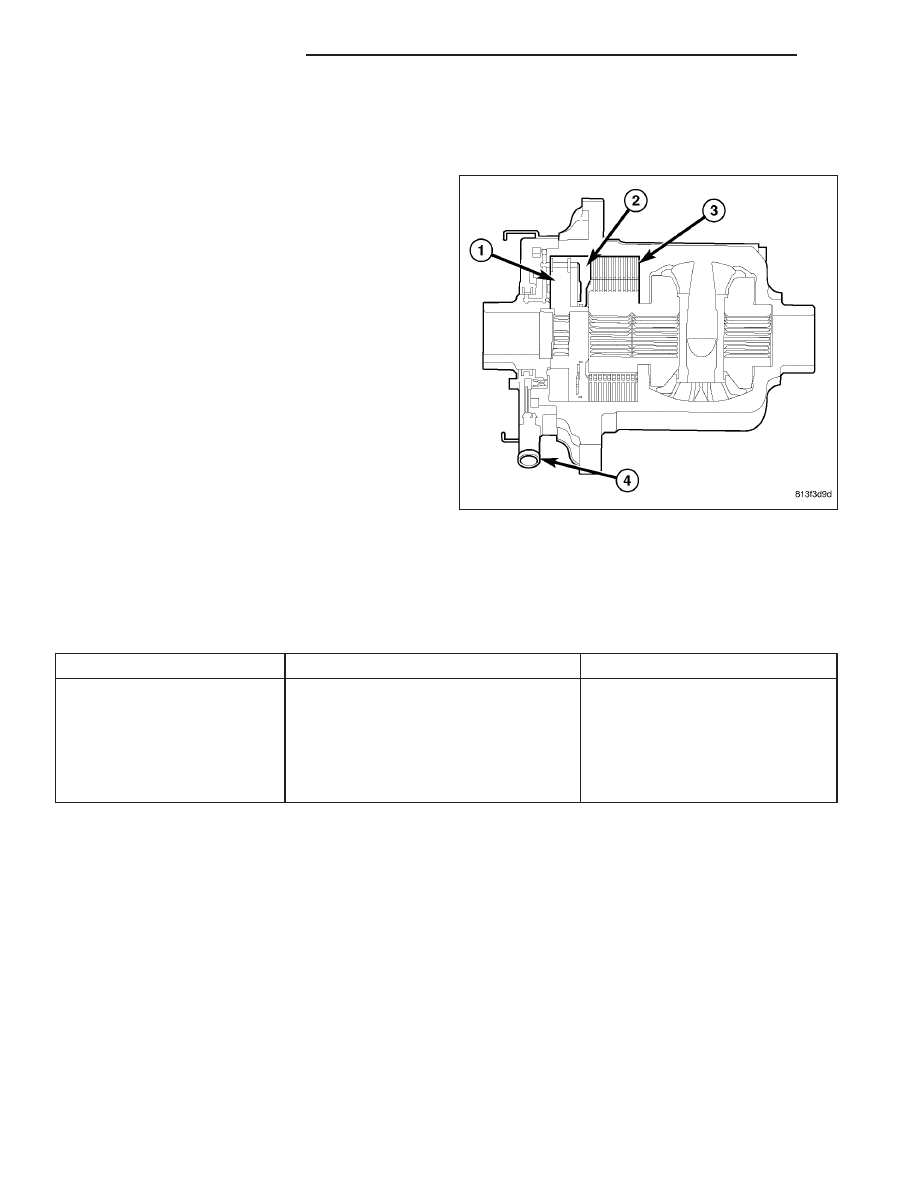
A gerotor pump (1) creates oil flow through the filter
(4) whenever left and right wheels spin at different
speeds and the solenoid valve is activated. The oil
flow is restricted by a Pressure Regulating Valve
(PRV) to build oil pressure. Pressurized oil is then fed
to a piston (2) chamber. The piston compresses the
clutch pack (3) providing additional torque to the lower
speed wheel.

When the antilock brakes are activated the differential
solenoid is switched off and pressure is bleed off the
clutch pack.

DIAGNOSIS AND TESTING

DIFFERENTIAL-ELSD

HYDRAULIC

CONDITION

POSSIBLE CAUSES

CORRECTION

No Lock Up

1. Pump Seals Leaking

1. Replace Differential

2. Clutch Worn

2. Replace Differential

3. Solenoid Valve

3. Replace Solenoid

4. Pluged Filter

4. Clean Filter

5. Final Drive Control Module

5. Replace Control Module

Raise vehicle and rotate tires in the opposite direction at the same time. This will make any oil left in the piston
chamber apply pressure to the clutch and create some drag on the wheels. The wheels will not lock because the
differntial solenoid is not activated.

SOLENOID

With solenoid disconnected resistance across the solenoid should be 13.5 to 14.5 ohms at 25°Celsius (77° Fahr-
enheit). To replace the solenoid diconnect wire connector then squeeze the retension clip and pull solenoid up.

3 - 258

REAR AXLE - C213RE

WK

REMOVAL

1. Remove differential cover.

2. Remove axle shafts.

3. Remove ABS sensor from housing.

4. Remove solenoid valve connector (1) from ELSD

solenoid valve (2).

5. Mark differential housing and bearing caps (3) for

installation reference.

WK

REAR AXLE - C213RE

3 - 259

6. Remove bearing adjuster lock bolt (3) from bearing

caps.

7. Loosen differential bearing cap bolts.

8. Loosen differential bearing adjusters through the

axle tubes (1) with Wrench C-4164 (3).

9. Hold differential case while removing bearing caps

and adjusters.

10. Remove differential case and tag differential bear-

ing cups and adjusters to indicate location.

11. Clean housing cavity with flushing oil, light engine

oil or a lint free cloth.

NOTE: Do not use steam, kerosene or gasoline to
clean the housing.

INSTALLATION

1. Apply a coat of hypoid gear lubricant to differential

bearings, bearing cups and threaded adjusters.

NOTE: Grease can be used to keep the adjusters
in position.

2. Install differential assembly into the housing.

3. Install differential bearing caps in their original loca-

tions.

4. Install bearing cap bolts and tighten upper bolts to

14 N·m (10 ft. lbs.). Tighten lower bolts finger-tight
until the bolt head is seated.

5. Perform differential bearing preload and adjustment

procedure.

6. Tighten bearing cap bolts (2) to 135 N·m (100 ft.

lbs).

3 - 260

REAR AXLE - C213RE

WK

7. Install adjuster locks (3) on bearing caps and tighten bolts to 11 N·m (8 ft. lbs.).

8. Install axle shafts (1).

9. Install solenoid valve connector (1) to ELSD sole-

noid valve (2).

10. Install differential cover.

WK

REAR AXLE - C213RE

3 - 261


Content   ..  88  89  90  91   ..