Jeep Grand Cherokee WJ. Manual - part 577


  Index      Jeep     Jeep Grand Cherokee WJ - service repair manual 2001 year


Search            


Content   ..  575  576  577  578   ..


Jeep Grand Cherokee WJ. Manual - part 577


(5) Disconnect the suction line refrigerant line

from the evaporator outlet tube. Install plugs in, or
tape over all of the opened refrigerant line fittings.

(6) Disconnect the heater hoses from the heater

core tubes. Clamp off the heater hoses to prevent loss
of coolant. Refer to Group 7-Cooling System for the
procedures. Install plugs in, or tape over the opened
heater core tubes.

(7) If the vehicle is equipped with the manual tem-

perature control system, unplug the heater-A/C sys-
tem vacuum supply line connector from the tee
fitting near the heater core tubes.

(8) Remove the coolant reserve/overflow bottle

from the passenger side inner fender shield. Refer to
Group 7 - Cooling System for the procedures.

(9) Remove the Powertrain Control Module (PCM)

from the passenger side dash panel in the engine
compartment and set it aside. Do not unplug the
PCM wire harness connectors. Refer to Group 14 -
Fuel System for the procedures.

(10) Remove the nuts from the heater-A/C housing

mounting studs on the engine compartment side of
the dash panel (Fig. 50).

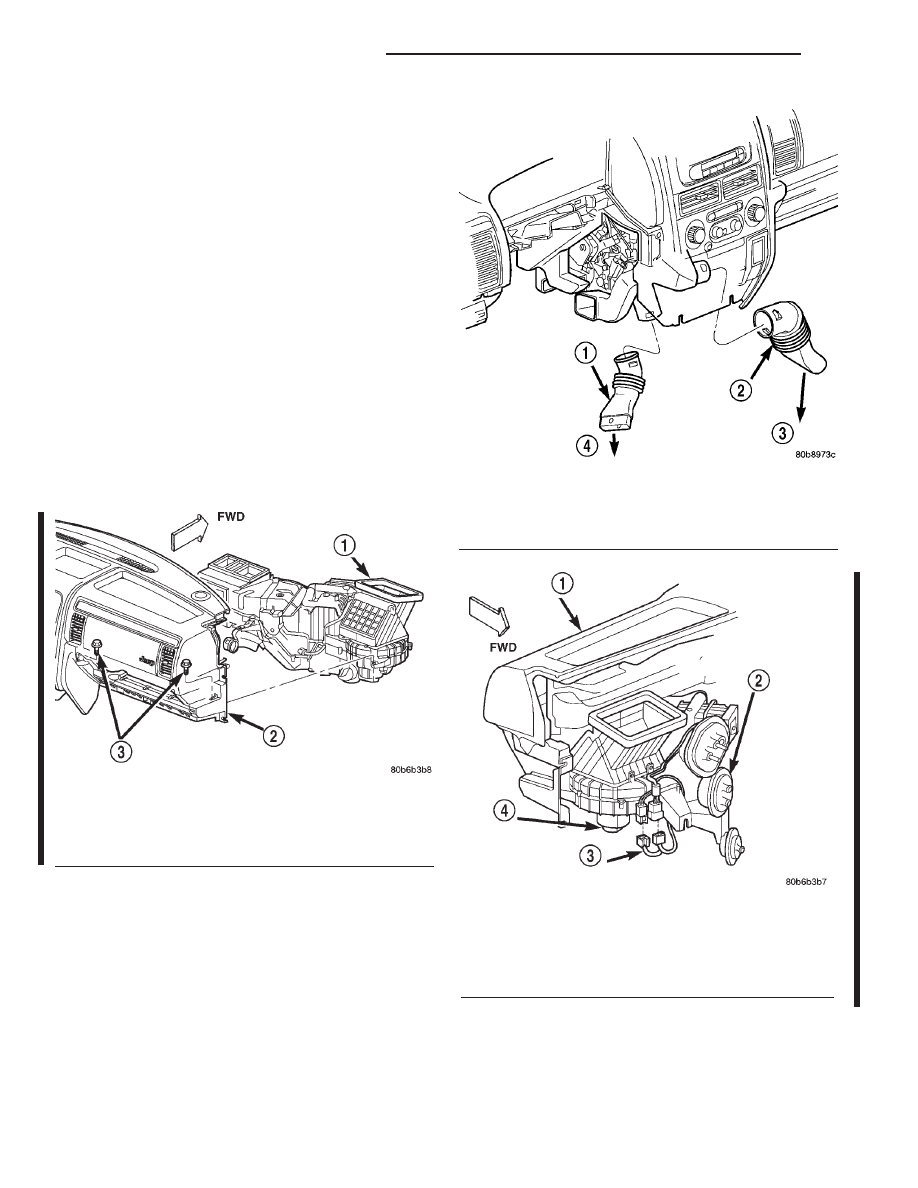
(11) Remove the rear floor heat ducts from the

floor heat duct outlets (Fig. 51).

(12) Unplug the heater-A/C housing wire harness

connectors.

(13) Remove the heater-A/C housing mounting

nuts from the studs on the passenger compartment
side of the dash panel (Fig. 52).

(14) Remove the heater-A/C housing from the vehi-

cle, ensuring that the interior is covered in case of
loss of fluids.

INSTALLATION

(1) Position the heater-A/C housing to the dash

panel. Be certain that the evaporator condensate

drain tube and the housing mounting studs are
inserted into their correct mounting holes.

(2) Install the heater-A/C housing mounting nuts

to the studs on the passenger compartment side of
the dash panel. Tighten the nuts to 4.5 N·m (40 in.
lbs.).

Fig. 50 Passenger Side Instrument Panel

to Heater-A/C Housing Mounting

1 – HEATER AND AIR CONDITIONER HOUSING
2 – INSTRUMENT PANEL STRUCTURAL DUCT
3 – SCREW (2)

Fig. 51 Rear Floor Heat Ducts

1 – LEFT REAR PASSENGER FLOOR AIR DUCT
2 – RIGHT REAR PASSENGER FLOOR AIR DUCT
3 – TO CARPET DUCT
4 – TO CARPET DUCT

Fig. 52 Heater and Air Conditioner Housing

Connections

1 - INSTRUMENT PANEL
2 - HVAC HOUSING
3 - INSTRUMENT PANEL WIRE HARNESS
4 - BLOWER MOTOR

24 - 50

HEATING AND AIR CONDITIONING

WJ

REMOVAL AND INSTALLATION (Continued)

2000 WJ Service Manual
Publication No. 81-370-0047
TSB 26-12-00

December, 2000

(3) Connect the heater-A/C housing wire harness

connectors.

(4) Reinstall the rear floor heat ducts to the center

floor heat duct outlets.

(5) Install and tighten the nuts onto the heater-

A/C housing mounting studs on the engine compart-
ment side of the dash panel. Tighten the nuts to 7
N·m (60 in. lbs.).

(6) Reinstall the PCM to the passenger side dash

panel in the engine compartment. Refer to Group 14
- Fuel System for the procedures.

(7) Reinstall the coolant reserve/overflow bottle to

the passenger side inner fender shield. Refer to
Group 7 - Cooling System for the procedures.

(8) If the vehicle is equipped with the manual tem-

perature control system, connect the heater-A/C sys-
tem vacuum supply line connector to the tee fitting
near the heater core tubes.

(9) Unclamp/unplug the heater core hoses and

tubes. Connect the heater hoses to the heater core
tubes and fill the engine cooling system. Refer to
Group 7-Cooling System for the procedures.

(10) Unplug or remove the tape from the suction

line and the evaporator outlet tube fittings. Connect
the suction line coupler to the evaporator outlet tube.
See Refrigerant Line Coupler in this group for the
procedures.

(11) Unplug or remove the tape from the liquid

line and the evaporator inlet tube fittings. Connect
the liquid line coupler to the evaporator inlet tube.
See Refrigerant Line Coupler in this group for the
procedures.

(12) Evacuate the refrigerant system. See Refriger-

ant System Evacuate in this group for the proce-
dures.

(13) Charge the refrigerant system. See Refriger-

ant System Charge in this group for the procedures.

(14) Install the instrument panel in the vehicle.

Refer to Group 8E - Instrument Panel Systems for
the procedures.

(15) Connect the battery negative cable.
(16) Start the engine and check for proper opera-

tion of the heating and air conditioning systems.

HEATER CORE AND TUBES

WARNING: ON VEHICLES EQUIPPED WITH AIR-
BAGS,

REFER

TO

GROUP

8M

-

PASSIVE

RESTRAINT SYSTEMS BEFORE ATTEMPTING ANY
STEERING

WHEEL,

STEERING

COLUMN,

OR

INSTRUMENT PANEL COMPONENT DIAGNOSIS OR
SERVICE. FAILURE TO TAKE THE PROPER PRE-
CAUTIONS COULD RESULT IN ACCIDENTAL AIR-
BAG DEPLOYMENT AND POSSIBLE PERSONAL
INJURY.

REMOVAL

(1) Remove the heater-A/C housing from the vehi-

cle. See Heater-A/C Housing in this group for the
procedures.

(2) Remove the foam gasket surrounding the core

tubes.

NOTE: Notice the orientation of the irregularly
shaped gasket on the tubes. The gasket must be
placed correctly to ensure proper sealing against
the body during reinstallation.

(3) Remove the screws and retainers that secure

the heater core and tubes to the heater-A/C housing
(Fig. 53).

Fig. 53 Heater Core, Tubes, Retainers

1 – TUBE-TO-CORE CLAMPS
2 – GROUND STRAP
3 – HVAC HOUSING
4 – TUBE RETAINERS AND SCREWS
5 – HEATER CORE

WJ

HEATING AND AIR CONDITIONING

24 - 51

REMOVAL AND INSTALLATION (Continued)

(4) Remove the mode door actuator if necessary,

for clearance to remove the core.

(5) Lift the heater core straight up and out of the

heater-A/C housing (Fig. 54).

(6) When replacing individual tubes, loosen and

remove the round tube-to-core clamp, and pull tube
from core.

INSTALLATION

(1) When installing individual tubes, insert tube

into core ensuring that tube O-ring is seated in core
and not pinched. Hold tube in seated position while
installing the round tube-to-core clamp (Fig. 55).

NOTE: The round tube-to-heater-core clamp should
be left loose enough to turn the tube in the core.
Position the core in the housing, and then tighten
the tube-to-heater-core clamp after orienting the
tubes to the molded heater-A/C housing.

(2) Lower the heater core into the heater-A/C

housing.

(3) Install the mode door actuator, if removed from

housing for core removal.

(4) Position the retainers over the heater core

tubes. Install and tighten the screws that secure the
heater core and retainers to the heater-A/C housing.
Tighten the screws to 2.2 N·m (20 in. lbs.).

NOTE: The grounding strap is to be attached to the
lower heater core tube retainer.

(5) Reinstall the heater-A/C housing to the vehicle.

See Heater-A/C Housing in this group for the proce-
dures.

HIGH PRESSURE RELIEF VALVE

WARNING: REVIEW THE WARNINGS AND CAU-
TIONS IN THE FRONT OF THIS GROUP BEFORE
PERFORMING THE FOLLOWING OPERATION.

REMOVAL

(1) Disconnect and isolate the battery negative

cable.

(2) Recover the refrigerant from the refrigerant

system. See Refrigerant Recovery in this group for
the procedures.

Fig. 54 Heater Core and Tubes

1 – ELECTRICAL CONNECTORS
2 – EVAPORATOR FITTINGS (CAPPED)
3 – ELECTRIC ACTUATOR
4 – OUTLET TO DEFROSTER DUCTS
5 – ELECTRIC ACTUATOR
6 – FLOOR DUCT
7 – TO REAR PASSENGER FLOOR AIR DUCTS

8 – FLOOR DUCT
9 – HEATER CORE AND TUBES
10 – HOUSING DRAIN
11 – BLOWER MOTOR CONTROLLER/POWER MODULE
12 – BLOWER MOTOR
13 – GROUND STRAP

24 - 52

HEATING AND AIR CONDITIONING

WJ

REMOVAL AND INSTALLATION (Continued)

(3) Turn

the

relief

valve

counterclockwise

to

remove it from the compressor manifold (Fig. 56).
Install a plug in, or tape over the opened relief valve
fitting on the compressor manifold.

INSTALLATION

(1) Remove the tape or plug from the relief valve

fitting on the compressor manifold.

(2) Install the high pressure relief valve in the

compressor manifold fitting.

(3) Connect the battery negative cable.
(4) Evacuate the refrigerant system. See Refriger-

ant System Evacuate in this group for the proce-
dures.

(5) Charge the refrigerant system. See Refrigerant

System Charge in this group for the procedures.

HIGH PRESSURE SWITCH

REMOVAL

(1) Disconnect and isolate the battery negative

cable.

(2) Unplug the wire harness connector from the

high pressure switch, which is mounted to a fitting
on the discharge line between the compressor, near
the condenser inlet (Fig. 57).

(3) Unscrew the high pressure switch from the dis-

charge line fitting.

(4) Remove the high pressure switch from the

vehicle.

Fig. 55 Heater Core, Tubes, O-rings

1 – HEATER CORE TUBES
2 – TUBE-TO-CORE CLAMPS
3 – SCREWS
4 – O-RINGS
5 – HEATER CORE

Fig. 56 High Pressure Relief Valve - Typical

1 – HIGH PRESSURE RELIEF VALVE
2 – HIGH PRESSURE SERVICE PORT
3 – COMPRESSOR MANIFOLD

Fig. 57 High Pressure Switch - Typical

1 – HIGH PRESSURE SERVICE PORT
2 – HIGH PRESSURE CUT-OFF SWITCH
3 – DISCHARGE LINE
4 – SUCTION LINE
5 – MANIFOLD

WJ

HEATING AND AIR CONDITIONING

24 - 53

REMOVAL AND INSTALLATION (Continued)


Content   ..  575  576  577  578   ..