Jaguar X-Type Sedan and Estate (Wagon). Manual - part 642


  Index      Jaguar     Jaguar X-Type Sedan and Estate (Wagon) (2.0 L, 2.5 L and 3.0 L Gasoline; 2.0 L and 2.2 L, Diesel) - manual 2001-2009 year


Search            


Content   ..  640  641  642  643   ..


Jaguar X-Type Sedan and Estate (Wagon). Manual - part 642


Published: 11-May-2011

Glass, Frames and Mechanisms - Windshield Glass Using Cutting Tool

Removal and Installation
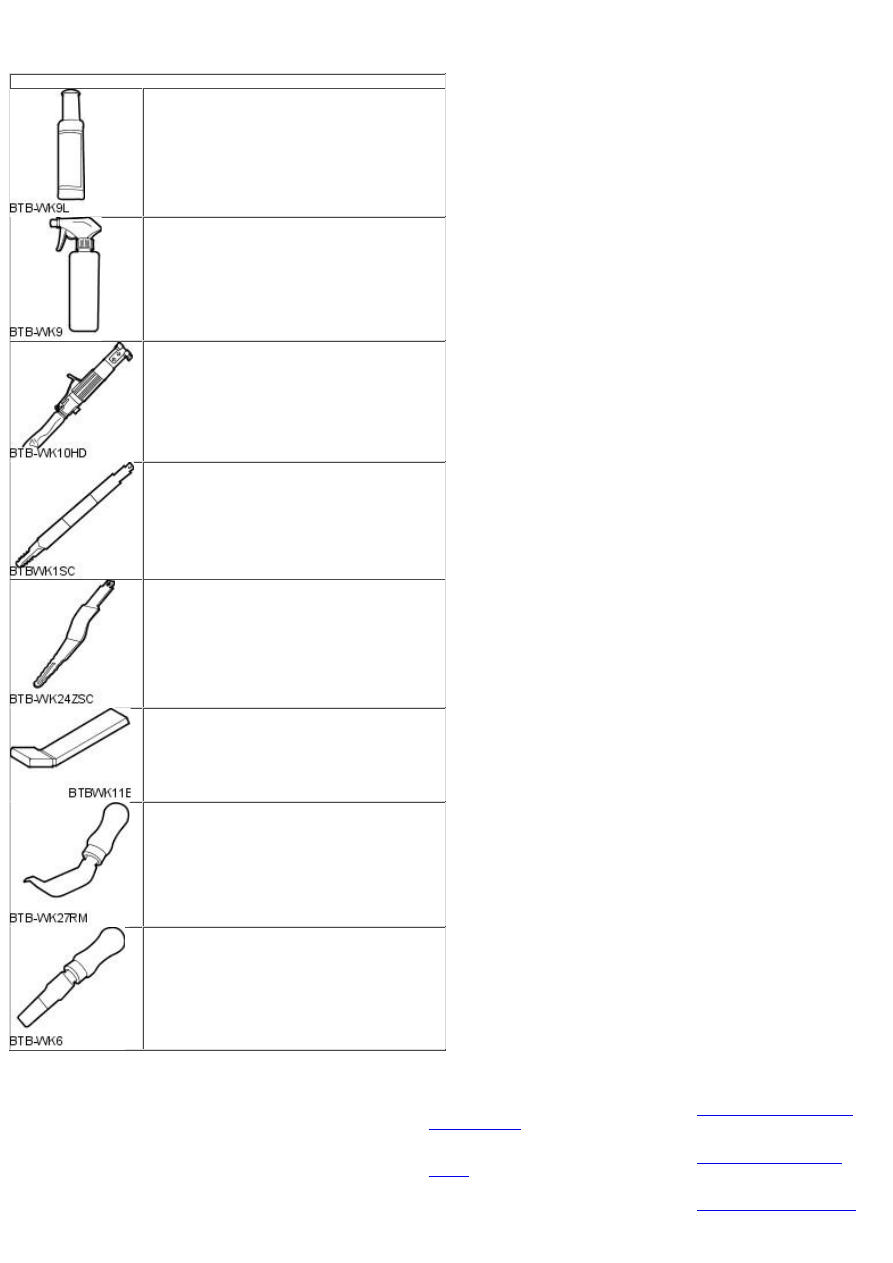
Special Tool(s)

Lubricant concentrate

BTB-WK9L

Spray bottle

BTB-WK9

Cutting tool

BTB-WK10HD

Serrated extra long flat cutting blade

BTB-WK1SC

Serrated general purpose 'Z' cutting blade

BTB-WK24ZSC

Cutting blade controller arm

BTB-WK11B

Reverse powered cold knife blade cutting tool

BTB-WK27RM

Pinchweld scraper blade

BTB-WK6

Removal

1. Remove the sun visors.

For additional information, refer to Section 

 501-05 Interior Trim and

Ornamentation

.

2. Remove the cowl vent screen.

For additional information, refer to Section 

 501-02 Front End Body

Panels

.

3. Remove the interior mirror.

For additional information, refer to Section 

 501-09 Rear View Mirrors

.

4. NOTE: Left-hand shown, right-hand similar.

Disconnect the heated windshield glass electrical connectors.

5. Remove the A-pillar exterior trim.

6. Apply suitable protective tape around the windshield glass aperture to

protect the paintwork.

7. Place a suitable protective sheet over the fascia and place a protective

board over the sheet.

8. Apply suitable protective tape to the leading inner edge of the roof

panel.

9. Dispense 20 ml of WK9L lubricant into the W K9 spray bottle, fill the

spray bottle with water and mix.

10. Apply cutting lubricant to the lower windshield glass adhesive and

approximately 150 mm (5.9 in) up the A-pillar.

11. Install the cutting tool blade BTB-W K1SC to the cutting tool

BTB-W K10HD.

12. NOTE: Right-hand shown, left-hand similar.

Using the cutting tool, cut through the lower windshield glass adhesive
and approximately 150 mm (5.9 in) up the A-pillar.

13. Apply cutting lubricant to both sides of the inner A-pillar windshield

glass adhesive.

14. NOTE: Remove the cutting tool blade BTB-WK1SC from the cutting tool
BTB-WK10HD.

Install the cutting tool side cutting blade BTB-W K24ZS and the cutting
tool controller arm BTB-WK11B to the cutting tool BTB-W K10HD.

Set the cutting tool controller arm to 20 mm.

15. NOTE: Right-hand shown, left-hand similar.

• NOTE: Start cutting the windshield glass adhesive from the top of the
A-piller downwards.

Using the cutting tool, cut through A-pillar windshield glass adhesive.

16. Apply cutting lubricant to the top of the inner windshield glass

adhesive.

17. Apply suitable protective tape to the top of the windshield glass.

18. NOTE: Start cutting from either corner into the center and continue the
cut all the way through to the other corner. Do not cut from each corner
into the center of the windshield glass as the pressure on the center of
the windshield glass could cause breakage.

Using the cutting tool, cut through the top of the inner windshield glass
adhesive.

19. NOTE: Right-hand shown, left-hand similar.

Using the special tool cut through any remaining windshield glass
adhesive on the A-pillars.

20. With assistance remove the windshield glass.

Attach the lifting handles to the windshield glass.

21. Remove the lifting handles from the windshield glass.

22. NOTE: To aid bonding of a new windshield glass, make sure at least 1
mm (0.3 in) of residual adhesive remains on the body flange.

Using the special tool remove the residual adhesive from the body
flange.

Installation

1. Make sure the new windshield glass surface is clean using Betawipe

spirit.

2. Apply glass primer to mating face of the windshield glass.


Content   ..  640  641  642  643   ..