Jaguar X-Type Sedan and Estate (Wagon). Manual - part 199


  Index      Jaguar     Jaguar X-Type Sedan and Estate (Wagon) (2.0 L, 2.5 L and 3.0 L Gasoline; 2.0 L and 2.2 L, Diesel) - manual 2001-2009 year


Search            


Content   ..  197  198  199  200   ..


Jaguar X-Type Sedan and Estate (Wagon). Manual - part 199


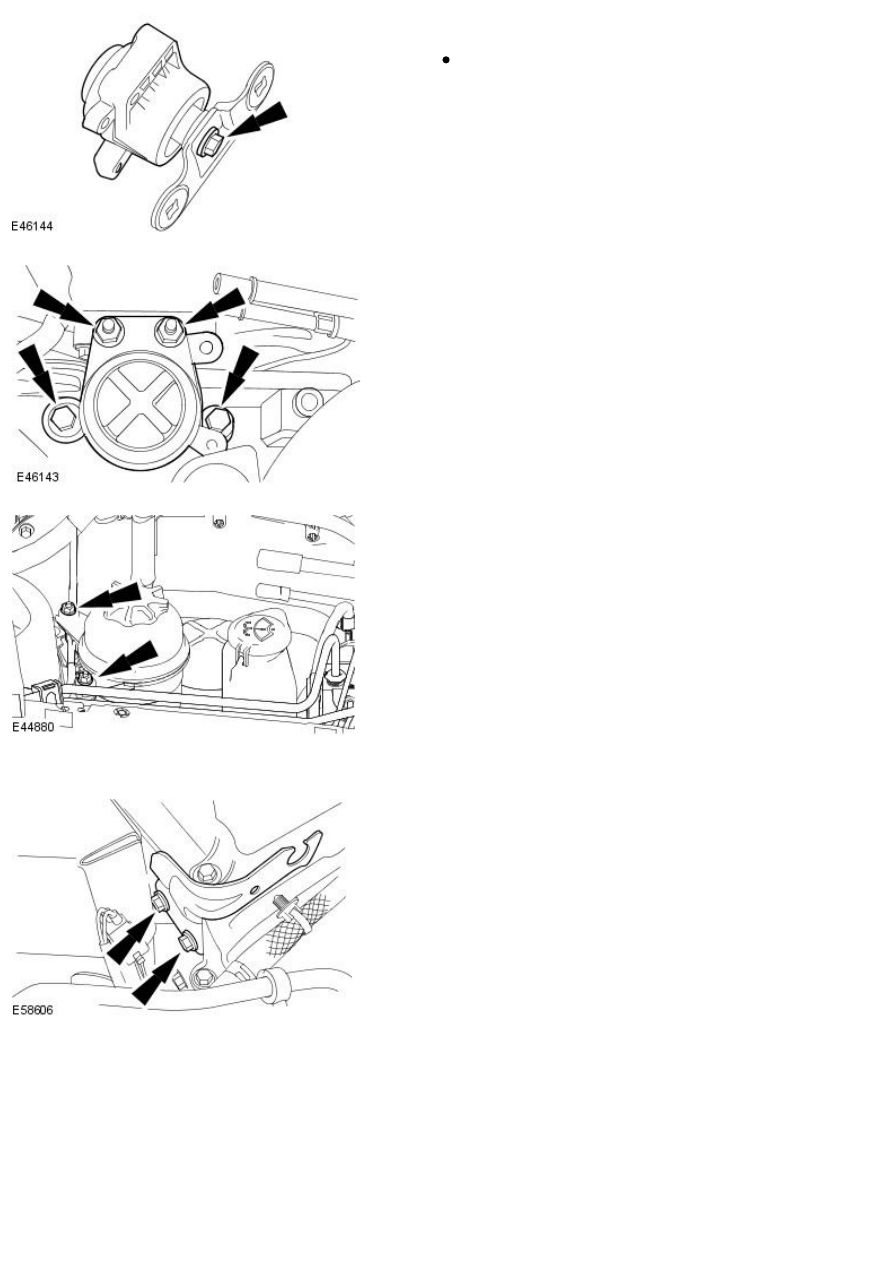
4. NOTE: Clean the front engine mount mating faces.

To install, reverse the removal procedure.

Tighten to 80 Nm.

5. Tighten to 80 Nm.

6. Tighten to 10 Nm.

All vehicles

7. Tighten to 23 Nm.

Published: 11-May-2011

Engine - 2.0L Duratorq-TDCi/2.2L Duratorq-TDCi (110kW/150PS) - Puma - Flexplate

In-vehicle Repair

Removal

1. Disconnect the battery ground cable.

For additional information, refer to: 

Battery Disconnect and Connect

(414-01 Battery, Mounting and Cables, General Procedures).

2. Raise and support the vehicle.

3. Remove the transmission.

For additional information, refer to: 

Transmission

 (307-01B Automatic

Transmission/Transaxle - Vehicles With: 6-Speed Automatic Transaxle -
AWF21, Removal).

4. 

CAUTION: Discard the bolts.

• NOTE: Some variation in the illustrations may occur, but the essential
information is always correct.

Remove the flexplate.

Remove the 8 bolts.

Installation

1. 

CAUTION: Make sure that new bolts are installed.

• NOTE: Some variation in the illustrations may occur, but the essential
information is always correct.

Install the flexplate.

Stage 1: Tighten bolts in the sequence shown to 25 Nm.

Stage 2: Tighten bolts in the sequence shown to 40 Nm.

Stage 3: Tighten bolts in the sequence shown a further 48 degrees.

2. Install the transmission.

For additional information, refer to: 

Transmission

 (307-01B Automatic

Transmission/Transaxle - Vehicles With: 6-Speed Automatic Transaxle -
AWF21, Removal).

3. Connect the battery ground cable.

For additional information, refer to: 

Battery Disconnect and Connect

(414-01 Battery, Mounting and Cables, General Procedures).

Published: 11-May-2011

Engine - 2.0L Duratorq-TDCi/2.2L Duratorq-TDCi (110kW/150PS) - Puma - Flywheel

In-vehicle Repair

Removal

1. Remove the clutch disc and pressure plate. For additional information,

refer to: 

Clutch Disc and Pressure Plate

 (308-01 Clutch, Removal and

Installation).

2. Remove the flywheel.

Discard the bolts.

Installation

1. NOTE: Install new flywheel bolts.

Install the flywheel.

Tighten the bolts in the sequence shown in three stages.

Stage 1: Tighten bolts 1 through 8 to 15 Nm.

Stage 2: Tighten bolts 1 through 8 to 30 Nm.

Stage 3: Tighten bolts 1 through 8 to 75 Nm.

Stage 4: Tighten bolts 1 through 8 to 45 degrees.

2. Install the clutch disc and pressure plate. For additional information,

refer to: 

Clutch Disc and Pressure Plate

 (308-01 Clutch, Removal and

Installation).

Published: 11-May-2011

Engine - 2.0L Duratorq-TDCi/2.2L Duratorq-TDCi (110kW/150PS) - Puma - Intake
Manifold

In-vehicle Repair

Removal

1. Remove the air cleaner assembly.

For additional information, refer to: 

Air Cleaner

 (303-12B Intake Air

Distribution and Filtering - 2.0L Duratorq-TDCi/2.2L Duratorq-TDCi
(110kW/150PS) - Puma, Removal and Installation).

2. Detach the engine wiring harness.

3. Remove the air cleaner mount bracket.

4. Detach the exhaust gas recirculation (EGR) valve from the intake

manifold.

Remove and discard the EGR valve gasket.

5. Detach the engine wiring harness from the intake manifold.


Content   ..  197  198  199  200   ..