Jaguar X-Type Sedan and Estate (Wagon). Manual - part 104
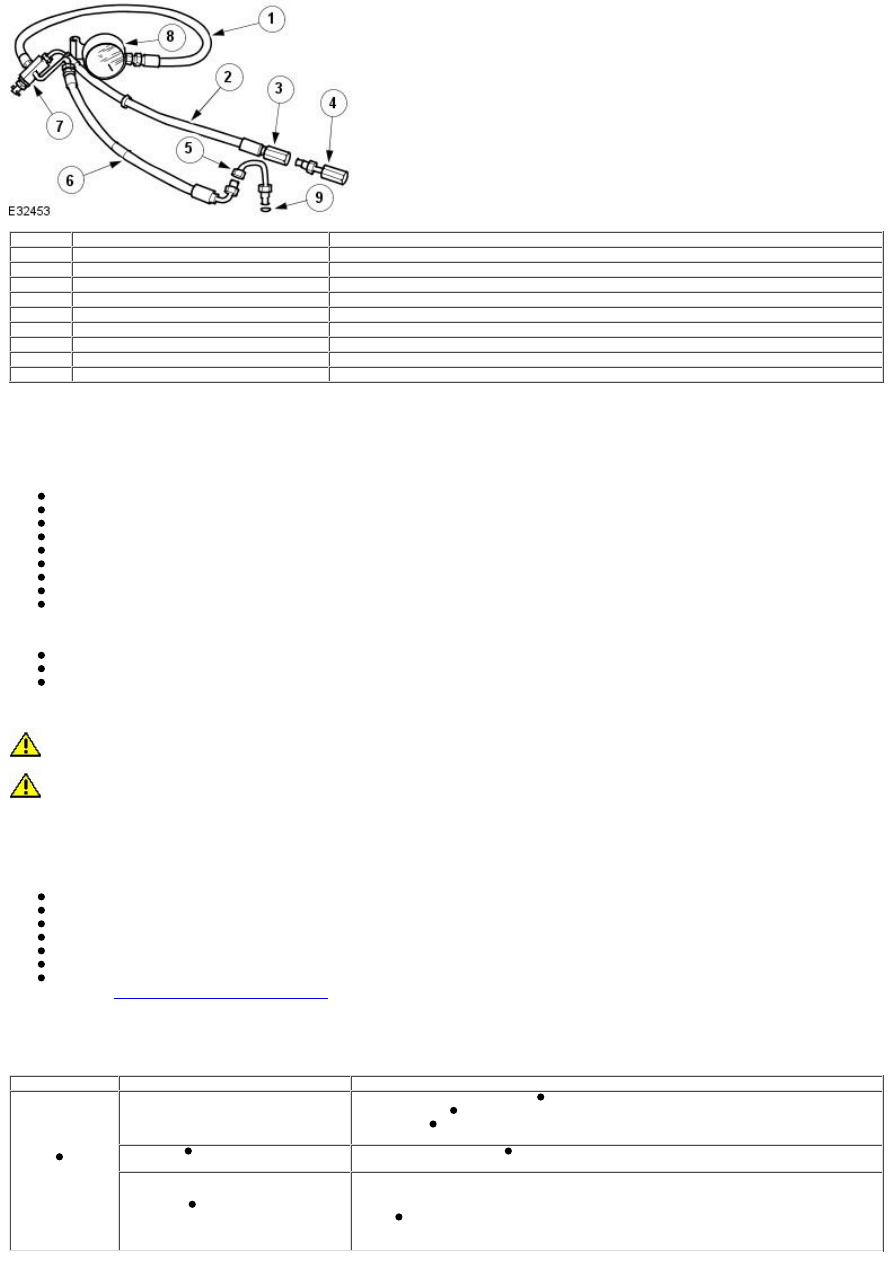
Item
Special Tool Number
Description
1
211-011
Pressure Gauge Hose
2
211-011-08
Pump Return Hose
3
211-011-07
Pump Return Hose Connector
4
211-011-03/2
Test Equipment to High Pressure Hose Adaptor
5
211-011-03/1
Pump High Pressure Outlet to Hose Adaptor
6
211-011-02
Pump Adaptor to Control Valve Hose
7
211-011-01
Control Valve
8
211-011
Pressure Gauge
9
-
'O' Ring Seal
The measurement of the maximum system pressure, (which is governed by the pressure relief valve) is achieved by inserting the Service
Tool (pressure gauge and adaptors) into the fluid circuit of the power steering system. Run the engine at idle speed, turn the steering from
lock to lock and read the maximum pressure recorded on the gauge.
Installing Test Equipment
To install the pressure test equipment:
Place a suitable drain tray below the power steering pump.
Install a hose clamp on the reservoir to pump hose prior to disconnecting any hoses, to avoid unnecessary loss of fluid.
Disconnect the hose from the power steering pump high pressure outlet.
Install the pump outlet to hose adaptor (5). Do not omit the 'O' ring seal (9).
Connect the power steering pump adaptor to control valve hose (6) of the test equipment.
Install the adaptor (4) in the high pressure hose previously removed from the power steering pump outlet.
Connect the connector (3) of the test equipment hose (2) to the adaptor (4).
Remove the hose clamp from the reservoir hose.
Start the engine.
With the control valve (7) OPEN and the engine idling, the following system pressures may be checked:
During turning.
When the steering is held on full lock.
With the steering at rest.
• CAUTIONS:
To avoid excessive heating of the power steering pump, do not close the valve for longer than 5 seconds maximum.
Do not drive the vehicle with the test equipment installed.
With the control valve (7) CLOSED the power steering pump maximum output pressure can be checked.
Removing Test Equipment
To remove the test equipment:
Install a hose clamp on the reservoir to power steering pump hose.
Removing the test equipment is a reversal of the installation instructions.
Install a new 'O' ring seal (9) to the power steering pump high pressure outlet to hose connection.
Install the original hose to the power steering pump.
Remove the clamp from the reservoir to the power steering pump hose.
Top-up the reservoir fluid.
Bleed the power steering system. For additional information,
REFER to
Power Steering System Bleeding -
in this section.
Steering Fault Diagnosis by Symptom Charts
Leakage
Condition
Possible Sources
Action
Fluid
leakage
Confirm the position of the fluid
leak.
CLEAN the area of the leak.
Inspect the area and confirm the exact position of leak.
Make sure the fluid is not from another system on the vehicle.
Overfilled system.
CORRECT the fluid level as necessary.
Component leak.
• NOTE: Record the position of the leak and some indication of the rate of the leak
on the W arranty Return Record Sheet.
LOCATE the suspect component or CHECK hose connections and repair as
necessary.