Jaguar X-Type Sedan and Estate (Wagon). Manual - part 72


  Index      Jaguar     Jaguar X-Type Sedan and Estate (Wagon) (2.0 L, 2.5 L and 3.0 L Gasoline; 2.0 L and 2.2 L, Diesel) - manual 2001-2009 year


Search            


Content   ..  70  71  72  73   ..


Jaguar X-Type Sedan and Estate (Wagon). Manual - part 72


4. 

CAUTION: If brake fluid is spilt on the paintwork, the affected

area must be immediately washed down with cold water.

• NOTE: To prevent the loss of brake fluid, apply the brake pedal hold
down tool and adjust to hold the brake pedal down 40mm. Install a
bleeder bottle to the bleed nipple and loosen.

• NOTE: Remove and discard the brake hose sealing washers.

Detach the brake hose.

5. NOTE: Tighten the bleed nipple and remove the bleeder tube and
bottle.

Remove the brake caliper.

Remove and discard the brake caliper retaining bolts.

Installation

1. 

CAUTION: If the piston is pushed back into the housing, brake

fluid will be forced out of the inlet port of the brake caliper.

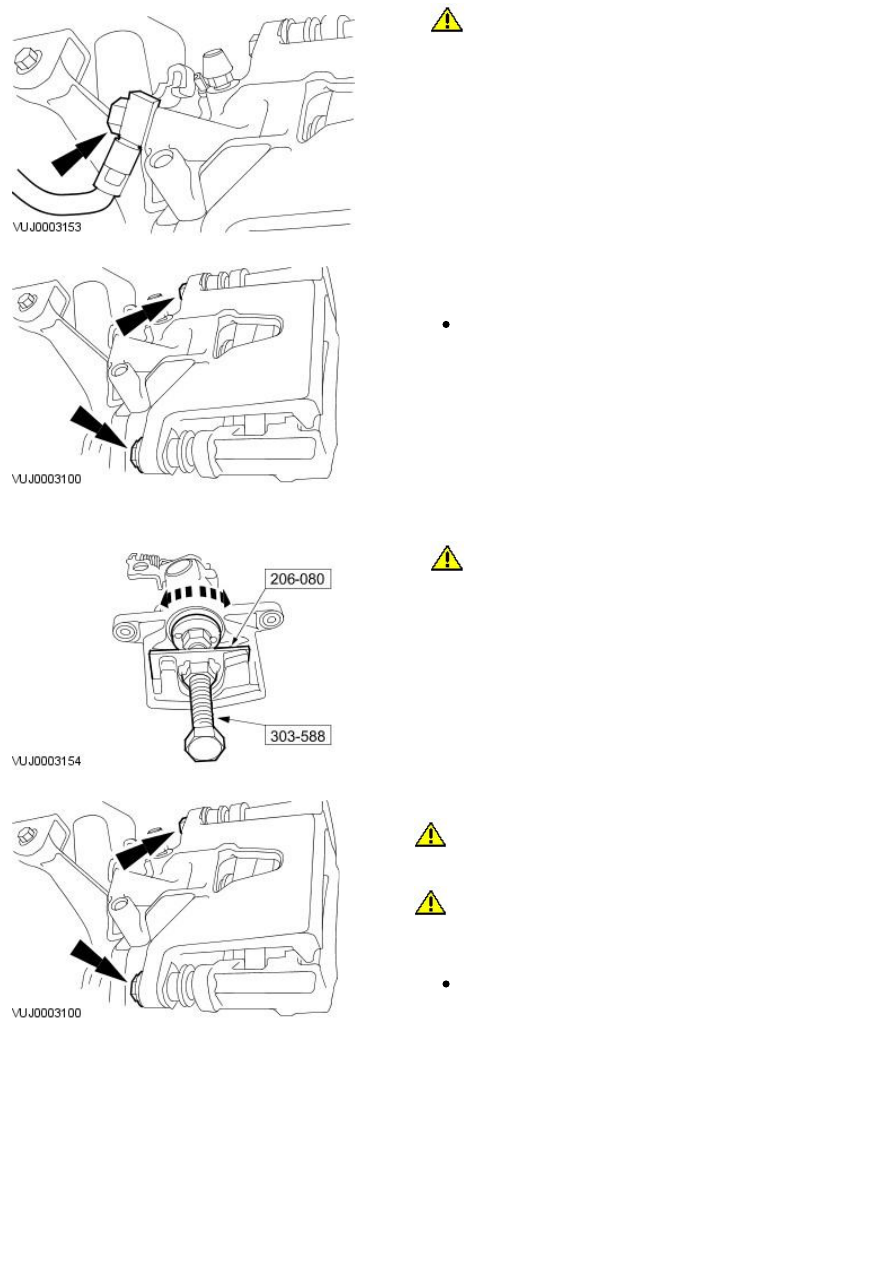
• NOTE: The left-hand brake caliper piston retracts counter clockwise and
the right-hand retracts clockwise.

Using the special tools, fully retract the brake caliper piston.

2. CAUTIONS:

 Make sure the piston location mark is in the correct position so that

the locator pin on the brake pad backing plate locates correctly into the
piston.

 Make sure that the brake disc faces are clean before installation.

• NOTE: Install new brake caliper retaining bolts.

Install the brake caliper.

Tighten to 32 Nm.

3. NOTE: Install new brake hose sealing washers.

Attach the brake hose.

Tighten to 38 Nm.

4. Remove the brake pedal hold down tool.

5. Bleed the brake system.

For additional information, refer to: 

Brake System Bleeding

 (206-00

Brake System - General Information, General Procedures).

6. Attach the parking brake cable retaining clip.

7. Attach the parking brake cable.

1. Release the tension.

2. Attach the parking brake cable.

8. Install the wheel and tire.

For additional information, refer to: 

Wheel and Tire

 (204-04 Wheels and

Tires, Removal and Installation).

Published: 11-May-2011

Rear Disc Brake - Brake Disc

Removal and Installation

Removal

All vehicles

1. Remove the brake pads.

For additional information, refer to: 

Brake Pads

 (206-04 Rear Disc Brake,

Removal and Installation).

Vehicles with 2.5L or 3.0L engine

2. Detach the Anti-lock brake system (ABS) wheel speed sensor.

Remove the ABS wheel speed sensor retaining bolt.

All vehicles

3. Remove the brake caliper anchor plate.

Remove and discard the brake caliper anchor plate retaining bolts.

4. NOTE: If the brake disc is being refitted, the tip of a wheel hub stud
must be marked with a corresponding part of the brake disc for correct
re-alignment.

Remove the brake disc.

Installation

1. NOTE: Install new brake caliper anchor plate retaining bolts.

To install, reverse the removal procedure.

Tighten to 70 Nm.

Published: 11-May-2011

Rear Disc Brake - Brake Disc Shield

Removal and Installation

1. Remove the rear wheel hub. For additional information, refer to Section

204-02 Rear Suspension

.


Content   ..  70  71  72  73   ..